Introduction
Different hosts have different methods of handling shell access, and we have opted for a simple but secure approach. It may be difficult to intuitively understand how you gain shell access to your server, so this guide serves to point you in the right direction.
Use our easy Web SSH Terminal
If you just need quick access with SSH without having to do any configuration whatsoever, you can get Shell access through our Web SSH Terminal directly in your browser. To access the Web SSH Terminal simply:
- Click on Shell Users in the main Server Menu
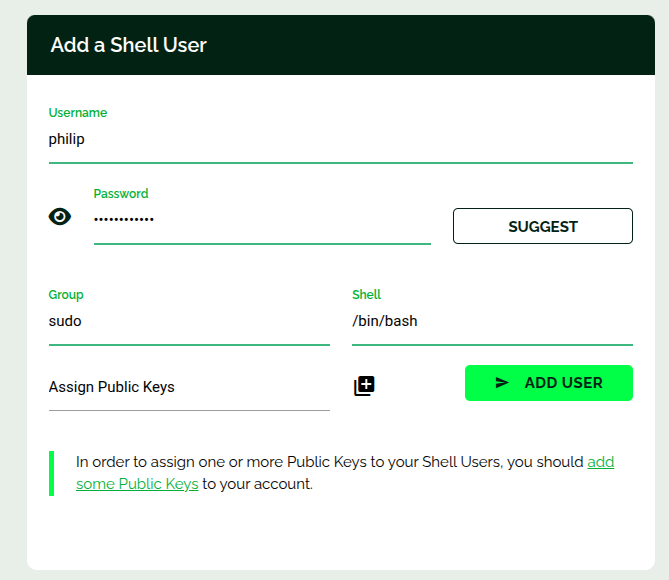
- Add a Shell User if you haven’t already
- Scroll down to the bottom and locate the information card for the Shell User. In this card you will find the link to access our Web SSH Terminal with that user.
- Now a new window will open up granting you access to that Shell user on your server. and you are ready to work in the terminal, you can simply put “sudo” in front of any commands to execute them as root, or just switch to being root entirely by executing
sudo su
The system will now prompt you for your user password (not your public key password) in order to execute sudo. For a standard Webdock stack, you will find your default admin shell user password on the main server information screen along with all your other auto-generated credentials.
Tip: You can disable password prompts when executing sudo commands by enabling Passwordless Sudo on your server. You can find this option on the Shell Users screen for your server.
How to get shell access with an SSH client and run commands as root
The best way
- Go to your account and add one or more public keys by clicking on Add Public Key on the Public Keys card
– Not sure how to get a hold of your public key in the first place? Click here to read our guide!
Be careful adding Public Keys you have generated on Windows as they may not be suitably formatted.Incorrect:---- BEGIN SSH2 PUBLIC KEY ---- Comment: rsa-key-20150211 AAAAB3NzaC1yc2EAAAABJQAAAIEAjm/8tQdXJ8gXETIOh3h6V+7KPAe+e9OUlBps a55Ky+1Ry1E2unGDDQNGqRVh9gmhL5p27NH0Bfd4kksa6Lm1WTnRirZCvHaVIPQ8 k4RTU73KJ9WnXmEi34hiMbmTjnrKLs+6YqLUqGmyyd/GK3Vs/9JYGhFHzc4qS2wk cmHKKws= ---- END SSH2 PUBLIC KEY ----
Correct:
ssh-rsa AAAAB3NzaC1yc2EAAAABJQAAAIEAjm/8tQdXJ8gXETIOh3h6V+7KPAe+e9OUlBps
a55Ky+1Ry1E2unGDDQNGqRVh9gmhL5p27NH0Bfd4kksa6Lm1WTnRirZCvHaVIPQ8
k4RTU73KJ9WnXmEi34hiMbmTjnrKLs+6YqLUqGmyyd/GK3Vs/9JYGhFHzc4qS2wk
cmHKKws= mike@mymacbook
- Now go to your server and go to the Shell Users management screen
- On standard Webdock stacks, there is already a shell user named admin. Click on the Assign Public Keys dropdown on the admin user card, and select your Public Key(s) you just added to your account.- If you are working with a clean server, simply add a new shell user, make sure they are part of the Sudo group and assign your public keys to this user
- Now you are ready to connect to your server. On Mac and Linux you now simply execute the following command in your terminal:
ssh [email protected]
You can find your server address on your main server information page.
If you are on Windows, you should use a client such as putty.
- If you assigned a password when you created your public key, you will be prompted to enter the password before you can connect.
- Now you are ready to work in the terminal, you can simply put “sudo” in front of any commands to execute them as root, or just switch to being root entirely by executing
sudo su
The system will now prompt you for your user password (not your public key password) in order to execute sudo. For a standard Webdock stack, you will find your default admin shell user password on the main server information screen along with all your other auto-generated credentials.
Tip: You can disable password prompts when executing sudo commands by enabling Passwordless Sudo on your server. You can find this option on the Shell Users screen for your server.
The less secure way
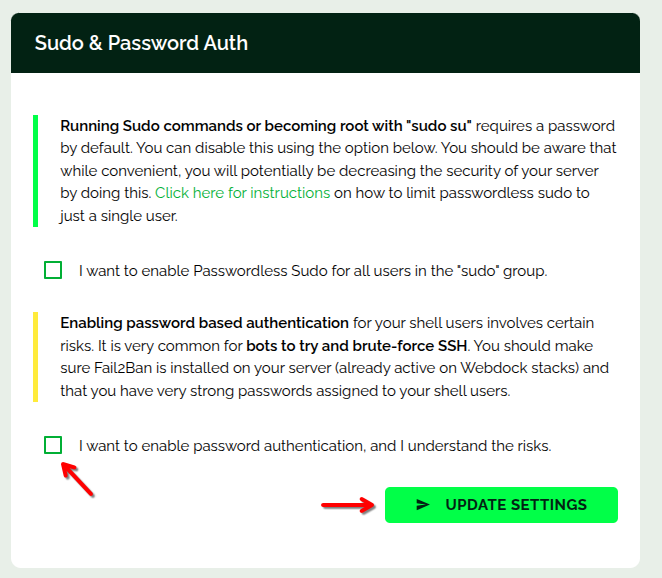
The less secure way is not to use public keys at all. Here you simply enable Password Based Authentication on the Shell Users management screen.
Now you can connect to your server using the ssh command and when prompted for a password, simply enter the admin shell user password, or the password you chose when adding your own shell user.
Why can’t I just use the root user?
That’s a bit silly when sudo is there to help keep your system secure. The root user is the primary target for automated brute force attacks, so having the root user disabled for ssh really helps with security. In addition, by using sudo you can have a log of activity on your server which may help track down what’s been happening on your server.
Besides, switching to root as a sudo user is as simple as executing
sudo su
Stay safe, use sudo! 🙂
If you insist on being unsafe: Enabling Password-based root login
Though we strongly discourage this (for security reasons), you can enable password-based SSH root login.
Firstly, if you have no shell user created, create one from the Shell Users screen.

Then, enable “Password Authentication” from the same screen (“Shell Users”).

Then, log into your server as a sudo user, switch to root, and then execute the below commands to enable root login. You can use Webssh for this.
Then to enable root login:
$ sudo su
# sed -i 's/#PermitRootLogin prohibit-password/PermitRootLogin yes/' /etc/ssh/sshd_config
Set password authentication to Yes – or just do it from the Shell Users screen in Webdock by checking the checkbox for that.
# sed -i 's/PasswordAuthentication no/PasswordAuthentication yes/' /etc/ssh/sshd_config
Now set root password by executing the below command
# passwd root
Finally, to apply the changes restart the ssh daemon by running the below command.
# systemctl restart ssh

(if the above errors out)

# systemctl restart sshd
Now you can SSH directly into your server as root with the password you set.

