Introduction
Open Game Panel, an open-source server management panel, is a powerful server management tool that can easily install most game/voice servers by selecting them from a list.
Some of the main features of Open Game Panel include Custom Web FTP, Auto Updates, and Easy installation of servers. Additionally, the panel comes with prebuilt plugins for a more advanced experience. You can rent out servers to clients directly from the panel itself, and we can also configure multiple machines to be used and managed by a single web panel.
Open Game Panel is one of the most user-friendly game server management panels available on the market, making it an excellent choice for those looking for an easy-to-use and install solution.
Open Game Panel supports games such as 7 Days to Die, Call of Duty 4: Modern Warfare, Counter Strike Global Offensive, Left 4 Dead, and many more on Linux. Find the complete list here.
In this article, I’ll discuss all the basics you need to get started.
Prerequisites
- Jammy LAMP server with PHP 7.4
- A sudo user
Installing Web Panel
Always start the installation by updating your server and packages:
$ sudo apt-get update && sudo apt-get upgrade -y
Then by installing the prerequisites for installing the Web Panel:
$ sudo apt-get install apache2 curl subversion php7.4 php7.4-gd php7.4-zip libapache2-mod-php7.4 php7.4-curl php7.4-mysql php7.4-xmlrpc php-pear php7.4-mbstring gettext git php7.4-bcmath
You will need to provide permissions for several actions to continue package installation. You can permit this by pressing ‘y’ on the prompts.
Then download and run the Open Game Panel files and install them:
$ wget "https://github.com/OpenGamePanel/Easy-Installers/raw/master/Linux/Debian-Ubuntu/ogp-panel-latest.deb"
$ sudo dpkg -i "ogp-panel-latest.deb"
Note: If you run into any errors, simply run apt –fix-broken install, and it will continue the process of installing Open Game Panel. It is a known bug in their installer at the point of writing this guide.
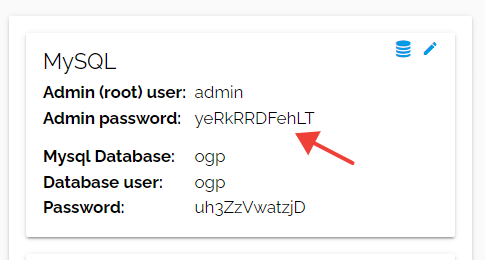
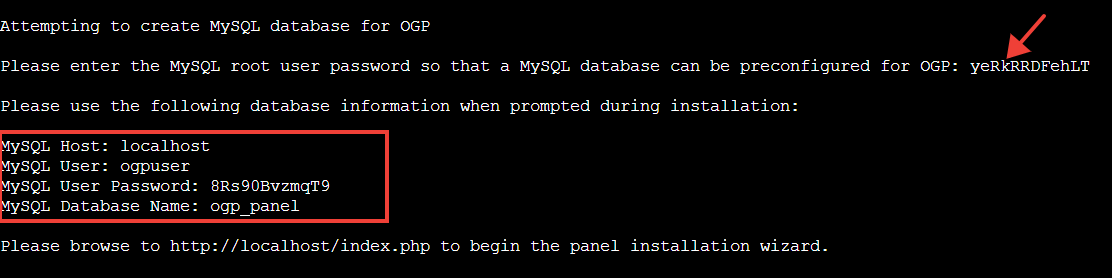
You can find the root database user password on your Webdock dashboard, which will be asked for by the installer. Enter the password into the installer, creating a new database and user. Note the password, as you’ll need it later to connect your Panel to the database.
Setting up the Web Panel
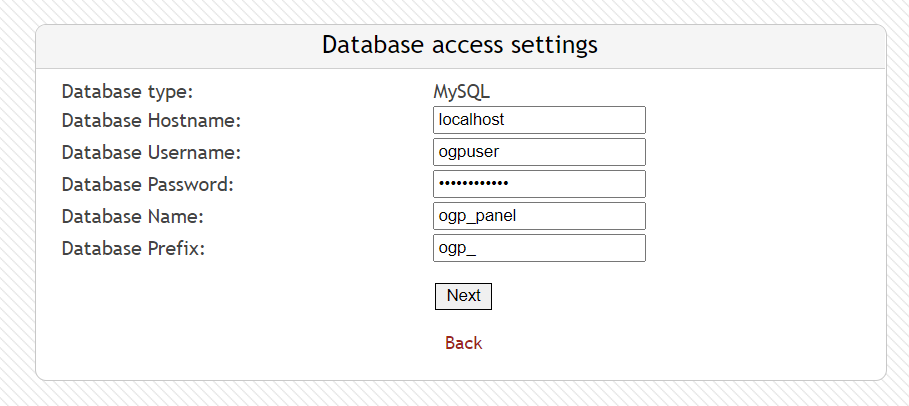
To set up your panel once installed, visit http://<your-server-ip>/install.php. You will be prompted to enter the database details, and you must enter the details you wrote down in the previous step.
The next step will be to create an admin user for the panel.
Our Panel is now installed and can be accessed at your IP address followed by /index.php. Use the details we set up in the above step to sign in. Optionally, you can select the language you want the panel to be in.
Installing the Agent
Like the web panel, you need certain packages before installing the agent. You can install them by running the following:
$ sudo apt-get install libxml-parser-perl libpath-class-perl perl-modules screen rsync sudo e2fsprogs unzip subversion libarchive-extract-perl pure-ftpd libarchive-zip-perl libc6 libgcc1 git curl
$ sudo apt-get install libc6-i386
$ sudo apt-get install libhttp-daemon-perl
$ sudo apt-get install libgcc1
Installing the agent is easy, but there are a few different ways you can do it. I’m going to show you how to use the Easy installer.
First, you need to add a new sudo user for the Open Game Panel agent:
$ sudo adduser ogpagent
$ sudo usermod -a -G sudo ogpagent
The username of the user can be anything but remember to note down the password. You will need it soon!
Now, download the Open Game Panel agent files and install them:
$ wget "https://github.com/OpenGamePanel/OGP-Agent-Linux/archive/master.zip"
$ unzip master.zip
$ cd OGP-Agent-Linux-master/
$ sudo bash ./install.sh
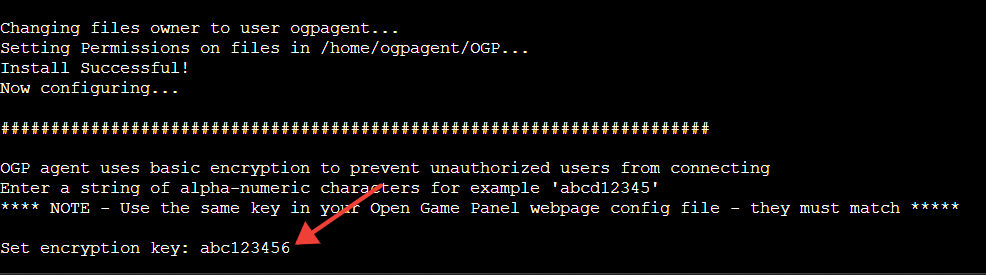
After you run the install script, you’ll be asked to enter your username and password. In the fields, add the newly created user and its password. For the rest of the options, you can use the default settings.
Make sure you note down the encryption key you set as well. You will need it in the next step.
The last step is to allow traffic through the Agent’s port. I am going to allow it for the default port:
$ sudo ufw allow 12679/tcp
Configuring the Agent on the Panel
Setting up an agent on the Web Panel before installing any game or voice servers is essential. To set up a server, visit the panel (http://<your-server-ip>/index.php) and navigate to Administration and then Servers.
Since I will set up the gaming on the server the panel is installed, I will just put in 127.0.0.1 as the remote host. You can add the IP address of an external server if you manage multiple servers with this setup.
To do this, you’ll also need the encryption key generated during the agent installation process. Enter your server’s IP for ‘Display Public IP.’
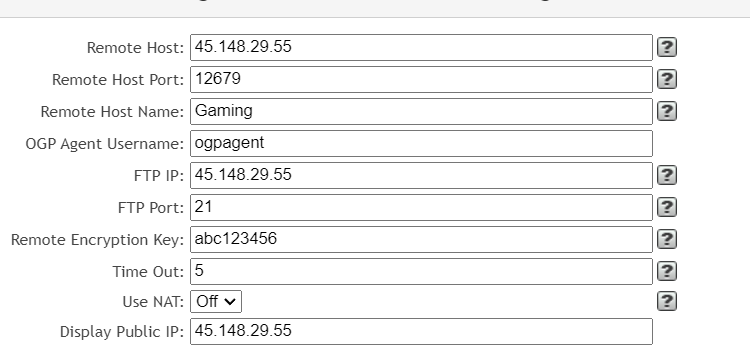
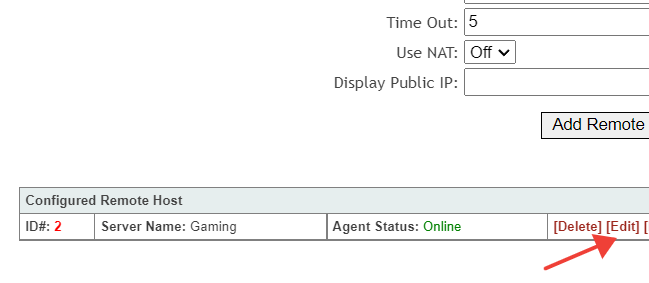
You may need to set up your IP address manually. You can do so by just clicking on the Edit button once the server is created.
Now simply install the game you’d like to play from Game Servers in Administration and fly away! You may need to allow traffic from certain ports for certain games (as shown above).
Conclusion
This guide outlined steps to install Open Game Panel on a Webdock server.
Contact Webdock Support if you see any issues.
Aayush Nair has been a passionate freelance WordPress designer for the past eight years. He likes to share his knowledge to help and enrich the community in his free time.
