Introduction
Pterodactyl is a popular, free, open-source server management tool built with PHP, React, and Go. Its main selling point is its interactive and straightforward UI, which makes it ideal for game server management.
Pterodactyl supports some of the most popular games, such as Minecraft, Rust, Terraria, Teamspeak, Mumble, Team Fortress 2, Counter-Strike: Global Offensive, Garry’s Mod, and ARK: Survival Evolved (Find the complete list here.)
In this article, I’ll discuss everything you need to know about Pterodactyl – from the installation process to hosting supported games and even introducing some of the terminologies used within the software. By the end, you should understand Pterodactyl and how it can help you with game hosting. Let’s get started!
Prerequisites
- A Linux Server with a decent amount of RAM ( I chose the SSD Bit more profile)
- Jammy LEMP 8.1 server
- A sudo user
- A domain name (it can also run on a bare IP address if necessary. However, it’s always best to use a domain for the panel to avoid potential issues.)
Note: If you want to use your custom domain instead of our .cloud alias domain make sure to add your domain in the Server Identity screen, and then run the SSL tool.
Installing Composer
Composer is a dependency manager for PHP that allows us to include everything you need code-wise to operate the Panel. You must have composer installed before continuing in this process. To install, run:
$ sudo su -
# curl -sS https://getcomposer.org/installer | sudo php -- --install-dir=/usr/local/bin --filename=composer
Download the Installer files
The first step is creating a folder; then, you need to open that newly created folder. The name can be anything. I am choosing a simple ‘panel’:
# mkdir -p /var/www/panel
# cd /var/www/panel
Once you have created a new directory for the Panel and moved into it, you can download the Panel files using curl:
# curl -Lo panel.tar.gz https://github.com/pterodactyl/panel/releases/latest/download/panel.tar.gz
Once you download the archive, you will need to unpack it and set the permissions for the storage/ and bootstrap/cache/ directories:
# tar -xzvf panel.tar.gz
# chmod -R 755 storage/* bootstrap/cache/
Using these directories helps us store files quickly and keep a cache available to reduce load times.
Installing the Panel
Now that the files are downloaded, we need to configure the core aspects of the Panel. Before moving forward, it is crucial to set up your database. If you’re on Webdock, they do it for you while the server’s spinning up.
We will start by copying over our default environment settings file. Next, we will install any core dependencies. Finally, we will generate a new application encryption key. To do so, run the following commands:
# cp .env.example .env
# composer install --no-dev --optimize-autoloader
Then, run this command:
# php artisan key:generate --force
Note: Make sure to back up your encryption key! It’s an encryption key for anything that needs to be stored securely in a safe place. If you lose it, all data will be unrecoverable.
After generating the application encryption keys, it is time to configure the environment. To do so, run:
# php artisan p:environment:setup
Add your domain, email address, and timezone.
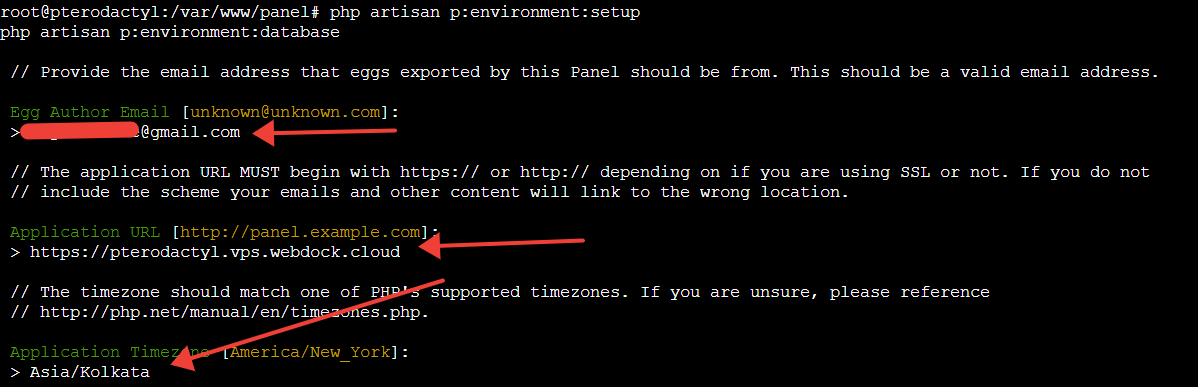
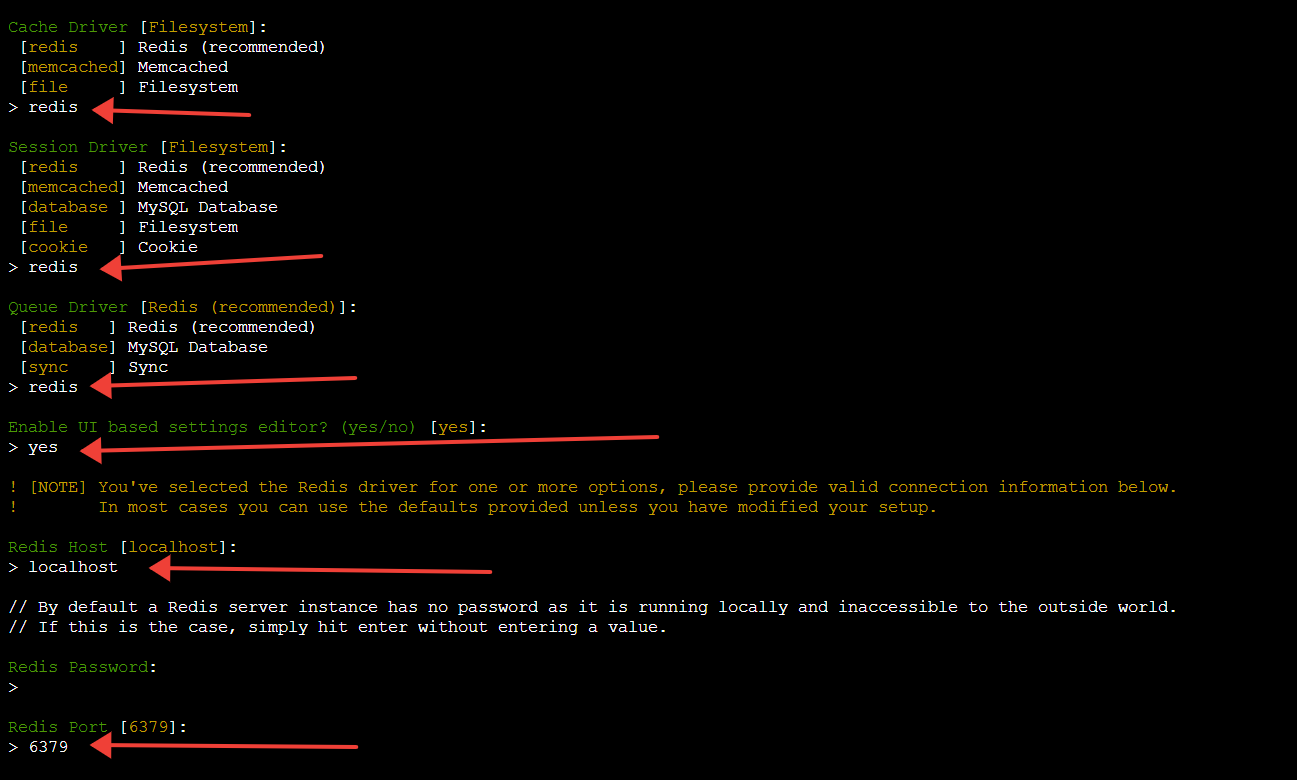
Then, select Redis for the following three options. Use localhost for Redis host, leave the password space blank and add the default value inside the brackets for Redis Port.
Now setting up database info.
# php artisan p:environment:database
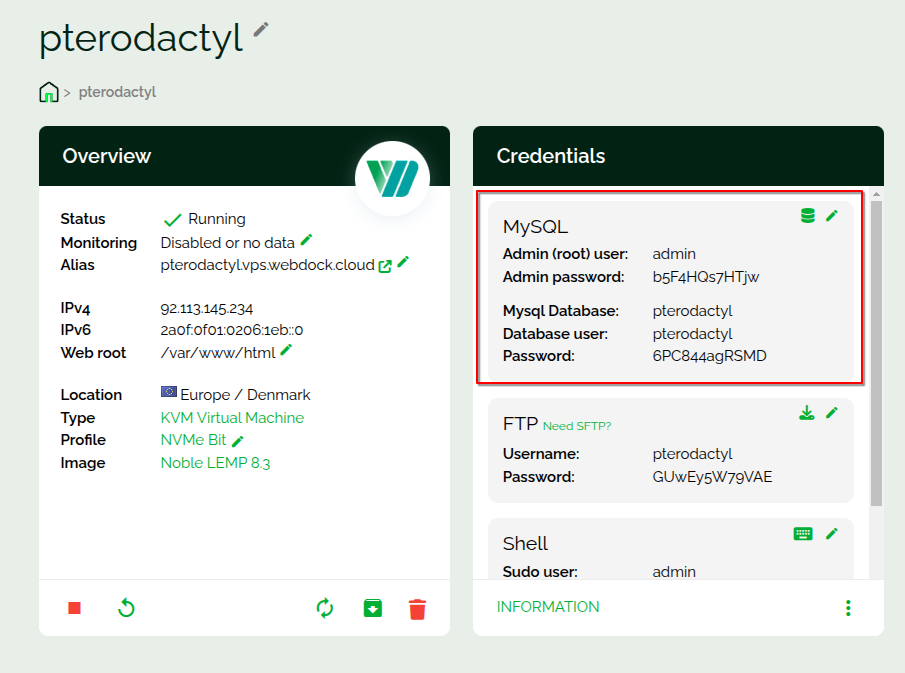
Add ’127.0.0.1’ as the database host. You can find all information for the next steps on your Server dashboard.
Note: For emails to work you need to have your custom domain linked to Postmark and will have to add the necessary DNS records to your DNS setup for Postmark verification.
And then, set up emails for timely notifications.
# php artisan p:environment:mail
I will set up the email service using Postmark for this tutorial. All Webdock server profiles (except Nano4) come with Postmark. Make sure to take advantage of this free addon!
Just copy the API key from your Server dashboard:

And Paste the same inside the terminal and use any address on your domain and name; the email set-up is complete!
Now it’s time to get all of the base data for the Panel into the database you set up earlier:
# php artisan migrate --seed --force
Depending on your machine, the command below could take a little while to finish running. So please, wait to exit the process until it’s completed.
You will need to create an administrative user to log into the panel. To do so, please run the command below:
# php artisan p:user:make
Remember that passwords must meet the following requirements: 8 characters, mixed case, and contain at least one number.
The last step in the installation process is to set the correct permissions on the Panel files so that the web server can use them correctly. You can do this by using the chmod command in your terminal:
# chown -R www-data:www-data /var/www/panel/*
Setting up Queue Listeners
Pterodactyl queues help to make the application faster by handling email sending and other actions in the background. You will need to set up the queue worker to process these actions.
We need to create a cronjob to process Pterodactyl tasks every minute, including session cleanup and sending scheduled tasks to daemons. To do so, run and select your favorite text editor:
# crontab -e
Then paste the line below and save the file:
* * * * * php /var/www/panel/artisan schedule:run >> /dev/null 2>&1
Next, you need to create a new systemd worker for your queue process. Run:
# nano /etc/systemd/system/pteroq.service
And paste the following and save the file:
## Pterodactyl Queue Worker File

## ----------------------------------


[Unit]

Description=Pterodactyl Queue Worker

After=redis-server.service


[Service]

## On some systems the user and group might be different.

## Some systems use `apache` or `nginx` as the user and group.

User=www-data

Group=www-data

Restart=always

ExecStart=/usr/bin/php /var/www/panel/artisan queue:work --queue=high,standard,low --sleep=3 --tries=3

StartLimitInterval=180

StartLimitBurst=30

RestartSec=5s


[Install]

WantedBy=multi-user.target
Now that’s done, we need to enable Redis on boot:
# systemctl enable --now redis-server
And lastly, enable the service and set it to run on the machine start:
# systemctl enable --now pteroq.service
Configuring NGINX
Now, we should configure NGINX to use Pterodactyl. To do so, run:
# nano /etc/nginx/sites-available/pterodactyl.conf
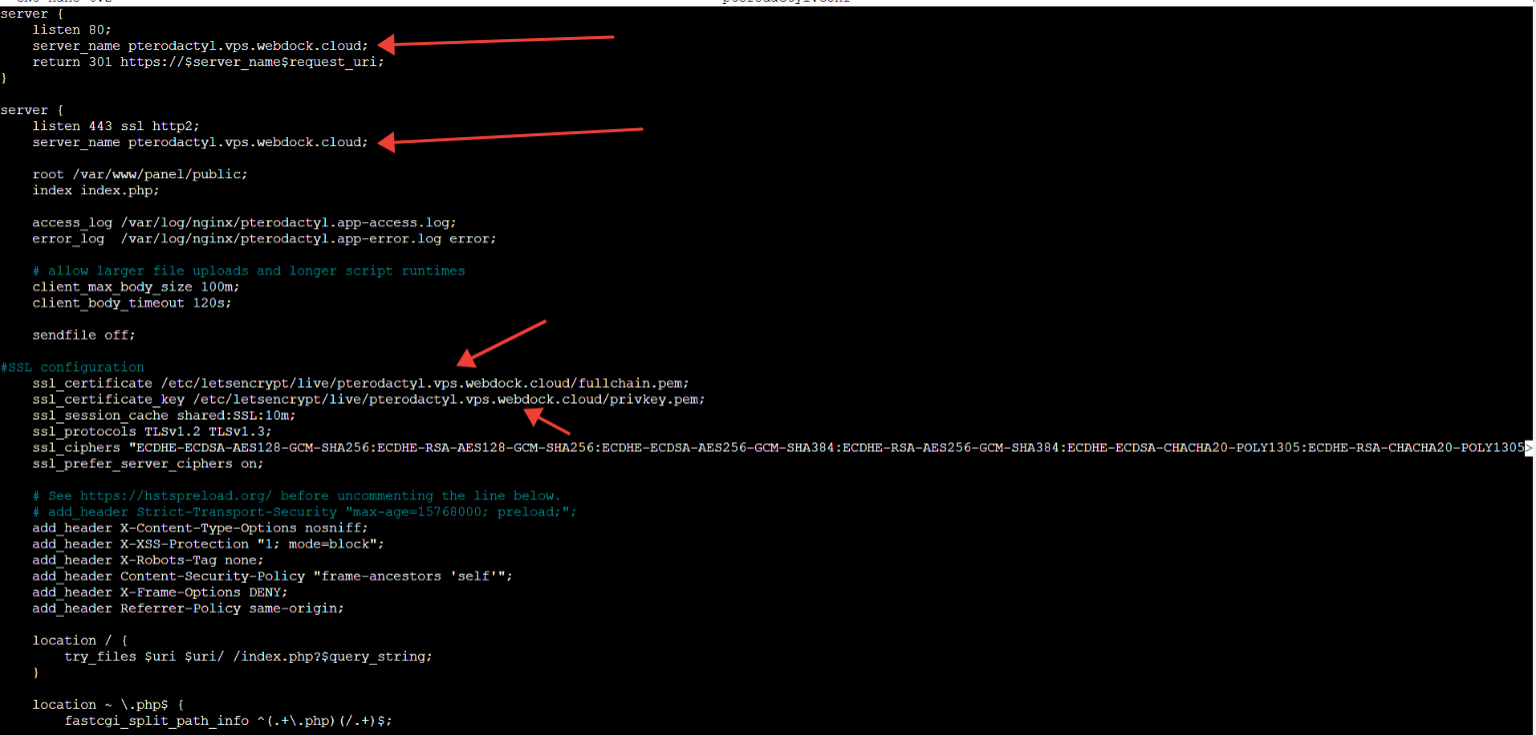
Replace example.com with your existing domain and paste the following:
server_tokens off;

server {

    listen 80;
    server_name example.com;
    return 301 https://$server_name$request_uri;
}

server {

    listen 443 ssl http2;
    server_name example.com;

    root /var/www/panel/public;

    index index.php;

    access_log /var/log/nginx/pterodactyl.app-access.log;
    error_log  /var/log/nginx/pterodactyl.app-error.log error;

    # allow larger file uploads and longer script runtimes

    client_max_body_size 100m;
    client_body_timeout 120s;

    sendfile off;

    #SSL configuration

    ssl_certificate /etc/letsencrypt/live/example.com/fullchain.pem;
    ssl_certificate_key /etc/letsencrypt/live/example.com/privkey.pem;
    ssl_session_cache shared:SSL:10m;
    ssl_protocols TLSv1.2 TLSv1.3;
    ssl_ciphers "ECDHE-ECDSA-AES128-GCM-SHA256:ECDHE-RSA-AES128-GCM-SHA256:ECDHE-ECDSA-AES256-GCM-SHA384:ECDHE-RSA-AES256-GCM-SHA384:ECDHE-ECDSA-CHACHA20-POLY1305:ECDHE-RSA-CHACHA20-POLY1305:DHE-RSA-AES128-GCM-SHA256:DHE-RSA-AES256-GCM-SHA384";
    ssl_prefer_server_ciphers on;

    # See https://hstspreload.org/ before uncommenting the line below.

    # add_header Strict-Transport-Security "max-age=15768000; preload;";

    add_header X-Content-Type-Options nosniff;
    add_header X-XSS-Protection "1; mode=block";
    add_header X-Robots-Tag none;
    add_header Content-Security-Policy "frame-ancestors 'self'";
    add_header X-Frame-Options DENY;
    add_header Referrer-Policy same-origin;

    location / {

        try_files $uri $uri/ /index.php?$query_string;
    }

    location ~ .php$ {

        fastcgi_split_path_info ^(.+.php)(/.+)$;
        fastcgi_pass unix:/run/php/php8.2-fpm.sock;
        fastcgi_index index.php;

        include fastcgi_params;

        fastcgi_param PHP_VALUE "upload_max_filesize = 100M n post_max_size=100M";
        fastcgi_param SCRIPT_FILENAME $document_root$fastcgi_script_name;
        fastcgi_param HTTP_PROXY "";
        fastcgi_intercept_errors off;
        fastcgi_buffer_size 16k;
        fastcgi_buffers 4 16k;
        fastcgi_connect_timeout 300;
        fastcgi_send_timeout 300;
        fastcgi_read_timeout 300;

        include /etc/nginx/fastcgi_params;

    }

    location ~ /.ht {

        deny all;

    }

}
# ln -s /etc/nginx/sites-available/pterodactyl.conf /etc/nginx/sites-enabled/pterodactyl.conf
Now we unlink the default webdock Nginx conf file as we’re not going to use that – we use our pterodactyl conf instead.
# unlink /etc/nginx/sites-enabled/webdock
Once you’ve completed the steps above, the final thing to do is to do a syntax check and then enable your NGINX configuration and restart it.
# nginx -t
If it reports no errors then you are good to follow the rest of the instructions. If not, please check if the text you copy-pasted to the config file is correct.
# systemctl restart nginx
This will ensure that your changes are applied and that NGINX is running again.
Setting up Docker
To use Wings (installation shown in the next step), you’ll need a Linux system to support running Docker containers. To install docker, run this quick installation of Docker CE:
# curl -sSL https://get.docker.com/ | CHANNEL=stable bash
And then set up Docker to start on boot:
# systemctl enable --now docker
Setting up Wings
Wings is the new generation server control plane from Pterodactyl, and it has been rebuilt from the ground up using Go.
The first step to installing Wings is to ensure the required directory structure is set up. To do this, run the commands below to create the base directory and download the wings executable:
# mkdir -p /etc/pterodactyl
# curl -L -o /usr/local/bin/wings "https://github.com/pterodactyl/wings/releases/latest/download/wings_linux_$([[ "$(uname -m)" == "x86_64" ]] && echo "amd64" || echo "arm64")"
# chmod u+x /usr/local/bin/wings
Setting up a Node
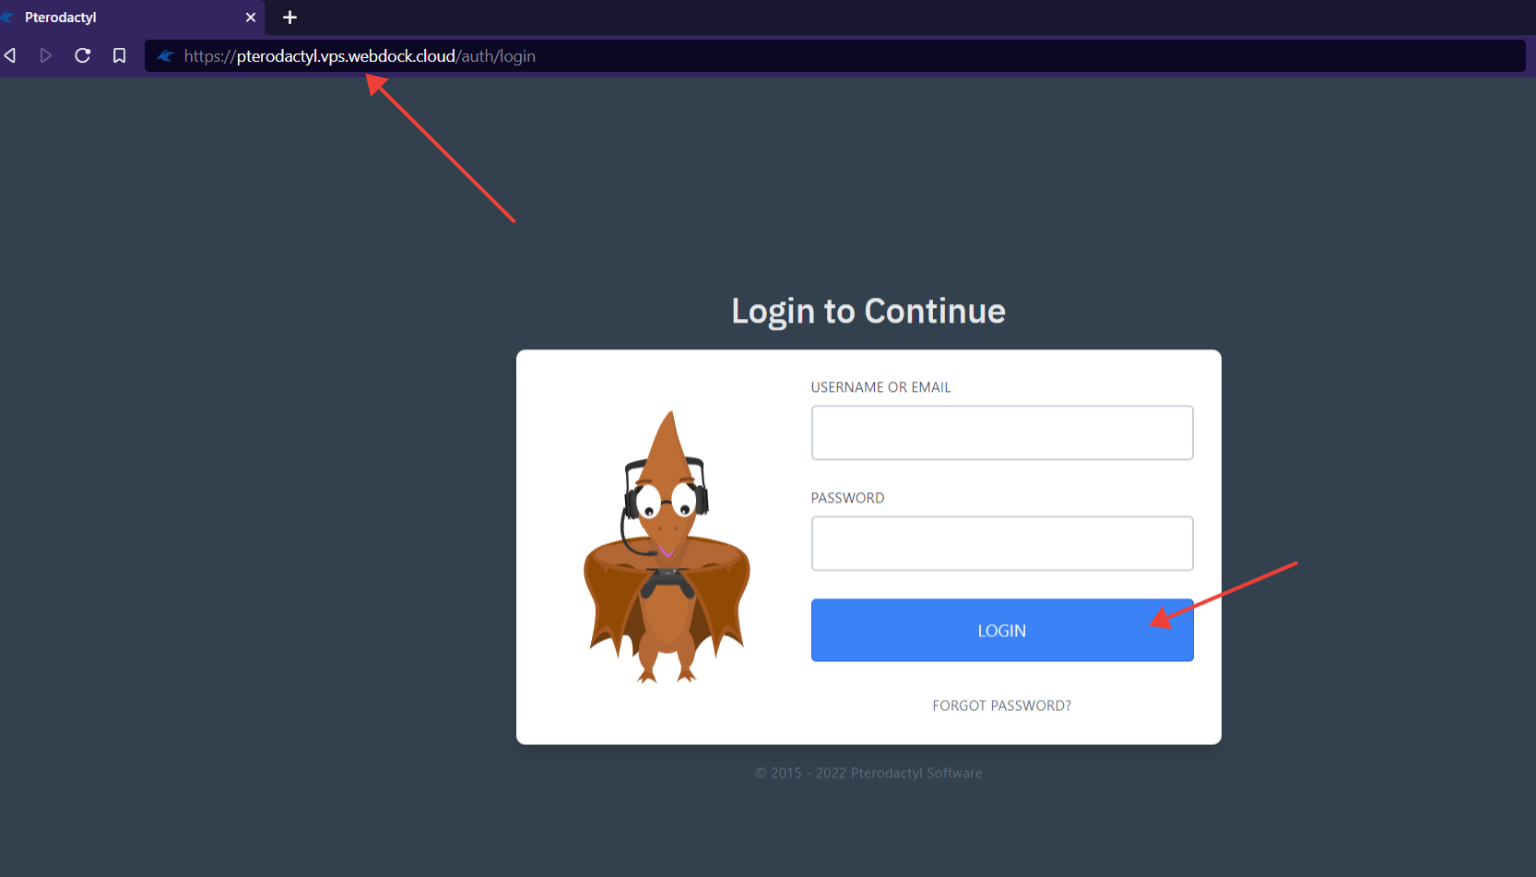
We first need to set up a node for the next steps in completing the Wings configuration. To do so, visit your domain and log into your Pterodactyl dashboard.
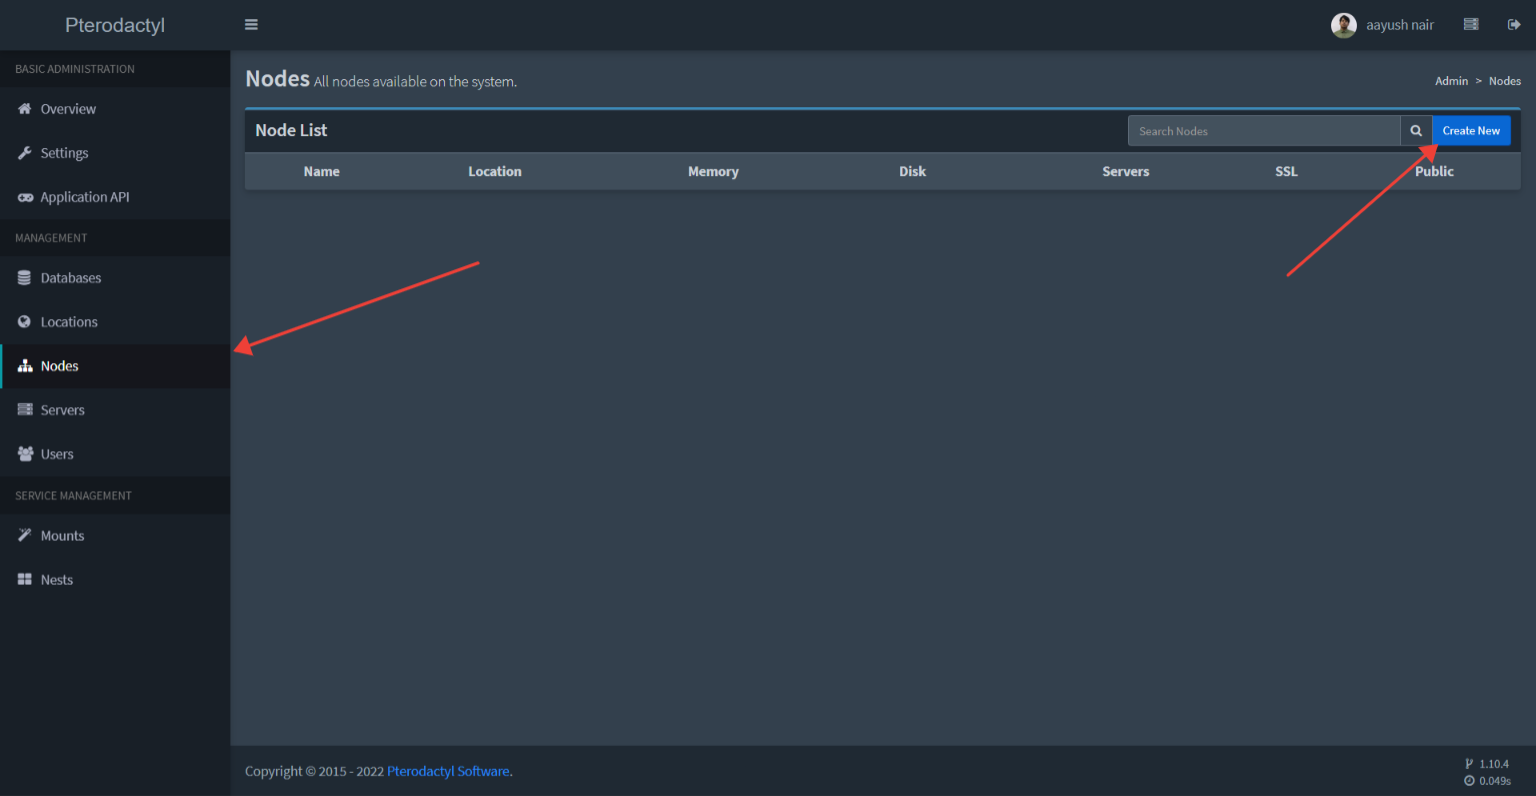
Once you log in, go to the Admin section by clicking on the gear icon on the top right of the screen. Then, navigate to Locations and add a new Location.
The name of the location can be anything. Then on the same screen, navigate to ‘Nodes’ and click on create new.
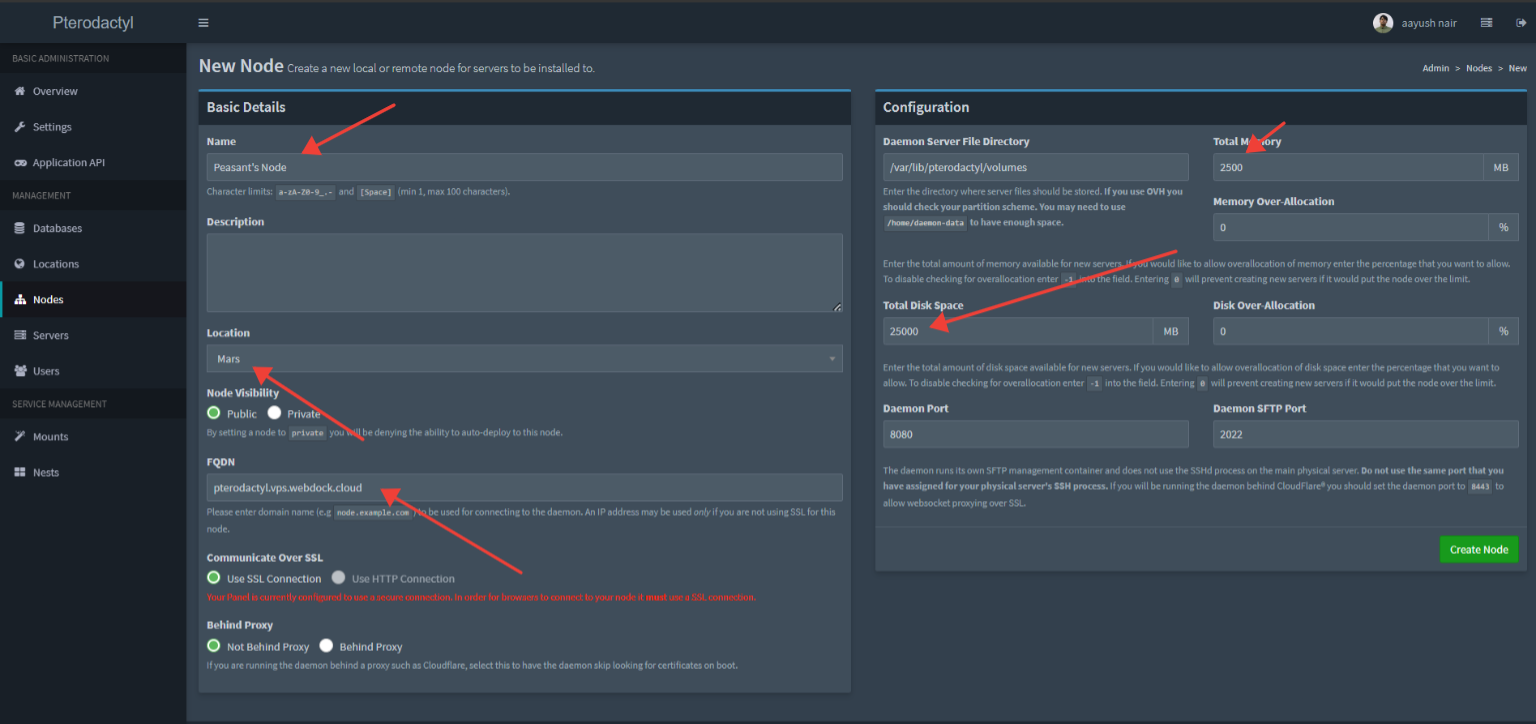
Name the server anything and add an optional description to the same. Select your Location from the drop-down and add your current domain to the FQDN field. Assign Memory and Disk space as you deem fit (you can set over allocation fields to ‘0‘) and depending on your server specs and click on ‘Create Node’
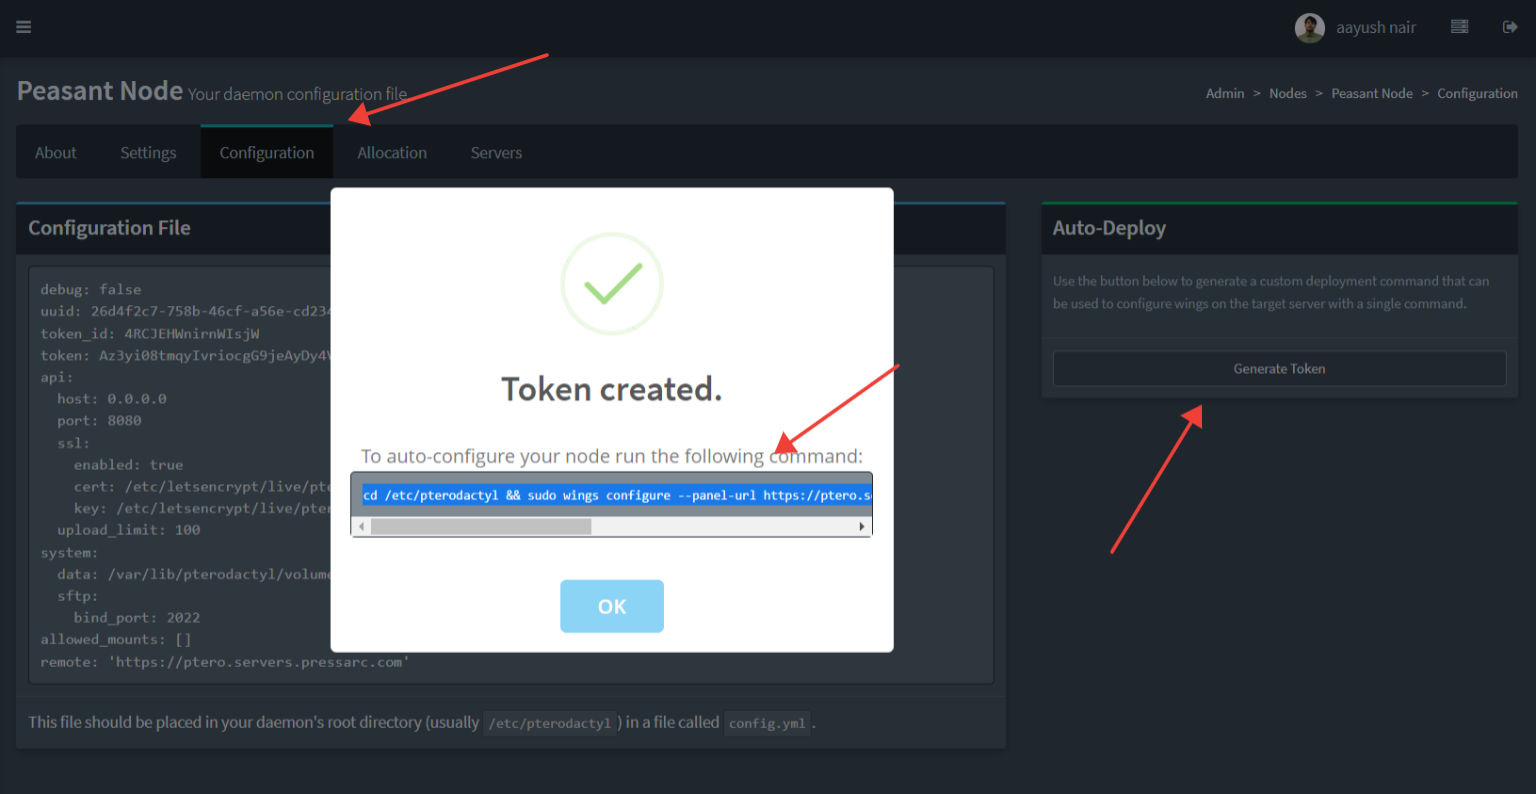
Once a node is created, navigate to its Configuration tab, click the Generate token button under the ‘Auto-Deploy’ tab, and copy the command.
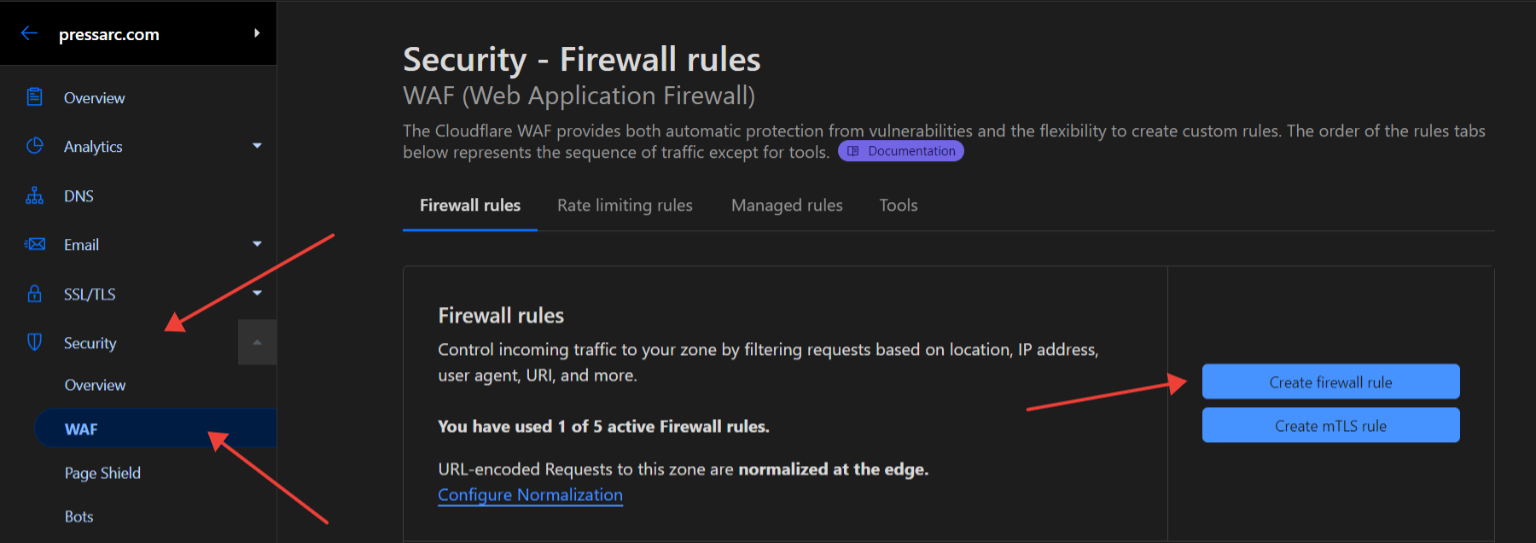
Note: If you use Cloudflare for your domain you need to add your IPv4 and IPv6 address to Cloudflare’s WAF and set it to ‘Allow’ to avoid any potential errors that could occur before proceeding to the next step.

And then, run the copied command on your SSH terminus. Once the configuration completes, run the following command and ensure you don’t see any errors:
# sudo wings
Once you verify that, click ctrl + c to exit the Wings terminal and run the following:
# nano /etc/systemd/system/wings.service
Paste the following and save the file:
[Unit]

Description=Pterodactyl Wings Daemon

After=docker.service

Requires=docker.service

PartOf=docker.service

[Service]

User=root

WorkingDirectory=/etc/pterodactyl

LimitNOFILE=4096

PIDFile=/var/run/wings/daemon.pid

ExecStart=/usr/local/bin/wings

Restart=on-failure

StartLimitInterval=180

StartLimitBurst=30

RestartSec=5s

[Install]

WantedBy=multi-user.target
And then, run the command below to reload the systemd and restart Wings:
# systemctl enable --now wings
Finally, to allow traffic from the 8080 and 2022 ports, run the following:
# ufw allow 8080/tcp
# ufw allow 2022/tcp
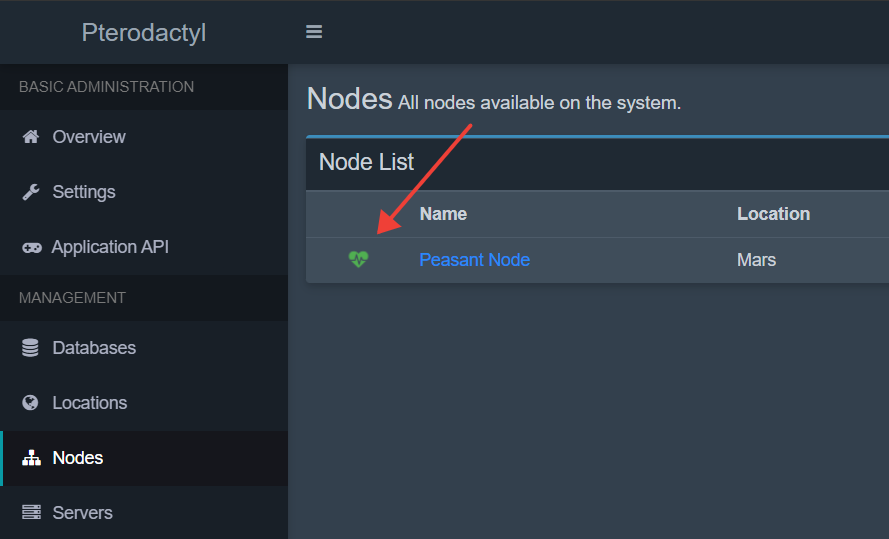
To verify if your node is working as expected, go to your Nodes and check for a green heart:
Conclusion
In this guide, you’ve installed and set-up a working node of Pterodactyl panel.
Contact Webdock Support if you encounter any issues.
Aayush Nair has been a passionate freelance WordPress designer for the past eight years. He likes to share his knowledge to help and enrich the community in his free time.
