Introduction
PostgreSQL, also known as Postgres, is a powerful and flexible open-source relational database management system (RDBMS). It enables you to store, organize, and retrieve large amounts of structured data efficiently. With PostgreSQL, you can handle complex queries, transactions, and concurrency control.
It is highly customizable, allowing you to adapt it to your needs. Many developers and organizations choose PostgreSQL for its scalability, robustness, and support for multiple programming languages. It is a reliable choice for effectively managing your data.
This blog article will provide installation instructions for PostgreSQL on Linux – whether you are a beginner or have some operating system experience.
Prerequisites
- An clean Ubuntu server (Ubuntu Jammy in my case)
- SSH access to the server
Installing PostgreSQL
You can use the apt packaging system to install Postgres packages on Ubuntu. First, refresh your server's local package index if you haven't done so recently.
$ sudo apt update
To install the Postgres package, you can also add a -contrib package that provides extra utilities and functionality.
$ sudo apt install postgresql postgresql-contrib -y
Now, start the service:
$ sudo systemctl start postgresql.service
Now that you have the software installed and running, let's look at how it works and how it might differ from other relational database management systems you've used before.
Setting up Postgres Roles
By default, Postgres uses a concept called "roles" to handle authentication and authorization. These roles are similar to regular Unix-style accounts. However, Postgres does not distinguish between users and groups and instead uses the term "role" for flexibility.
When you install Postgres, it is set up to use peer authentication. This means that Postgres associates roles with matching Unix/Linux system accounts. If a role exists in Postgres, you can log in as that role using a Unix/Linux username with the same name.
During installation, a user account called "Postgres" is created and associated with the default Postgres role. To access Postgres, you can simply log into that account.
There are a few ways you can use this account to access Postgres.
1. Switching to Postgres Account
To switch over to the Postgres account on your server, simply type:
$ sudo -i -u postgres
To access the PostgreSQL prompt right away, simply type:
$ psql
Once you have reached that point, you can freely engage with the database management system as required.
To exit the PostgreSQL prompt, simply type:
q
This command will return you to the Linux command prompt for PostgreSQL.
2. Without Switching To Postgres Account
You can also run the command you want directly with the postgres account using sudo.
For example, in the previous example, you were told to access the Postgres prompt by first switching to the postgres user and then running psql to open the prompt. Instead, you can do this in one step by running the psql command as the postgres user with sudo. Here's how:
$ sudo -u postgres psql
This command allows you to execute psql as the postgres user, granting you access to the Postgres prompt without having to switch users.
To exit the interactive Postgres session, simply type "q".
You can use the create role command from the command line to create a new role within the database. This command allows you to interactively enter the name of the new role and specify whether it should have superuser permissions.
If you are currently logged in as a postgres account, you can create a new user by following these steps:
$ sudo -u postgres createuser --interactive
3. Creating A New Role
To create a new role within the database, you can use the command line and the createrole command. This command allows you to specify the name of the new role interactively and whether it should have superuser permissions.
If you are currently logged in as the postgres account, you can create a new user by following these steps:
createuser --interactive
If you prefer to use sudo for each command without switching from your normal account, you can do the following:
$ sudo -u postgres createuser --interactive
The script will present you with options and, depending on your choices, perform the appropriate Postgres commands to create a user that meets your requirements.
Creating a Database
The Postgres authentication system assumes that when you log in with a role, there should be a database with the same name that the role can access. So, if you created a user named "aubrey," that user will try to connect to a database named "aubrey" by default. To create the appropriate database, you can use the command "createdb."
If you’d like to use a sudo account to do the same, you would need to type something like this:
$ sudo -u postgres createdb admin
If you prefer to use the logged-in postgres account for each command without switching from your normal account, you can simply type the following:
createdb admin
Running Postgres with a New User
To log in with peer authentication, you need to have a Linux user with the same name as your Postgres role and database. If you don't have a matching Linux user, you can create one using the adduser command. Please note that you should perform this task from your non-root account with sudo privileges, which means you should not be logged in as a postgres user.
$ sudo adduser aubrey
Once this new account becomes accessible, you can switch and establish a connection to the database by entering:
$ sudo -u aubrey psql
To log in automatically, make sure all the components are properly configured. If you want to connect to a different database, you can do so by specifying the database in this way:
$ psql -d postgres
After logging in, you can check your current connection information by entering the following command. This feature proves beneficial when connecting to databases that are not the default or when using non-default user credentials.
conninfo
Managing Tables
Creating A New Table
The syntax for creating tables in the PostgreSQL database system is as follows:
CREATE TABLE table_name (

    column_name1 col_type (field_length) column_constraints,

    column_name2 col_type (field_length),

    column_name3 col_type (field_length)

);
I’ll create a demo table for this tutorial, something like this:
CREATE TABLE dogs (

    tag serial PRIMARY KEY,

    breed varchar (50) NOT NULL,

    hair_colour varchar (25) NOT NULL,

    store varchar(25) check (store in ('Odense', 'Copenhagen', 'Aalborg', 'Billund', 'Asperup')),

    acquisition date

);
The above creates a table for a pet shop franchise. The following is how it works:
- The first column in the table will hold the tag numbers of the dogs, which will automatically increment. This column is also set as the primary key, meaning its values must be unique and not null.
- The next two lines create columns for the dog's breed and hair color, both of which cannot be left empty.
- The line after that creates a store column and adds a constraint that requires the value to be one of five specific options.
- Finally, the last line creates a date column that records the date you added the dogs to the database.
Please note that the command does not specify a field length for two of the columns (tag and acquisition). This is because some data types do not require a set length as the length or format is already implied.

Adding Data to the Table
Once the table has been set up, data can be inserted into it. For instance, to add a Broholmer and a Danish Spitz, the table to be modified needs to be specified, followed by the column names and corresponding data for each column. Here is an example of how this can be done:
INSERT INTO dogs (breed, hair_colour, store, acquisition) VALUES ('Broholmer', 'Blonde', 'Asperup', '2022-10-20');
INSERT INTO dogs (breed, hair_colour, store, acquisition) VALUES ('Danish Spitz', 'White', 'Odense', '2023-11-10');
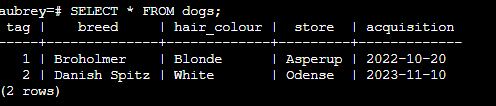
Let’s check if that worked:
SELECT * FROM dogs;
And the results are something like:
Deleting Data to the Table
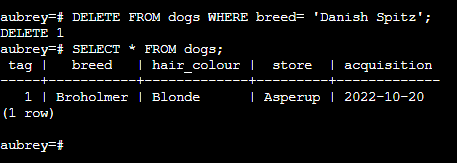
You can simply delete the corresponding row from your table to remove the adorable Spitz from the database:
DELETE FROM dogs WHERE breed= 'Danish Spitz';
The results:
Adding And Deleting Columns From A Table
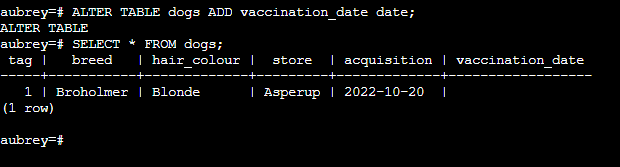
To make changes to a table you've created, you have the flexibility to add or remove columns. To display the vaccination date for each dog, you can simply add a column by typing:
ALTER TABLE dogs ADD vaccination_date date;
You can also delete the new column by running:
ALTER TABLE dogs DROP vaccination_date;

Updating Data to the Table
To update the values of an existing entry, you can search for the specific record you want and then change the column to the desired value. In this case, you can search for the Danish Spitz record, which will match every 'Broholmer' in your table, and update its breed to Samoyed.
UPDATE dogs SET breed= 'Samoyed' WHERE breed= 'Broholmer';
Conclusion
PostgreSQL offers enhanced performance, robust security measures, and seamless application integration. Moreover, its flexibility and scalability make it an excellent choice for projects of all sizes, from small-scale endeavors to large enterprise environments.
Following this comprehensive guide taught you to install and use PostgreSQL. I also reviewed some essential table management commands so you could get started quickly!
Meet Aayush, a WordPress website designer with almost a decade of experience who crafts visually appealing websites and has a knack for writing engaging technology blogs. In his spare time, he enjoys illuminating the minds around him.
