Introduction
In today’s world, your data and systems are at risk from hackers’ increasingly clever tricks. It’s vital for you and your organization to stay ahead by spotting and handling these weak spots early on.
Vuls is a free tool that can scan for these security gaps. Let’s dive into how Vuls can safeguard your systems and guide you through finding and fixing these vulnerabilities.
What is Vuls?
Understanding system vulnerabilities is crucial for safeguarding your digital environment. These weaknesses can compromise the integrity of your systems, making it essential to detect and remedy them promptly.
Enter Vuls. As a system administrator, you’ll find Vuls, a Go-based, open-source vulnerability scanner, streamlines the daunting task of analyzing software vulnerabilities. This efficient tool taps into various databases, like the National Vulnerability Database, to keep your systems secure.
Vuls operates without an agent, and its light footprint allows simultaneous scans across numerous systems. Tailor your security checks with three distinct modes—fast, fast root, or deep. Furthermore, you can effortlessly receive updates through email or Slack, ensuring you’re informed and proactive in safeguarding your environment.
As you set up Vuls, you’ll appreciate its straightforward process, ensuring your defenses are robust and up to date.
Installing and Setting up Vuls
Prerequisites
You’ll need root access to operate an Ubuntu 22.04 server, which should have a minimum of 4 GB RAM and a non-root user. You can easily add a user using the Webdock panel without ever going to the command line.
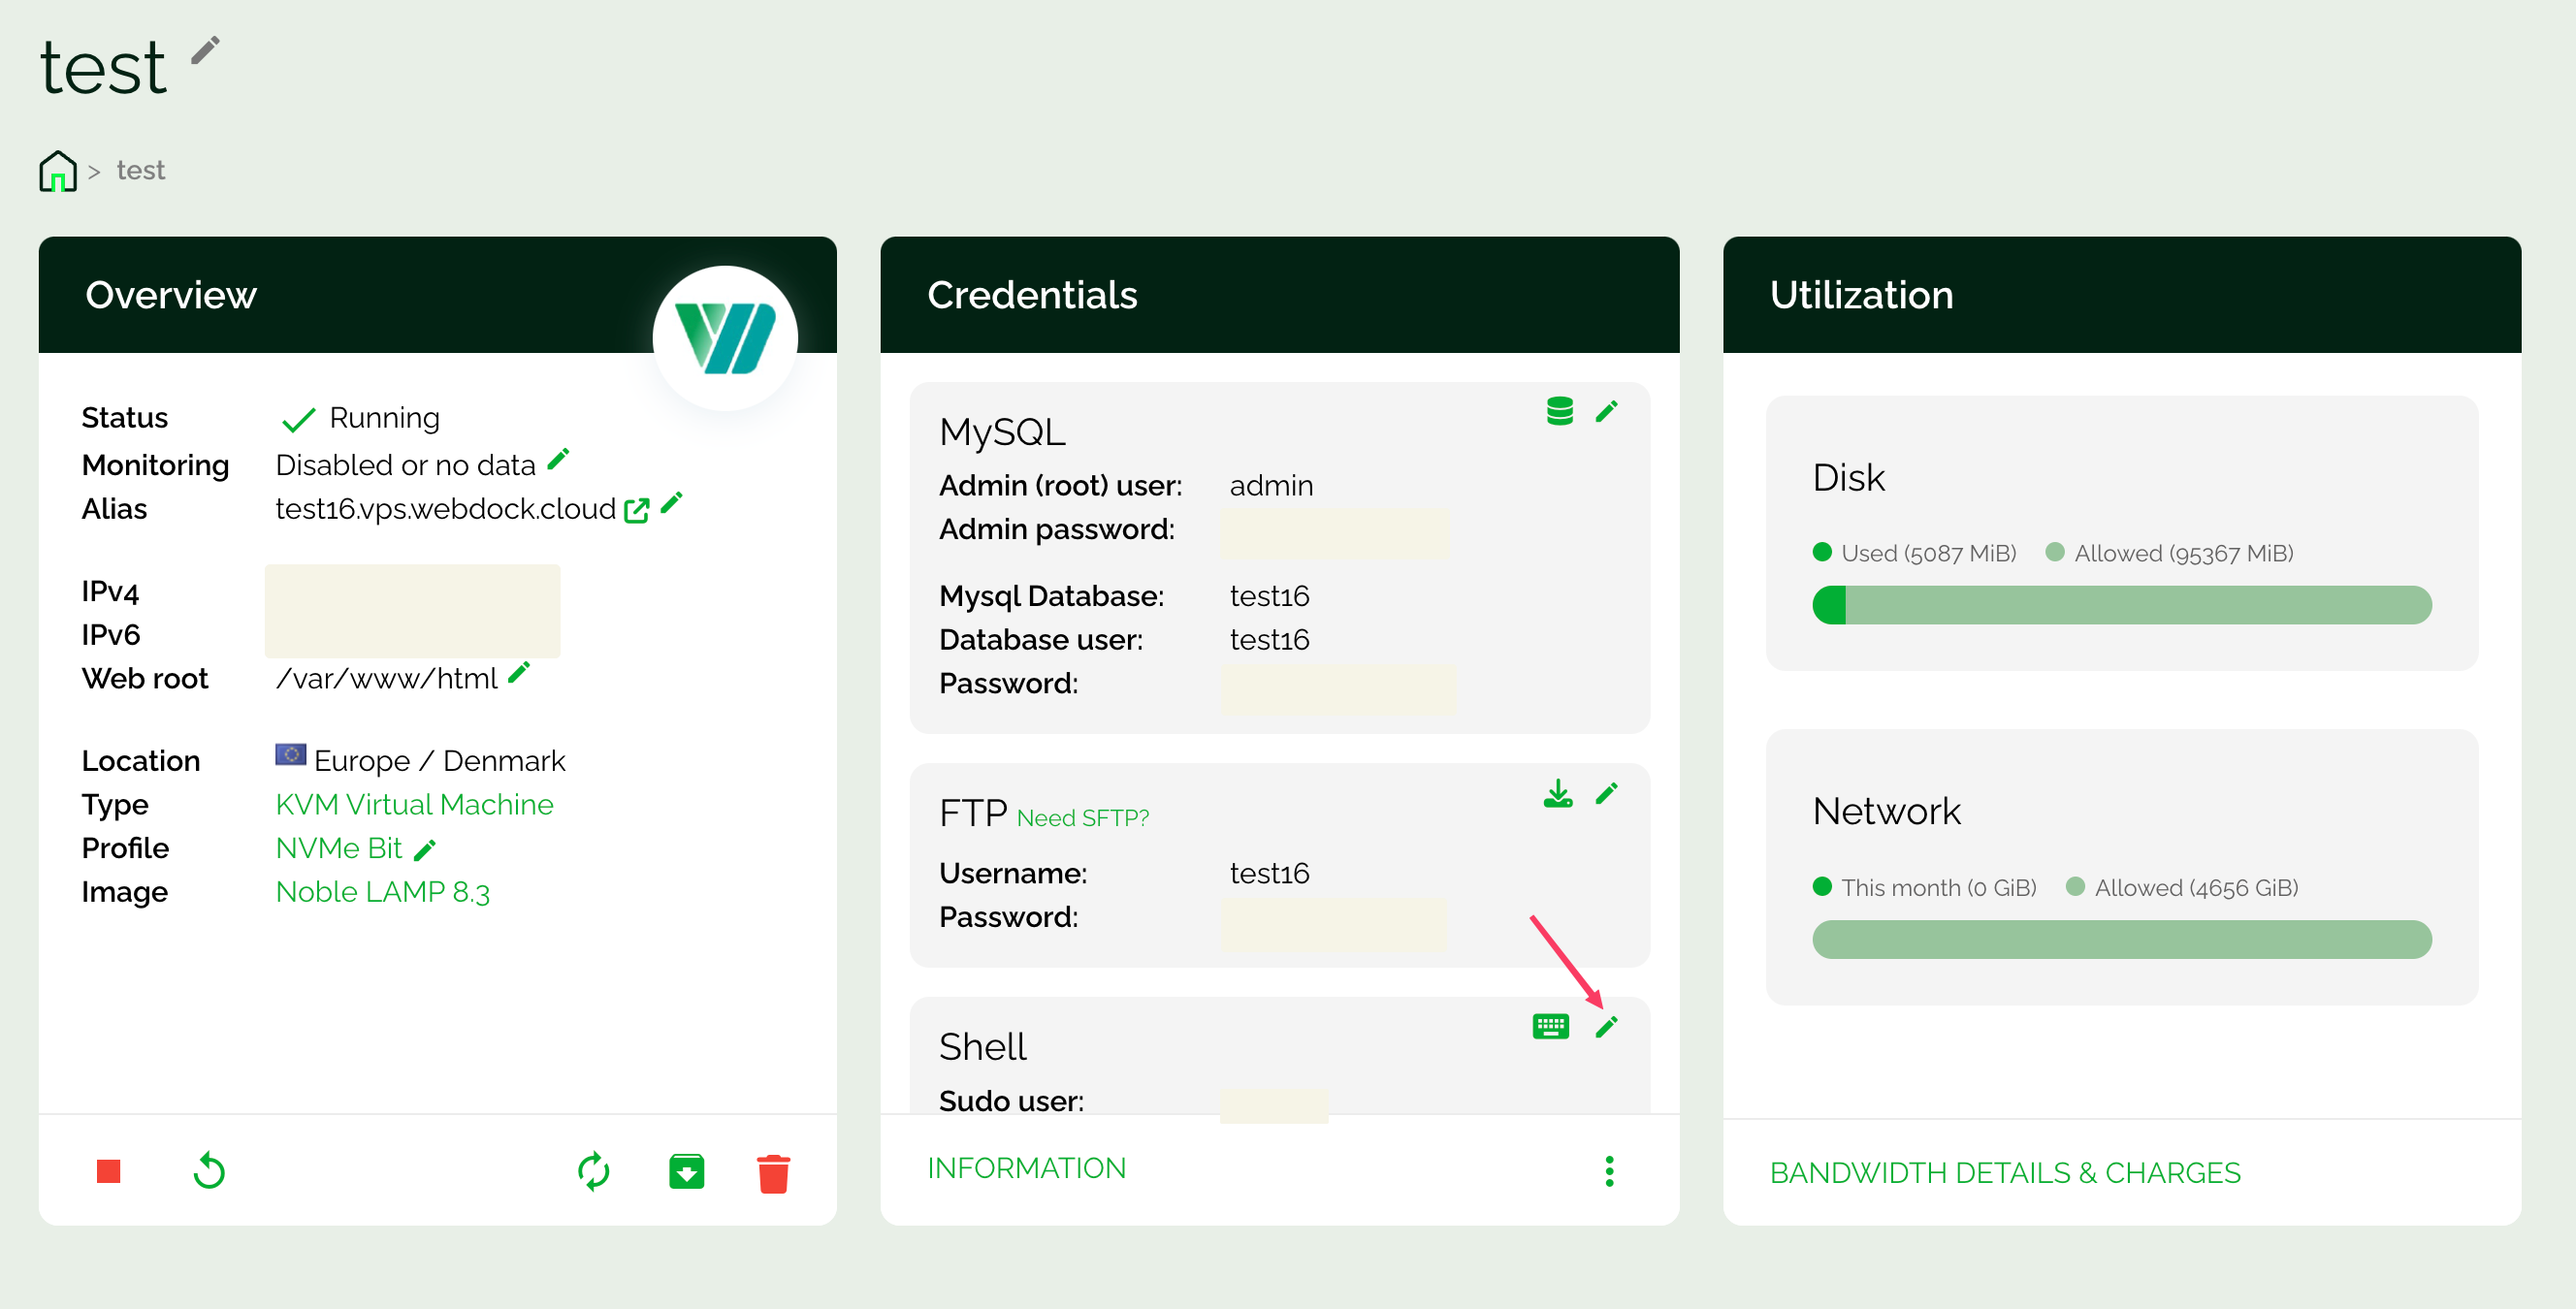
Click on manage shell users on your server’s dashboard, insert a username and password (or generate one quickly), assign them the ‘users’ user group, and click the Add user button.
If you’re not using Webdock, open the terminal as a sudo user, and enter:
$ sudo su
# useradd jimmy
Replace “Jimmy” with the name you choose. Then, set a password by running and following the prompts:
# passwd jimmy
Installing Dependencies
Let’s start by creating a folder. This would be the folder where all dependencies required for Vuls would be installed. You can name it anything you’d like, but I will name it Vuls-stuff for this tutorial. Run the command to create a folder:
# sudo mkdir /usr/share/vuls-stuff
For security, let’s assign this folder to Jimmy, our non-sudo user we created a step earlier:
# sudo chown -R jimmy /usr/share/vuls-stuff
To prepare for downloading and compiling necessary components, you’ll have to first set up git, gcc, make, along with sqlite for managing vulnerability data. Additionally, debian-goodies, which includes the handy checkrestart tool, will inform you about packages needing a reboot. You’ll also need wget.
You can do this manually or install them all together. I am going to do the latter:
# sudo apt install sqlite git debian-goodies gcc make wget -y
The -y flag will automatically mark ‘yes’ to all prompts for extra convenience.
Having established the vuls-stuff folder as your playground, proceed by refreshing the package manager cache before you install the necessary packages:
# sudo apt update
Installing Go
Having completed the necessary package installations, I’ll now move forward with setting up Go and the accompanying tools for Vuls. To install Go with the snap package manager, first install snap by executing the provided command:
# sudo apt update && sudo apt install snapd -y
Then, install Go:
# sudo snap install go --classic
To ensure you’re working with the most recent Go version, opt for snap over apt; the latter may install an outdated variant, potentially hindering your progress through this guide.
Go’s operation hinges on specific environment variables: GOPATH delineates your Go workspace, while an augmented PATH allows the system to locate Go executables.
For persistent environment settings, craft a script named go-env.sh in /etc/profile.d. This script will execute upon each user login, seamlessly integrating the required variables:
Open the go-env.sh file for editing by entering:
# sudo nano /etc/profile.d/go-env.sh
Then, add the subsequent instructions to your file:
# export GOPATH=$HOME/go
# export PATH=$PATH:$GOPATH/bin:/snap/bin
Use the export command to set your environment variable to the needed value, establishing GOPATH and PATH accordingly. Once you’ve edited the file, ensure that you save and exit.
At present, go-env.sh, cannot be executed. Rectify this by granting it executable permissions with the command provided:
# sudo chmod +x /etc/profile.d/go-env.sh
To maintain your session without repeated logins, please refresh go-env.sh by executing it again:
# source /etc/profile.d/go-env.sh
Installing go-cve-dictionary and goval-dictionary
You’ve successfully installed Go, configured its environment, and added the necessary packages. Now, proceed to acquire and build go-cve-dictionary and goval-dictionary, essential for Vuls to search vulnerability databases. Utilize the source command to integrate changes without disrupting the current shell’s state.
To gather vulnerability data for Vuls, begin by setting up a go-cve dictionary, which taps into the National Vulnerability Database (NVD), a database of known vulnerabilities maintained by the US government.
The best way is to organize your packages neatly within the $GOPATH/src/ directory, using subdirectories named after their GitHub origin, such as github.com/example-user for those from “example-user”.
Next step involves installing go-cve-dictionary. Clone the repository from GitHub, followed by compiling it to make use of the package:
# sudo mkdir -p $GOPATH/src/github.com/vulsio
Explore it by running:
# cd $GOPATH/src/github.com/vulsio
Next, you’ll proceed to copy the go-cve-dictionary from GitHub onto your server with this command:
# sudo git clone https://github.com/vulsio/go-cve-dictionary.git
Then find the package’s root:
# cd go-cve-dictionary
Now, let’s compile and install by using the make command:
# sudo make install
If your coffee cup is empty, consider refilling it or stretching for a few moments, as setting up may be lengthy.
Once installed, make it available systemwide. You can do so by copying it to the local/bin folder:
# sudo cp $GOPATH/bin/go-cve-dictionary /usr/local/bin
Go-cve-dictionary requires access to a log output directory; by default, it is /var/log/vuls. You can create it by running:
# sudo mkdir /var/log/vuls
Currently, everyone can read the log directory. Ensure only you can access it by using this command:
# sudo chmod 700 /var/log/vuls
When you set permission flags to 700, only you, the file’s owner, can access it. To allow access for the non-sudo user we created, Jimmy, simply execute this command:
# sudo chown -R jimmy /var/log/vuls
Let’s fetch data from the National Vulnerability Database and store it locally:
# sudo go-cve-dictionary fetch nvd --dbpath /usr/share/vuls-stuff/cve.sqlite3
To retrieve NVD vulnerability data from around the early 2000s to the current year, this will save it in the database located at /usr/share/vuls-stuff folder we created.
Again, this will take a little time. Skip the java, drink water, and enjoy the ultimate cat video marathon. If your server does not have at least 3 GB RAM, this process will fail, which is why it is recommended to use a server with at least 4 GB.
Set up go-cve-dictionary? Check. Gathered NVD data for Vuls? Done. Next, you’ll install goval-dictionary and obtain OVAL data for Ubuntu.
OVAL, or Open Vulnerability and Assessment Language, serves as your tool for crafting checks confirming software vulnerabilities on systems.
Let’s obtain the goval-dictionary, a Go language package connecting to Ubuntu’s OVAL database. Then, compile it, launch the program, and gather vulnerability data for Vuls.
Navigate to the $GOPATH/src/github.com/vulsio folder:
# cd $GOPATH/src/github.com/vulsio
Clone the GitHub package:
# sudo git clone https://github.com/vulsio/goval-dictionary.git
Then, open the package folder:
# cd goval-dictionary
Compile and install with make:
# sudo make install
You know what to do now – this will also take some time. Once done, make it accessible:
# sudo cp $GOPATH/bin/goval-dictionary /usr/local/bin
To obtain the OVAL data for Ubuntu 22.04, please execute the command below:
# sudo goval-dictionary fetch ubuntu --dbpath=/usr/share/vuls-stuff/oval.sqlite3 22.04
You can replace the number 22.04 with the version you’d like to install the goval-dictionary.
Installing Gost
Let’s compile and install Gost – a Go package designed to interface with the Debian security bug tracker. Following its installation, you’ll retrieve data on vulnerabilities for Vuls utilization. This data is compiled by the Ubuntu security tracker, which maintains a record of the vulnerability status for Ubuntu-distributed packages.
To proceed, you’ll store this package in a previously specified directory. Access this directory using the command provided:
# cd $GOPATH/src/github.com/vulsio
Again, let’s clone a package from GitHub:
# sudo git clone https://github.com/vulsio/gost.git
Once it finishes, enter the package folder, compile, and install it:
# cd gost
# sudo make install
Copy it to /usr/local/bin to make it globally accessible:
# sudo cp $GOPATH/bin/gost /usr/local/bin
Next, create a log file directory for Gost:
# sudo mkdir /var/log/gost
Ensure you limit access exclusively to yourself using this command:
# sudo chmod 700 /var/log/gost
Setting the permission flags to 700 allows solely you, the owner, to access the file. Let’s grant access to another user, such as Jimmy, by executing this command:
# sudo chown -R jimmy /var/log/gost
Next, obtain the security tracker data for Ubuntu by executing the command. But the output here would be too long, so first clear the existing output by using the clear command, and then run:
# sudo gost fetch ubuntu --dbpath=/usr/share/vuls-stuff/gost.sqlite3
Configuring VULS
Once you’ve installed the necessary dependencies, proceed to obtain and build Vuls from its source code. Next, set it up to perform a scan on your local system. Begin by creating a new directory to house the Vuls repository using the following command and then opening it:
# mkdir -p $GOPATH/src/github.com/future-architect
# cd $GOPATH/src/github.com/future-architect
Let’s clone Vuls from GitHub and open the directory:
# sudo git clone https://github.com/future-architect/vuls.git
# cd vuls
Compile and run:
# sudo make install
Please note executing this command might require a moment. To ensure it’s available system-wide, place a copy in the /usr/local/bin directory:
# sudo cp $GOPATH/bin/vuls /usr/local/bin
Let’s head back to /usr/share/vuls-stuff to whip up the Vuls config file:
# cd /usr/share/vuls-stuff
You’ll need to set up Vuls by crafting a configuration file named config.toml. Please initiate this file using a text editor:
# sudo nano config.toml
Then, add the following configuration:
[cveDict]

type = "sqlite3"

SQLite3Path = "/usr/share/vuls-stuff/cve.sqlite3"


[ovalDict]

type = "sqlite3"

SQLite3Path = "/usr/share/vuls-stuff/oval.sqlite3"


[gost]

type = "sqlite3"

SQLite3Path = "/usr/share/vuls-stuff/gost.sqlite3"


[servers]


[servers.localhost]

host = "localhost"

port = "local"

scanMode = [ "fast" ]

#scanMode = ["fast", "fast-root", "deep", "offline"]
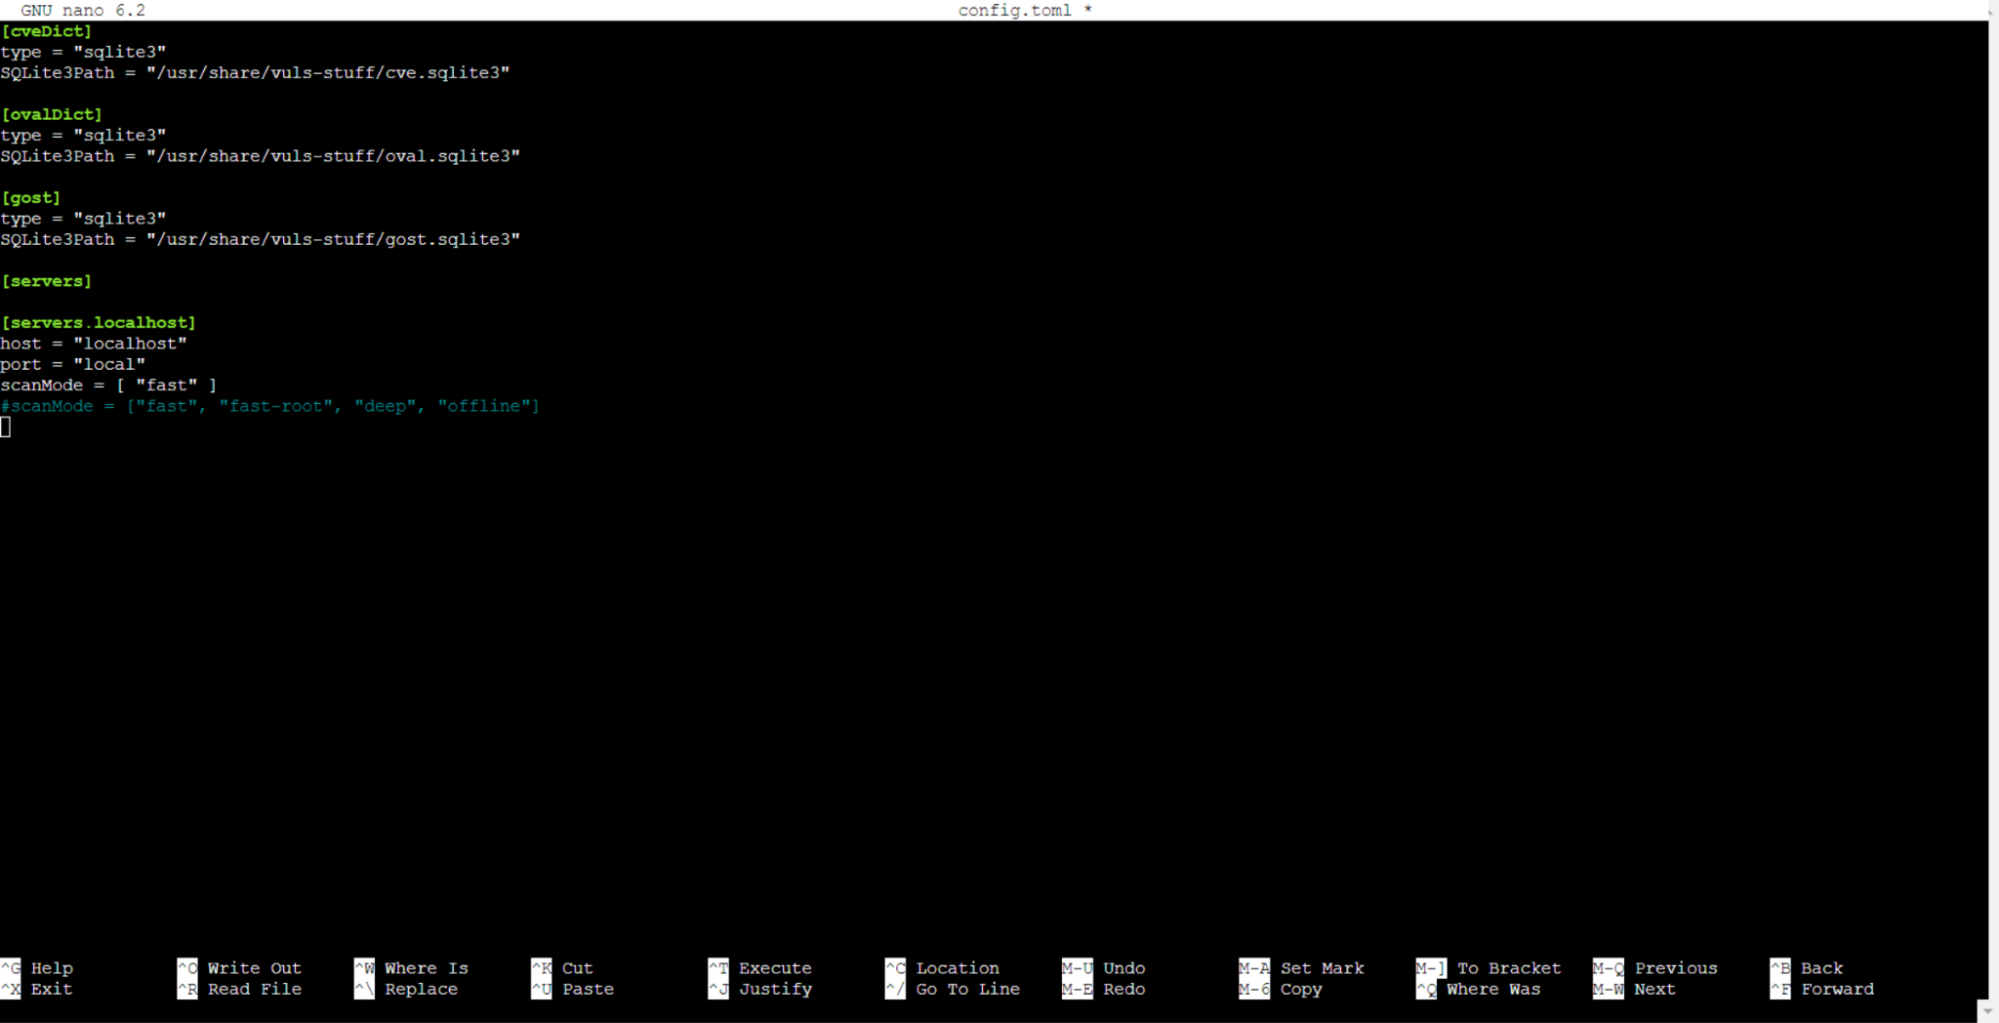
This configuration sets up Vuls with the vulnerability databases using the cveDict, ovalDict, and gost sections. Following this, you’ll encounter the servers section, which organizes details for each server. Your configuration is set to scan only the local server, identified as localhost.
Vuls offers four distinct scan modes for flexibility:
- Fast mode operates without root privileges, requires no dependencies, and minimally impacts the server.
- Fast root mode necessitates root access to uncover processes that need a restart post-update.
- Deep scan mode extends the capabilities of fast root mode by examining changelogs, potentially increasing server load.
- Offline mode functions without an internet connection and pairs well with other modes.
After configuring, ensure that you save and exit the document.
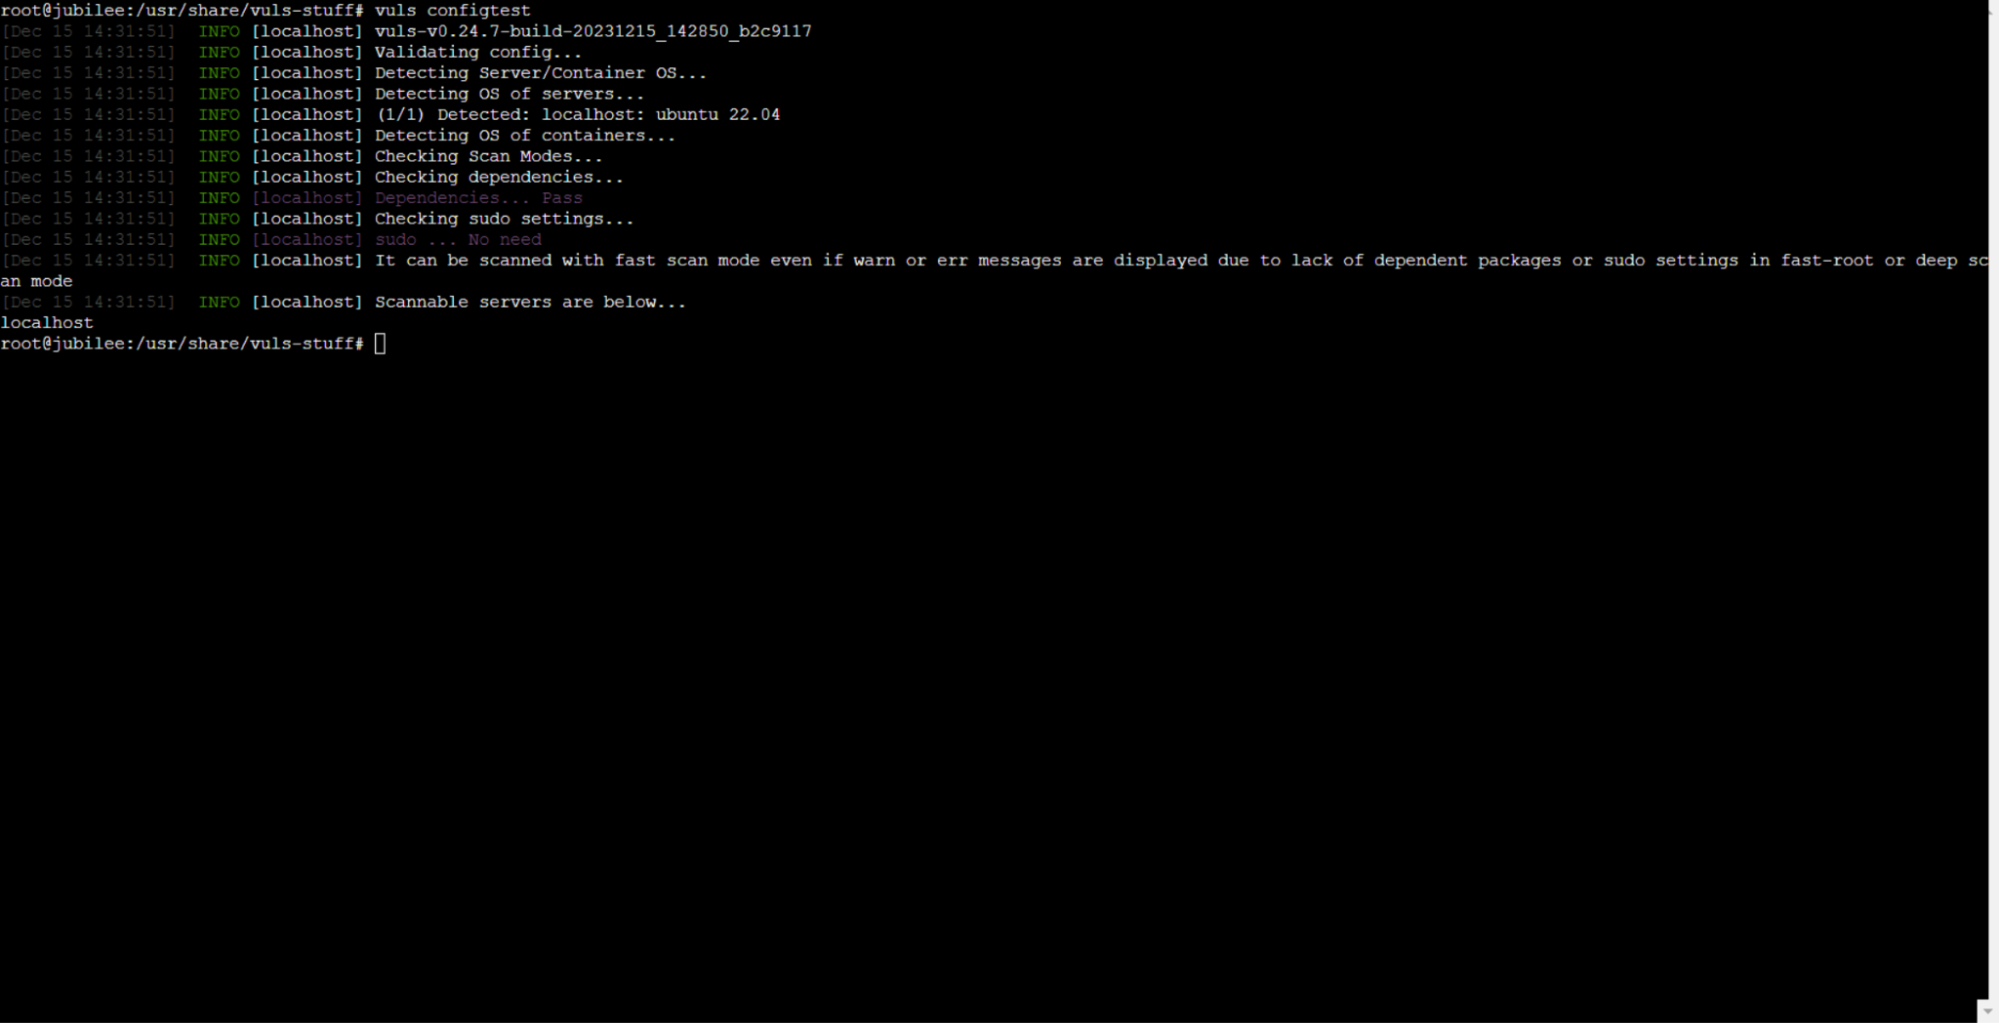
Finally, execute the provided command to verify your configuration file’s correctness:
# sudo vuls configtest
If everything is set up correctly, you’ll get a response like this:
Running Scans with Vuls
Let’s begin by running a local scan and examining the vulnerability report produced. At this stage, you have configured only the local server, which Vuls has accurately identified previously. Note that the default scan mode operates swiftly unless otherwise specified.
To initiate the scan, execute the command:
# sudo vuls scan
Interpreting Results
Upon running the scan, you’ll get a result something like this:
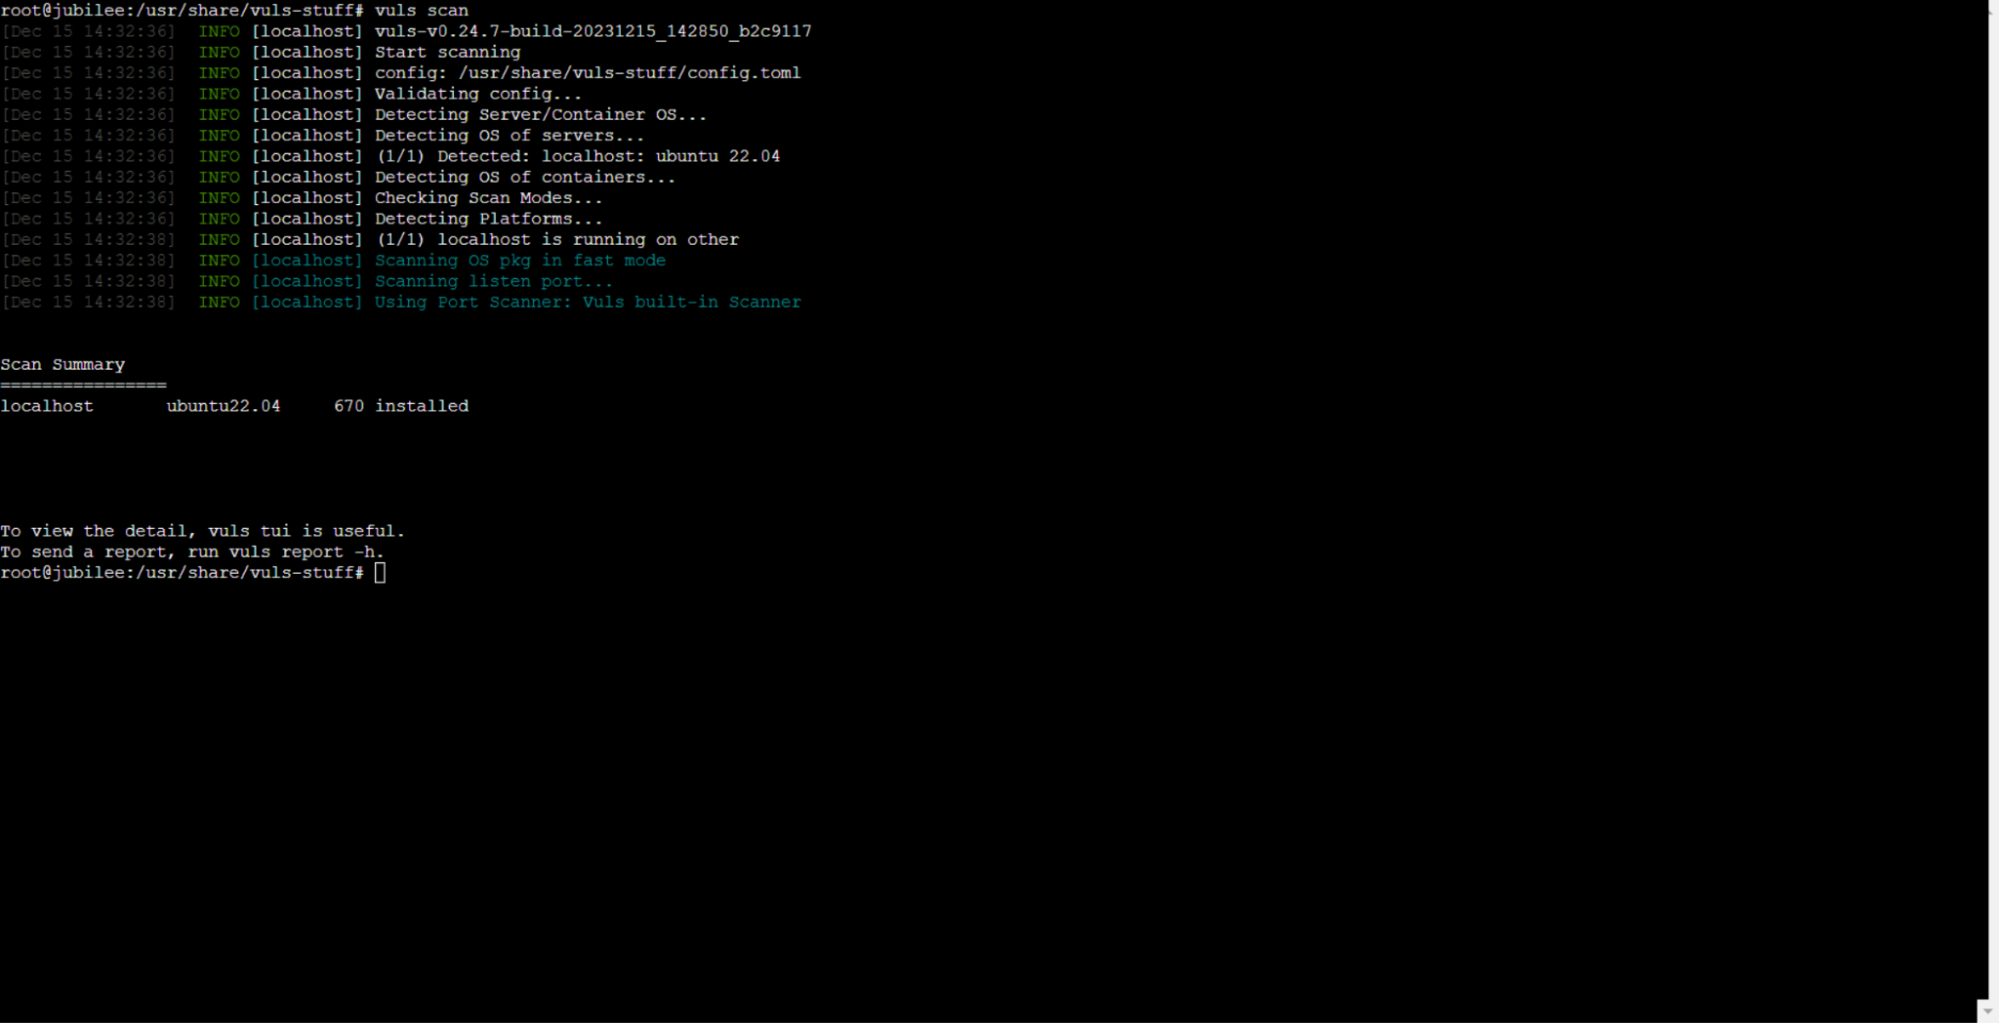
Vuls has recorded its actions. To see the vulnerabilities it found, run the following command:
# sudo vuls tui
Vuls organizes the report into four sections. Scanned machines are displayed on the upper left, detailing Vuls has scanned machines. Adjacent to this list, on the right, is a section for found vulnerabilities, indicating the vulnerabilities Vuls identified in the installed packages.
Occupying the left portion of the screen is an area for detailed information about each vulnerability, which includes data sourced from various databases. On the right side of the detailed information is a section for affected packages, which outlines the impacted versions and indicates whether a fixed version is available.
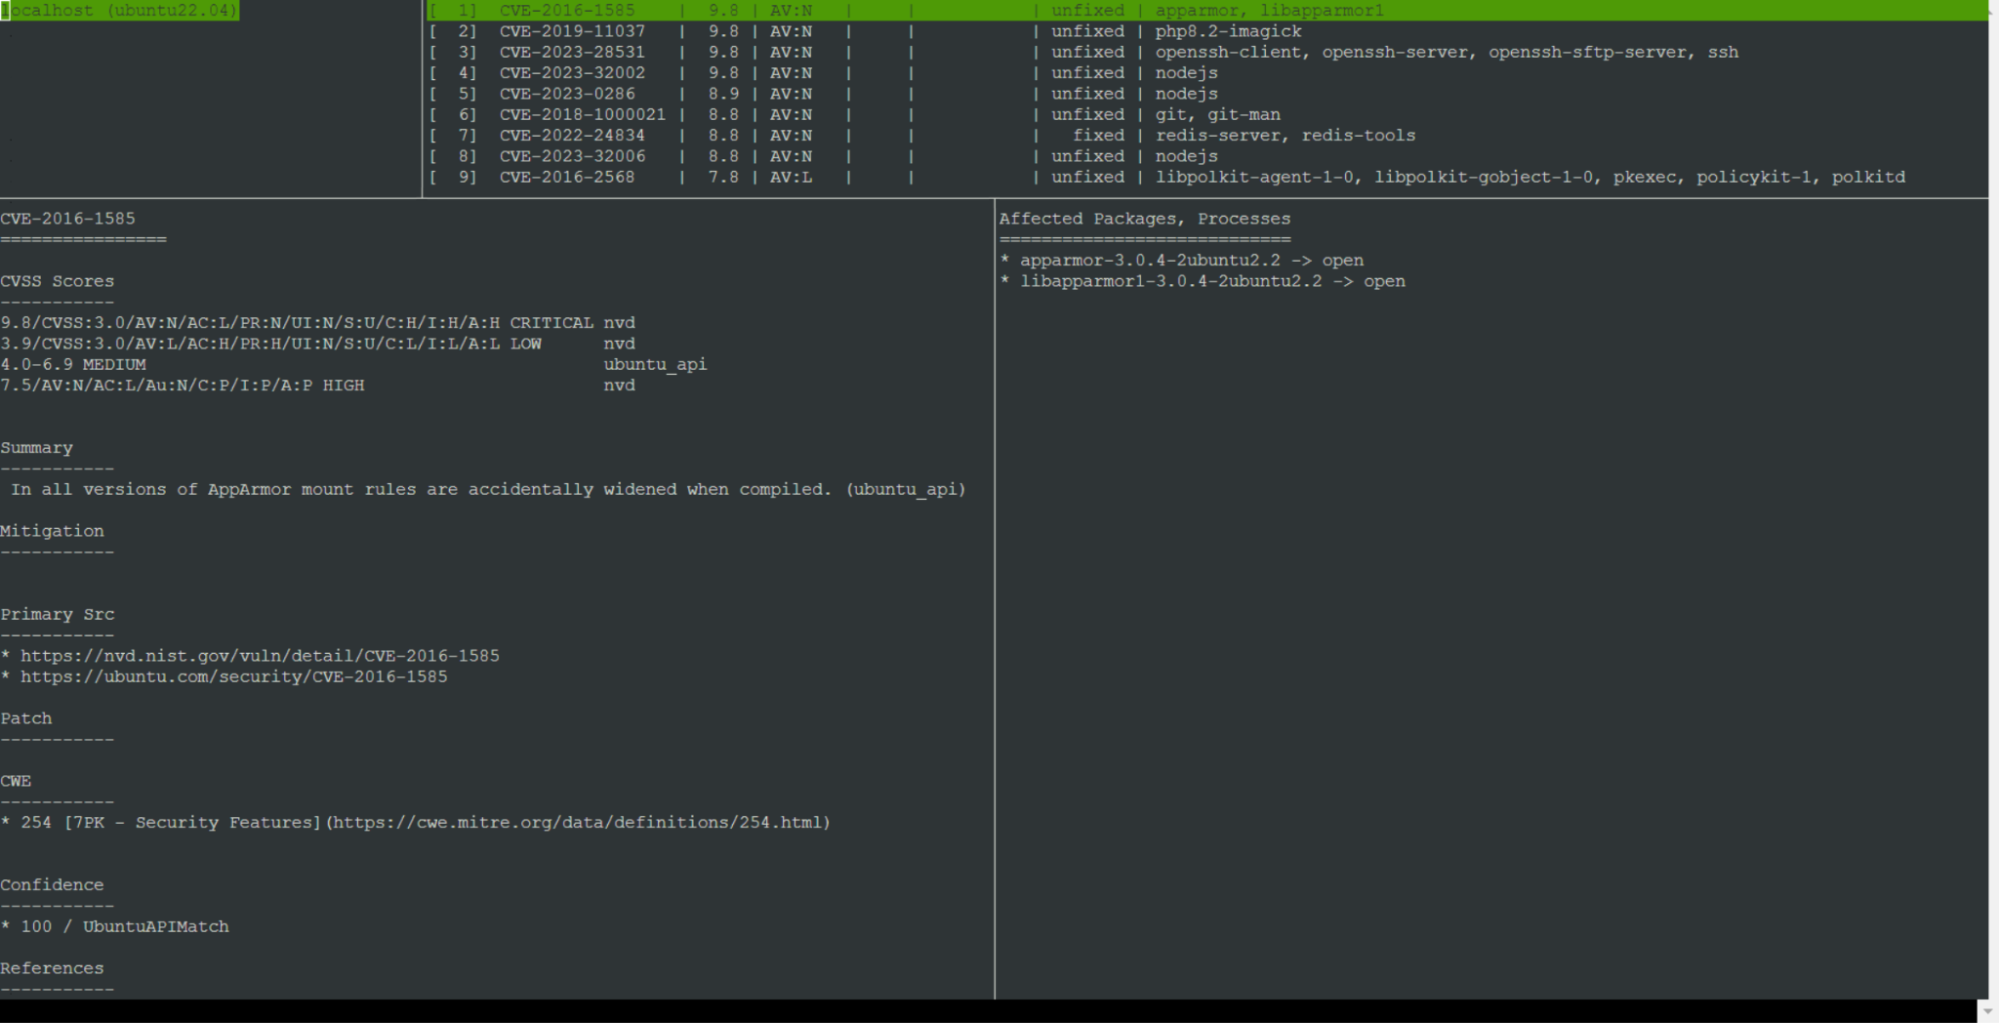
To move your cursor through the panels, simply press ENTER. Use the arrow keys to explore within a panel. To exit, press CTRL+C.
Pro Tip: Automating Vuls Scanner
Managing an online business often leaves little room for routine server checks for security weaknesses. Nonetheless, this critical task can be streamlined through automation. Let’s find out how with our old buddy, cron.
Cron, a built-in scheduler for Ubuntu, operates through the crontab file. This file, precise in its syntax, determines when commands execute. For editing, utilize the crontab utility. It opens your existing crontab file in the nano editor with this command:
# sudo su
# export VISUAL=nano; crontab -e
Once opened, add the following line to the end of the file:
0 9 * * * vuls scan -config=/usr/share/vuls-stuff/config.toml; vuls report -config=/usr/share/vuls-stuff/config.toml > /dev/null 2>&1
With this command, you’ll schedule a daily vuls scan and report at 9 am sharp every day. The ‘0 9 * * *’ signifies noon in Cron’s time. Save the file once you’ve entered this line.
Bonus: How to Setup Email Notifications for Results
Scanning for vulnerabilities is crucial, but it’s only the beginning. Once you discover vulnerable software on your server, fixing these issues promptly is vital. However, checking scan results every day isn’t feasible. That’s why setting up notifications can be a lifesaver, with its timely reports helping you stay on your toes. Vuls offers built-in support for many notification channels like Emails, Slack, ChatWork, and GoogleChat.
For this guide, let’s focus on email notifications. They’re not only flexible but also straightforward to configure. Let’s walk through the process:
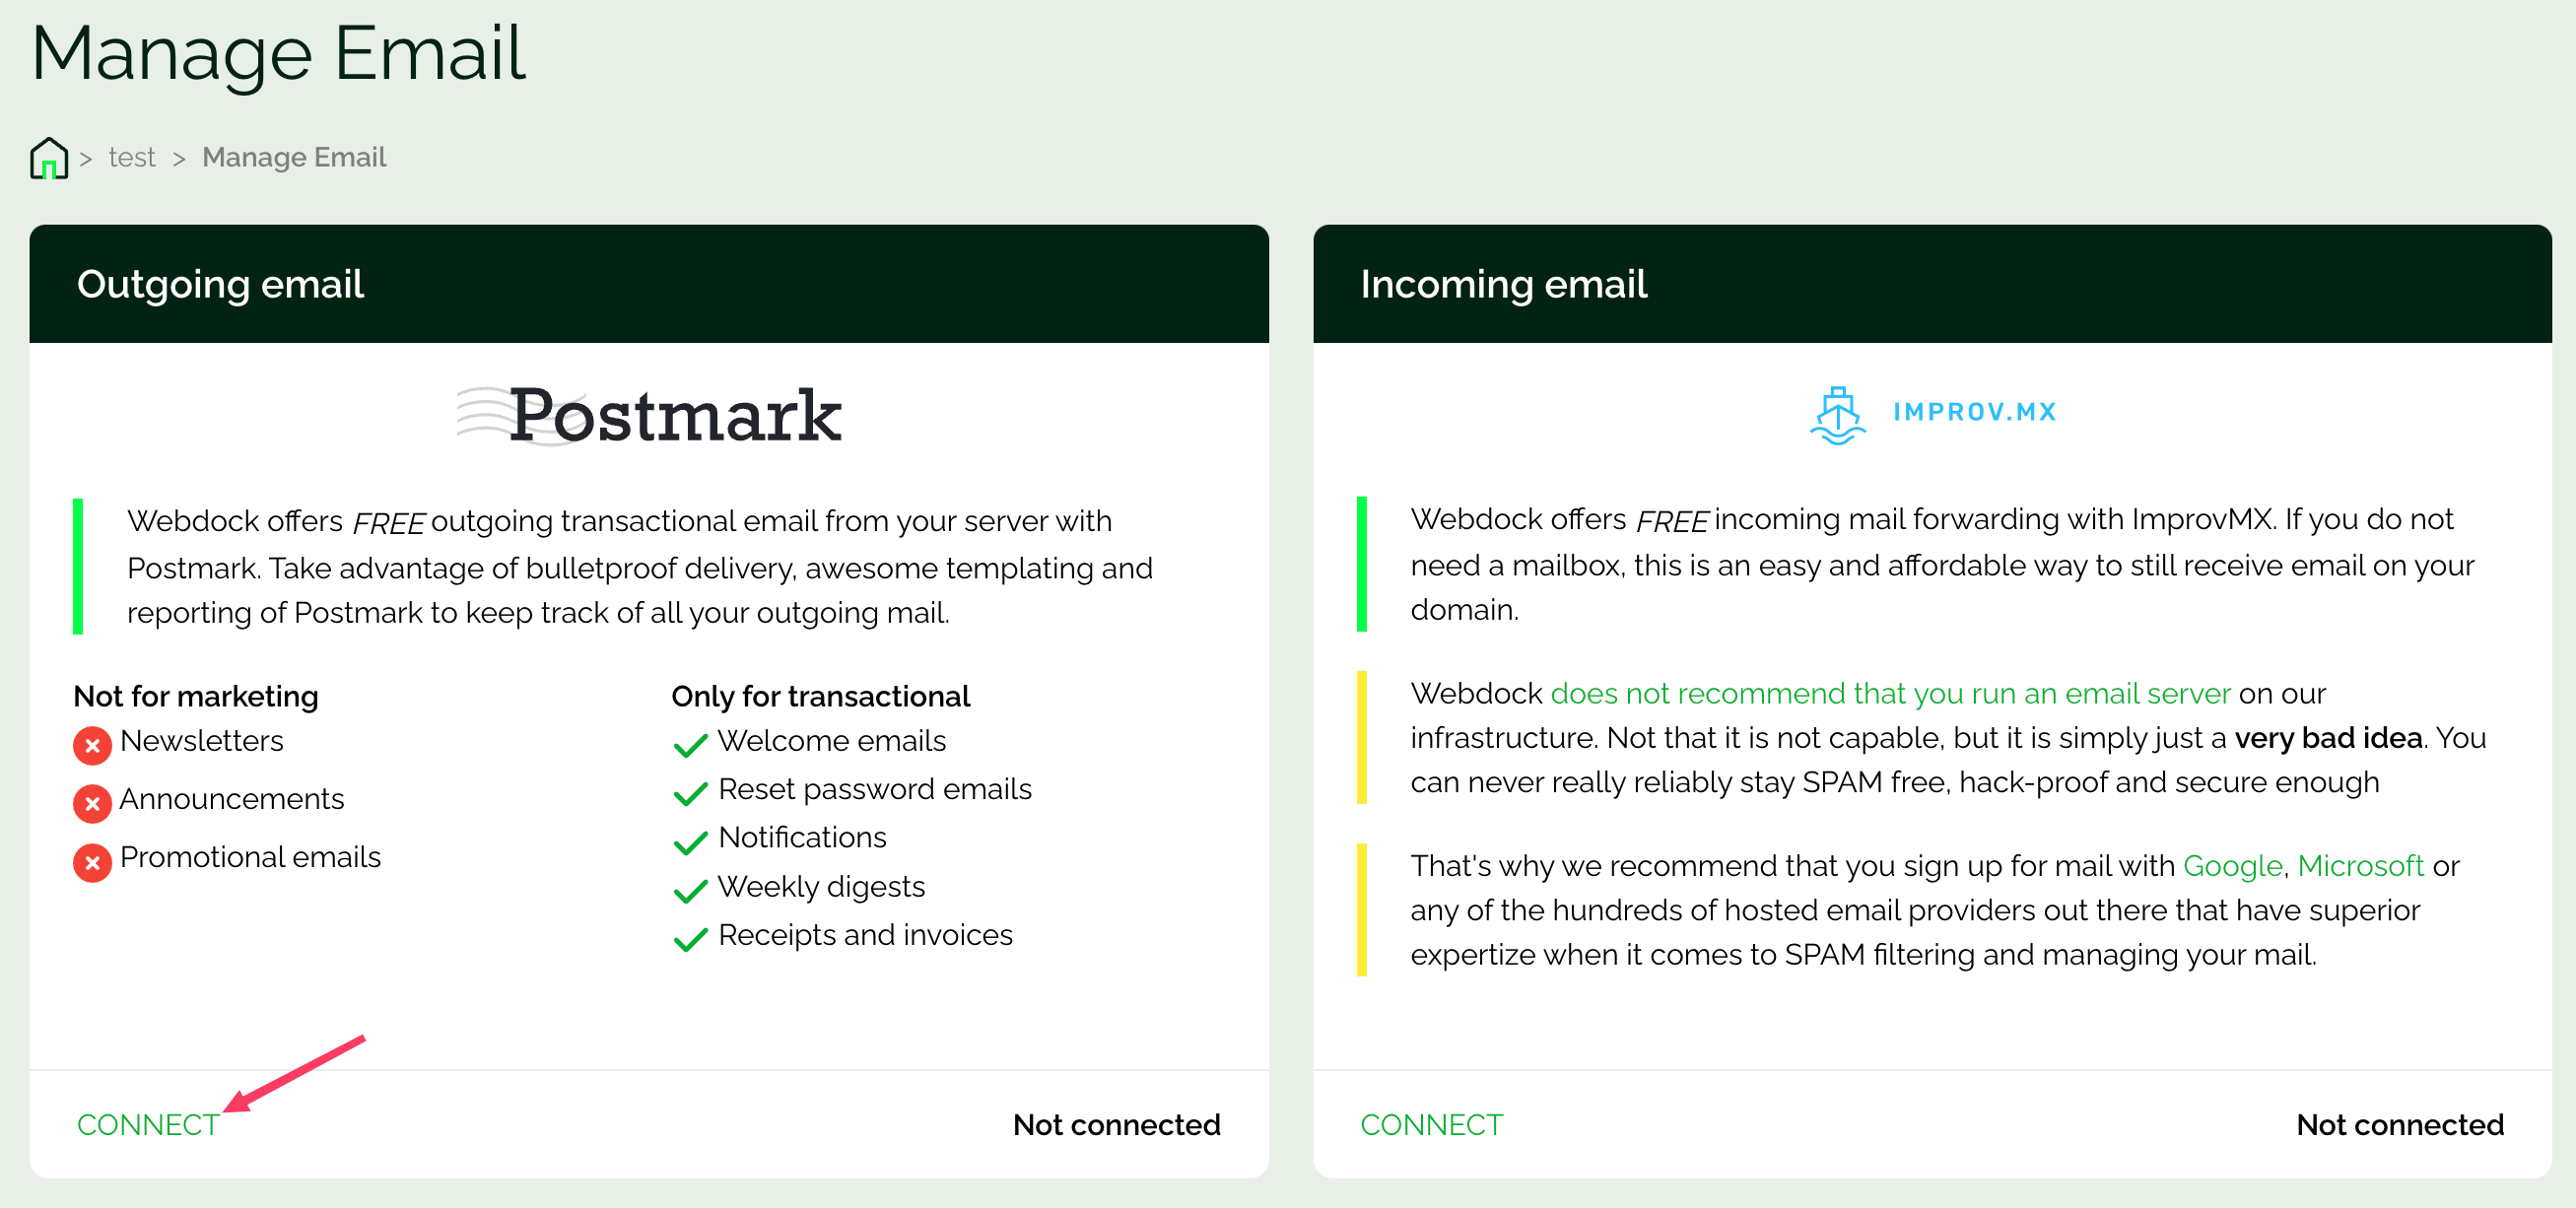
To send emails from your server, make sure to open the right ports. Many server providers keep these ports closed to prevent spam. Even if they open them for you, your emails might still be in spam or not delivered. Using a trusted email/SMTP service for sending emails is better. If you ask any seasoned professionals, they will tell you Postmark is simply the most reliable one.
Here’s some good news: with Webdock’s SSD Bit stacks (and above), you can send unlimited transactional emails through Postmark, and Webdock will pick up the bill for you. Isn’t that great?
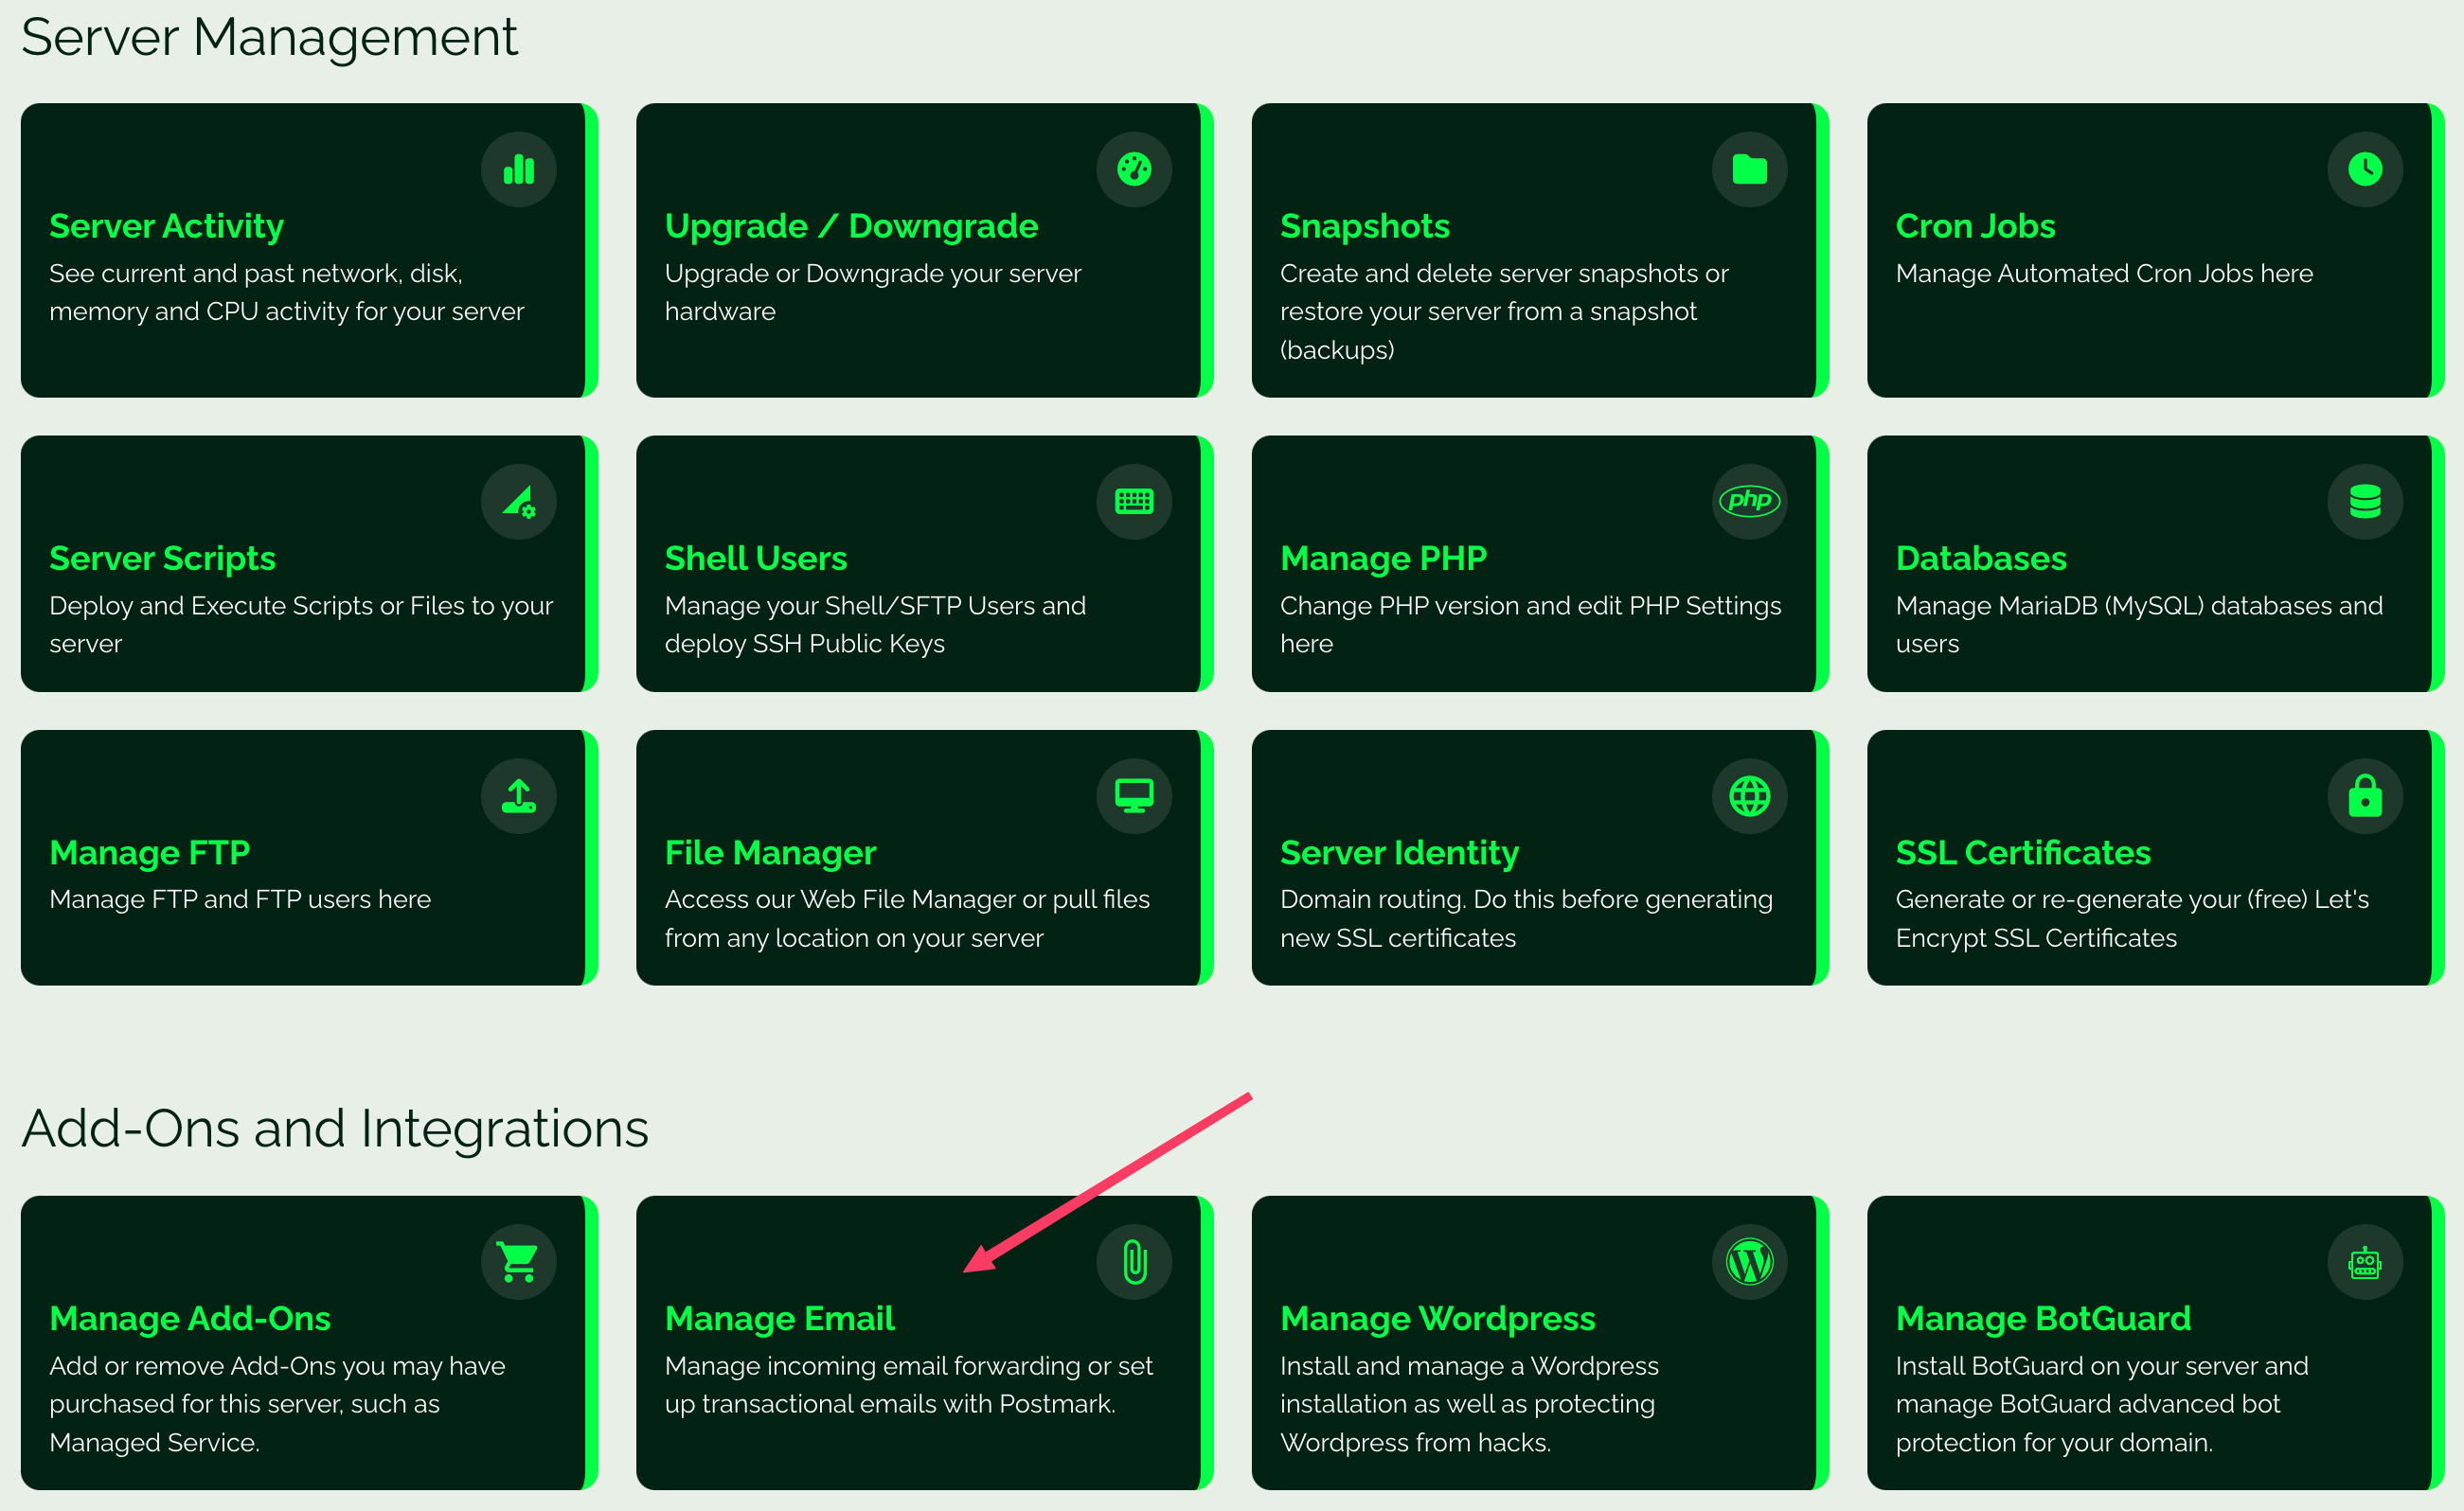
To configure your email sender, access your server’s control panel. Look for “Manage emails” and request permission from Webdock to enable this feature, ensuring responsible use.
After approval, click Connect
To start sending emails with Postmark, please add DKIM and return-path records to your DNS provider’s site to confirm your domain.
After updating, verification may take up to 15 minutes. You’ll receive an email once it’s complete.
Then, open your server’s terminal and execute the given command:
$ sudo nano config.toml
Then, add the following lines:
[email]

smtpAddr      = "smtp.example-provider.com"

smtpPort      = "567"

user          = "johndoe"

password      = "password"

from          = "[email protected]"

to            = ["[email protected]"]

cc            = ["[email protected]"]

subjectPrefix = "[Vuls Report]"
Remember to replace the values with actual data, which you can find in the manage email section of Webdock (or your SMTP provider)
And…you’ve made vulnerability checks in live systems smoother by setting up Vuls for automated scans and reports on an Ubuntu 22.04 server. Vuls will now scan for vulnerabilities and send you an email report daily at 9 AM!
Conclusion
Following this guide, I hope you learned to set up and configure Vuls, conduct vulnerability scans, analyze results, and more.
However, using just Vuls is far from being completely safe. To maintain a secure system, you must be proactive and prevent vulnerabilities before they become problematic. This involves regularly updating and patching your systems to stay ahead of potential threats. Recognizing the importance of detecting system vulnerabilities is crucial, as it allows you to address weaknesses before they are exploited.
Meet Aayush , a WordPress website designer with almost a decade of experience who crafts visually appealing websites and has a knack for writing engaging technology blogs. In his spare time, he enjoys illuminating the minds around him.
