Introduction
Distributed Denial of Service (DDoS) attacks are a significant threat to online services and servers. These attacks flood a server with so much traffic from many places that it can’t handle normal users. This can cause many problems, like downtime, lost money, and harm to a business’s reputation.
It’s tough to stop DDoS attacks entirely, but you can take steps to lessen their impact and strengthen your server. In this article, I’ll show you how to protect your server from DDoS attacks using two robust firewall tools: Uncomplicated Firewall (UFW) and Fail2ban. Let’s find out.
What are DDoS attacks?
When someone wants to cause trouble for a website or network, they might use a Distributed Denial of Service (DDoS) attack. This means they get lots of computers to flood the target with so much internet traffic that it can’t handle regular visitors anymore. These computers, often called a botnet, are controlled by the attacker and work together to send a vast amount of data simultaneously.
This data flood uses all of the target’s resources, like bandwidth and computing power, so it can’t respond to regular requests. There are different ways to do a DDoS attack. Some send a massive amount of data, some mess with the network rules, and some overload specific parts of a website.
Let’s see how we can protect servers from basic DDoS attacks using two simple, free tools.
Using UFW
UFW (Uncomplicated Firewall) is a user-friendly tool for managing firewalls on Linux systems, designed to simplify how you control network traffic. It offers an easy-to-use interface for setting up firewall rules, so you can quickly turn specific ports, services, or connections on or off.
UFW is ideal if you’re unfamiliar with complex firewall settings but still need effective and flexible network traffic management. It is a front-end to the more intricate iptables firewall, providing a more straightforward way to secure your Linux system against unauthorized network access while maintaining a comprehensive feature set. UFW is usually preinstalled on Ubuntu. However, if you’re unsure, you can always install UFW yourself:
$ sudo apt-get update && sudo apt-get install ufw -y
Once installed, let’s take a look at how we can optimize it to protect us against a basic DDoS attack. We’ll start by blocking all incoming and outgoing connections:
$ sudo ufw default deny incoming
$ sudo ufw default deny outgoing
And then specifically allow only the traffic needed for specific services:
$ sudo ufw allow in 80/tcp
$ sudo ufw allow in 443/tcp
These two ports are default ports for HTTP and HTTPS requests. You can add even more ports if you desire. We’ll also need to allow outgoing requests from these ports:
$ sudo ufw allow out 80/tcp
$ sudo ufw allow out 443/tcp
Additionally, we’ll also have to allow port 22 for SSH/FTP requests:
$ sudo ufw allow in 22/tcp
And also, port 53 to allow DNS requests:
$ sudo ufw allow out 53/udp
These steps might seem overkill, but adopting this approach significantly reduces the risk of unauthorized access or exploitation of vulnerabilities. This ensures that only crucial ports and services are open.
Once you’ve added all desired ports, enable the UFW:
$ sudo ufw enable
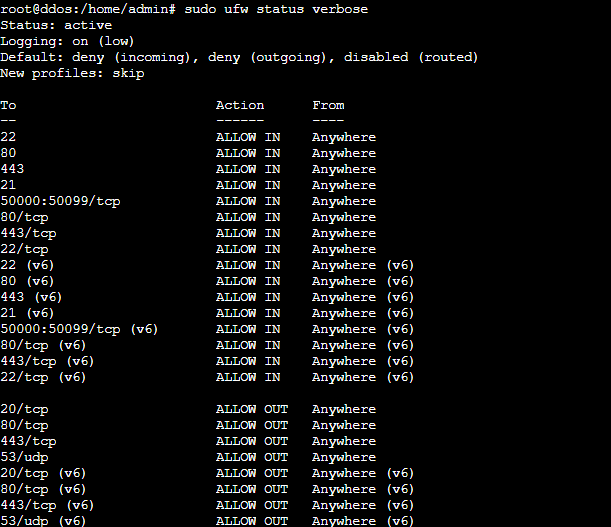
Let’s review the current status and configuration settings of the firewall just to be sure:
$ sudo ufw status verbose
However, leaving port 22 open can be an easy target for attackers, so let’s take a step further by limiting the total number of tries allowed:
$ sudo ufw limit 22/tcp
This limits six new connections within 30 seconds from a single IP address, after which the IP is blocked if it attempts further connections within that time frame. This limit is the default in iptables; you can change the limit yourself.
If you want to be extra careful, you can restrict this port only to specific IP addresses or ranges:
First, delete the existing rules:
$ sudo ufw delete allow in 22/tcp
Then, add the following rule
$ sudo ufw allow from X.X.X.0/16 to any port 22 proto tcp
Remember to replace X.X.X.0/16 with actual values (/16 represents the IP range). A word of caution, though. Most IP addresses of home/office internet users are dynamic these days, i.e., they keep changing. However, this step can be an added layer of security if you utilize an organizational VPN, where IP addresses usually remain static.
Using Fail2ban
Fail2ban is a vigilant guardian, ever watchful over your server’s activity logs, safeguarding against malicious intruders. Its primary mission is to identify repeated unsuccessful login attempts – a tell-tale sign of a brute-force attack.
Once detected, Fail2ban swiftly takes action, temporarily barring the attacker’s IP address from accessing your system, effectively quarantining the threat and preventing further intrusions. While UFW is good enough in many cases, Fail2ban brings muscle to this entire operation and brings to fruition the potential of UFW. Let’s set it up.
Fail2ban, just like UFW, is usually preinstalled on most servers. However, if you’re unsure, start by installing Fail2ban:
$ sudo apt-get update && sudo apt-get install fail2ban -y
Then, start the service:
$ sudo systemctl start fail2ban
Followed by:
$ sudo systemctl enable fail2ban
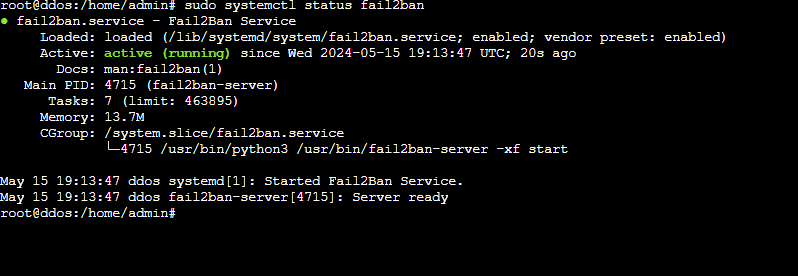
Ensure the installation as worked by running:
$ sudo systemctl status fail2ban
You should see something like this:
Before you start configuring, you need to know how Fail2ban works. This program uses three critical components in separate directories:
- Jails: You can define a set of rules to determine when and how to ban an IP address using Fail2ban. A jail consists of log files you need to watch, filters that use regex to identify failures and actions that are triggered when these failures occur. Fail2ban comes with a set of default jail configurations located in /etc/fail2ban/jail.conf
- Filters: You can use regular expressions to check service logs for signs of suspicious activities like intrusion attempts. You’ll find the necessary tools in the /etc/fail2ban/filter.d/ directory.
- Actions: You can perform various responses, such as blocking an IP address, alerting through notifications, or running specific scripts. The commands that allow you to block or unblock an IP address are stored in the /etc/fail2ban/action.d/ directory.
As mentioned, all the basic settings and configurations are in the /etc/fail2ban/jail.conf file. It’s essential to adjust and customize these parameters to fit the specific actions you want to achieve:
- bantime: Specifies the length of an IP ban, which is set at 10 minutes by default, but extending it to several hours or days is advisable.
- findtime: This specifies the time window during which Fail2Ban counts the number of failed attempts from an IP address to determine if it should be banned.
- ignoreip: List of IP addresses to exclude, including your own, to prevent accidental self-banning.
- maxretry: Maximum number of unsuccessful login attempts before being blocked.
Now that you understand how Fail2ban works let’s work on setting it up to prevent a basic DDoS attack. First, create a custom configuration file:
$ sudo nano /etc/fail2ban/jail.d/fort.conf
Here, you can add custom rules based on the above logic. For example:
[DEFAULT]

bantime = 5d

findtime = 2d

ignoreip = 127.0.0.1/8 192.168.0.0/16

maxretry = 5

banaction = ufw
banaction_allports = ufw
Here’s a strict setup that blocks any initial unauthorized access for five days. This example uses UFW to block IP addresses, not only on the attacked port but also on all ports of the server for added security. You’ll need to tweak the local IP addresses to match your network settings. Press CTRL + X and then Y to save this file and restart fail2ban:
$ sudo systemctl restart fail2ban
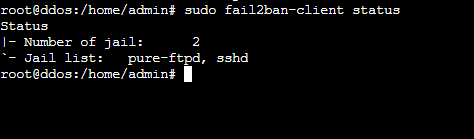
Let’s check if Fail2ban understood our config:
$ sudo fail2ban-client status
You should see something like:
This setup should be good enough for basic firewalling; however, it might be inadequate in case of a DDoS attack. Let’s configure Fail2Ban further. I will demonstrate how this can be done on an NGINX server. However, these steps can be easily modified for an Apache one.
First, we need to know the filters that already exist on the server. We can know this by running:
$ sudo ls -alt /etc/fail2ban/filter.d/nginx*
This command lists all files in the /etc/fail2ban/filter.d directory, starting with “nginx” and showing detailed information about them. Using sudo ensures that the command runs with superuser privileges, which might be necessary to access specific files. The ls -alt part specifies that the listing should be in long format (-l), sorted by modification time (-t), and include hidden files (-a). The result will display files like nginx.conf or nginx-*.conf along with their permissions, number of links, owner, group, size, and modification date.
 As you can see in the above image, we now have the locations of each filter here, and for missing files, we create them as we go. If you’re using Webdock’s default stack, these three files might already have all the necessary content. However, I’ll go over them one by one:
nginx-botsearch.conf
This filter targets requests for non-existent URLs (404 errors). These often indicate that a bot or scanner is trying to discover vulnerabilities or hidden pages.
I’ll set up a filter for this config file to look for specific patterns in the logs that indicate a bot attempting to access non-existent URLs or causing errors. Then, I’ll set up a failregex directive and define the conditions under which an IP address will be flagged while leaving the ignoreregex section empty so no specific patterns are excluded from being flagged.
Finally, I will add a date pattern directive to help match the date format in the logs. The final command should look something like:
$ sudo nano /etc/fail2ban/filter.d/nginx-botsearch.conf
And then add the following:
[INCLUDES]

# Load regexes for filtering before

botsearch-common.conf

[Definition]

failregex = ^<HOST> - S+ [] "(GET|POST|HEAD) /<block> S+" 404 .+$
            ^ [error] d+#d+: *d+ (S+ )?"S+" (failed|is not found) (2: No such file or directory), client: <HOST>, server: S*, request: "(GET|POST|HEAD) /<block> S+", .*?$

ignoreregex =

datepattern = {^LN-BEG}%%ExY(?P<_sep>[-/.])%%m(?P=_sep)%%d[T ]%%H:%%M:%%S(?:[.,]%%f)?(?:s*%%z)?
              ^[^[]*[({DATE})
              {^LN-BEG}
Save and exit the file (CTRL + X and then Y). This configuration is inspired by the Apache botsearch filter by Frantisek Sumsal. Save and exit the file.
nginx-http-auth.conf
This filter will help spot and stop repeated failed login attempts that may suggest someone is trying to break into password-protected sections by guessing passwords repeatedly. Open the file:
$ sudo nano /etc/fail2ban/filter.d/nginx-http-auth.conf
I’ll use regular expressions to match log entries that indicate authentication failures, such as incorrect passwords or non-existent users. I’ll also use failregex to capture these failure events and identify the client IP address (<HOST>) responsible.
Then an empty ignoreregex along with a datepattern directive that specifies how the date is formatted in the logs. In this case, I’ll use {^LN-BEG} is used to find entries that start with a specific date format at the beginning of a line. The content should be something like:
[Definition]

failregex = ^ [error] d+#d+: *d+ user "(?:[^"]+|.*?)":? (password mismatch|was not found in "[^"]*"), client: <HOST>, server: S*, request: "S+ S+ HTTP/d+.d+", host: "S+"(?:, referrer: "S+")?s*$

ignoreregex =

datepattern = {^LN-BEG}
This configuration is inspired by Daniel Black’s. The pattern is based on a sample file on Fail2ban’s GitHub repository, and it may be incomplete as a comprehensive investigation into all NGINX authentication failures has not been completed yet. Save and exit the file.
nginx-limit-req.conf
This filter blocks IP addresses that exceed the request limits you set in NGINX (limit_req). This helps prevent issues like an aggressive distributed denial of service (DDoS) attack or overt malicious bot activity.
However, to modify this config file, you must specify a request limit on the NGINX configuration file. Here’s how to do this on a Webdock’s default stack:
The following steps are for Webdock’s default stack but can also be adapted to any other server setup. Open the NGINX config file:
$ sudo nano /etc/nginx/nginx.conf
Then, the following directive should be placed in the HTTP block:
limit_req_zone $binary_remote_addr zone=mylimit:10m rate=1r/s;
Save the file and open it:
$ sudo nano /etc/nginx/sites-enabled/webdock
Then, use this directive, also in the server or location block where you want to apply the rate limiting:
limit_req zone=mylimit burst=5 nodelay;
In a typical configuration, both of these directives would go inside /etc/nginx/nginx.conf
The directive limit_req_zone $binary_remote_addr zone=mylimit:10m rate=1r/s limits requests using the client’s IP address. It creates a shared memory zone named “mylimit” with 10MB of storage and sets a rate limit of 1 request per second.
The limit_req zone=mylimit burst=5 nodelay directive applies this rate limit, allowing a burst of up to 5 requests before the limit takes effect. The nodelay option ensures that requests exceeding the limit are immediately rejected with a 503 status code. Of course, you can customize this as per your needs. Once pasted, save the file and reload NGINX:
$ sudo nginx -s reload
Once you’ve done the above, you must add some directives to the said .conf file. Open the file:
$ sudo nano /etc/fail2ban/filter.d/nginx-limit-req.conf
I’ll first set up a filter to detect logs where NGINX is limiting requests due to rate limiting. Then, the failregex pattern to match log entries indicating request limiting for zones defined in ngx_limit_req_zones, capturing the client’s IP as <HOST>.
I’ll also add the ignoreregex and datepattern as additional parameters for refining the log-matching criteria. The content should look something like:
[Definition]

ngx_limit_req_zones = [^"]+

failregex = ^s*[[a-z]+] d+#d+: *d+ limiting requests, excess: [d.]+ by zone "(?:%(ngx_limit_req_zones)s)", client: <HOST>,

ignoreregex =

datepattern = {^LN-BEG}
This config is inspired by Serg G. Brester’s (sebres) setup. Save and exit the file.
nginx-sslerror.conf
This filter helps you avoid SSL handshake failures caused by attackers who attempt to establish an SSL/TLS connection with incorrect or harmful parameters. Since this file isn’t available on my server, I’ll go ahead and create a new file here:
$ sudo nano /etc/fail2ban/filter.d/nginx-sslerror.conf
First, I’ll define a filter for detecting SSL handshake errors in NGINX logs. Then, I will set a failregex directive that sets the pattern to identify failed SSL handshakes while leaving ignoreregex empty to ensure no log entries are ignored.
I’ll also set up a datepattern directive that specifies the format of the timestamps in the log entries. This new filter will enable Fail2ban to monitor NGINX logs for SSL handshake failures and act appropriately, such as banning the offending IP addresses. This is how the final content would look like:
[Definition]

failregex = SSL_do_handshake() failed .+ while SSL handshaking, client: <HOST>, server: .+

ignoreregex =

datepattern = {^LN-BEG}%%ExY(?P<_sep>[-/.])%%m(?P=_sep)%%d[T ]%%H:%%M:%%S(?:[.,]%%f)?(?:s*%%z)?
Save and exit the file.
nginx-4xx.conf
This filter identifies requests that lead to HTTP 4xx errors, such as 404, 403, and 400. These errors often happen when someone tries to access unauthorized or non-existent resources, which can indicate malicious probing. This file also doesn’t exist, so I’ll create a new one:
$ sudo nano /etc/fail2ban/filter.d/nginx-4xx.conf
Here, I will define a pattern for detecting failed HTTP requests, specifically those that result in 404, 444, 403, or 400 status codes. Then, I’ll add a failregex line that specifies the regular expression pattern to match these failed requests, capturing the host IP address and the type of HTTP request (GET or POST).
I shall also add an ignoreregex line that specifies patterns to ignore, such as requests for robots.txt, favicon.ico, and image files with extensions like jpg and png.
Essentially, this filter will help Fail2ban identify and potentially block IP addresses that frequently cause certain types of HTTP errors on your NGINX server while ignoring benign requests for common files. The final content should look something like:
[Definition]

failregex = ^<HOST>.*"(GET|POST).*" (404|444|403|400) .*$

ignoreregex = .*(robots.txt|favicon.ico|jpg|png)
Save and exit the file.
nginx-forbidden.conf
This filter blocks attempts to reach restricted directories, helping to prevent directory scans that seek out hidden files or folders on your server. Create a new file/edit existing:
$ sudo nano /etc/fail2ban/filter.d/nginx-forbidden.conf
I will add a definition section that specifies the rules for identifying log entries that indicate a “directory index of [directory] is forbidden” message from NGINX.
Then, a failregex line will match the log line containing specific notifications with a placeholder <HOST> that Fail2Ban will replace with the actual client’s IP address. As usual, I’ll also add an empty ignoreregex line. The content should look something like:
[Definition]

failregex = directory index of .* is forbidden, client: <HOST>, server: .*

ignoreregex =
Save and exit the file. Now, we must configure the jail. Start by opening the file:
$ sudo nano /etc/fail2ban/jail.d/fort.conf
And add the following:
[sshd]

enabled = true


[nginx-botsearch]

enabled = true

port     = http,https

filter   = nginx-botsearch

logpath  = %(nginx_access_log)s


[nginx-http-auth]

enabled = true

port     = http,https

filter   = nginx-http-auth

logpath  = %(nginx_error_log)s


[nginx-sslerror]

enabled = true

port    = http,https

filter  = nginx-sslerror

logpath = %(nginx_error_log)s


[nginx-4xx]

enabled = true

port     = http,https

filter   = nginx-4xx

logpath  = %(nginx_error_log)s


[nginx-forbidden]

enabled = true

port    = http,https

filter  = nginx-forbidden

logpath = %(nginx_error_log)s


[ufw]

enabled = true

filter  = ufw

logpath = /var/log/ufw.log
Save and close the file (CTRL + X followed by Y) and restart Fail2ban:
$ sudo systemctl restart fail2ban
Let’s verify if the jails are applied:
$ sudo fail2ban-client status
And you should see something like:

Checking Logs
To understand Fail2ban’s security measures, it helps to look at the list of banned IP addresses. While there are many ways to do so, I like to list all the jails managed by Fail2ban and remove unnecessary text. Then, for each jail identified, print the name of the jail.
Following that, check the status of each jail and look specifically for lines containing ‘Banned IP,’ which indicates IP addresses that that particular jail has banned. This can be achieved through a simple concoction of the commands:
for jail in $(sudo fail2ban-client status | grep 'Jail list:' | sed 's/.*://;s/,//g'); do

  echo "Jail: $jail";

  sudo fail2ban-client status $jail | grep 'Banned IP';

done
Conclusion
In conclusion, by wielding the combined might of UFW and Fail2ban, you’ve constructed a formidable shield against DDoS attacks. UFW’s ease of use allows for swift deployment, while Fail2ban grants granular control for advanced defense.
The setup in this guide can help you reduce DDoS attacks, but it’s not a guaranteed solution. DDoS attacks can be quite complex, particularly when the attackers have significant resources at their disposal. However, this setup can definitely help you mitigate the effect.
Remember, vigilance is vital. Regularly monitor your server’s logs and adapt your firewall rules as needed. With this knowledge and proactive measures, your server will stand firm against malicious traffic, ensuring continued service and a secured digital environment.
Meet Aayush , a WordPress website designer with almost a decade of experience who crafts visually appealing websites and has a knack for writing engaging technology blogs. In his spare time, he enjoys illuminating the minds around him.
