Introduction
Often, migration to a robust host is stalled for apprehensions of losing your site or just because of how complicated migrating a WordPress website is. And not to mention downtime. If your website is even mildly popular, you can’t afford downtimes for even a minute.
But, if approached correctly, this straightforward guide can make migrating your WordPress website to a better hosting alternative like Webdock a breeze without costing you hefty charges that often come with hiring migration experts or without ever losing uptime.
Before we start, I would like to say that this migrating method is best suited for regular websites that don’t receive much user-generated content or active e-commerce sites that receive orders several times an hour. If your website belongs to any such categories, I have discussed how you can possibly make it work for you in the third step.
Now that’s out of the way, let’s get moving!
Prerequisites
- Access to your WordPress dashboard
- UpdraftPlus (Free or Pro, either works well)
- A Webdock account
- A Remote Store service like Google Drive (optional)
- Access to an administrator account to edit your computer’s host files.
- Access to your DNS provider
Step 1: Installing and setting up UpdraftPlus
Go to your WordPress website’s dashboard, hover over “Plugins”, and click on Add New.
Search for “UpdraftPlus” and click on the Install now button for UpdraftPlus WordPress Backup Plugin. Once installed, activate it.
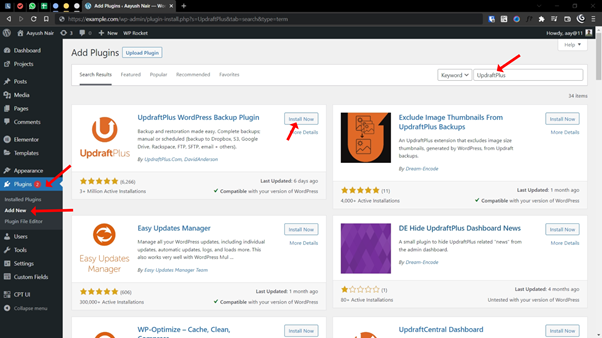
You may follow through with the tour or dismiss it if you don’t plan to use this plugin in the future or if it isn’t relevant to you.
Once installation is complete, go to UpdraftPlus settings (can be found under Settings, UpdraftPlus, Settings), scroll down to “Choose your remote storage”, and select the remote storage of your choice.
For this tutorial, I will choose Google Drive as it is the easiest among all others to set up and free for up to 15GB. You may choose a remote storage service of your choice.
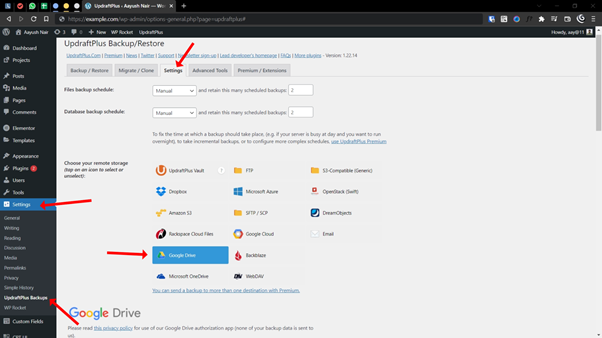
Once you have selected Google Drive, scroll down, click the save changes button and then click on the Sign In with Google button and follow the steps.
Setting up a remote storage service is optional; you can always download the files on your computer and manually upload them to your Webdock server. But doing it through a remote storage service is more convenient.
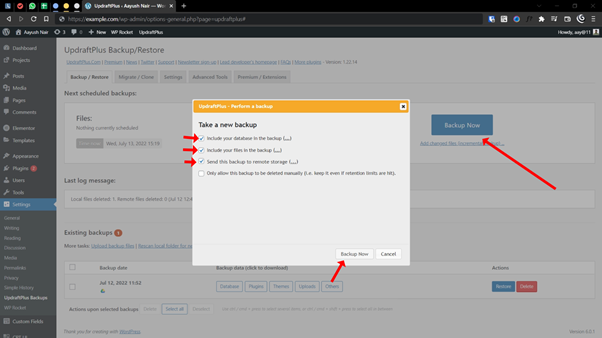
After you have set up the remote storage service, It will redirect you to the Backup/Restore tab. There, click on the big “Backup Now” button.
Make sure to include your database in the backup; include your files in your backup and send this backup to remote storage (if you are using remote storage) and then click on the Backup Now button.
Wait for the backup to finish. Meanwhile, go to your Webdock account, provision a new WordPress VPS server and install WordPress. Ensure to use the same domain as your website.
Once the backup finishes, move on to the next step.
Step 2: Adding your Webdock Server’s IP address to your computer’s host file.
This step is the most crucial part of migrating your site without downtime.
Copy your Server’s IP address from your Webdock dashboard. After that, open your computer’s host file:
- If you are on Windows: Search for Notepad, right-click and select “Run as Administrator”, click CTRL+ O and open – c:WindowsSystem32Driversetchosts.
- If you are on Mac: Open the terminal, add sudo nano /private/etc/hosts (for older Mac) or sudo nano /etc/hosts (on newer Mac)
- If you are on Linux: Open a terminal window, add sudo nano /etc/hosts to the terminal and hit enter and log in
Once you are in your hosts file, navigate to the bottom and add your Webdock server’s IP address, followed by a space and then both www and the non-www variants of your domain on separate lines. For example:
123.456.789 example.com
123.456.789 www.example.com
Save the changes on the host files and exit the editor. You may need to clean your computer’s DNS cache to speed up the process of your computer resolving your domain to the Webdock server.
To clear DNS cache:
- On Windows, Run the command prompt as an admin and run ipconfig /flushdns
- On Mac, open the terminal and run sudo dscacheutil -flushcacheb
- On Linux, open the terminal and run systemd-resolve –flush-caches
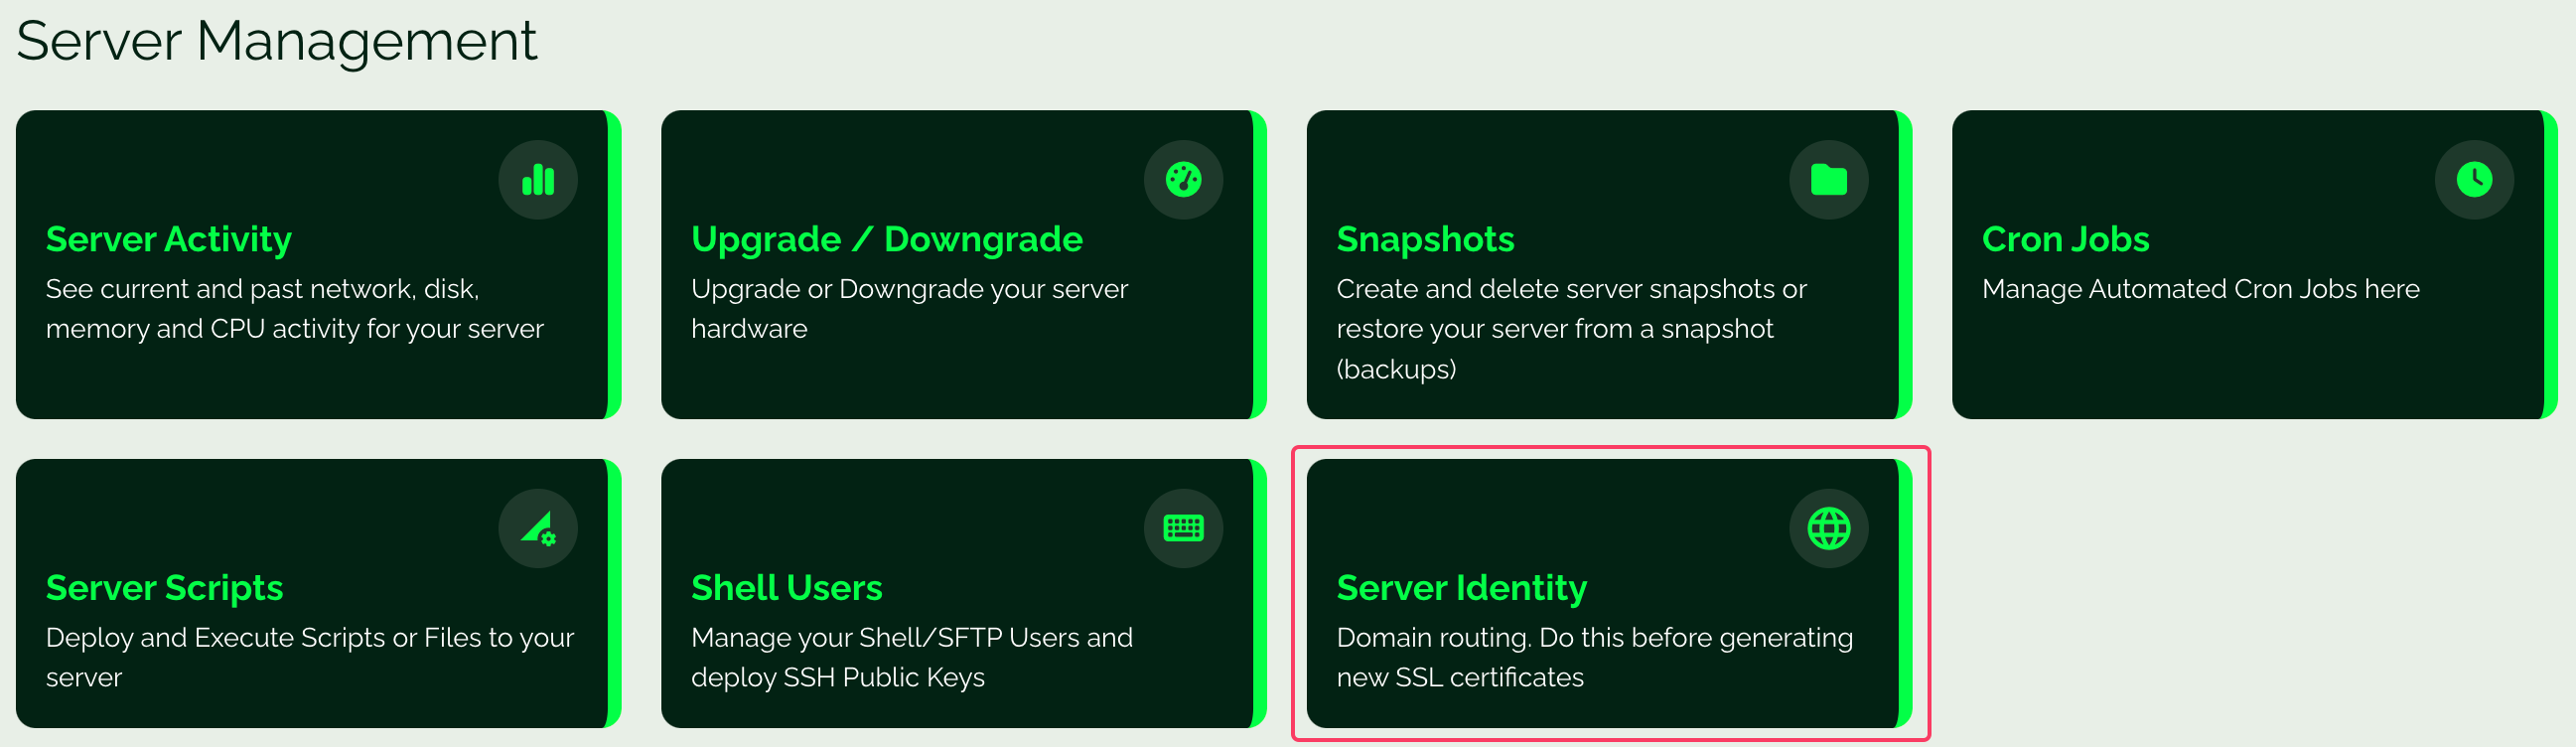
After you have added your IP to the computer’s hosts file, go to your Webdock dashboard and run the Server Identity with your domain to ensure that your Webdock server knows to respond whenever the server is tried to be accessed by your domain name. This action will also be beneficial in the next step.
Once you have verified that going to your domain redirects you to a blank WordPress website, you may proceed with the next step.
Step 3: Moving the site to Webdock
Install and set up Updraftplus as shown in Step 1 on your WordPress site on Webdock.
Once installed and set up, go to the Backup/Restore tab and scroll to the “Existing Backups” section. You may see a message saying, “You have not yet made any backups.” In such a case, click on Rescan Remote Storage button.
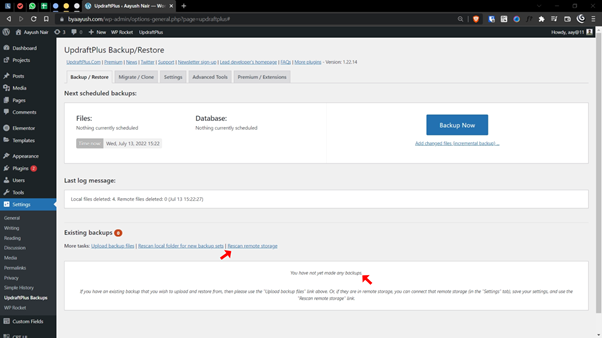
UpdrafPlus will automatically look for backups and show them as soon as it founds them.
If you are not using remote storage, you may manually upload the backup files by dragging and dropping the file into the box with “You have not yet made any backups.”
Once you see your backup made on your old host (you may verify it by looking at the backup’s date and time), instead of the “You have not yet made any backups.” message, click on the restore button.
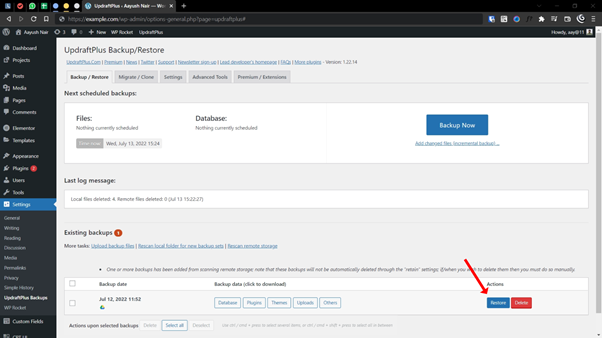
Choose everything from the “Choose the components to restore” box and click next. It will download the files as necessary. Till that happens, feel free to grab a cup of coffee.
After every file has been downloaded, click next and wait for the restoration to complete.
Verify if everything works well, and clear caches if you have any. Once verified, update your domain’s DNS to reflect the Webdock server details and remove the settings on your device’s host file.
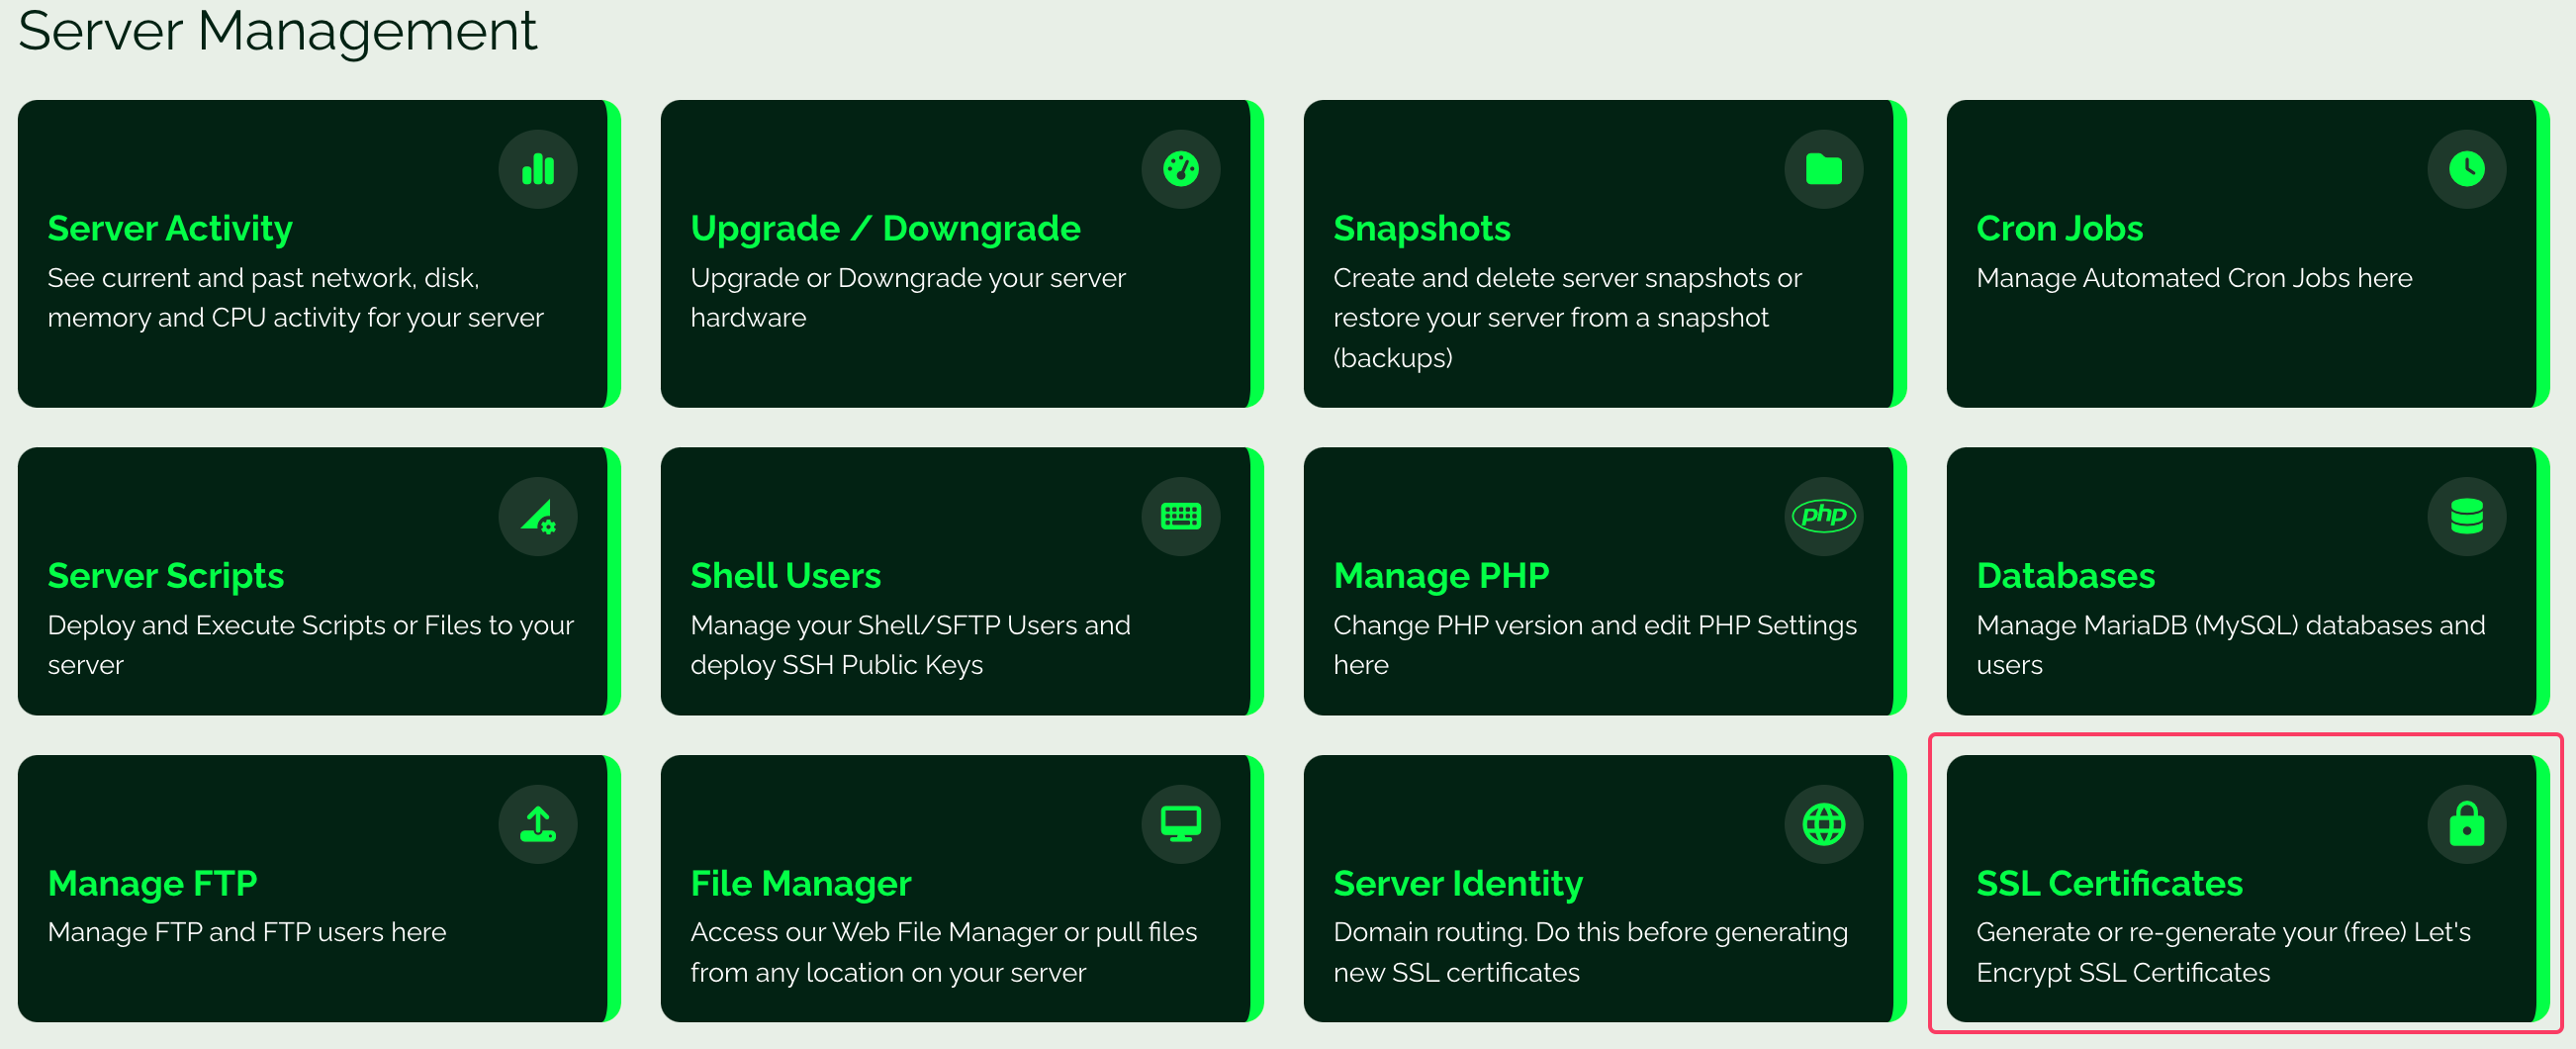
To ensure your WordPress website is secure and encrypted to the users, you may get an SSL certificate by running the SSL tool, again, by clicking on SSL certificates from the three dots on the top right corner of your Webdock dashboard.
And voila! You have moved your WordPress website to Webdock without ever actually taking the website down!
As mentioned, this method is best suited for websites that don’t frequently receive user-generated content or customer orders in an hour.
Although if your site does come under such a category, I will encourage you to migrate around the time when your traffic is usually low, and once you have moved the site, use tools like WP All Import/Export to move over new data that may have skipped during the migration. Alternatively, you can pause your live site until you move to Webdock.
Conclusion
Numerous guides would guide you with migrating your WordPress website manually. Migrating WordPress sites manually is one of the most difficult, time-consuming, and inefficient.
There are many reasons for this. So many things can go wrong. I recommend automating the migration of your WordPress website.
In this article, I demonstrated how to migrate your WordPress website to Webdock for free, without downtime, and as mentioned, it was easy.
You might as well use any backup plugin for this process. Still, I specifically used UpdraftPlus because its free version provides more features than most paid alternatives and is probably the easiest way to migrate your website.
I hope this was a helpful guide! Feel free to provide your feedback in the comments down below.
Aayush Nair has been a passionate freelance WordPress designer for the past eight years. He likes to share his knowledge to help and enrich the community in his free time.
