Introduction
In our previous article, we made an introduction to the JSON Web Token (JWT) protocol with the Laravel PHP framework. We walked you through the setup process and implement basic authentication routes for our API project.
In this tutorial we will inspect JWT itself: structure, lifecycle and security. Also, we will explore a new possibility of how to use JWT and the benefits we could exploit.
JWT Structure
In this section I used material from the official page. Here I am going to highlight only parts of direct concern for our research. Click here for more information.
In its compact form, JSON Web Tokens consist of three parts separated by dots (.), which are:
- Header
- Payload
- Signature
Therefore, a JWT typically looks like the following.
xxxxx.yyyyy.zzzzz
Where:
Header. Indicated the type of the token, which is JWT, and the signing algorithm being used, such as HMAC SHA256 or RSA.
Payload. Contains the claims. Claims are statements about an entity (typically, the user) and additional data. There are three types of claims: registered, public, and private claims (our own).
Signature. To create the signature part you have to take the encoded header, the encoded payload, a secret, the algorithm specified in the header, and sign that. Or in short: a signature GUARANTEE that the first two parts of the token (header and payload) are what they say they are.
Before we run real experiments, let's summarize all we stated above with quick test: go to your login route (which you created in PART 1 of this series), grab your access token, copy each part separately into the base64 encoded dasta field at this link, and see the results for yourself.
Experimenting with JWT
If you tested your token like I suggest, you would see that the header and payload are base64 encoded JSON objects. Which leads us to conclude that anybody can read our token and tamper with it. Like I stated before, a JWT protocol in our API app use a signature (the third part) to VALIDATE contents of the header and payload.
You can reverse engineer your payload by modifying its contents. Try to modify slightly one of the variable values, encode it back (with base64 encoding), glue token parts back together, and test it in Postman against the protected route. You will see the message: "Token is invalid!"
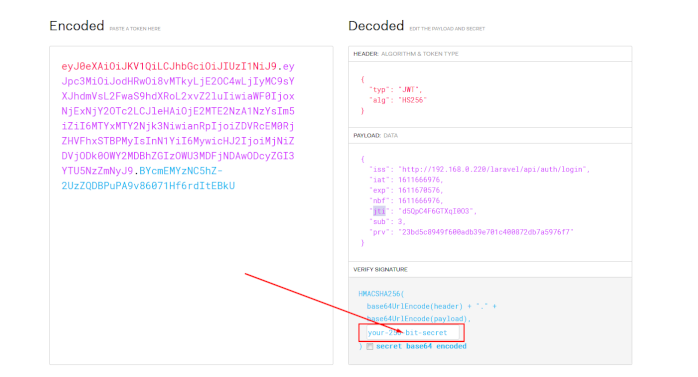
Let's start our experiment. Go to the official JWT debugger and paste your token. Here we can see more clearly the structure of our token. Let's focus on the payload contents:
iss – issuer: where token is issued (self explanatory).
iat – issued at: timestamp, when token is issued.
exp – expiry time: timestamp, token is valid until.
nbf – not before: timestamp, value between iat and exp usually equal to iat. This value represents the moment when the token becomes active. Very useful for scheduled tasks. Understand it like booking reservation for your holidays: you are booking hotel now, but it is not valid until your holiday begins.
jti: token unique identifier or token ID.
sub – subject: In our case subject refers to the user ID. So, whenever we login and a token is issued, subject value equals to the user ID from our database.
So far, everything stated above are public claims, and you can find their definition in the file config/jwt.php under "Required Claims" section.
Please note: Later on in our tutorial we will use custom claims which will be designed to be meaningful for our application workflow. For now, it is very important to know: you should try to avoid custom claim names colliding with reserved names from public domain, unless it is intended!
Now, create several users (if you haven't already) in the fashion we did in the previous article, login, with one of them and copy/paste your token in JWT debugger once more. Open the .env file, copy value of the JWT_SECRET variable and paste it in the debugger (see image below).
Next, change sub value to the ID of the existing user in your database, copy the new token from the debugger (left pane) and use it to access /api/auth/me route from Postman.
If you have done everything properly, you have just logged in as a different user, with a valid token which is NOT issued by our app at all! Although this experiment is interesting, it is also dangerous. This technique is refered to as "identity spoofing".
Security
In our journey, I will discuss about security of our application in a several occasions. For now, let see what the repercussions are of our experiments above.
- The only true protection of your tokens is your JWT_SECRET key. Although the auto generated one looks strong, always "salt it" with a few more characters on your own, anywhere in the string. This also applies to the APP_KEY from the .env file.
- Do not pass sensitive information in the payload section of the token.
- If your API application will run as a micro service with a multiple instances (proxied by Nginx rules, for example), all of them must have a same JWT_SECRET key.
- Blacklist used tokens, FOREVER.
- Track your issued tokens. This is the part of the multilayer security approach. Build a database of tokens issued by YOU and check their origin. We will touch on this in the next article.
- Define an optimal token lifecycle, not too long, nor too short.
- Create different types of the tokens. Not all of them should be used for Authorization. I will discuss these in the next section of this tutorial.
- And lastly: There is no perfectly secure token that will last forever…
Custom Claims and Token Types
In our current application setup, we use the same token for accessing protected routes and reissuing (refreshing) a new token. We are going to change that. We are going to implement an access token (for accessing resources) and a seperate refresh token (used only for reissuing access tokens).
With this change we are going to achieve several things. First, we will introduce different token types. Second is security: while an access token is short lived and can be used many times a refresh token is long lived and can be used only once! Worth mentioning, many Javascript frameworks already utilize some mechanisms for token refresh.
Now, let's start making changes to our project. Open app/Http/Controllers/AuthController.php and make these changes:
public function login()
{
    $credentials = request(['email', 'password']);

    if (!$access_token = auth()->claims(['xtype' => 'auth'])->attempt($credentials)) {
        return response()->json(['error' => 'Unauthorized'], 401);
    }

    return $this->respondWithToken($access_token);
}
Here, we changed the variable name for semantic purposes. More important is the claim we made to the newly issued token. To avoid collision with the possible public claim names I used X in front of the variable (similar to the custom headers naming convention). So, I added xtype = 'auth' to the payload of the token.
protected function respondWithToken($access_token)
{
    return response()->json([
        'access_token' => $access_token,
        'token_type' => 'bearer',
        'access_expires_in' => auth()->factory()->getTTL() * 60,
        'refresh_token' => auth()
            ->claims([
                'xtype' => 'refresh',
                'xpair' => auth()->payload()->get('jti')
            ])
            ->setTTL(auth()->factory()->getTTL() * 3)
            ->tokenById(auth()->user()->id),
        'refresh_expires_in' => auth()->factory()->getTTL() * 60
    ]);
}
Explanation:
We enriched respondWithToken function with the new token that we are going to use for reissuing new tokens. Main change is in the 'refresh_token' variable we are going to return back. We also added a new claim to the payload of the new token. While xtype is self explanatory, let's pay attention to the xpair. Xpair value is the 'jti' value from the previous token or access token! Just as a reminder: JTI represents a unique token identifier, or ID of the token in the JWT protocol. So this is how we will track (in our database which we will implement in the next article) which access token for whom the refresh token is issued for, or it's pair – xpair.
The rest of the expression basically means this: extend the TTL three times from the default (refresh tokens must live longer), and bind it to the auth user id.
Now you can test auth/login and auth/me route to see results. In the JWT debugger check the contents of the payload.
Middleware
Here we are going to build logic for distinguishing different token types. We'll use xtype claim for that. Create two more files in the /app/Http/Middleware directory:
JwtXAuth.php
namespace AppHttpMiddleware;

use Closure;
use JWTAuth;
use Exception;
use TymonJWTAuthHttpMiddlewareBaseMiddleware;


class JwtXAuth extends BaseMiddleware
{


	/**
	 * Handle an incoming request.
	 *
	 * @param  IlluminateHttpRequest  $request
	 * @param  Closure  $next
	 * @return mixed
	 */
	public function handle($request, Closure $next)
	{
		$payload = JWTAuth::payload();

		if ( $payload->get('xtype') != 'auth' ){
			return response()->json(['status' => 'Token Misused'], 406);
		}

        return $next($request);
	}
}
…and JwtXRefresh.php with the contents:
namespace AppHttpMiddleware;


use Closure;
use JWTAuth;
use Exception;
use TymonJWTAuthHttpMiddlewareBaseMiddleware;


class JwtXRefresh extends BaseMiddleware
{


	/**
	 * Handle an incoming request.
	 *
	 * @param  IlluminateHttpRequest  $request
	 * @param  Closure  $next
	 * @return mixed
	 */
	public function handle($request, Closure $next)
	{
		$payload = JWTAuth::payload();

		if ( $payload->get('xtype') != 'refresh' ){
			return response()->json(['status' => 'Token Misused'], 406);
		}

        return $next($request);
	}
}
Basically, both middleware files are doing the same: checking payload for the xtype value.
Register them in the /app/Http/Kernel.php by adding these two lines:
protected $routeMiddleware = [
    // ...
    'jwt.xauth' => AppHttpMiddlewareJwtXAuth::class, // WE ADDED THIS!
    'jwt.xrefresh' => AppHttpMiddlewareJwtXRefresh::class, // WE ADDED THIS!
];
All that is left is to update AuthController.php once more. First, let's protect our routes with new middleware:
public function __construct()
{
    $this->middleware('jwt.verify', ['except' => ['login', 'register']]);
    $this->middleware('jwt.xauth', ['except' => ['login', 'register', 'refresh']]);
    $this->middleware('jwt.xrefresh', ['only' => ['refresh']]);
}
…and a refresh function:
public function refresh()
{
    $access_token = auth()->claims(['xtype' => 'auth'])->refresh(true, true);
    auth()->setToken($access_token);

    return $this->respondWithToken($access_token);
}
Explanation:
In our middleware files, all we have done was checking payload for correct type. We do not need to check the validity of the token, since they are already checked in the jwt.verify middleware file. The only requirement is they must execute AFTER jwt.verify. That behavior is obvious from the construct() function with a subject routes which applies to the mentioned middlewares. In this manner we can inspect and create all kinds of middleware regarding JWT payload. Handy.
Our refresh() function does the same thing as before, but with one important difference. Here,
$access_token = auth()->claims(['xtype' => 'auth'])->refresh(true,true);
…nothing unusual and it is documented here. What we have done is simple and can be summarized as: reset claims and blacklist old token and reissue a new one with new claims. What we got is a fully functional new token, but funny business starts if you try to extract the payload from this new token:
$payload = auth()->payload();
Instead of the payload you will get BlackList Exception! What needs to be done is to assign the new token explicitly to the Auth Guard
auth()->setToken($access_token);
For some reason old tokens continue to persist inside AuthGuard. Although our token is blacklisted the lifecycle ended and a VALID new token has been reissued (refreshed) it will persist. There is no good reason for an old token to reside anywhere anymore except on the blacklist… Maybe this behaviour is intended, or maybe this is the workaround for this and this issue, I don't know. Official documentation does not state anything explicitly concerning this behavior.
Ok, now we can proceed with the respondWithToken() function where we can safely use payload() method to issue new refresh token.
After all our edits your AuthController.php should look like this:
namespace AppHttpControllers;


use IlluminateHttpRequest;
use IlluminateSupportFacadesValidator;
use IlluminateSupportFacadesHash;


use AppModelsUser;


use JWTAuth;


class AuthController extends Controller
{
    /**
     * Create a new AuthController instance.
     *
     * @return void
     */
    public function __construct()
    {
        $this->middleware('jwt.verify', ['except' => ['login', 'register']]);
		$this->middleware('jwt.xauth', ['except' => ['login', 'register', 'refresh']]);
		$this->middleware('jwt.xrefresh', ['only' => ['refresh']]);
    }


    /**
     * Get a JWT via given credentials.
     *
     * @return IlluminateHttpJsonResponse
     */
    public function login()
    {
        $credentials = request(['email', 'password']);


        if (! $access_token = auth()->claims(['xtype' => 'auth'])->attempt($credentials)) {
            return response()->json(['error' => 'Unauthorized'], 401);
        }

        return $this->respondWithToken($access_token);
    }


    /**
     * Get the authenticated User.
     *
     * @return IlluminateHttpJsonResponse
     */
    public function me()
    {
        return response()->json(auth()->user());
    }


    /**
     * Log the user out (Invalidate the token).
     *
     * @return IlluminateHttpJsonResponse
     */
    public function logout()
    {
        auth()->logout();


        return response()->json(['message' => 'Successfully logged out']);
    }


    /**
     * Refresh a token.
     *
     * @return IlluminateHttpJsonResponse
     */
    public function refresh()
    {
		$access_token = auth()->claims(['xtype' => 'auth'])->refresh(true,true);
		auth()->setToken($access_token);


		return $this->respondWithToken($access_token);

    }


    /**
     * Get the token array structure.
     *
     * @param  string $token
     *
     * @return IlluminateHttpJsonResponse
     */
    protected function respondWithToken($access_token)
    {
        return response()->json([
            'access_token' => $access_token,
            'token_type' => 'bearer',
            'access_expires_in' => auth()->factory()->getTTL() * 60,
            'refresh_token' => auth()
				->claims([
					'xtype' => 'refresh',
					'xpair' => auth()->payload()->get('jti')
					])
				->setTTL(auth()->factory()->getTTL() * 3)
				->tokenById(auth()->user()->id),
			'refresh_expires_in' => auth()->factory()->getTTL() * 60
        ]);
    }

	/**
     * Register new user and issue login token.
     *
     * @param  string $name, $email, $password, password_confirmation
     *
     * @return IlluminateHttpJsonResponse
     */
    public function register(Request $request){

		$validator = Validator::make($request->all(), [
        	'name' => 'required|string|max:255',
            'email' => 'required|string|email|max:255|unique:users',
            'password' => 'required|string|min:6|confirmed',
        ]);

		if($validator->fails()){
        	return response()->json([
            	'status' => 'error',
            	'success' => false,
                'error' =>
                $validator->errors()->toArray()
            ], 400);
        }

		$user = User::create([
            'name' => $request->input('name'),
            'email' => $request->input('email'),
            'password' => Hash::make($request->input('password')),
        ]);

		return response()->json([
			'message' => 'User created.',
            'user' => $user
        ]);

    }


}
Conclusion
Let's make quick recap of what we discuss in this article:
- JWT structure
- payload, public/custom claims, security
- different token types guarded by middleware
- implementation of all above
You may notice, but we didn't blacklisted access tokens at all, or refresh tokens at logout(). In the next article we will start to track our tokens and solve that issue.
Series Author: Aleksandar Milivojevic is a PHP programmer for over 10 years (Laravel and WordPress). Writing articles in brief pauses between projects, to help out the community and popularize PHP in general.
<< Previous Article in this series: Build an API in Laravel with JSON Web Tokens (JWT) (Part 1)
Next Article in this Series: Database and tracking JSON Web Tokens (JWT) (Part 3) >>
