Introduction
In this tutorial, we will explain the basic use of Redis with Laravel PHP framework. So what is Redis? The most common explanation is: memory based key-value pair database. Although this definition does not help us much, if we put it into context with Laravel we can start to see benefits. Since Redis storing its data in memory, speed is the first advantage we could see. Accessing data through RAM memory is the fastest way of delivering a resource to the vast majority of services, and in turn this would provide a better experience to end-users.
Redis will help us to cut I/O hard disk operations, relieve our database from overloading of complex queries during heavy traffic, while the only negative side of usage is a little more PHP coding and typically requires more server RAM – which doesn’t have to be the case if the code is implemented correctly.
Our main goal is to make an introduction for possible interactions between Redis and your Laravel application, and give you an idea of more complex and advanced usage. So, take this article as a “starting point”, not as “only valid” or “must use”.
List of things we are going to do:
- Upgrade Redis to version 5
- Install Redis Commander as our GUI for Redis database
- Install PHP extension necessary for Redis
- Laravel examples
Requirements
Before you start, please make sure you fulfill the prerequisites for this tutorial.
- A functional web server – these instructions are based on The Perfect Server – Ubuntu LEMP 7.4.
- Basic knowledge of PHP and Laravel framework
- Ubuntu user with root privileges (sudoer)
Redis 5 – upgrade if needed
If you followed the instructions from the prerequisites section, you already have Redis installed alongside with other useful tools.
Let’s check Redis server version:
$ redis-server -v
In my case result was:
Redis server v=4.0.9 sha=00000000:0 malloc=jemalloc-3.6.0 bits=64 build=9435c3c2879311f3
If the Webdock stacks have been upgraded in the meantime and your version numer is already 5+ – great, you can safely skip this section!
Next step is to upgrade Redis server to version 5. First we need to shut down Redis and safely shut down data storage
$ redis-cli
 127.0.0.1:6379> SHUTDOWN SAVE
 not connected> quit
$
Now, let’s stop Redis instance
$ sudo systemctl stop redis
Upgrade Redis to version 5 – check the current releases to find the exact URL for the release you want to download at http://download.redis.io/releases/
$ sudo apt-get install tcl wget
$ wget http://download.redis.io/releases/redis-5.0.5.tar.gz
$ tar xzf redis-5.0.5.tar.gz
$ cd redis-5.0.5
~/redis-5.0.5$ sudo make distclean
~/redis-5.0.5$ sudo make
~/redis-5.0.5$ sudo make test
.....o/ All tests passed without errors!
~/redis-5.0.5$ sudo make install
~/redis-5.0.5$ cd utils
~/redis-5.0.5/utils$ sudo ./install_server.sh
Selected config:
Port : 6379
Config file : /etc/redis/6379.conf
Log file : /var/log/redis_6379.log
Data dir : /var/lib/redis/6379
Executable : /usr/local/bin/redis-server
Cli Executable : /usr/local/bin/redis-cli
Is this ok? Then press ENTER to go on or Ctrl-C to abort.
Copied /tmp/6379.conf => /etc/init.d/redis_6379
Installing service...
Success!
Starting Redis server...
Installation successful!
Now it is safe to remove old redis.conf file, or alternatively you can copy its contents into a new config file 6379.conf in the same folder.
$ sudo rm /etc/redis/redis.conf
Now we should reboot our server for all changes to take full effect, or alternatively we can start our new process with systemctl start redis_6379 command.
Ok, it seems all good. All is left to test it with ping – pong.
$ redis-server -v
Redis server v=5.0.5 sha=00000000:0 malloc=jemalloc-5.1.0 bits=64 build=63aa0a9eddfbe2e6
$ redis-cli
127.0.0.1:6379> ping
PONG
127.0.0.1:6379> quit
$ _
At this point we have fully functional Redis 5 server.
Redis Commander
Next stop is Redis Commander, a handy tool and “window” to our Redis database. Redis-Commander is a node.js web application used to view, edit, and manage a Redis Database.
Redis Commander is NOT a necessary tool for our Laravel application, nor for running Redis at all. However, we strongly recommend it at least during the development phase of your project.
Install Redis Commander with:
$ npm install -g redis-commander
$ redis-commander &
The ampersand at the end of the run command (&) puts Redis Commander in the background.
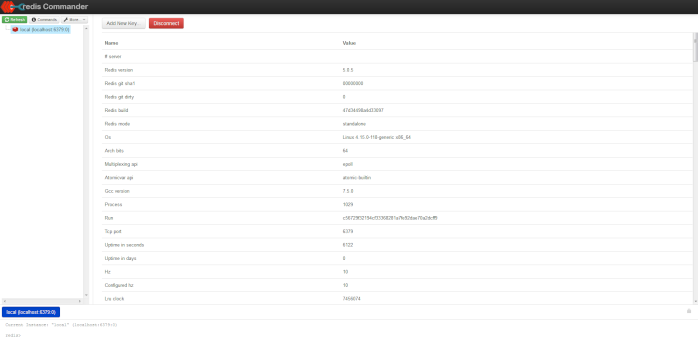
Installing Redis Commander is quite straightforward task. All you have to do, is to visit your IP address in browser with :8081 port ( eg. http://x.x.x.x:8081/ ). You should see a screen similar to this:
PhpRedis extension installation
According to Laravel documentation, we have two options here: predis package installable via composer, or PhpRedis as a PHP extension. Also worth mentioning, the second option is recommended, faster and already set as default in Laravel framework.
In order to make or PHP code to communicate with Redis server, we have to install a PHP extension for it. First, let’s check if it is already there:
$ php -m
If you see redis in the list above, you are already good to go. In another case, which is more likely, proceed with installation:
$ sudo apt-get install -y php-redis
You can check again modules with $ php -m You may need to restart php-fpm with:
$ sudo systemctl restart php7.4-fpm
Interaction with Laravel
First, we need to change the alias for Redis. Open file /config/app.php In aliases section, change Redis to RedisDb
'aliases' => [
  .
  .
  .
  'RedisDb' => IlluminateSupportFacadesRedis::class, // Original line 'Redis' => ...
  .
Reason why we did this is explained in Laravel documentation; to avoid possible conflicts and class naming collisions with the PHP Redis extension itself.
Now it is time to test our Redis in Laravel application. Open your /routes/web.php file and add the code below:
Route::get('test-redis', function () {
  RedisDb::set('name', 'John Doe');
  return 'Redis set command';
});
Now, in your browser, visit the URL of your Laravel app and append it with /test-redis route. If everything went fine you should see “Redis set command” message on your screen. To inspect what we have done, now is a good time to check our Redis Commander. Click refresh and you should see an image like this:
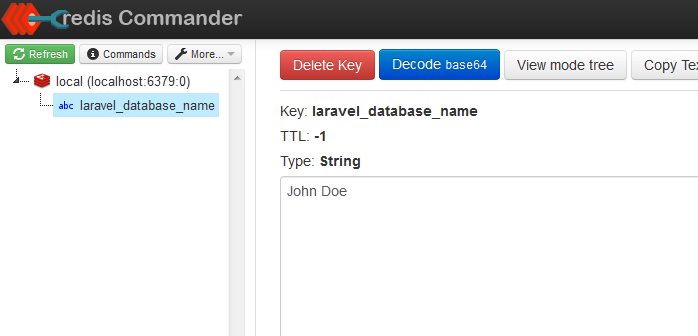
First of all we see Key is named as laravel_database_name. Well, only ‘name’ part we actually set in our code. Reason behind this behaviour lies in the file /config/database.php. Under “prefix” value, you can actually see how our variable name (Key) is built.
We didn’t mention database.php file before only to show you how Redis work “out of the box” inside the Laravel framework with default settings. You can safely change these settings on your own or leave it untouched. As far as we are concerned, we access this variable by calling Key as we set it “name”. So, let’s try. Append web.php with another route code:
Route::get('read-redis', function () {
  return 'Name = '.RedisDb::get('name');
});
Visit in browser newly created route /read-redis and you should see the response: Name = John Doe
Now, let’s experiment. Go to Redis Commander, and change the value of our variable to something else (do not forget to hit save). Visiting same route again should reflect the changes.
Good, now let look in Redis Commander again. We will see TTL is set to -1. TTL is short from Time To Live, and its value (-1) indicates that it’s not set. So let’s go back and edit our first route:
Route::get('test-redis', function () {
  RedisDb::setex('name', 3600, 'John Doe');
  return 'Redis set command with expire of 1h';
});
Here,
- We used the setex function to set the expiry time of our variable
- Second parameter is seconds to expire, where 1h = 3600secs = or 60 * 60 * 1 for easier reading
- From the Redis Commander we could read actual time left. After TTL hits 0, our variable will be deleted from the Redis and free up memory
There are very few cases where you actually would not use an expiry method at the moment of creation of your key/value pairs. It is a good practice and it prevents server memory to be bloated with the “junk” data, so Redis always holds info you actually need.
Conclusion & Next Steps
Hopefully you did not encounter any major issues and Redis is happily running on your server and connected to your Laravel application.
Now that you have Redis up and running with Laravel, you should check out our companion article Laravel and Redis 5 – A Functional Example in order to learn more about how to use Redis in real-life situations.
Series Author: Aleksandar Milivojevic is a PHP programmer for over 10 years (Laravel and WordPress). Writing articles in brief pauses between projects, to help out the community and popularize PHP in general.
