Introduction
This tutorial will show you how to build an API application based on the Laravel PHP framework, which utilizes JSON Web Tokens (JWT) for protecting routes, issuing grants and claims over API resources.
Before you start you should get familiarized with JWT (what it is, how it works, strengths and weaknesses), so I strongly suggest you to visit these internet resources for more info:
https://jwt-auth.readthedocs.io/en/develop/
https://auth0.com/docs/api/management/v2
https://github.com/tymondesigns/jwt-auth
Possible consumers of our API application are other web apps which can include: JS framework based apps, mobile apps, third party servers or even our own Laravel installation. Basically everything with an IP address!
This is the right moment for us to mention Laravel Passport. As we know, Passport is an official Laravel package that implements Oauth2 and JWT, and is well documented. On the other hand, we are going to use tymondesigns/jwt-auth which is a PHP Laravel implementation of the JWT protocol.
The JWT (in this article, JWT refers exclusively to tymondesigns/jwt-auth package) is lightweight, thus making it more comfortable for beginners to work or begin with when building an API. Passport can bring more confusion than answers to beginners although it is very powerful. For more clarification on API authorization types I suggest you visit this link.
Please note: The main goal of this tutorial series is to introduce the logic of building an API and to show "what can be done", not "how it must be done".
Requirements
- A fresh Laravel 8.x installation
- Postman app for testing routes and API calls
- beginner-intermediate level knowledge of the Laravel framework
- A fresh Webdock Ubuntu LEMP cloud VPS instance.
- Shell (SSH) access to your Webdock VPS.
We assume in this article that the SSH user you have connected with is either a sudo user that can become root or otherwise has permissions to work in your web directory.
Install tymondesigns/jwt-auth package
Let's install the tymondesigns/jwt-auth package via composer
$ composer require tymon/jwt-auth
Run the following command to publish the package config file:
$ php artisan vendor:publish --provider="TymonJWTAuthProvidersLaravelServiceProvider"
You should now have a config/jwt.php file that allows you to configure the basics of this package. We will inspect this file later.
Generate a secret key:
$ php artisan jwt:secret
This command will update your .env file with the new constant JWT_SECRET, and is used to sign your tokens along with the cryptographic algorithm that you choose to use.
Update User model
Update your user model so it looks like this:
namespace AppModels;


use IlluminateContractsAuthMustVerifyEmail;
use IlluminateDatabaseEloquentFactoriesHasFactory;
use IlluminateFoundationAuthUser as Authenticatable;
use IlluminateNotificationsNotifiable;


use TymonJWTAuthContractsJWTSubject;


class User extends Authenticatable implements JWTSubject
{
    use HasFactory, Notifiable;


    /**
     * The attributes that are mass assignable.
     *
     * @var array
     */
    protected $fillable = [
        'name',
        'email',
        'password',
    ];


    /**
     * The attributes that should be hidden for arrays.
     *
     * @var array
     */
    protected $hidden = [
        'password',
        'remember_token',
    ];


    /**
     * The attributes that should be cast to native types.
     *
     * @var array
     */
    protected $casts = [
        'email_verified_at' => 'datetime',
    ];

    /**
     * Get the identifier that will be stored in the subject claim of the JWT.
     *
     * @return mixed
     */
    public function getJWTIdentifier()
    {
        return $this->getKey();
    }


    /**
     * Return a key value array, containing any custom claims to be added to the JWT.
     *
     * @return array
     */
    public function getJWTCustomClaims()
    {
        return [];
    }
}
You need to implement a JWTSubject contract to your user model which requires two new methods: getJWTIdentifier() and getJWTCustomClaims().
Configure Auth guard
Edit config/auth.php with these lines:
'defaults' => [
    'guard' => 'api',
    'passwords' => 'users',
],

...

'guards' => [
    'api' => [
        'driver' => 'jwt',
        'provider' => 'users',
    ],
],
What we have done here is basically implement the jwt/auth system in the built-in Laravel Auth system. Later in this article we will build our own middleware, so it will slightly change this behaviour.
Auth routes and AuthController
Add some auth routes to routes/api.php :
Route::group([


    'middleware' => 'api',
    'prefix' => 'auth'


], function ($router) {

    Route::post('login', [AppHttpControllersAuthController::class, 'login']);
    Route::post('logout', [AppHttpControllersAuthController::class, 'logout']);
    Route::post('refresh', [AppHttpControllersAuthController::class, 'refresh']);
    Route::post('me', [AppHttpControllersAuthController::class, 'me']);
});
..and make the AuthController:
$ php artisan make:controller AuthController
…with the following code:
namespace AppHttpControllers;


use IlluminateHttpRequest;
use IlluminateSupportFacadesValidator;
use IlluminateSupportFacadesHash;


use AppModelsUser;


class AuthController extends Controller
{
    /**
     * Create a new AuthController instance.
     *
     * @return void
     */
    public function __construct()
    {
        $this->middleware('auth:api', ['except' => ['login']]);
    }


    /**
     * Get a JWT via given credentials.
     *
     * @return IlluminateHttpJsonResponse
     */
    public function login()
    {
        $credentials = request(['email', 'password']);


        if (! $token = auth()->attempt($credentials)) {
            return response()->json(['error' => 'Unauthorized'], 401);
        }


        return $this->respondWithToken($token);
    }


    /**
     * Get the authenticated User.
     *
     * @return IlluminateHttpJsonResponse
     */
    public function me()
    {
        return response()->json(auth()->user());
    }


    /**
     * Log the user out (Invalidate the token).
     *
     * @return IlluminateHttpJsonResponse
     */
    public function logout()
    {
        auth()->logout();


        return response()->json(['message' => 'Successfully logged out']);
    }


    /**
     * Refresh a token.
     *
     * @return IlluminateHttpJsonResponse
     */
    public function refresh()
    {
        return $this->respondWithToken(auth()->refresh());
    }


    /**
     * Get the token array structure.
     *
     * @param  string $token
     *
     * @return IlluminateHttpJsonResponse
     */
    protected function respondWithToken($token)
    {
        return response()->json([
            'access_token' => $token,
            'token_type' => 'bearer',
            'expires_in' => auth()->factory()->getTTL() * 60
        ]);
    }


}
Ok, so far we managed to replicate the official package setup guide for jwt adjusted for Laravel 8+. Now you can test the login route (example.com/api/auth/login) with credentials via Postman.
If you are on a plain Laravel install, you probably don't have any users added yet – we will be creating users later in this article, for testing.
Run migration if you didn't already
$ php artisan migrate
Register Route and Custom Auth Middleware
To complete our small API app we need register a route. It's not uncommon for API apps to omit this route since objects of user type is created elsewhere or by other apps.
Before we start, let's set some requirements for our API application.
- all application responses must be in JSON format (no HTML responses)
- no redirects to other routes – routes should provide resources or errors as results
Add this line in Auth group in routes/api.php
Route::post('register', [AppHttpControllersAuthController::class, 'register']);
Your api.php file should look like this:
use IlluminateHttpRequest;
use IlluminateSupportFacadesRoute;


Route::group([

    'middleware' => 'api',
    'prefix' => 'auth'

], function ($router) {

    Route::post('login', [AppHttpControllersAuthController::class, 'login']);
    Route::post('logout', [AppHttpControllersAuthController::class, 'logout']);
    Route::post('refresh', [AppHttpControllersAuthController::class, 'refresh']);
    Route::post('me', [AppHttpControllersAuthController::class, 'me']);
    Route::post('register', [AppHttpControllersAuthController::class, 'register']);


});

Route::any('{any}', function(){
    return response()->json([
    	'status' => 'error',
        'message' => 'Resource not found'], 404);
})->where('any', '.*');
While routes are self explanatory let's take a look at the last piece of code:
Route::any('{any}', function(){
    return response()->json([
    	'status' => 'error',
        'message' => 'Resource not found'], 404);
})->where('any', '.*');;
This is our fallback route for all undefined routes in our application. While fallback() in web middleware works only with the GET method, our code works with all methods (POST, PUT) in our API middleware.
Edit AuthController.php and add a register function:
    /**
     * Register new user
     *
     * @param  string $name, $email, $password, password_confirmation
     *
     * @return IlluminateHttpJsonResponse
     */
    public function register(Request $request){

	$validator = Validator::make($request->all(), [
            'name' => 'required|string|max:255',
            'email' => 'required|string|email|max:255|unique:users',
            'password' => 'required|string|min:6|confirmed',
        ]);

	if($validator->fails()){
            return response()->json([
            	'status' => 'error',
            	'success' => false,
                'error' =>
                $validator->errors()->toArray()
            ], 400);
        }

	$user = User::create([
            'name' => $request->input('name'),
            'email' => $request->input('email'),
            'password' => Hash::make($request->input('password')),
        ]);

	return response()->json([
	    'message' => 'User created.',
            'user' => $user
        ]);
    }
Now we have to create middleware for our protected routes. This will slightly replace behaviour of the api:auth middleware we mentioned before, but will give us more flexibility with the upcoming work with our tokens.
Create /app/Http/Middleware/JwtMiddleware.php and populate file with this code:
<?php
namespace AppHttpMiddleware;


use Closure;
use JWTAuth;
use Exception;
use TymonJWTAuthHttpMiddlewareBaseMiddleware;


class JwtMiddleware extends BaseMiddleware
{


	/**
	 * Handle an incoming request.
	 *
	 * @param  IlluminateHttpRequest  $request
	 * @param  Closure  $next
	 * @return mixed
	 */
	public function handle($request, Closure $next)
	{
		try {
		   $user = JWTAuth::parseToken()->authenticate();
 		} catch (Exception $e) {
        	  if ($e instanceof TymonJWTAuthExceptionsTokenInvalidException){
		    return response()->json(['status' => 'Token is Invalid'], 403);
		  }else if ($e instanceof TymonJWTAuthExceptionsTokenExpiredException){
			return response()->json(['status' => 'Token is Expired'], 401);
		  }else if ($e instanceof TymonJWTAuthExceptionsTokenBlacklistedException){
			return response()->json(['status' => 'Token is Blacklisted'], 400);
		  }else{
		        return response()->json(['status' => 'Authorization Token not found'], 404);
		  }
		}
            return $next($request);
	}
}
Register middleware in /app/Http/Kernel.php by adding this line:
    protected $routeMiddleware = [
	.
	.
	.
      'jwt.verify' => AppHttpMiddlewareJwtMiddleware::class, //WE ADDED THIS!
All that left for us to do is to replace the middleware we use. Open AuthController.php and replace the __construct() function with this:
    public function __construct()
    {
        $this->middleware('jwt.verify', ['except' => ['login', 'register']]);
    }
Explanation:
We introduced our own middleware solution for Auth protected routes (with login and register as an exclusion for obvious reasons). So, whenever we access a protected route with invalid or no token, an appropriate Exception message as a JSON object will be returned, instead of redirecting to the login route (which by the way has to be "named" that way to work properly). Also, redirect is not allowed by the requirements we stated as a goal.
Last but not the least, we made nice foundation for all kinds of the middleware we are going to create in the next parts of this series.
Testing Routes with Postman
First, we will create a user. Open Postman and make a request like this:
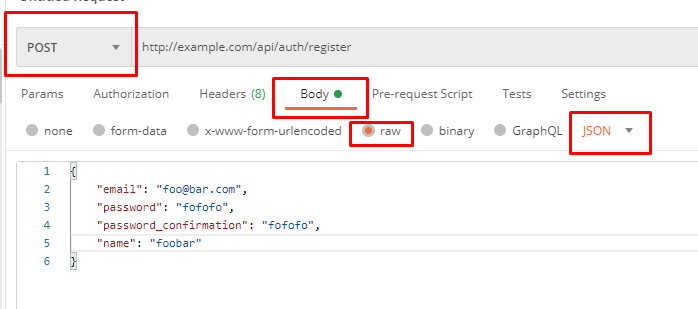
If you have done everything properly, you should see a response similar to this:
{
    "message": "User created.",
    "user": {
        "name": "foobar",
        "email": "[email protected]",
        "updated_at": "2021-01-20T19:50:53.000000Z",
        "created_at": "2021-01-20T19:50:53.000000Z",
        "id": 3
    }
}
You can repeat the request with same data, invalid data, omitting fields and see validator in action. Also, in our case we return the new user model just created alongside with a success message.
Let's login as a new user we just created:
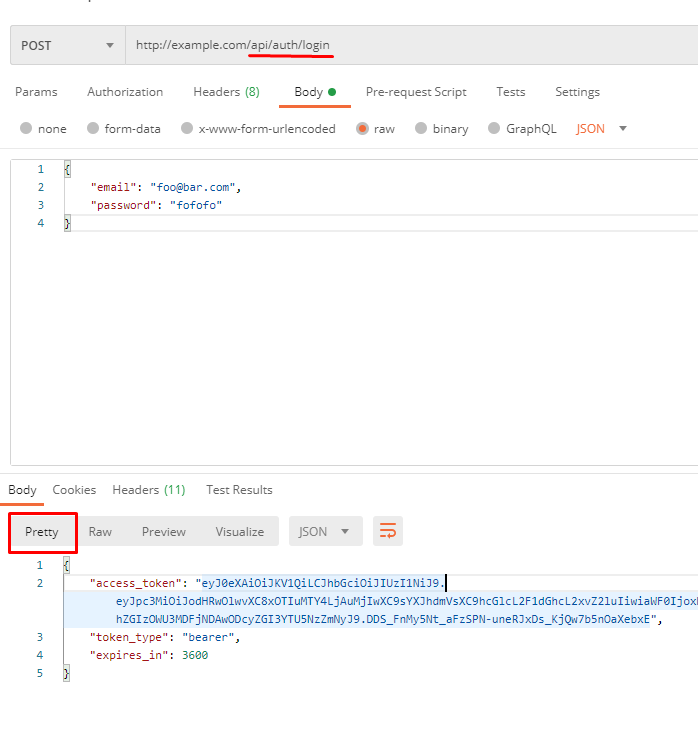
Explanation:
- access_token : The token we use to access protected (auth) routes
- token_type : information for front-end applications on how to use this token
- expires_in : Time To Live (or TTL) in seconds, in our case 60 minutes
Now, we are going to test our access token in action by visiting api/auth/me route. Copy the token (value) and paste it in Postman like in the image below:
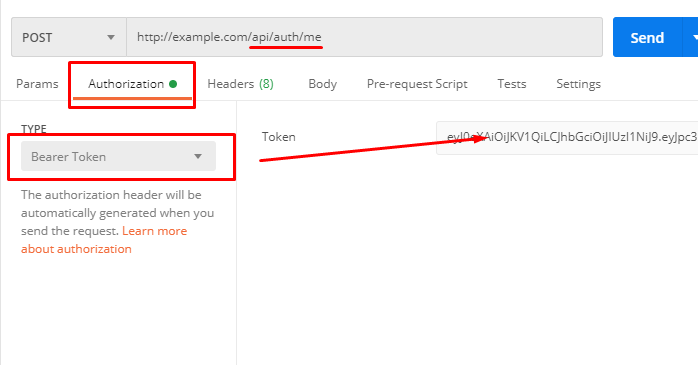
Explanation:
Postman will create for us a key-value pair in our header request like this
Authorization : Bearer eyJ0eXAiOiJKV.....
The good thing with the Tymon package is that a token also can be sent via a URL like a query parameter in this fashion
http://example.com/api/auth/me?token=eyJ0eXAiOiJKV.....
We will exploit this behaviour in next part of this series when we create tokens for other purposes.
The refresh route in our example is used to reissue new token based on an old token. Once a token is refreshed, we can not use the old token for protected routes since it is blacklisted. The Tymon package use Laravel's CACHE system to store blacklisted tokens mixed with algorithm with nth order to count them.
Our logout route is self explanatory so we will not comment on this.
Conclusion & Next Steps
What we did so far:
- Installed tymon/jwt-auth package and update it to Laravel 8 based on the official tutorial
- Implemented our own auth middleware
- Created a register route
- Tested and learned the basics of Postman
In the next part of my API and JWT series I will show you fruther the anatomy of JWT, custom claims, enhancing the middleware, expiry times, etc. We will dive much deeper into the possible uses of JSON Web Tokens.
Series Author: Aleksandar Milivojevic is a PHP programmer for over 10 years (Laravel and WordPress). Writing articles in brief pauses between projects, to help out the community and popularize PHP in general.
Next Article in this Series: The Anatomy of JSON Web Tokens (JWT) (Part 2) >>
