Introduction
One of the biggest barriers for every entry level programmer is the setup of the working environment for testing, learning and experimenting with the code, or in short development environment. In web development this barrier is even higher. Even “Hello World” code app requires environment similar to production server. Of course, we are discussing here online solutions, not local driven environments. At some point, even local environment projects need to face off with online reality, no matter how complex or small they are.
Notice: There are so many quality tutorials, how to properly setup web server (check Webdock docs). In this article we are trying to achieve simplicity as a viable option worth considering for speeding up learning process. Less terminal typing, more code, creating.
In this article we are going to explain how to easily setup Laravel development server for beginners. This process should mimic something closer to the full fledged dev / production environment in the terms of the simplicity. So, use it as a starting point until you gain enough foothold to tailor your own development tools. Development environment does not have to be a necessary evil for beginners (I thought it was back in the days), but quite fun experience with high rising learning curve.
So, to whom is this article meant for:
- beginners in Laravel programming
- students and enthusiasts, academic research and studying
- people with limited knowledge of UNIX operating system derivatives
- entry level web administration for PHP apps
- those who are looking to move away from shared hosting plans (can’t blame them) in a painless way
What we are going to learn in this article / series?
- setting up a web server using aaPanel app
- setting up working project(s)
- setting up the code editor on your working station, desktop, laptop, (phone??)
- back up your projects on server (locally) and on GitHub
- create Laravel template
Laravel only?: NO. This tutorial can be applied to Symfony users almost exactly, and other PHP frameworks with slight changes, including WordPress too. Most of the steps are valid.
If you don’t want to manage aaPanel yourself, consider using Webdock’s integrated free web hosting control panel for your Laravel projects.
Requirements
For this article the requirements are as modest as they can be. Once you gain confidence and knowledge you are free to browse and buy premium software tools.
- fresh and clean Ubuntu Jammy Jellyfish 22.04 installation
- basic knowledge of Laravel
- basic knowledge of web servers
- basic knowledge of Linux OS (users, privileges, permissions)
Install aaPanel and setup PHP
I already wrote an article about how to install aaPanel on Ubuntu, so you can use this to get started. There are some changes related to this tutorial you need to be aware of: Since we do not use the domain as suggested in mentioned article you are free to skip Point your domain to server section. Furthermore, ignore changes on first time login into aaPanel. Return to this article and follow the instructions here instead.
Although PHP settings by default look fair enough, let’s make them more “dev friendly”. Navigate to the PHP settings screen until you see a window like shown in the picture below.
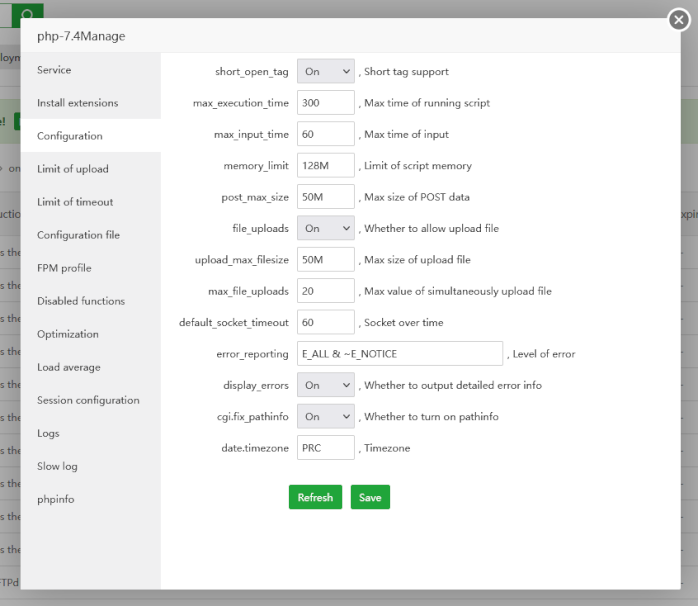
There are no ideal PHP.ini settings, so just configure what you actually need. I created table as a reference for what should be changed, common issues, and what were defaults so you can easily roll back to old settings:
| option | default value | new value | known issues |
|---|---|---|---|
| max_execution_time | 300 | do not change | WP users 1000, demo upload |
| max_input_time | 60 | do not change | WP users 400, demo upload |
| memory_limit | 128M | 2G | Composer memory exhaust; installing packages |
| post_max_size | 50M | do not change | WP users 256M, demo upload |
| upload_max_filesize | 50M | do not change | WP users 256M, demo upload |
| date.timezone | PRC | UTC | do not change if you are in Bejing |
Now, let’s move on to disabled functions tab. Here you can see a list PHP functions disabled for security reasons. They are OK for production environments, while can be in the way for developing. You are free to delete symlink restriction because it blocks php artisan storage:link execution.
Also worth mentioning are the optimization and session configuration sections, but I’ll leave you to experiment with these, because they are not crucial for development. Now you can go to service and restart PHP.
As you can see, we use the aaPanel’s GUI for quick setup of our dev server and apply configuration settings with ease. From beginners point, this approach is more appropriate than tampering with configuration files. All these can be done from the terminal, but the process can be exhausting for every newbie willing to learn programming.
Create Dev User on System
Now we will create Ubuntu dedicated user. Let’s call it dev user with the sole purpose to deploy and create code in our projects. This is a VERY important step which beginners usually omit to do, and use sole user for everything on the system. As we progress through this tutorial, I will reveal the reasons why dev user is important. For now, let’s just say, we wanna separate sudoer (user with sudo privileges) from our development.
From aaPanel left sidebar select terminal. You should see a screen similar to this:
Login into the terminal as a SUDO user (for a first time, your input should be remembered) and create dev user:
$ sudo useradd -g www example-dev-username
Set password for new user:
$ sudo passwd example-dev-username
So, what we have done here. While second command is self explanatory, first one is a bit more complex. It is not enough just to create users, nor assign a new user to the WWW group. New user group (www) MUST be his primary group. So every dev user action is done on behalf of the WWW group if not explicitly instructed otherwise. This will help us with a constant struggle with permissions inside the WWW folder where our projects should reside. That is why we used -g option in our command. Also, this is the second good reason why we need dev user in a first place.
Let’s check new user:
$ id example-dev-username
You should see something like this:
uid=1005(example-dev-username) gid=1001(www) groups=1001(www)
…where gid is primary group! So, now whenever you wanna switch to dev user, you can do it by typing in the terminal:
$ su example-dev-username
Deploy Laravel framework
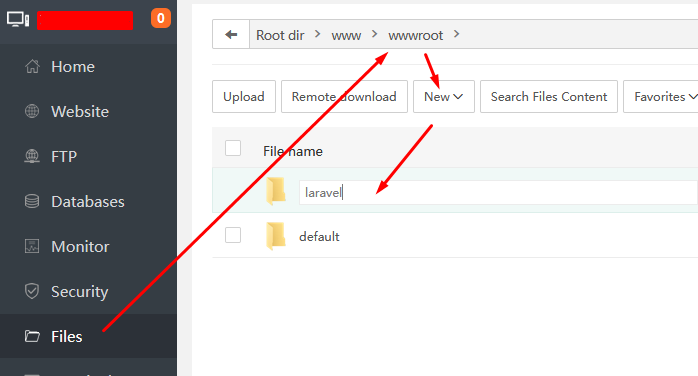
Click Files and create Laravel folder like from the image below:
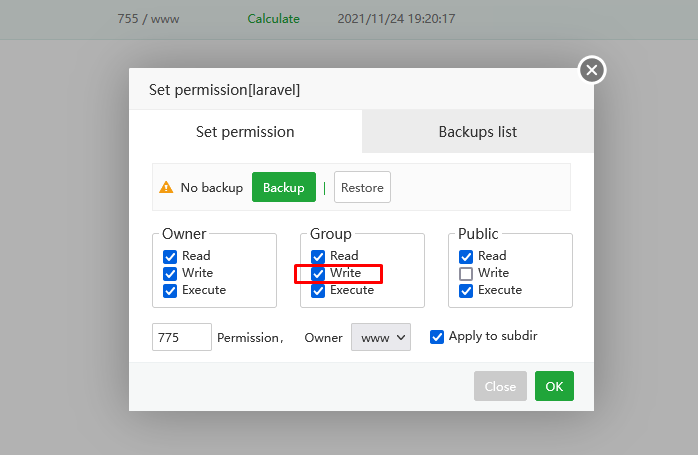
Change permissions on the new folder to 775:
Now, enter Laravel folder and click terminal from the top of the screen.
$ su example-dev-username
Check if you are on the right place:
$ pwd
If you see /www/wwwroot/laravel then we will continue with composer:
$ composer create-project laravel/laravel .
The point (.) at the end of the composer’s command instructs deployment in the current directory. Note: directory must be empty.
Configure NGINX
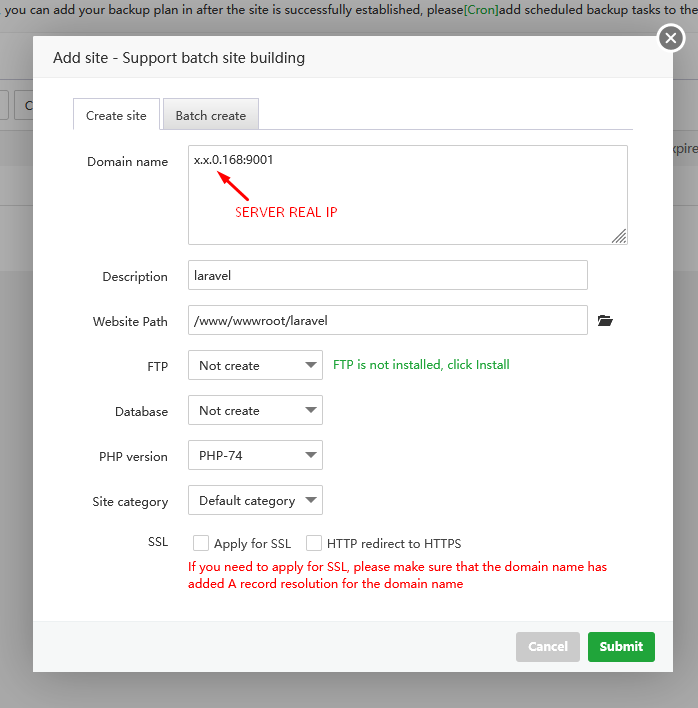
The aaPanel is meant to use with valid domains which we do not have at the moment (deliberately for the purpose of this text), so we will use a simple trick.
Click Website -> Add site and populate like from picture below:
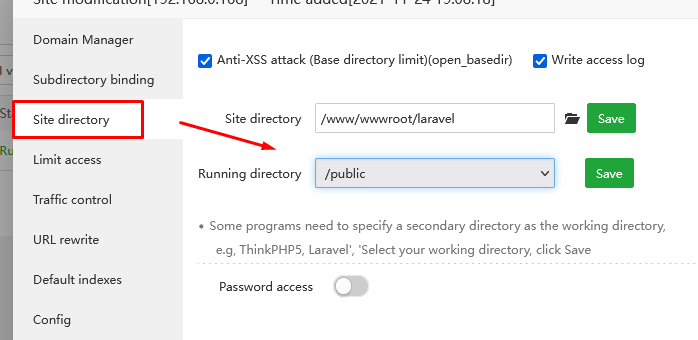
Click on website from the list and point site directory to public:
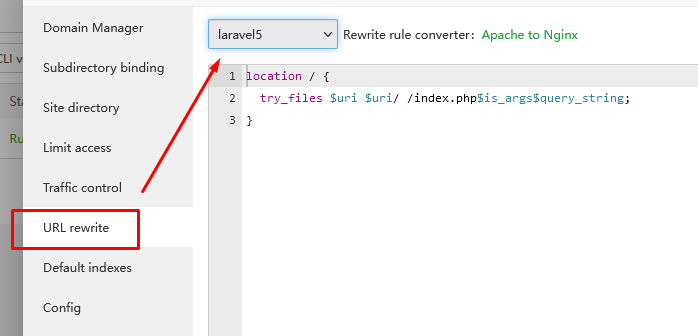
Then setup URL rewrite:
Once again change laravel directory permissions to 775 because the composer bounded files to our dev user only.
Now, type in your browser http://_YOUR_SERVER_IP_:9001, and you should see Laravel’s welcome screen.
Explanation: In this section, we deployed Laravel framework to our server and bound it to the 9001 port (check Security section of the aaPanel). We used the real IP address of the server to access it. As you can guess, in this way we could bound many Laravel installs on our server bounding them to different ports. Explore NGINX rules aaPanel created for us. Be aware some ports are reserved for server services by default and they are not available.
If you’re happy with results, create a snapshot from your Webdock panel.
Homework: Why work with IP addresses when Webdock provided your server with an alias domain already? Try using the alias instead of your IP address.
Install a Real Code Editor to Your Workstations – Atom
Writing your code is essential for your work. While Notepad2 and Notepad++ are good, they are not better than an inbuilt aaPanel editor. So I strongly suggest you to visit Atom.io wesite and download their solution, it is free. Install it on your desktop, laptop everywhere you plan to use it. It works on Mac, Linux, Windows flawlessly.
Start it after install, and go to Files -> Settings -> Packages. Search for and install:
- ftp-remote-edit by h3imdall
- symbols-list by 7ute (optional, recommended)
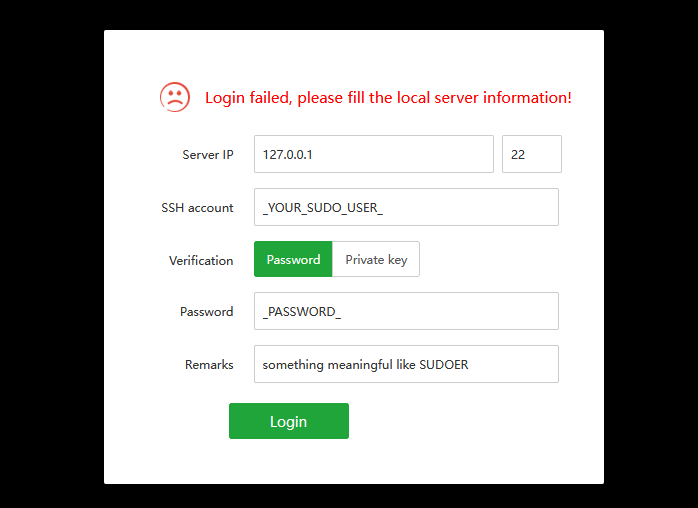
After restarting the program, press Ctrl + Space to run remote package and enter the session password (something meaningful to you). Right click on Remote panel, then choose Edit servers and New. Now populate server information:
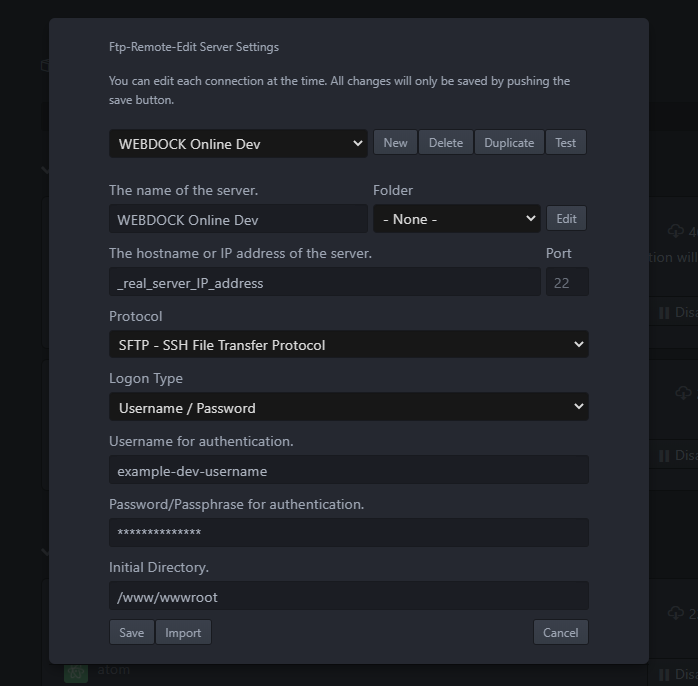
If you have done everything properly, soon enough (left sidebar) you should see a contents of your /www/wwwroot folder at your Webdock server. Start editing/creating files and upload changes by Ctrl+S shortcut. By the way, this is a third good reason why you should have a dev user on your system.
Conclusion
I this article I presented you how to setup fully online development server and access it with your local machines. As I promised, there are very few terminal commands (with the help of aaPanel).
With your online server, you can instantly share work progress, invite co-workers, co-students to your project, feel true online reality. You can create numerous Laravel projects and dev users for others, change system settings on-fly, while using the terminal for common artisan commands as you did before.
There is a lot more to explore with the aaPanel and Atom because they are very powerful software and they are free. After you gain enough experience with solution from this article, you will know exactly what you are getting with premium services like Laravel Forge or PHP Storm, which can be blurry from the beginners point.
Hope it helps!
Series Author: Aleksandar Milivojevic is a PHP programmer for over 10 years (Laravel and WordPress). Writing articles in brief pauses between projects, to help out the community and popularize PHP in general.
