Introduction
In the previous article, we explained how to setup Laravel development server with aaPanel. Also, we deployed Laravel framework and tested online visibility. In this article we are going to setup Laravel for further development.
We are going to install and configure user authentication logic with CSS and JS scaffolding for frontend. In this way we will test database connection and email connection by building something meaningful and reusable.
Info: This tutorial is dedicated to complete beginners, and it is a direct sequel to the "Laravel development server with aaPanel on a Webdock VPS for beginners" article. As already said, the goal of this tutorial is simplicity in an acceptable way.
Database
Let's create a database for our Laravel app. First, we are going to setup MySql root password. Worth mentioning, MySql root user IS NOT system user (Ubuntu root user), so, choose a different password for the MySql root.
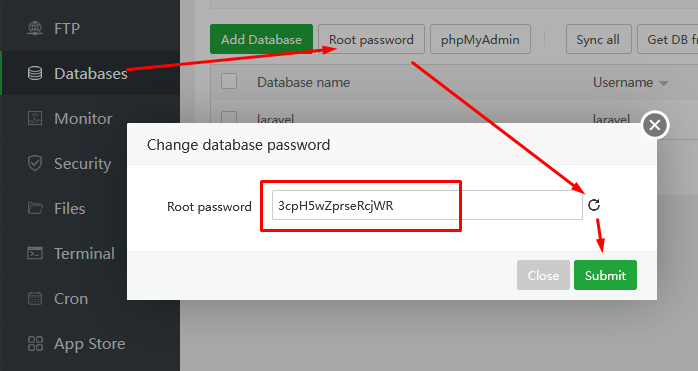
Generally, you are required to setup MySql root user only once, usually right after aaPanel installation.
Proceed with a Laravel database:
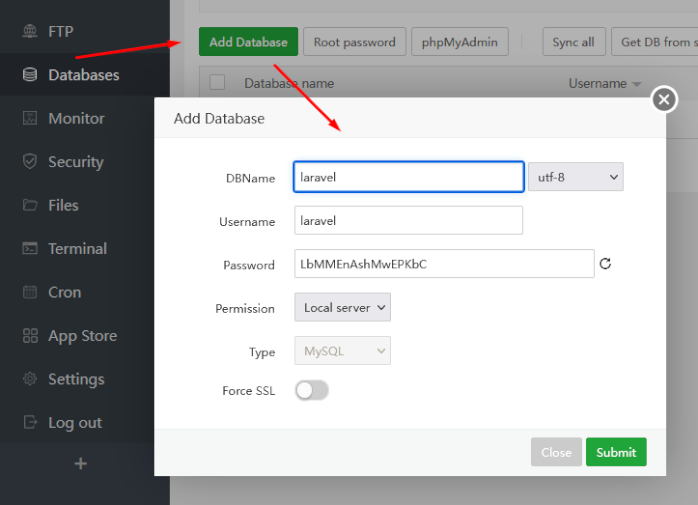
Now, apply changes to Laravel .env file (of course by corresponding values):
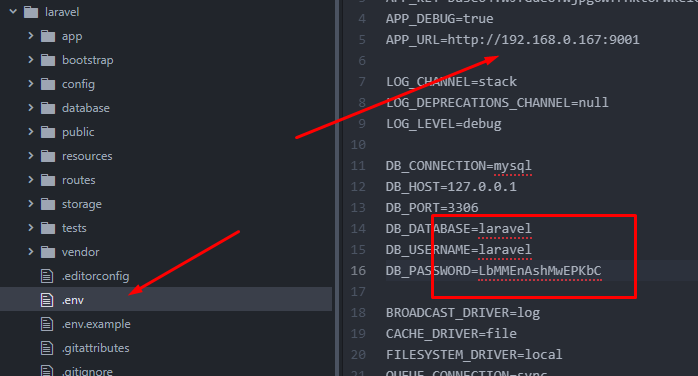
APP_URL: Environment variable APP_URL is not a part of the database setup. It should always reflect the true URL of Laravel installation, especially in the environments with a multiple Laravel installs.
phpMyAdmin
You can always visit phpMyAdmin from the Databases->phpMyAdmin. Use MySql root credentials to access it. In the first versions of the aaPanel, phpMyAdmin had severe security issues. I strongly suggest you to change access port and use very strong passwords.
Also, you can check nGinx configuration file and disable it from web access without deinstalling it. You can enable it again whenever you plan to use it.
Connect to email server
For this article we will use the Mailtrap.io (create account if you do not have one) mail catching system. For those who do not know, mail catching system is email debug tool used by developers for testing their emails in a safe way. Emails sent by our application never reach the final destination, but rather stay on the mail catching server (fictional email addresses allowed), offering us a further review of our app emails.
From your Mailtrap account goto Inboxes->Demo->SMTP settings, and copy/paste credentials provided to the corresponding places in your .env file.
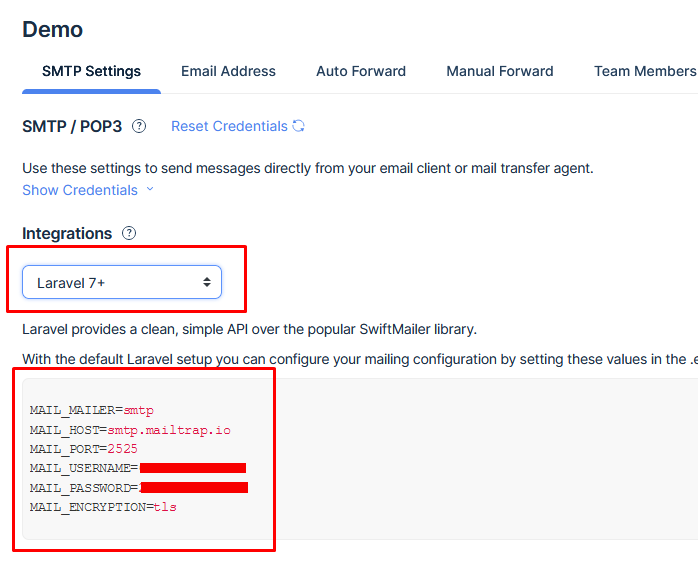 Also, populate [email protected], or any other fictional mail in the valid format.
Auth Routes
For the purpose of this text, we are going to use older but still effective laravelui package instead (as suggested) of Breeze or Jetstream. Reason is simplicity, and more beginner friendly.
Go to the terminal from your aaPanel dashboard, and login as dev user. Make sure you are in /www/wwwroot/laravel directory.
$ composer require laravel/ui
Then, generate login / registration scaffolding:
$ php artisan ui bootstrap --auth
We are using here Bootstrap CSS toolkit, but if you are familiar with Vue, or React, you can use them too. And finally run:
$ npm install && npm run dev
BUT WAIT, you just got message npm: command not found (which is very likely in current versions of aaPanel).
Fastest but most unpopular workaround
The reason for this is not because npm is missing (we installed it with PM2 Manager from app store), but because is bound to the OS root itself. Best way and the only right solution is to give our dev user privileges to run npm, but this can be quite tricky in aaPanel ecosystem. Or install npm to run for all users (or specific group of users, even better). Both solutions exceed purpose of this text, so we will use least popular solution: run npm as root.
WARNING: Running Composer or NPM as root is VERY BAD practice! If you are forced to do it often, then you are doing something very wrong! Consider solutions mentioned above as long term solutions. Since the front-end is not in the focus of this tutorial, use this only as temporary "override".
Go to PM2 Manager settings and set the current Node version from the list to the highest available.
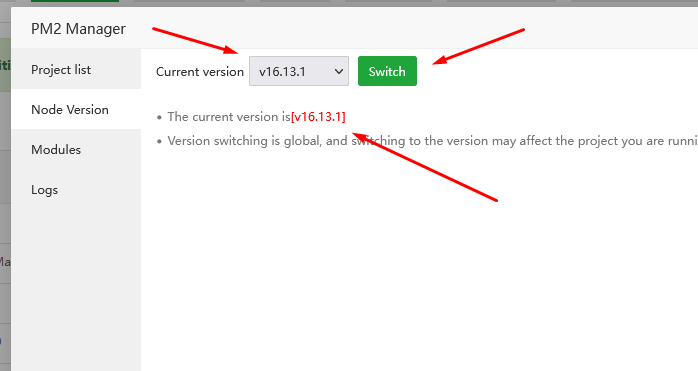 While you are there, visit Modules and remember npm version.
Then go to file manager and change our Laravel directory permissions/ownership to root user. Open terminal and login as root:
$ sudo su -
cd /www/wwwroot/laravel
npm -v
If version matches from Modules section you may proceed, otherwise reboot server from panel home dashboard.
npm install
npm run dev
When finished, you should see a screen similar to this:
 Go again to file manager, and reverse back Laravel directory permissions to the www (775). In a terminal (dev user), run migrations:
$ php artisan migrate
Why we installed PM2 Manager in a first place? We could install npm manually for the dev users and avoid further trouble. Well, it is worth considering the option, but if you run any plain Node.js projects on your dev server PM2 Manager way to go. Example: you are building the Laravel API app alongside with Node.js project as a front-end for the same app.
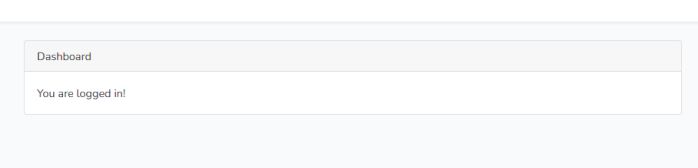
Visit app in your browser and register new user. If you have done everything properly you should see a screen similar to this:
Implement Verify Email Policy
In this section we are going to allow only users with a verified email to login. This is a standard feature of any web app. Also, this way we are going to check our email server connectivity.
Edit User.php model:
.
.
use IlluminateContractsAuthMustVerifyEmail;
.
.
class User extends Authenticatable implements MustVerifyEmail
.
…and web.php from routes folder:
.
.
Auth::routes(['verify' => true]);
.
..then HomeController.php:
.
.
public function __construct()
    {
        $this->middleware(['auth', 'verified']);
    }
.
Now, if you try to visit /home route, you will be asked to confirm mail, for new and existing user accounts.
 Go to your Mailtrap account and see outcomes.
Connect your project to GitHub
Backup of your code should be a top priority for every programmer, even for beginners. There are two different types of the code backups. Live, and revision control system.
Live backup should be understood like snapshots in timeline like you do with your Webdock server. You can always reverse back to a previous state without penalties to code and database. Both Websites and Databases (from the left sidebar of the aaPanel) provide us a backup option.
The revision control system works a bit different. It takes starting point of your code and track changes. In our case, we are going to use the GitHub service (there are others like BitBucket, GitLab). Also, although is possible to backup database too, our main focus is to track and store code changes. Create a GitHub account if you don't have one already.
Personal Access Tokens: Visit Settings / Developer Settings to create Personal access tokens. This token should be used to communicate with Github from our terminal whenever you are asked for a password.
Now, create a new repository: testone. Private or public is not important, but DO NOT add any files like README or GITIGNORE etc.
Now, in your terminal, go to Laravel folder (dev user). Check Git status:
$ git status
If you get an error, that is good. We may proceed.
$ git init
git add --all
Identify yourself to local git (Github email and username):
$ git config --global user.name "your-guthub-user-name"
$ git config --global user.email "your-guthub-email"
…now we can make a commit:
$ git commit -m "first commit"
…add remote origin (remote origin equals your HTTPS of the newly created repo):
$ git remote add origin https://github.com/__YOUR_GIT_USERNAME__/testone.git
…finally, make a push:
$ git push origin master
Now you can check your repo on github.
Clone project from Github repo
In this section we are going to use (reuse) or newly created repo as a template for next project.
Advantages:
- basic setup with repetitive work skipped
- custom added code is already there (user auth with email verify)
- included packages and dependencies solved
- webpack mix and npm outcome is already compiled
Disadvantages:
- updating framework can be tricky
- updating packages can be tricky
Now, from panel create a new directory named second inside /www/wwwroot folder give permission to www user (775). Then,
$ cd /www/wwwroot/second
$ git clone https://github.com/__YOUR_GIT_USER_NAME__/testone .
$ composer install
$ cp .env.example .env
$ php artisan key:generate
And we deployed our project. You can continue from HERE configuring NGINX (with other port number) for a second project, and from the start of this article (db and email).
Conclusion
In these two articles, we build a development server for our Laravel projects using aaPanel. I tried to bring to you simple yet effective solution, especially with beginners in mind.
Series Author: Aleksandar Milivojevic is a PHP programmer for over 10 years (Laravel and WordPress). Writing articles in brief pauses between projects, to help out the community and popularize PHP in general.
