Introduction
In today’s world of constantly evolving application environments, server automation has become an integral part of system administration. Modern application environments are often disposable and require quick and efficient server setup.
To achieve this, configuration management tools such as Ansible are commonly utilized. These tools help streamline automating server setup by establishing standard procedures for new servers, saving time, and reducing the likelihood of human error associated with manual configurations.
One of the critical benefits of Ansible is its simple architecture, which eliminates the need for unique software installation on nodes. Additionally, Ansible offers a range of robust features and built-in modules that make writing automation scripts a breeze.
Overall, Ansible is a valuable tool that helps system administrators stay on top of the ever-changing demands of modern application environments.
And in this guide, I will take you step by step through how you can set up such automation on your Webdock server using Ansible. Let’s get into it.
Prerequisites
- A server running Ubuntu 22.04, featuring a user with standard sudo privileges and the ability to execute commands, is configured to operate as an Ansible Node. I will call this server the Node from hereon.
- Another freshly installed server with Ubuntu 22.04 with no pre-existing configurations. This server will be designated as an Ansible host remote server, which the Ansible control node will use for automatic setup. I will call this server the Host from hereon.
- Coffee, the guide is long 😉
Pre-Configuration
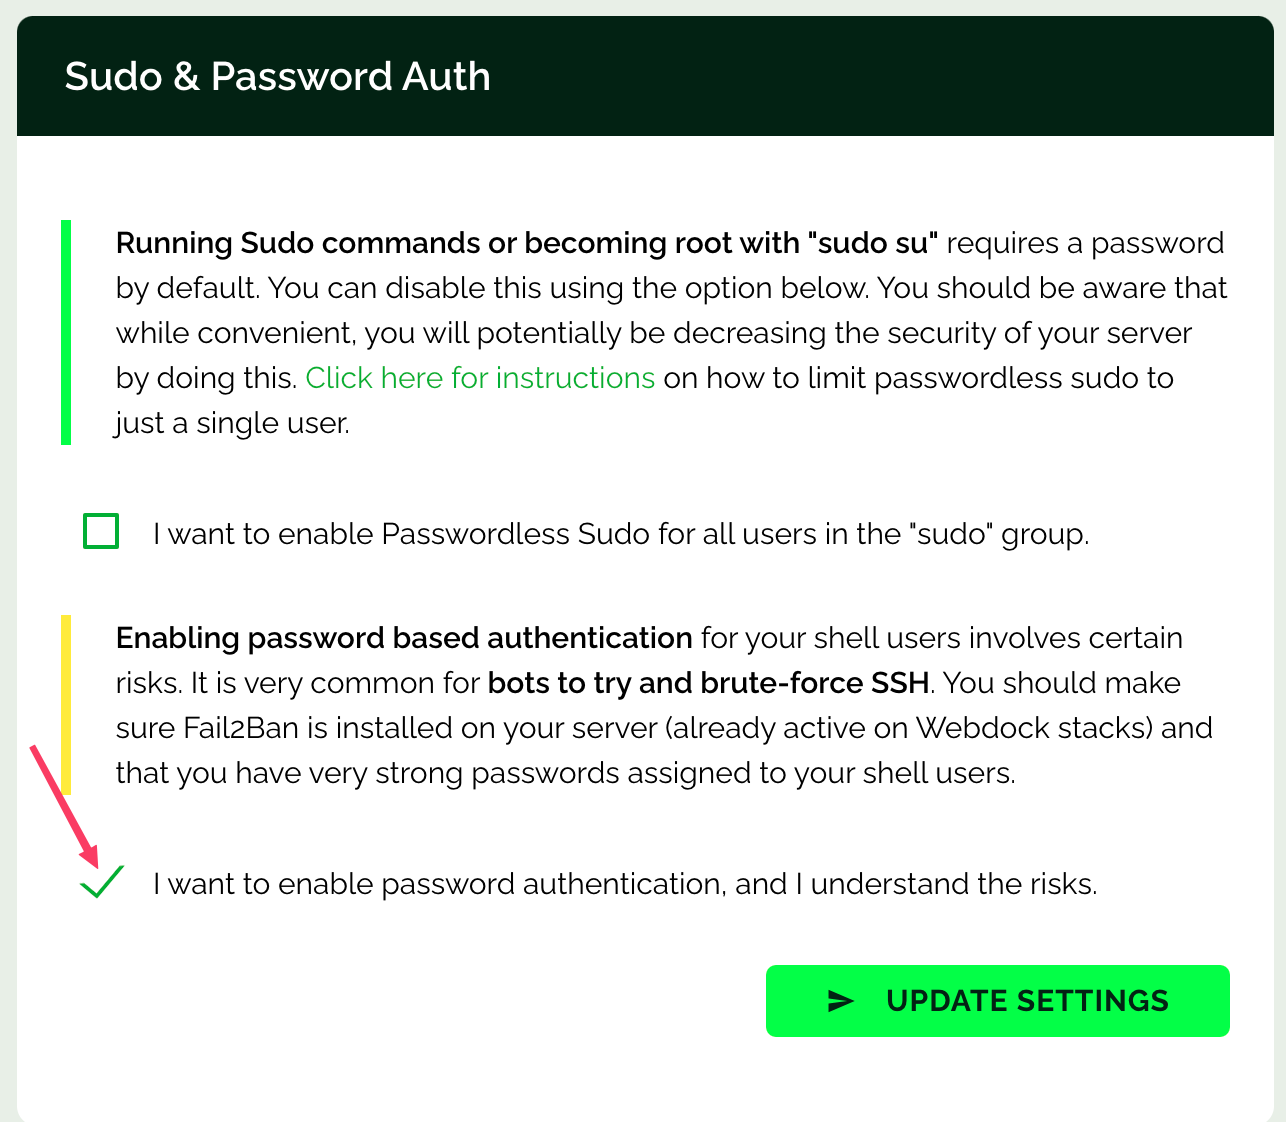
Firstly, add a user to your Node and Host. And on your Host Server’s Manage Shell User page, tick the ‘I want to enable password authentication, and I understand the risks.’ checkbox.
Before getting underway, we must generate an SSH key on our Ansible Control Node server. To accomplish this, kindly execute the following command as a sudo user:
$ ssh-keygen -t rsa -b 4096 -C "ansible-key"
Simply press ‘Enter’ to store the SSH key in its original location within the ‘.ssh/’ sub-folder.
Next, you will be prompted to set a passphrase which adds an additional layer of security. Keep in mind that you will need to enter this passphrase each time you log in to a remote machine, but for now, you can leave it blank by pressing ‘Enter’.
This will create a fresh 4096-bit SSH key pair and include the “Ansible Key” as a comment, making it simpler to identify and manage for future reference.
One can verify the successful generation of the ssh key pair on the client machine by employing the command provided below:
$ ls ~/.ssh/id_*
Next, you will need to transfer the SSH public key that has been generated. The recommended method to copy this public key is through the use of the “ssh-copy-id” tool. This tool simplifies the process and ensures the public key is successfully transferred to your host. You can easily accomplish this task by issuing a specific command on the node:
$ ssh-copy-id username@host-server-IP
Substitute ‘username’ with the username belonging to the user you have enlisted on the Host. You shall receive a prompt to enter the password of the Host user. Kindly input the same.
Installing and Configuring Ansible
In order to utilize Ansible as a tool for handling your server infrastructure, the first step is to download and install the Ansible software onto the designated control node. Once the software is installed, proceed to input the official project’s PPA (personal package archive) into the system’s list of sources by running the following command from the control node:
$ sudo apt-add-repository ppa:ansible/ansible
When prompted to accept the PPA addition, tap the enter key on your keyboard. Once done, ensure to update the package index on your system so that it can detect the latest packages now accessible via the freshly added PPA:
$ sudo apt update -y
After the implementation of this latest modification, you are now able to procure and implement the Ansible software successfully:
$ sudo apt install ansible -y
After successfully installing all the necessary software, your Ansible control node is ready to take charge of all your hosts. Moving forward, incorporate your hosts into the control node’s inventory file.
Configuring Ansible Control Node
To include your Ansible host remote server in the inventory file, update the IP address on your Ansible inventory file on the node:
$ sudo nano /etc/ansible/hosts
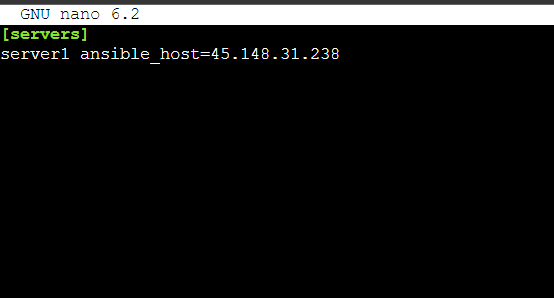
Once you have gained access, proceed to include the IP of your remote server in the [servers] block:
[servers]
server1 ansible_host=host_server_ip
Press CTRL + X, followed by Y, to save the file.
It’s time to put your SSH connection to the test and verify its authenticity between the Ansible control node and the remote server where Ansible is hosted:
$ ssh username@remote_server_ip
Upon receiving the authentication request, kindly approve it, and in case of any prompt, kindly enter your password. Once you’ve confirmed the SSH connection, press CTRL+D to end the connection and return to your control node.
Creating a Playbook
$ nano playbook.yml
To begin your playbook, include the following steps as a starting point:
- name: My Ansible Playbook
  hosts: all
  become: true
  vars:
    default_username: ansy
You may substitute the username with one that you prefer.
The “host” statement specifies the servers that the Ansible control node will apply this playbook. Meanwhile, “become” defines whether all actions will be conducted with escalated root privileges.
With the “vars”, you can save the data variably or dynamically. If you opt to alter your username down the road, you’ll need to modify only this line of text within your document.
Configuring Aptitude on the Playbook
Typically, Ansible sequentially conducts tasks from the top of your playbook to the bottom, ensuring synchronous execution. This emphasizes the importance of task order, as you can assume that one task will finish executing before the next one commences.
Each task in this playbook is self-sufficient and can be reused in other playbooks easily.
  tasks:
    - name: Install aptitude
      apt:
        name: aptitude
        state: latest
        update_cache: true
In this scenario, the Ansible built-in module is being utilized to instruct Ansible to proceed with the installation of aptitude. Simply put, Ansible modules are a more straightforward way to execute an operation that would otherwise require a raw bash command.
Additionally, Ansible has taken the necessary precautions to ensure that it can successfully use apt as a fallback option for package installation in case aptitude is unavailable. While it may not be mandatory, it’s worth noting that the use of aptitude has been a preferred choice by Ansible.
Add a Sudo User to Setup Tasks
When it comes to system security, it’s generally advisable to steer clear of relying too heavily on the root user. To streamline creating a user with sudo privileges, you might consider adding the following:
    - name: Setup passwordless sudo
      lineinfile:
        path: /etc/sudoers
        state: present
        regexp: ^%sudo
        line: '%sudo ALL=(ALL) NOPASSWD: ALL'
        validate: "/usr/sbin/visudo -cf %s"

    - name: Create a new sudo user
      user:
        name: '{{ default_username }}'
        state: present
        groups: sudo
        append: true
        create_home: true
Please Note: Encasing the curly braces that signify a variable with quotes is crucial. Neglecting to do so is a prevalent blunder when working with Ansible syntax.
When making changes to a specific line in a file, the line in the file Ansible module comes in handy. Using regex, you can easily modify the sudoers file to allow passwordless use of sudo. To ensure the changes are valid and don’t cause any issues, the visudo tool is used to validate them.
A new user is added using the user module to make the most of this functionality. Ansible will create the user if they don’t already exist, add them to the sudo group without removing them from any other groups they may be part of, and create a home directory for them.
Setting up SSH keys for the Sudo user
It is important to bear in mind that SSH keys are the default mode of operation in Ansible. To ensure optimal security, it is advisable to combine the utilisation of SSH keys with the deactivation of root password authentication. This can easily be accomplished by incorporating automation into the process. Simply include the following, and you’ll be good to go:
    - name: Set SSH key for user
      ansible.posix.authorized_key:
        user: '{{ default_username }}'
        state: present
        key: "{{ lookup('file', lookup('env','HOME') + '/.ssh/id_rsa.pub') }}"

    - name: Disable password login for root
      lineinfile:
        path: /etc/ssh/sshd_config
        state: present
        regexp: ^#?PermitRootLogin
        line: PermitRootLogin prohibit-password
By providing the necessary details, such as the username and key location, you can leverage the authorized_key module to establish secure access. Ansible’s versatile lookup function aids in building the path toward your key.
On the other hand, the lineinfile module serves the purpose of locating and replacing a specific line in sshd_config. Through this process, password authentication for root is disabled, ultimately limiting access and enhancing security measures.
Installing NGINX
Add the following to your playbook to install NGINX after it completes the tasks above:
    - name: Install nginx
      apt:
        name: nginx
        state: latest

    - name: start nginx
      service:
        name: nginx
        state: started
The initial step of this playbook involves the installation of the Nginx web server using the “apt” module. The “name” parameter specifies the package to be installed, which is “nginx”. The “state” parameter ensures that the package is installed and updated.
The second task focuses on starting the Nginx service using the “service” module. The “name” parameter specifies the service name, which is “nginx”. The “state” parameter ensures that the service is running.
This playbook guarantees that the Nginx web server is installed and running smoothly on all hosts.
Configuring Firewall
It is paramount for any server exposed to the internet to have a robust firewall in place. To guarantee that your UFW (Uncomplicated Firewall) is configured correctly, you can incorporate the following into your Ansible Setup:
    - name: Install UFW
      apt:
        name: ufw
        state: latest

    - name: Allow connections
      community.general.ufw:
        rule: allow
        name: OpenSSH

    - name: Enable and deny by default
      community.general.ufw:
          state: enabled
          default: deny
Running the Playbook
The entire playbook may look like this.
- name: My Ansible Playbook
  hosts: all
  become: true
  vars:
    default_username: ansy

  tasks:
    - name: Install aptitude
      apt:
        name: aptitude
        state: latest
        update_cache: true

    - name: Setup passwordless sudo
      lineinfile:
        path: /etc/sudoers
        state: present
        regexp: ^%sudo
        line: '%sudo ALL=(ALL) NOPASSWD: ALL'
        validate: "/usr/sbin/visudo -cf %s"

    - name: Create a new sudo user
      user:
        name: '{{ default_username }}'
        state: present
        groups: sudo
        append: true
        create_home: true

    - name: Set SSH key for user
      ansible.posix.authorized_key:
        user: '{{ default_username }}'
        state: present
        key: "{{ lookup('file', lookup('env','HOME') + '/.ssh/id_rsa.pub') }}"

    - name: Disable password login for root
      lineinfile:
        path: /etc/ssh/sshd_config
        state: present
        regexp: ^#?PermitRootLogin
        line: PermitRootLogin prohibit-password

    - name: Install nginx
      apt:
        name: nginx
        state: latest

    - name: start nginx
      service:
        name: nginx
        state: started

    - name: Allow connections
      community.general.ufw:
        rule: allow
        name: OpenSSH

    - name: Enable and deny by default
      community.general.ufw:
          state: enabled
          default: deny
Before running the playbook, let’s do a syntax check
$ ansible-playbook playbook.yml --syntax-check
If you see no errors continue running the playbook, else fix the errors (probably indentation errors in most cases), and then run the playbook.
$ ansible-playbook playbook.yml -u username
Now, onto those flags. the -u flag will allow you to log into a specific user on the remote server.
Note: the -kK flag can be passed while running the playbook if you set up ssh password authentication but since the ssh key is copied to the host server, the “-kK” flag is not needed. You can safely disable password authentication that you enabled on the host server, Ansible node can connect to the host server using the configued ssh keys. However if you had setup root password you theh have to pass “-K” to enter the root password (the “become” password)
After executing the command mentioned above, the system will prompt you to enter your password. It is crucial to keep in mind that the password being requested is for the host server. Additionally, you may be prompted to create a “become” password, which will serve as the default password for future use.
The playbook is designed to run on each server in your inventory by default. However, if you want the playbook to run on a specific server, simply add flags like the following example:
$ ansible-playbook playbook.yml -l server3 -u username
The results must resemble something like this:

Conclusion
Streamlining your server setup process can be a valuable time-saving technique while ensuring servers are configured uniformly to be further modified to fit your preferences. In light of current applications’ decentralized structure and the need for consistency between various staging environments, automation of repetitive and similar tasks of this kind has become essential.
This guide presented a detailed overview of automating crucial initial server tasks using Ansible.
Aayush Nair has been designing WordPress websites for eight years now. He is also a content writer, writing blogs on technology and related topics, and likes helping people in his free time.
