Introduction
Once you have your Nginx server up and running, connecting it to PHP-FPM is the next logical step for dynamic sites.
PHP-FPM (FastCGI Process Manager) is a powerful alternative to the traditional FastCGI implementation of PHP. It has additional features that are particularly beneficial for websites experiencing high traffic volumes. Regarding processing PHP pages with NGINX, PHP-FPM is the preferred method as it outperforms other CGI-based approaches like SUPHP or mod_php in terms of speed.
One significant advantage of using PHP-FPM is its efficient utilization of system resources. By demonizing PHP and transforming it into a background process, PHP-FPM consumes significantly less memory and CPU than other methods for running PHP scripts. Additionally, managing your PHP requests becomes easier thanks to the availability of a CLI script specifically designed for this purpose.
You’ll need to follow simple steps to get PHP up and running on NGINX with FastCGI. First, install PHP onto your server. Next, configure NGINX to work seamlessly with FastCGI. Finally, test your setup to ensure everything is working smoothly. Don’t worry if you’re unfamiliar with the process – we’ve got you covered! Check out our step-by-step guide below for easy instructions on how to set it all up.
Install PHP and FastCGI Process Manager (FPM):
I assume you have already installed NGINX on your server, so I won’t go over how you can install NGINX. If you’re unsure, simply run this command to see if you see an ‘active’ status:
$ sudo systemctl status nginx
Once you verify that you have installed NGINX, Simply run the following command to install PHP-FPM using apt:
$ sudo apt-get install php8.1-fpm -y
In this case, we are installing version 8.1 of both the PHP and PHP-FPM packages. You can change the PHP version if you like.
It’s important to note that a common mistake is installing only the PHP package without including PHP-FPM. The issue with this approach is that unlike PHP-FPM, which works seamlessly with NGINX, the regular PHP package also installs the Apache HTTP server along with its httpd process. This can lead to conflicts when using NGINX.
To verify if PHP-FPM is working, run the following, and see if you see an ‘active’ tag:
$ sudo systemctl status php8.1-fpm
Configure NGINX
With Nginx and PHP-FPM installed, you must make some changes in the default Nginx configuration file. This modification is necessary to enable the PHP FastCGI Process Manager (PHP-FPM) to handle requests with a .php extension. Run the following:
$ sudo nano /etc/nginx/sites-available/default
Press ALT + T to clear all dummy text already present. And then, paste the following:
server {

  listen 80 default_server;

  listen [::]:80 default_server;

  root /var/www/html;


  index index.php index.html index.htm index.nginx-debian.html;


  server_name _;


  location / {

    try_files $uri $uri/ =404;

  }


  location ~ .php$ {

    include snippets/fastcgi-php.conf;


    # NGINX php-fpm sock config:

    fastcgi_pass unix:/run/php/php8.1-fpm.sock;

  }


  # disallow Apache’s access to .htaccess on NGINX with PHP,

  location ~ /.ht {

    deny all;

  }

}
The updated NGINX config file is validated using the following command to ensure that there are no syntax errors introduced by the edits made:
$ sudo nginx -t
You should see an ‘ok’ message here. And when you see it, go ahead and restart the server to apply the NGINX PHP FastCGI setup:
$ sudo systemctl restart nginx
After the restart, PHP should be enabled on NGINX. To confirm this, you can create a PHP file in your Nginx server’s /var/www/html folder and check if the page renders correctly. But first, to create a file in the folder, you might need to change its permissions using the chmod command. This will allow you to have the necessary access and control over it:
$ sudo chmod -R 755 /var/www/html
Now make sure that the webroot is owned by “www-data” since the web server and PHP-FPM, by default, run as the user “www-data”.
$ sudo chown -R www-data:www-data /var/www/html
Just add a new PHP file to Nginx’s web root directory. The easiest way to do it is with a quick echo command. Before that switch to root.
$ sudo su
# echo "<?php phpinfo(); ?>" >> /var/www/html/info.php
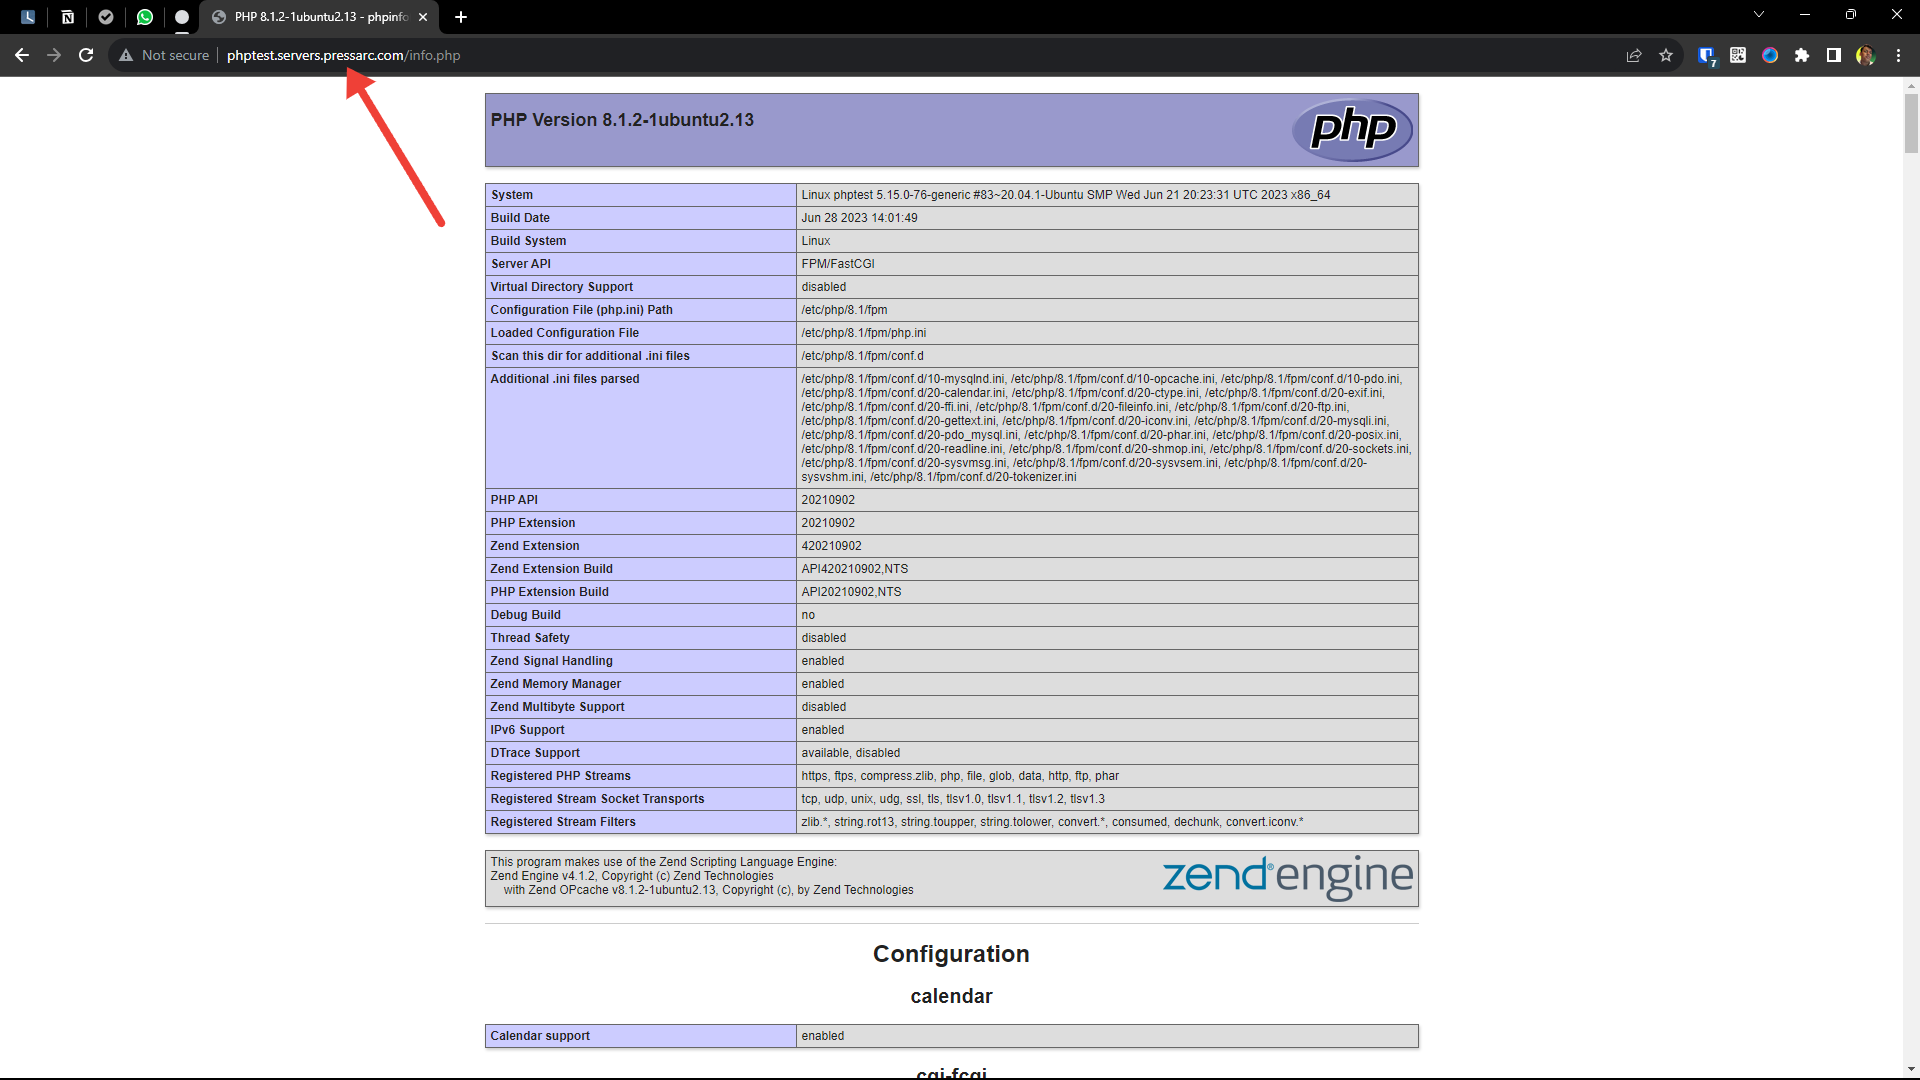
Once you’ve configured Nginx, PHP, and the PHP-FPM module and added a new file called info.php to your web server, open your browser and go to http://yourdomain.com/info.php. You’ll see the PHP info page that confirms everything is set up correctly with Nginx running on PHP 8.1
Conclusion
Awesome! Your NGINX server is now all set up to process PHP files through FastCGI. This means you can quickly deploy your PHP applications and frameworks, and NGINX will take care of routing requests to PHP FPM for processing. Just remember to make any necessary adjustments in terms of paths and settings according to your specific environment and requirements.
Aayush Nair has been designing WordPress websites for eight years now. He is also a content writer, writing blogs on technology and related topics, and likes helping people in his free time.
