Introduction
In my latest contribution to the series “Introduction to Web Server Setup & Management,” I delved into the intricacies of NGINX with a meticulous approach. The series itself is designed to provide a comprehensive understanding of how web servers operate and communicate with their users. By the end of the series, one can expertly optimize their web server for an enhanced user experience while also gaining a deeper understanding of the logic behind our LAMP/LEMP stacks. The knowledge garnered from this series is universally applicable to different programming environments and languages, thus making it a must-have addition to anyone’s skill set.
Today, let’s delve into the intriguing world of SSL and uncover how you can incorporate it into your NGINX setup. I’ll explore the numerous benefits of SSL, guide you through generating and installing a self-signed SSL, and demonstrate how to assign the same to your NGINX application. I’ll also show you how to automate issuing and renewing SSL certificates by installing Certbot to simplify your life. Let’s get started!
What is an SSL certificate?
In today’s digital age, website security has become a critical aspect of every online business. With numerous cybersecurity threats looming, taking necessary measures to protect your website from potential data breaches is essential. One of the most effective ways to secure your website is by setting up SSL (Secure Socket Layer) encryption.
SSL is a critical component of secure Nginx hosting, encrypting data between the user’s browser and your server. This is achieved by encrypting all data transmitted between the two, making it unreadable to anyone who may try to intercept it. SSL is often used to protect sensitive information such as credit card details, login credentials, and other personal data.
Most websites use SSL to keep their customers’ information safe and secure. It is also crucial for website owners to ensure that their SSL certificate is up-to-date and correctly configured. Failure to do so can result in warnings from web browsers and damage to the website’s reputation.
Advantages of using an SSL certificate
SSL encryption has numerous advantages, making it an essential security measure for websites and online transactions. An SSL certificate’s primary benefit is that it encrypts data transmitted between a user’s browser and the website’s server, ensuring that sensitive information such as credit card details and login credentials remain secure. This is particularly important for e-commerce websites that handle financial transactions and personal data.
In addition to providing data security, SSL certificates also provide authentication and trust. Websites with SSL certificates display a padlock icon and HTTPS in their URL, indicating that they have been authenticated and verified by a trusted third-party certificate authority. This gives users peace of mind that they are interacting with a legitimate website, not a fraudulent one. Moreover, SSL certificates can improve search engine rankings as search engines prefer websites with SSL encryption. Another benefit of using SSL is that it can help prevent phishing attacks, where malicious actors try to trick users into revealing sensitive information.
Apart from enhancing website security, SSL can also improve website speed. This is because SSL-enabled websites use HTTP/2, the latest HTTP protocol version. HTTP/2 allows faster and more efficient data transfer between servers and clients, improving website performance. SSL can also help websites load more quickly by using caching techniques. This means that the SSL certificate allows the web browser to cache some of the website’s resources (such as images or scripts) locally, reducing the number of requests made to the server and improving overall website speed.
Using a self-signed SSL with NGINX
Note: Generation of a self-signed SSL certificate is included here just for learning purposes. If you have webapp or a site and you want to use a SSL certificate with it, then skip to the certbot section.
NGINX is also capable of supporting SSL for secure communication. Using SSL with NGINX is a simple process. It involves generating a certificate and key, configuring the server to use SSL, and ensuring that the website or application is accessible via HTTPS. Using SSL with NGINX provides security and improves website performance by reducing the risk of attacks and ensuring that data is transmitted securely.
Generating a Self Signed SSL certificate
SSL utilizes a public certificate and a private key. The private key is strictly kept confidential on the server and is responsible for encrypting information being sent to clients. Meanwhile, the public SSL certificate is openly shared with anyone requesting access to the content, allowing it to decrypt the signed content from the associated SSL key.
In just a single command, OpenSSL offers the ability to generate a self-signed key and certificate pair after logging in as a sudo user:
$ sudo openssl req -x509 -nodes -days 365 -newkey rsa:2048 -keyout /etc/ssl/private/nginx-selfsigned.key -out /etc/ssl/certs/nginx-selfsigned.crt
Let’s analyze the packed things within the command initiated so we have a better understanding of why we did what we did:
- openssl: an essential utility for crafting and handling various certificates, keys, and files. Its versatile capabilities make it an indispensable resource for managing your OpenSSL cryptographic solutions.
- req: by utilizing this subcommand, we are indicating our preference for employing advanced X.509 certificate signing request (CSR) management. The X.509 standard is widely recognized as a key component of public key infrastructure, which SSL and TLS utilize for practical key and certificate management. We aim to generate a brand-new X.509 certificate; therefore, this subcommand is particularly useful in achieving our objective.
- -x509: directs the system to produce a self-signed certificate rather than the typical process of creating a certificate signing request. This command modifies the preceding subcommand and enables the creation of a certificate without the need for external validation or authentication.
- -nodes: This instructs OpenSSL to forego securing our certificate with a passphrase that enables NGINX to access the file upon server startup. The presence of a passphrase would hinder this process as NGINX would require a manual intervention to input it every time the system restarts.
- -days 365: The certificate’s validity period can be customized per your requirements. For this particular certificate, I have selected one year.
- -newkey rsa:2048 indicates our intention to produce a fresh certificate and key simultaneously. Since we had yet to generate the key needed to authorize the certificate, we must create it together with the certificate. The ‘rsa:2048’ specifies creating an RSA key of 2048 bits.
- -keyout: This command instructs OpenSSL to create a private key file and specify the location where it should be saved.
- -out: This command informs OpenSSL about the destination location for the certificate that is being generated.
Once we run the above command, we must answer a few queries about our server to ensure the information is accurately included in the certificate.
Please complete all the prompts correctly, paying particular attention to the line requesting the Common Name. This should be either your server’s fully qualified domain name or your name. If you are unsure, please enter the public IP address associated with your server.
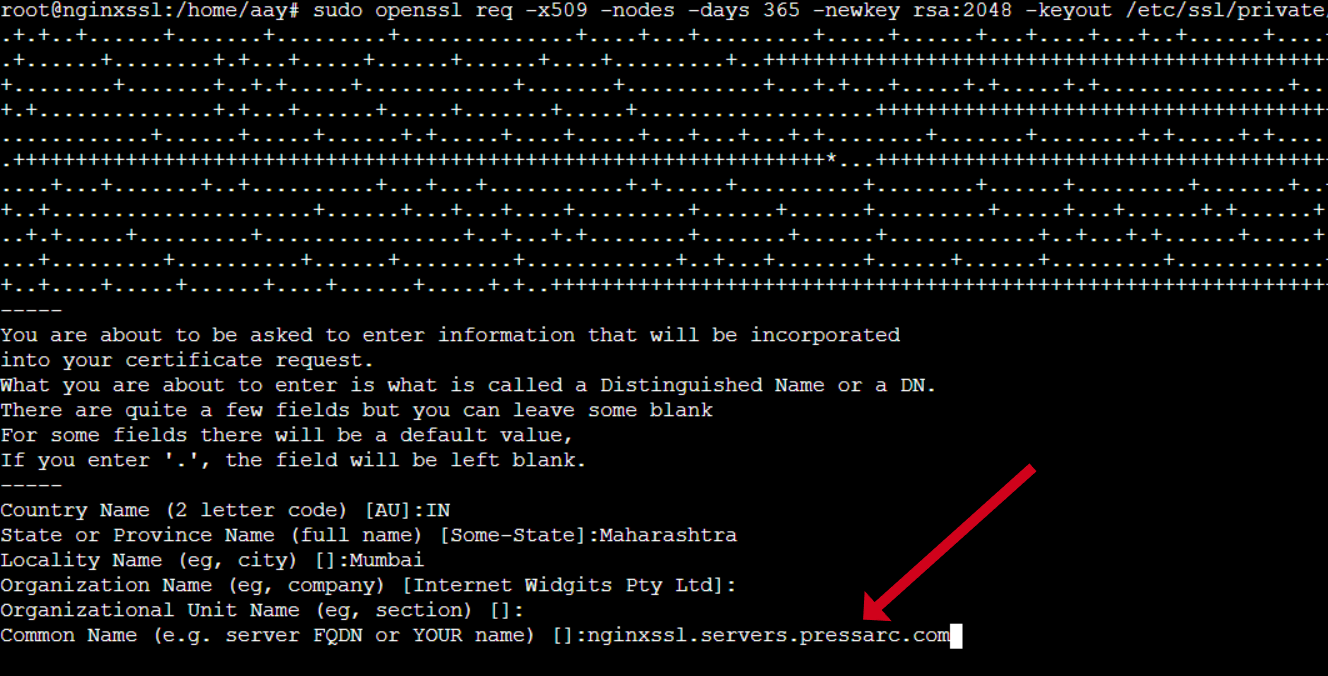
OpenSSL will properly store the two files you have created in their respective subdirectories within the /etc/ssl directory.
N.B: Using a self-signed certificate for your server may have limitations. While it can still encrypt communication between your server and clients, it may not be recognized by trusted certificate authorities included with popular web browsers. This means that users may not be able to validate the identity of your server automatically.
However, there are situations where a self-signed certificate may still be a viable option. For example, if your server doesn’t have a domain name or the encrypted web interface is not user-facing. In other cases, using a CA-signed (Certificate Authority Signed) certificate may be more beneficial, offering increased trust and security measures, which I have elaborated on further in this article.
Creating a Config Snippet Pointing the Key and Certificate
We’ve generated the necessary key and certificate files in the /etc/ssl directory. To simplify the process, we will consolidate all required settings into a snippet file that can be easily incorporated into our NGINX server blocks.
Generate a new config snippet in the snippets directory designated for NGINX:
$ sudo nano /etc/nginx/snippets/self-signed.conf
This will create a new file and open it. Simply paste the following content:
ssl_certificate /etc/ssl/certs/nginx-selfsigned.crt;
ssl_certificate_key /etc/ssl/private/nginx-selfsigned.key;
ssl_protocols TLSv1.2;
ssl_prefer_server_ciphers on;
ssl_ciphers ECDHE-RSA-AES256-GCM-SHA512:DHE-RSA-AES256-GCM-SHA512:ECDHE-RSA-AES256-GCM-SHA384:DHE-RSA-AES256-GCM-SHA384:ECDHE-RSA-AES256-SHA384;
ssl_session_timeout 10m;
ssl_session_cache shared:SSL:10m;
ssl_session_tickets off;
ssl_stapling on;
ssl_stapling_verify on;
resolver 8.8.8.8 8.8.4.4 valid=300s;
resolver_timeout 5s;
add_header X-Frame-Options DENY;
add_header X-Content-Type-Options nosniff;
add_header X-XSS-Protection "1; mode=block";
Once added, press CTRL + X followed by Y to save this file. The initial two lines of this code snippet enable NGINX to utilize our custom-built certificate and private key. Following this, the subsequent section contains SSL settings applicable across the board.
Updating the NGINX configuration file
After obtaining our code snippets, we must modify our Nginx settings for SSL activation.
For the sake of this guide, I’ll assume that the default server block file within the /etc/nginx/sites-available folder is employed in this tutorial. If a different server block file is utilized, kindly replace its name in the following directives.
It’s time to access the server block file and make the necessary tweaks:
$ sudo nano /etc/nginx/sites-available/default
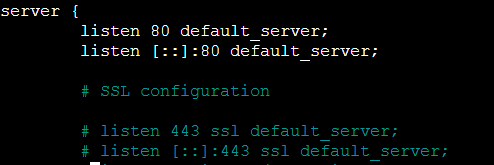
Most likely, the start of your server block would look something like this:
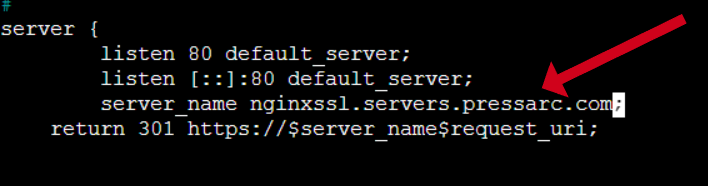
We’ll add a server_name directive specifying your server’s domain name or IP address. Once we complete this short block, we’ll be all set.
I will add the following after the “listen [::]:80 default_server;” line:
server_name domain_or_IP;
Remember to replace the domain_or_IP with your domain or IP address.
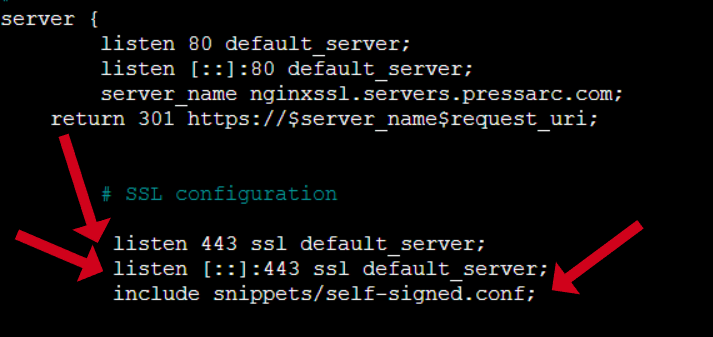
Once that is done, simply remove the hashtags and add the following snippet after listen [::]:443 ssl; to the block below:
include snippets/self-signed.conf;
Save and close the file by pressing CTRL + X followed by Y when you are finished.
Before we restart NGINX, we must test if there’s nothing wrong with our changes. To do so, run:
$ sudo nginx -t
If everything is as we expect, you will see something like this:

You might see a warning at the beginning here. The self-signed certificate we’re using can’t use SSL stapling. But don’t worry – our server will still encrypt your connections properly, so everything should be good.
If you see the same output as above, your configuration file has no syntax errors. You can restart Nginx to ensure your changes are implemented:
$ sudo systemctl restart nginx
And voila! The NGINX web server is now encrypting all the data transmitted using our self-signed SSL certificate. However, if you visit your domain or IP in your browser, you will see an error saying that the connection isn’t private. As mentioned earlier, this is because for a browser to accept an SSL certificate, it must be issued by a trusted Certificate Authority (CA.)
What is a Certificate Authority (CA)
A Certificate Authority (CA) is a trusted entity that issues digital certificates to verify the identity of individuals, organizations, and devices in a network. The CA acts as a trusted third party to verify the authenticity of the information provided by the certificate holder and ensures that the data is protected from tampering or forgery.
CAs are commonly used by web browsers to establish secure connections between websites and users by verifying the website’s identity using a digital certificate issued by a trusted CA. Certificate Authority (CA) examples include DigiCert, GlobalSign, Comodo, Symantec, Entrust, and Let’s Encrypt.
Let’s Encrypt is a free open certificate authority that provides digital certificates for enabling HTTPS (SSL/TLS) encryption for websites, free of cost. It was launched by the Internet Security Research Group (ISRG) in 2015 to make it easy and affordable for website owners to secure their sites with SSL/TLS encryption and promote a more secure and privacy-respecting web.
Issuance and implementation of a free SSL certificate provided by Let’s Encrypt is a tad complicated. However, using software like Certbot, you can quickly get free SSL certificates from Let’s Encrypt.
What is Certbot?
Certbot is a free and open-source tool widely used for automating obtaining and renewing SSL/TLS certificates. It offers a simple and user-friendly interface for managing SSL/TLS certificates and can be used with various web servers and operating systems.
Certbot ensures your website is secure and protects sensitive information by encrypting data in transit. It also helps to improve your website’s search engine ranking and enhances trust among users. Some of its key features include:
- Automated certificate installation and renewal: Certbot can automatically install and renew SSL certificates for various web servers and platforms.
- Support for multiple web servers: Certbot supports many web servers, including Apache, Nginx, and IIS.
- Integration with Let’s Encrypt: Certbot is designed to work seamlessly with Let’s Encrypt.
- Command-line interface: Certbot can be controlled via a simple command-line interface, making it easy to automate certificate management tasks.
Therefore, using Certbot is a recommended practice for website owners to ensure the security and reliability of their online presence.
Installing Certbot
Before installing Certbot, you need to install snapd. To do this, you can simply run the following:
$ sudo apt update && sudo apt install snapd -y
Once that’s done, you can go ahead and install Certbot:
$ sudo snap install --classic certbot
Getting an SSL Certificate with Certbot
Getting an SSL certificate with Certbot is easy! You must run a simple command, and Certbot will handle everything else. It will even automatically edit your Nginx configuration, enabling HTTPS access with just one command.
Before you continue this step, remove all the configurations we made to the NGINX config file to use the self-signed certificate and restart NGINX. Once you’ve done that, you can proceed:
$ sudo certbot --nginx
Running this command will ask you a few questions, such as your email, present you with their terms and conditions – which you must accept before using Certbot and if you’d like to share your email with the makers of Let’s Encrypt to hear from them – which is optional.
After you provide your choices, it will automatically detect your domain numerically listed. Please choose the numbers that match your selection, and you can separate them using commas or spaces. If you want to select all the options, leave the input blank and hit the enter key.
This will send a request to Let’s Encrypt for an SSL certificate. Once you receive this and Certbot configures everything for you, you will see a success message like this:

To verify if everything is working fine, fire up your website on incognito mode, and you’ll see a padlock preceding your domain.
Conclusion
To sum it up, setting up SSL with NGINX may seem daunting, but it’s definitely worth the effort. Not only does it provide security and trust to your website visitors, but it can also improve your search engine rankings. Following the steps outlined in this practical guide, you can confidently set up SSL with NGINX and protect your website from potential security breaches. While it may require some technical knowledge and patience, the end result will be well worth it in the long run.
The folks at Webdock know how crucial it is to have a fast and secure website. That’s why they’ve made managing your SSL easy by including Certbot in all LEMP/LAMP stacks. You no longer have to be a tech genius to manage your SSLs. Come on over and see the Webdock difference for yourself. Spin up a server today, and let them take care of the rest!
Aayush Nair has been designing WordPress websites for eight years now. He is also a content writer, writing blogs on technology and related topics, and likes helping people in his free time.
