Introduction
Selecting the appropriate hosting control panel is essential for optimizing your WordPress website’s performance and management.
This article explains why Webdock could be the superior option for your WordPress site, from budget-friendliness and an intuitive interface to advanced security features.
We’ll also go over how to effortlessly migrate your website from Plesk to Webdock with minimal downtime and with the least effort, ensuring a smooth transition. Let’s go!
Plesk v/s Webdock: A Quick Comparison
Webdock presents numerous benefits in comparison to Plesk. Let’s explore them –
- Included Add-ons: Webdock offers a range of benefits, including free full server snapshots and application-level backups to keep your data secure. Moreover, it provides free transactional emails through Postmark, known for its top-notch deliverability, for plans above €/$5.99. These features make Webdock a fantastic choice for maintaining your WordPress site’s functionality. Additionally, you can set up email forwarding with ImprovMX at no extra charge. Buying these services separately can cost you over $30/mo with severe restrictions.
- User Interface: While Plesk’s User Interface isn’t bad from any mile, it still can be information overload-inducing. There are plenty of options on Plesk’s interface you would never need while managing WordPress websites. Moreover, it can be a little hard for your clients to manage. At the same time, Webdock’s interface, while not fancy, is practical and intuitive. All options are neatly organized and exactly where you need them.
- Price: While Plesk offers a free 15-day trial, you still have to pay anywhere between $14 to $60 per month just for the control panel, on top of your VPS services. These costs will only increase as your business expands. On the other hand, Webdock offers its control panel completely free of cost, and most of its servers can give you above industry-standard performances for a fraction of the costs of what you would pay just for Plesk.
Migrating Your Website
Now, let’s look at how we can migrate your WordPress website from Plesk to Webdock.
A Word of Caution…
Fortunately, these strategies typically result in minimal downtime (I’ll point out ways to reduce it even down the line). However, low downtime doesn’t mean all changes made during the process will be captured. Therefore, planning your migration is wise when traffic is at its lowest. Consider using tools like WP All Import/Export to transfer any new data that might not have been included in the initial migration.
Alternatively, using an under-maintenance plugin, you can temporarily keep your live site paused until everything is successfully transferred to Webdock.
Download Files
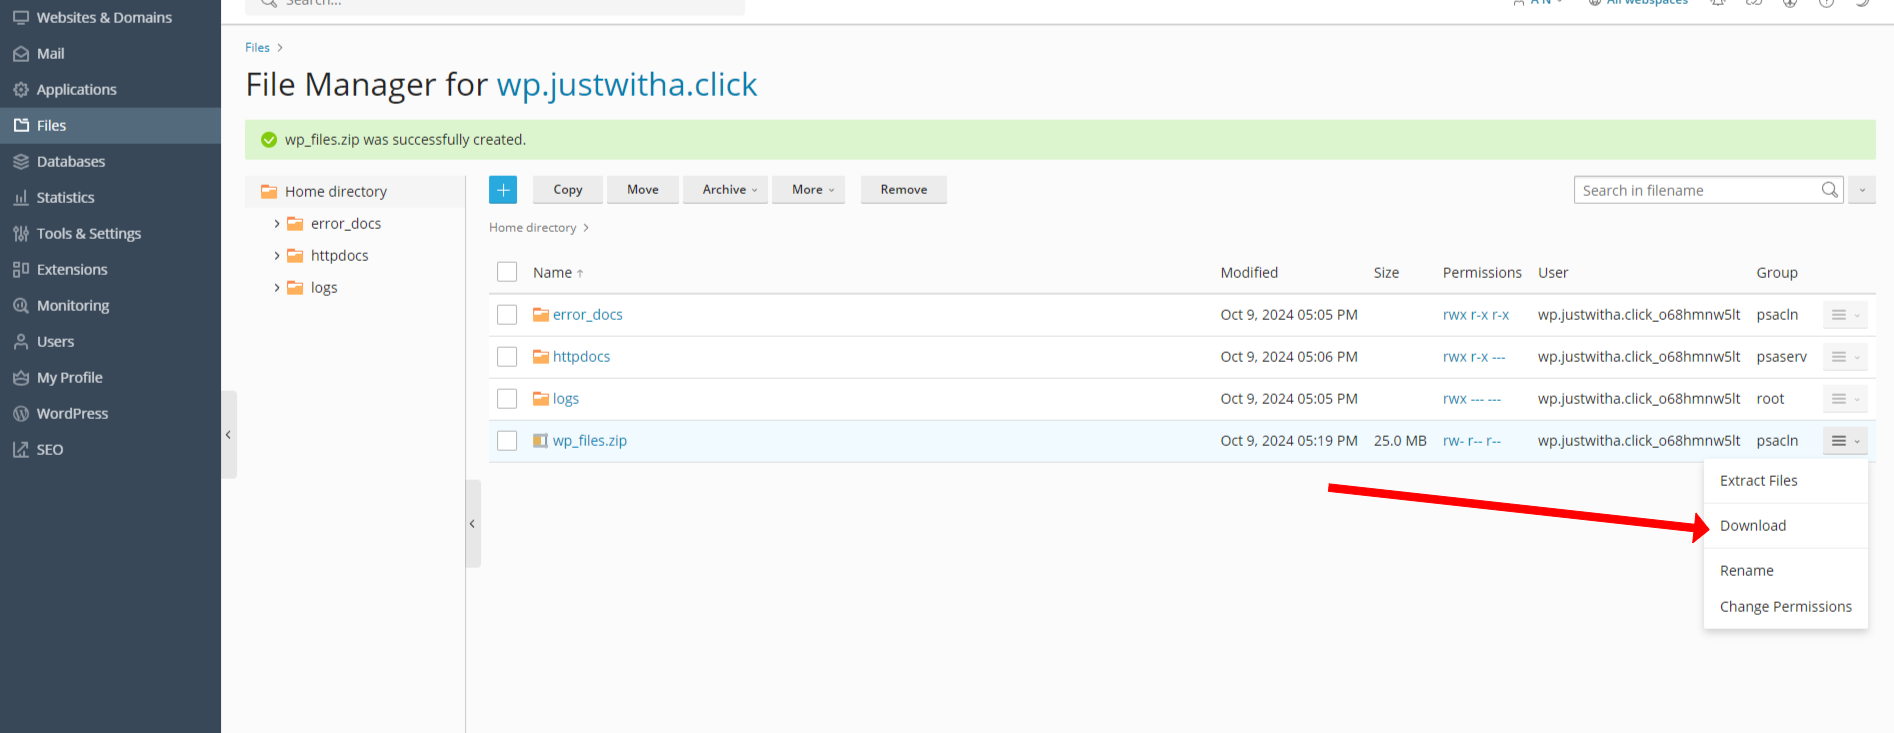
On your Plesk website’s dashboard, click on the Files open to open your WordPress website’s file manager. Then, select the httpdocs folder using the checkbox, click on the archive dropdown, and select the Add to archive button. Name it whatever you’d like for reference.
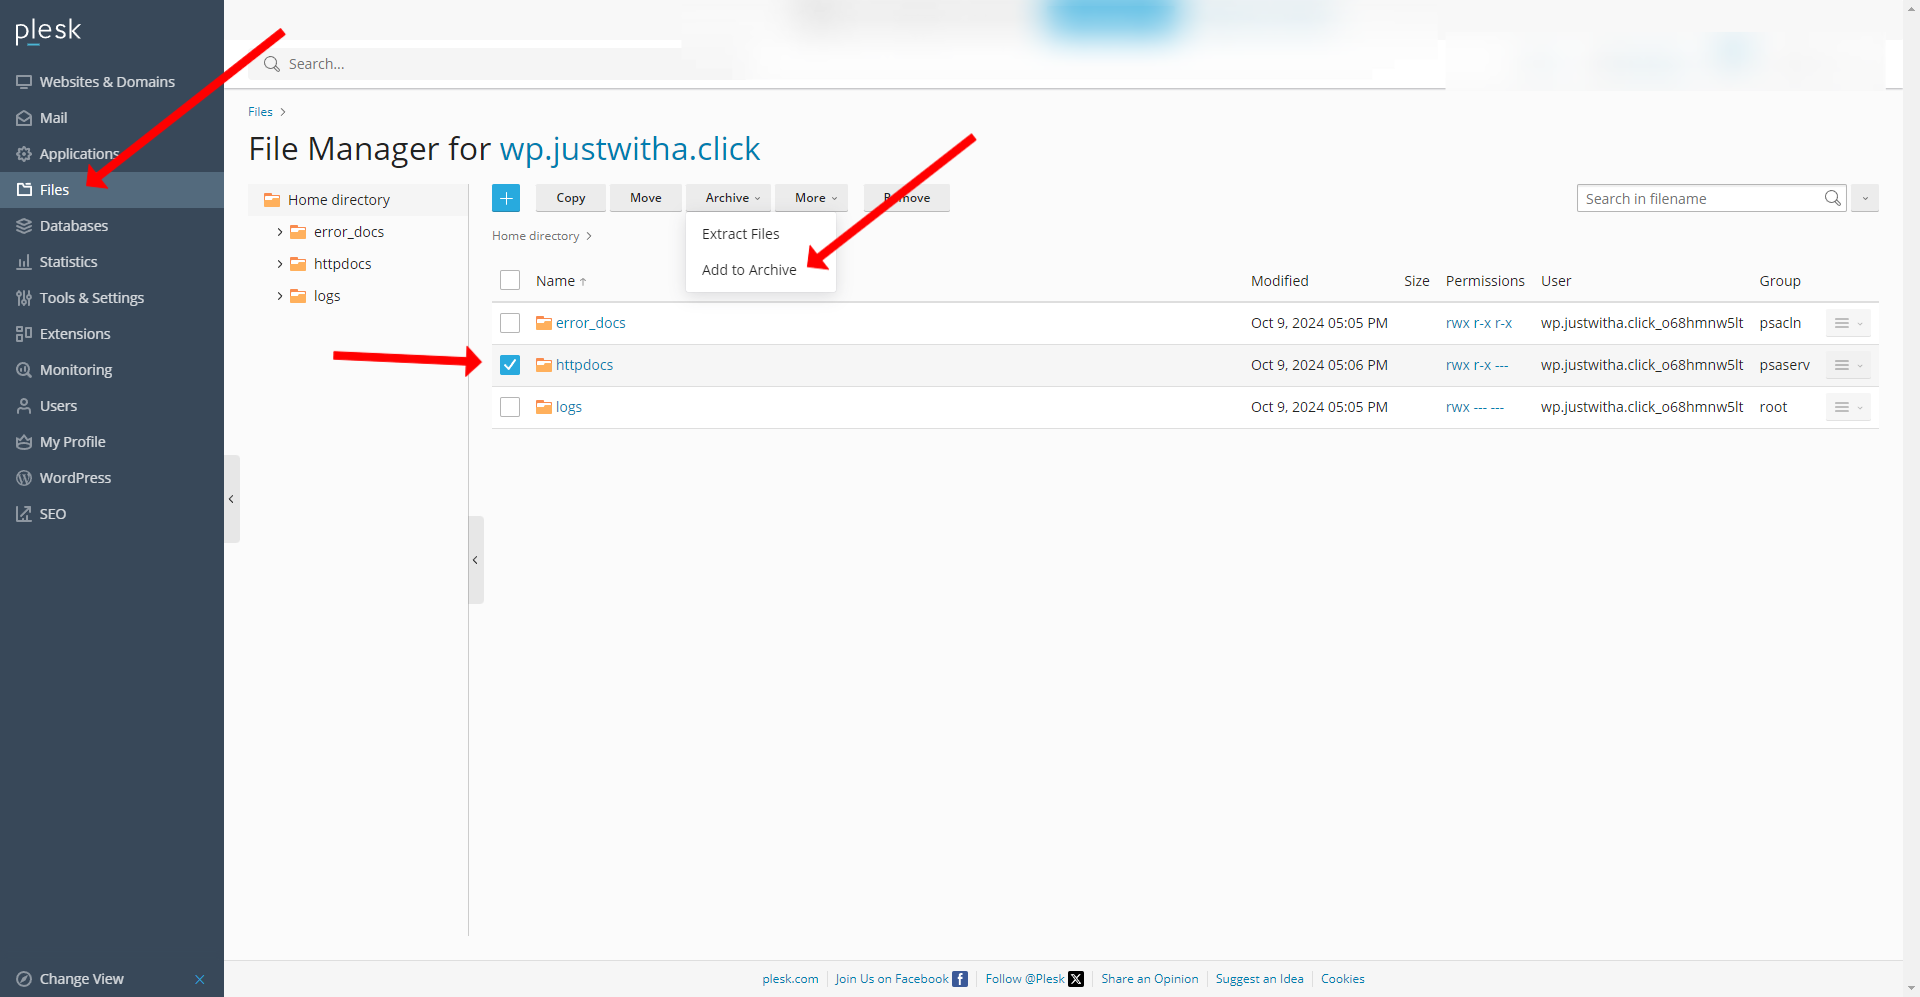
This will create a zip folder with your name. Right-click on the zip file and download it to your machine.
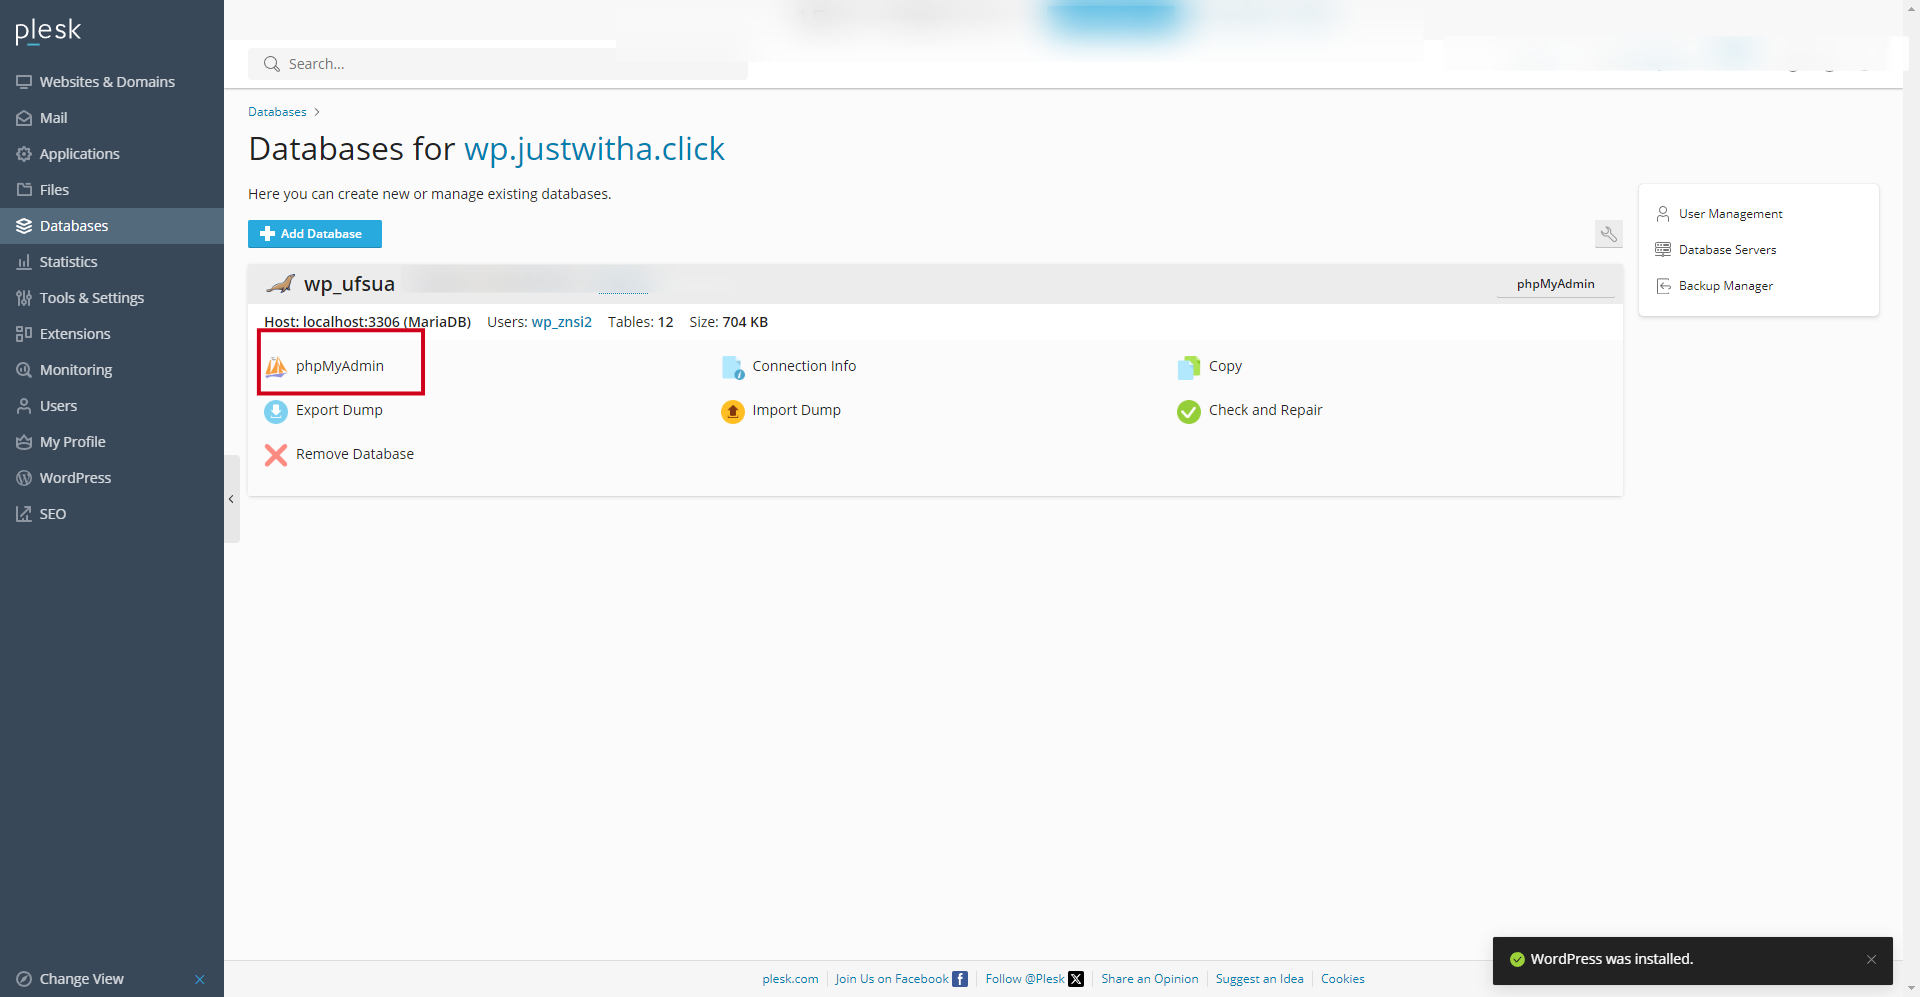
Download Database Backup
Similarly, find the database tab, select your website’s database, and then the phpMyAdmin button to open the console.
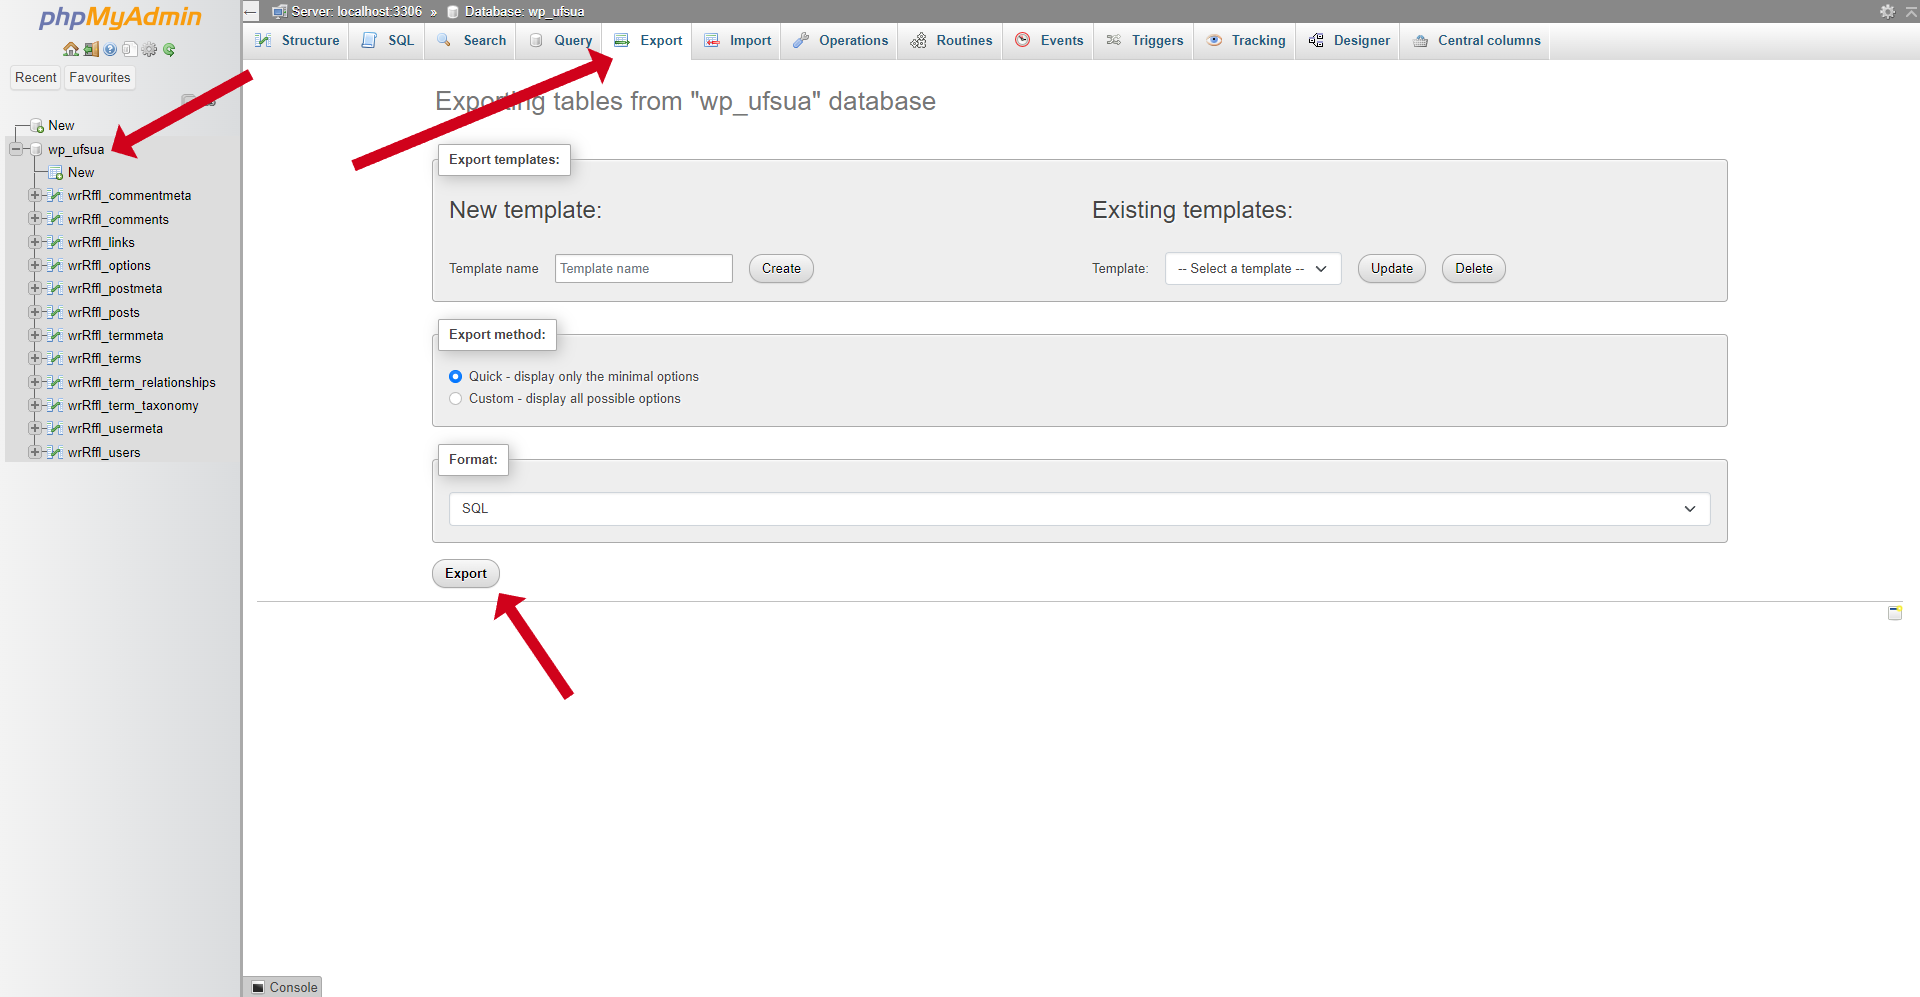
There’s also an export dump button, but the SQL file uploaded from this option lacks many important tables, so we’ll stick to good ole phpMyAdmin. Click on the option, and it will auto-login to the console.
Select your database, navigate to the export tab, and save your database as an SQL file. This will attempt to download a .sql file on your computer. Save it and keep it ready.
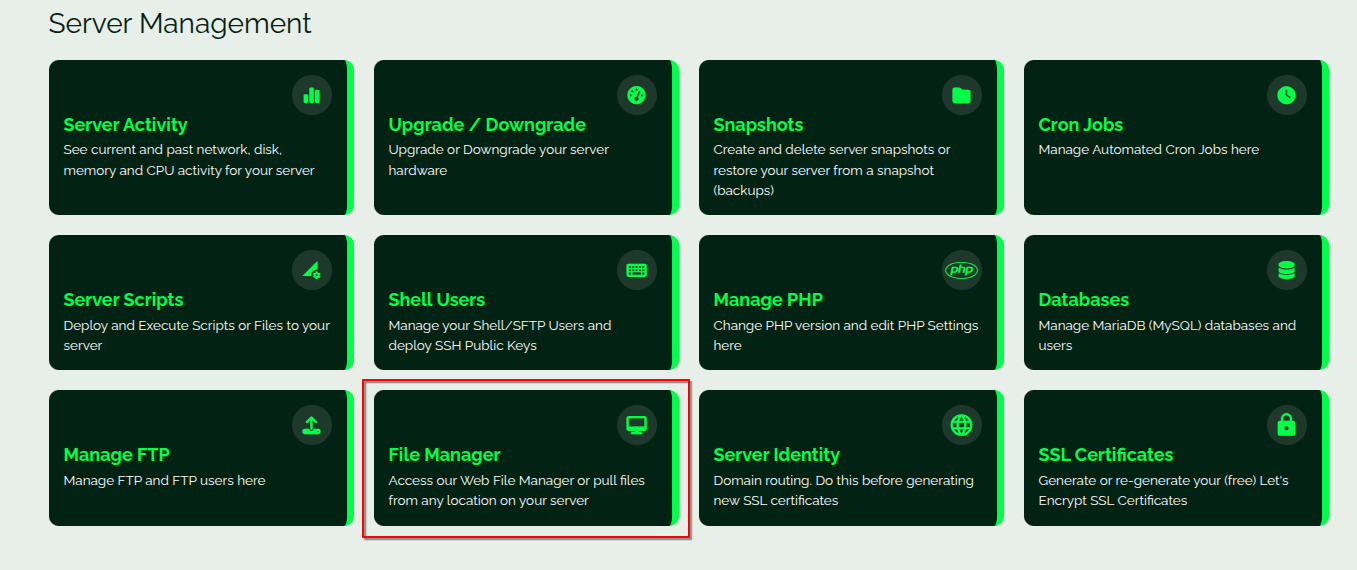
Configure Your Server on Webdock
Visit Webdock and set up a server starting at €/$5.99 or more. You can choose between Apache or NGINX as your server software; I recommend NGINX.
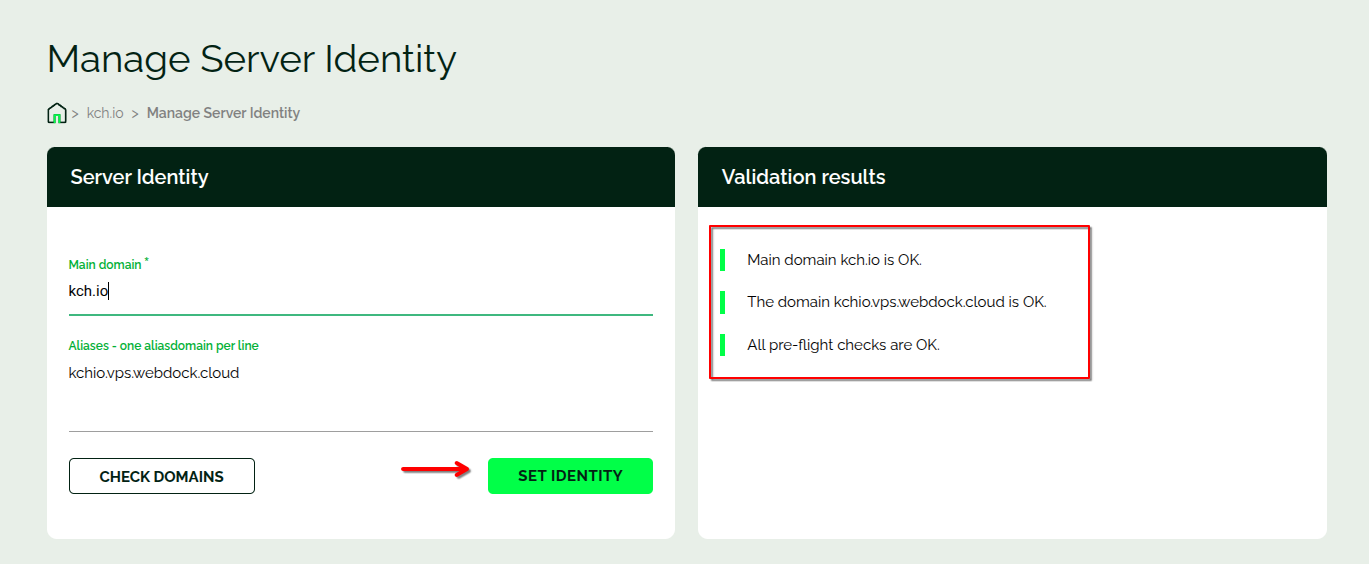
Once your server is ready, navigate to its dashboard on Webdock. Click the small pencil icon next to the Alias field in the Overview tab.
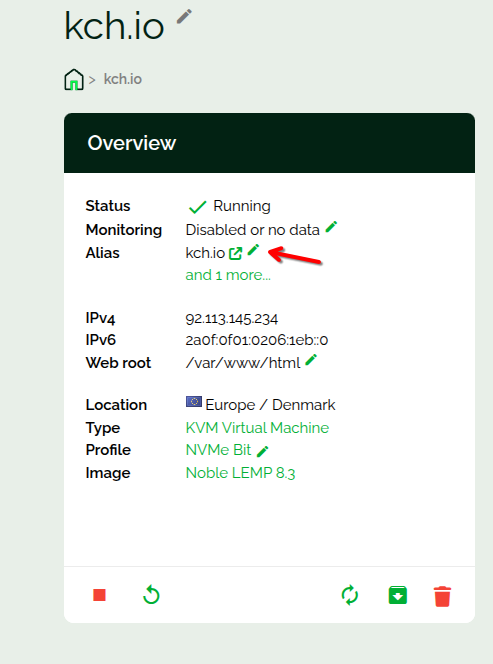
Enter your website’s primary domain in the main domain column. Typically, you’d click on Check Domain before setting an identity, but since we’re aiming for minimal downtime, directly set your website’s domain as the primary one instead.

The setup may take around 3-4 minutes and might result in an error message, but it’s fine to overlook this for now. If all OK, set the identity finally.
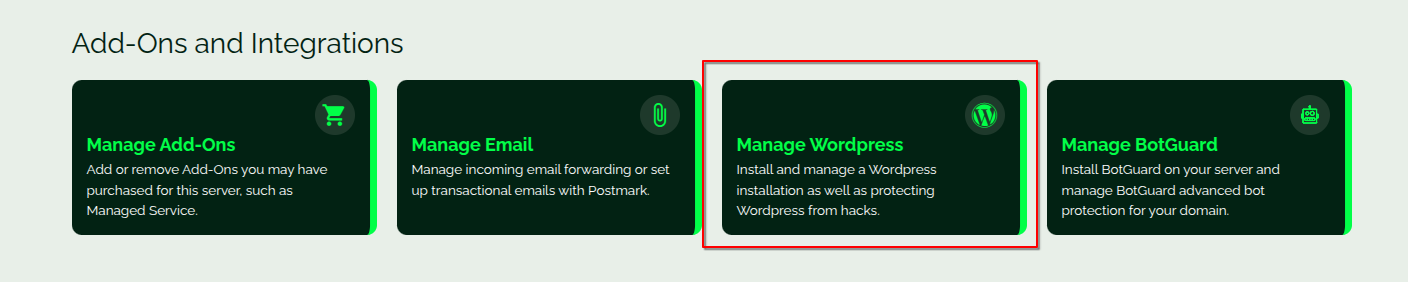
Install WordPress on Webdock
Return to your server’s overview page, scroll down, and locate the Manage WordPress section.
You’ll be asked to install WP-CLI on your server. Proceed by clicking the corresponding button to install it. Once WP-CLI is set up, click on the Install WordPress Now button. This will bring up a form with fields like admin email, domain, path, database, and more. In most situations, the default settings should suffice.
You won’t be able to create an admin password yourself, as Webdock automatically generates one for you.
Import Database Backup
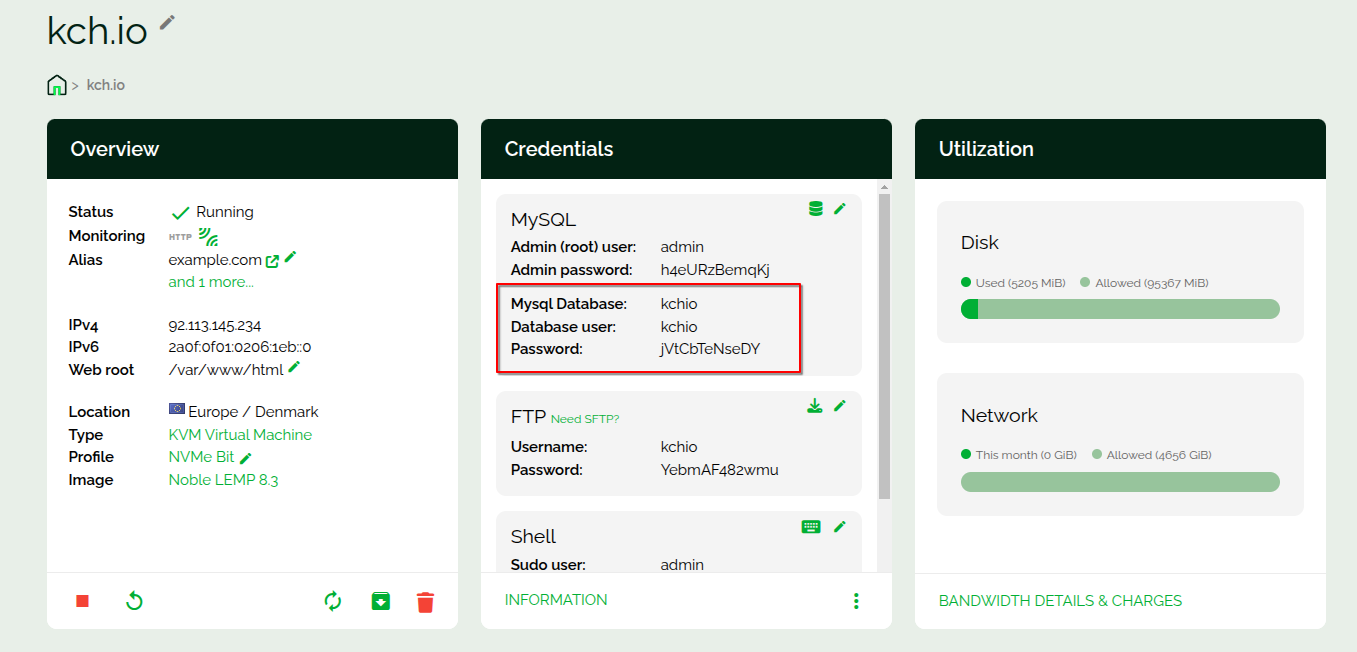
After installing WordPress, access phpMyAdmin by clicking the small database icon in the credentials tab. When prompted, enter your Admin username and password.

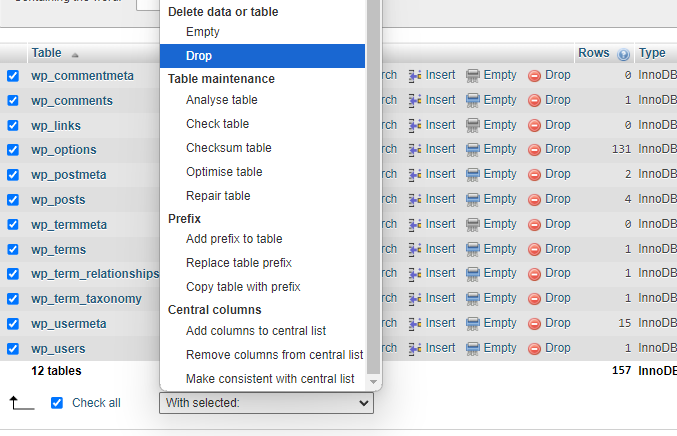
Locate your WordPress site’s database, select all tables within it, and proceed to drop (delete) them.
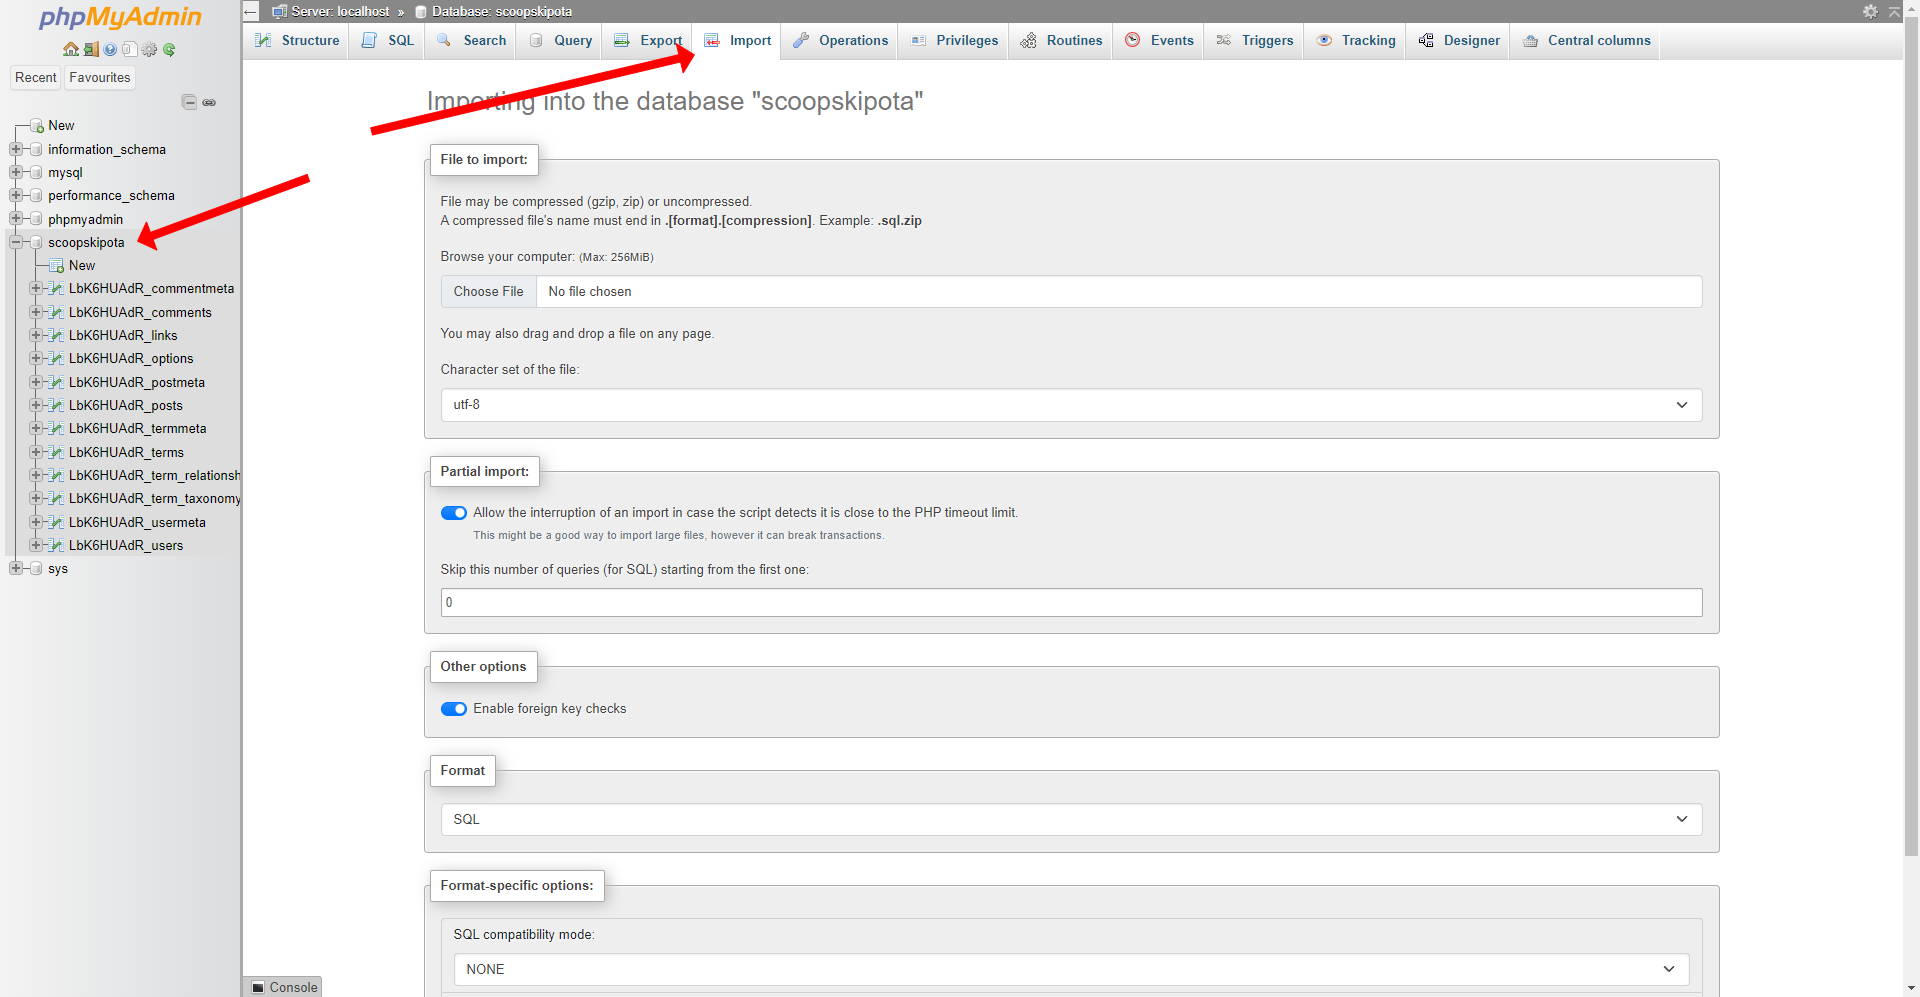
Next, navigate to the import tab. Here, you can drag and drop the .sql file downloaded from the Plesk dashboard or manually choose it from your computer. This SQL file will populate your database with all the necessary data.
Then, open the “wp_options” table and verify that both the siteurl and home option_names contain the https:// version of your website’s URL.
Transfer Website Files
After importing and verifying your database, install the File Manager from the overview section and log in.
Once inside the file manager, select all files using the option provided, but make sure to uncheck both the PHPMyAdmin folder and the filemanager.php file.
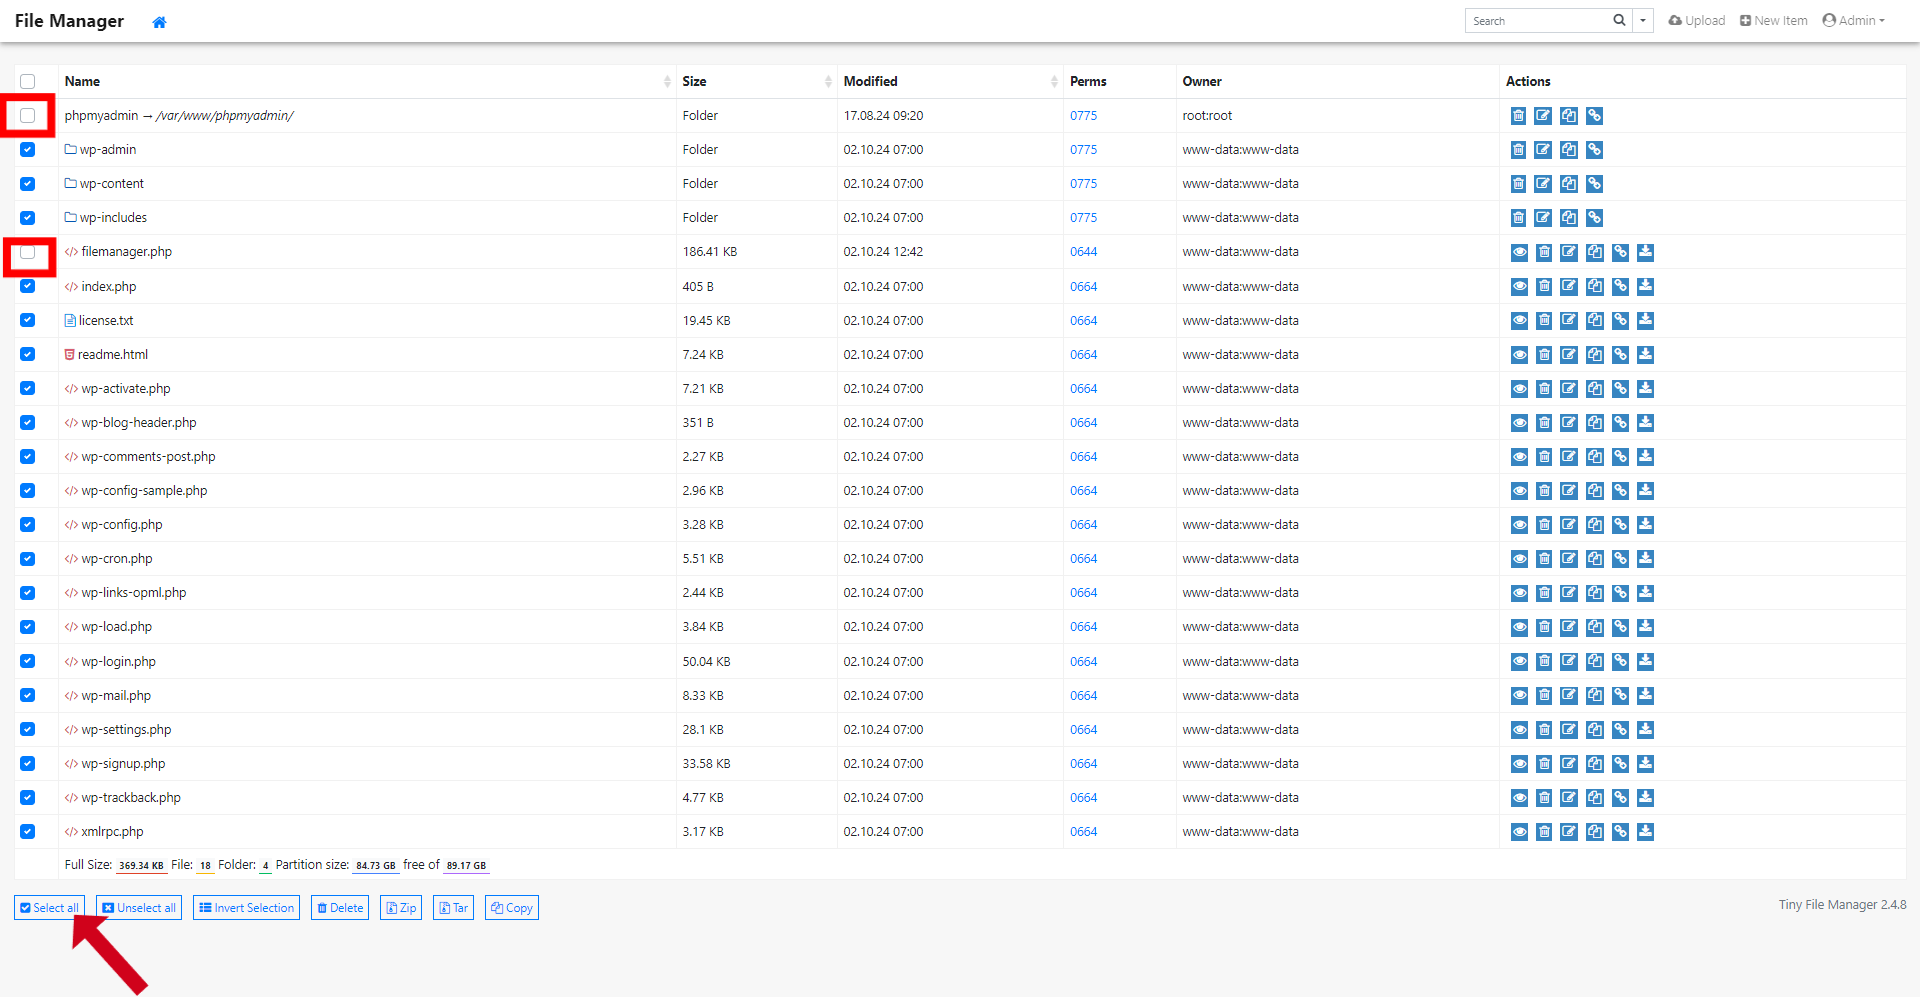
Delete all remaining files.
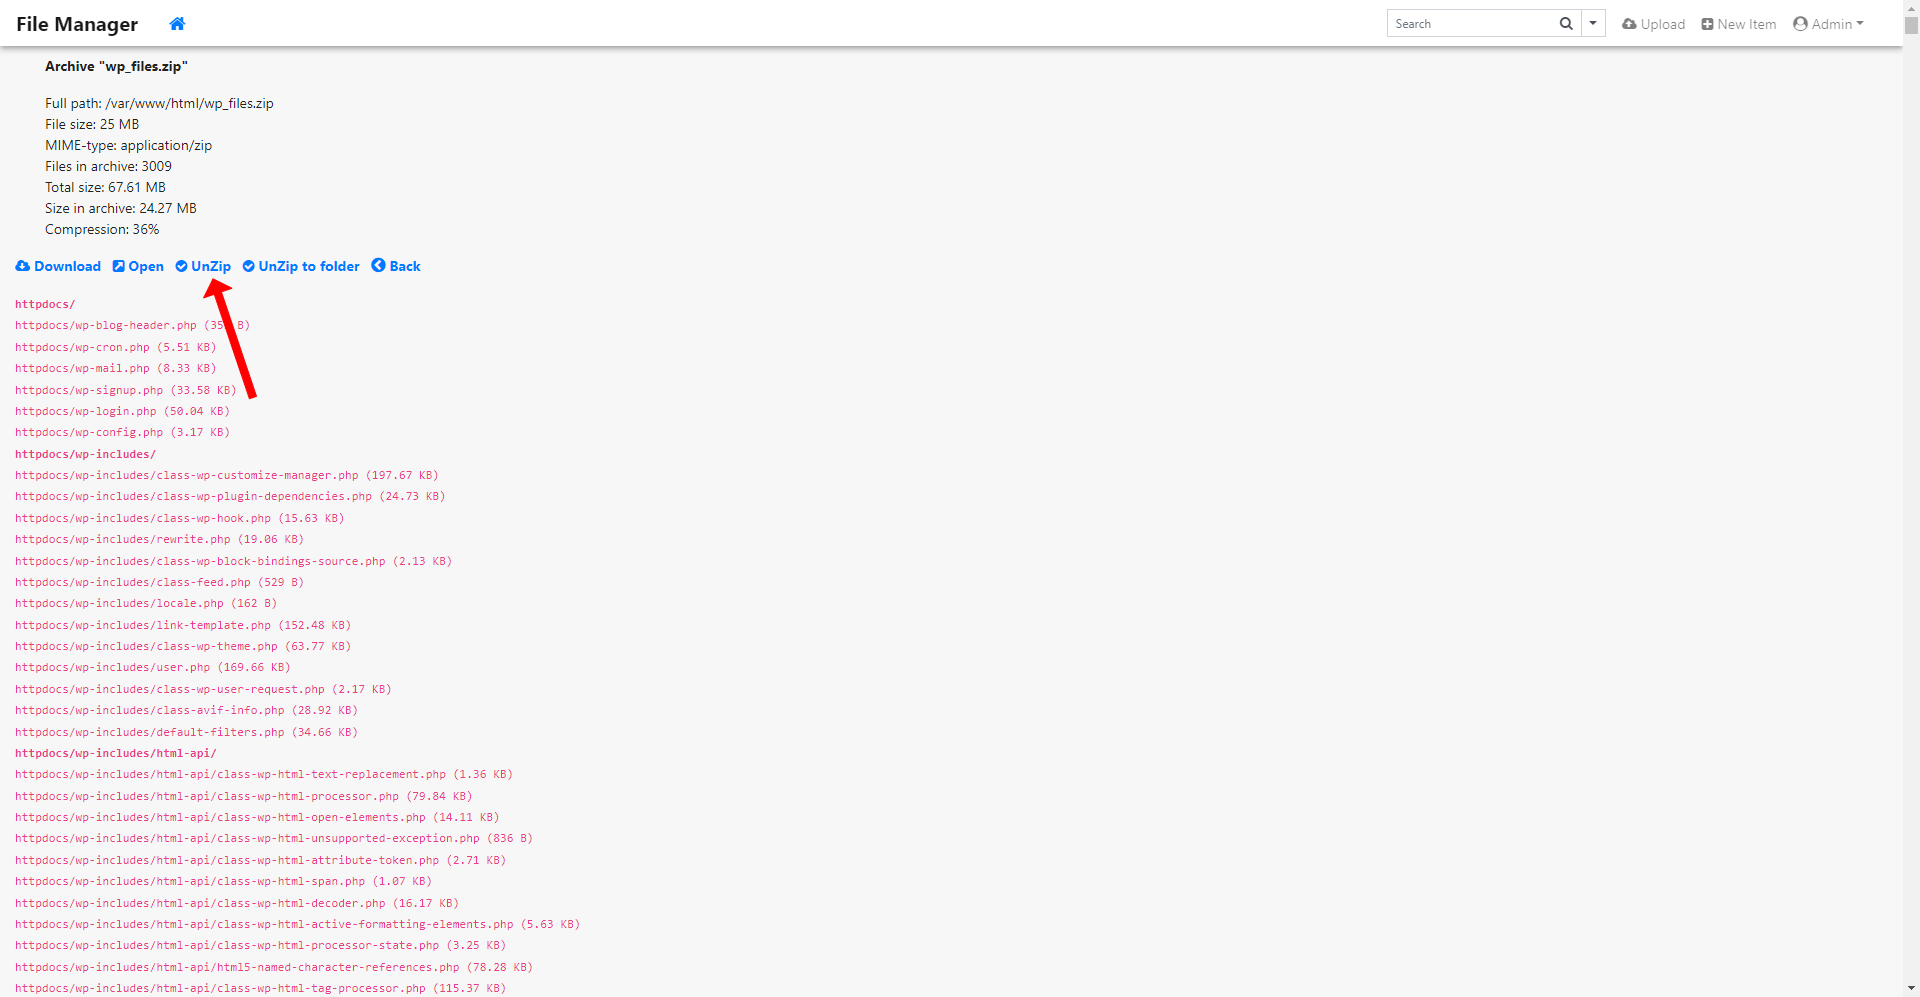
Next, navigate to the top right corner, click on the upload button, and upload the public_html zip file you previously downloaded from the Plesk dashboard. You can do this by either dragging and dropping it or manually selecting it from your computer.

After uploading the zip folder, locate it and find an option to unzip it.
Once unzipped, open the resulting folder, where you’ll see another folder named httpdocs. Open this folder and select all its files. Click on the copy button.
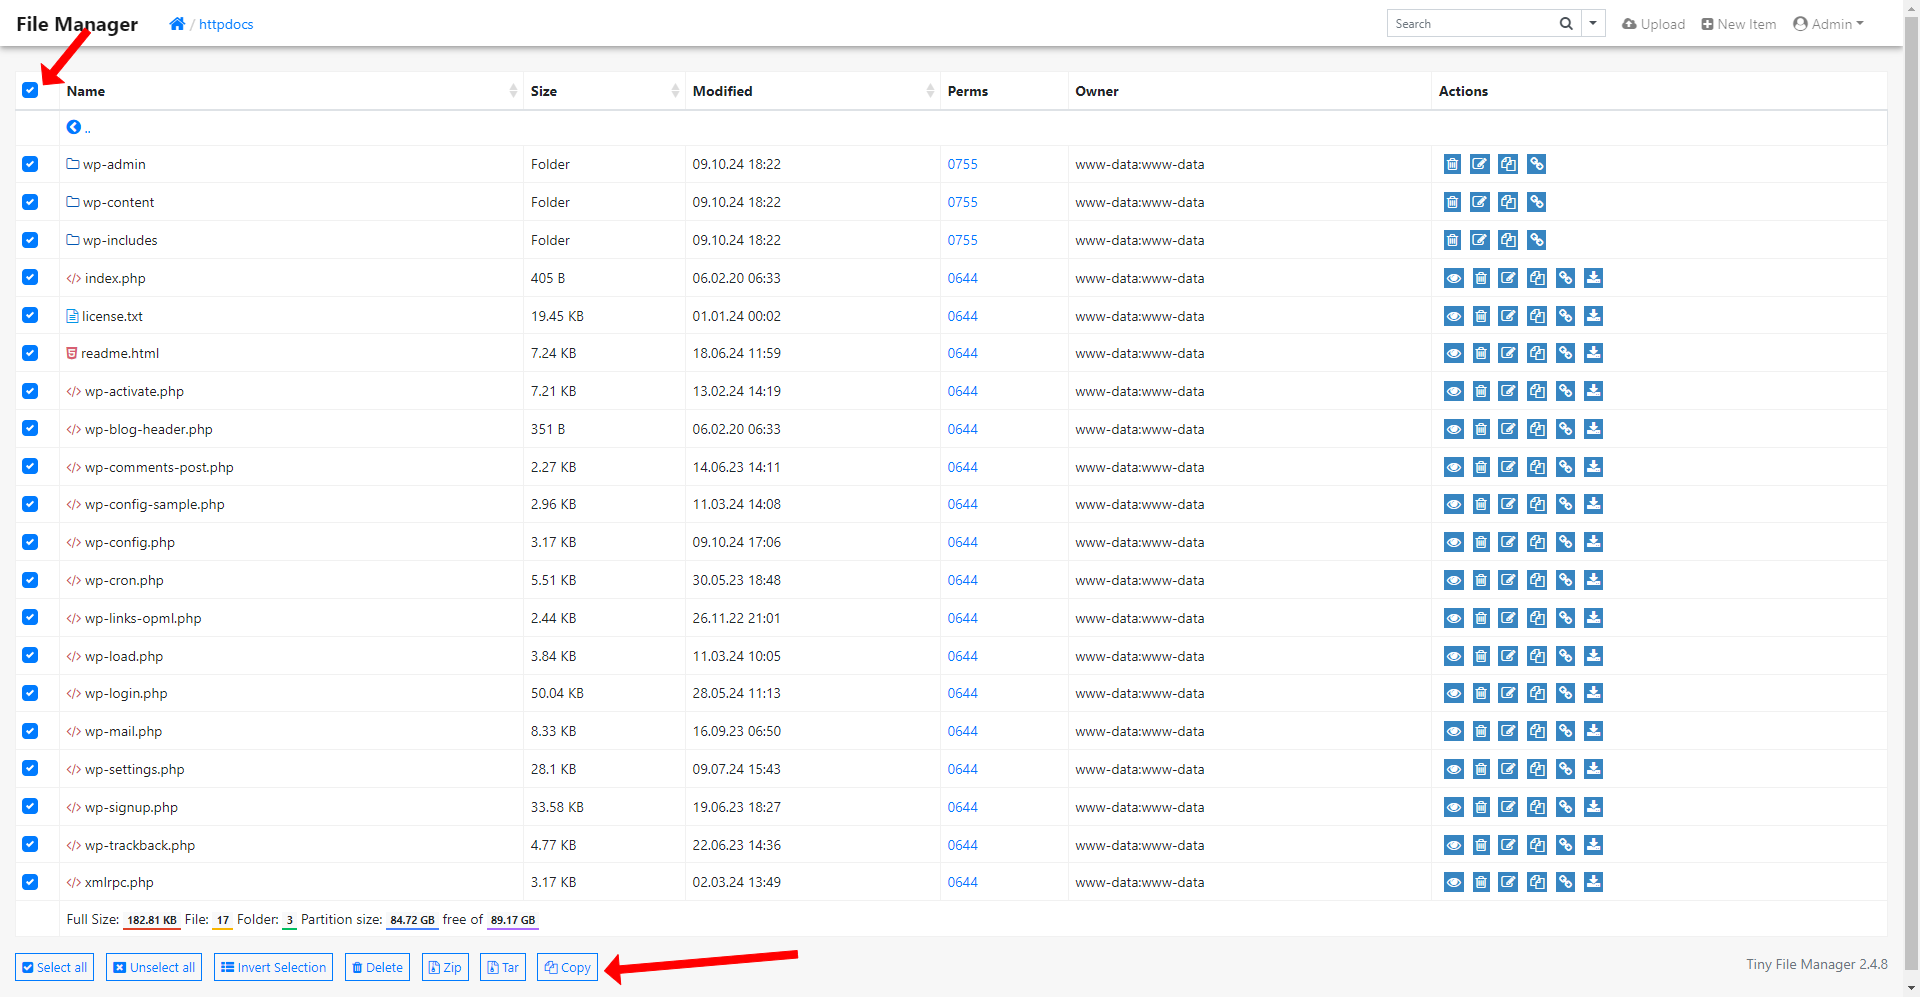
In the next screen that appears, check off the “Move” box while leaving the path field empty.
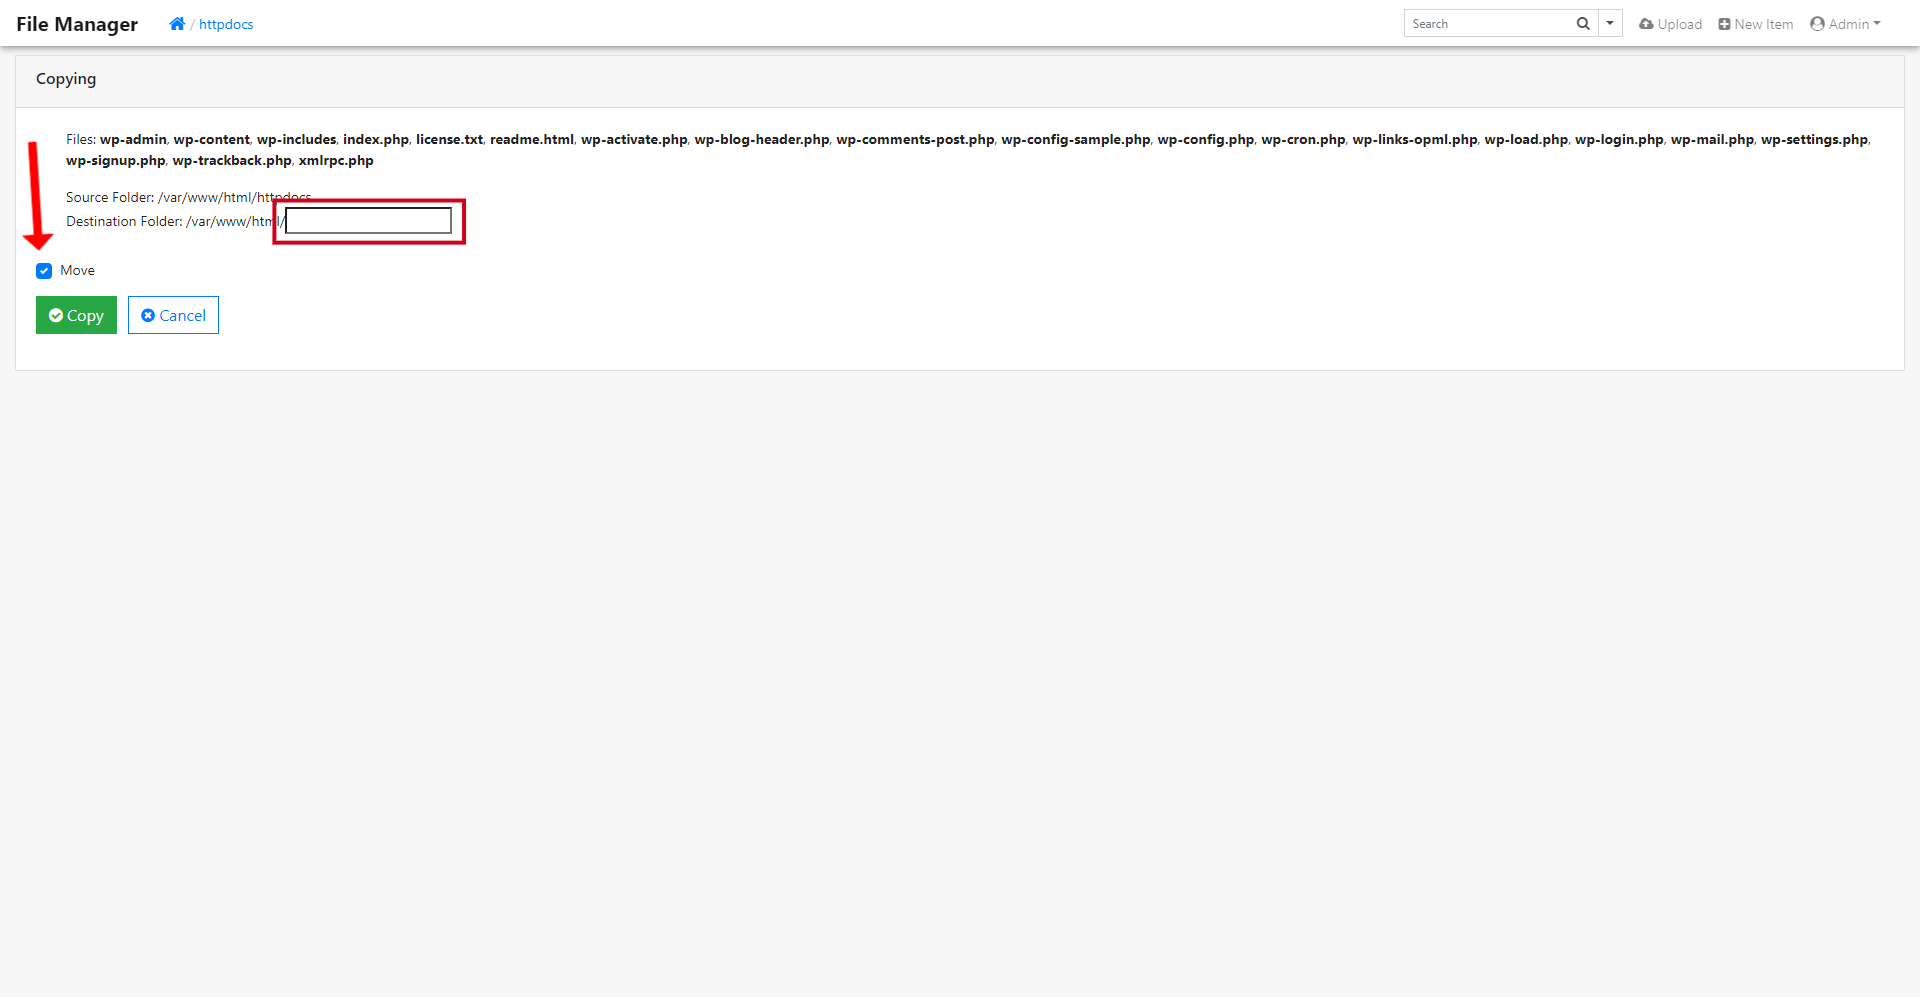
Now that your files have been moved to the main directory, you can go ahead and delete both the original zip file and its unzipped folder.
Connect to the Database
Open the wp-config.php file and locate the section containing the database details.
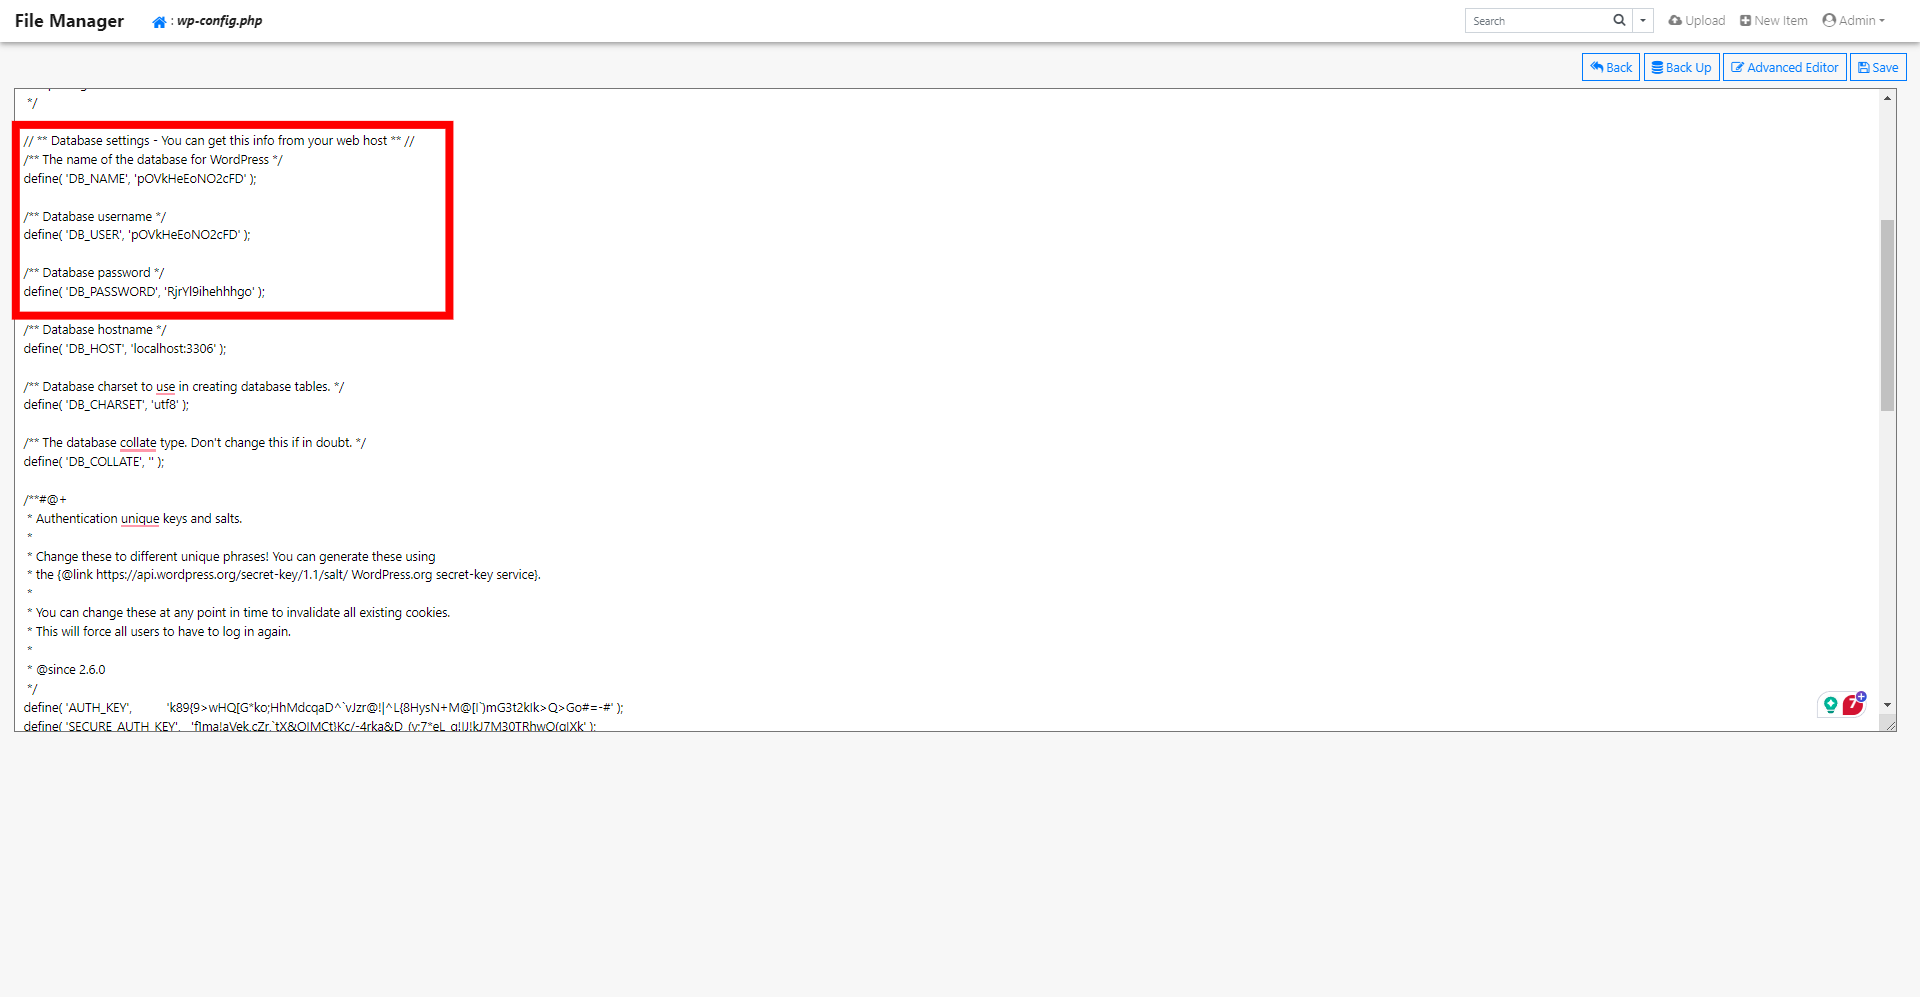
Update these details with the current information from your server overview.
Once you’ve made these changes, save the file.
After completing all your file-related tasks, disable and remove the File Manager. Even though a password protects it, it can still present a security risk. It’s advisable to remove it when you’re finished. You’ll find a quick button to delete the File Manager in the area where you initially enabled it.
Assign SSL Certificate
Now, update your domain’s DNS settings to point to your Webdock VPS IP address using an A/CNAME record.
As previously mentioned, return to your server overview, navigate to Alias, and click the check domain button. If everything checks out in the validation section, proceed to set the domain.
This action will also regenerate SSL certificates for your site. And that’s it—your WordPress website is now live on Webdock from Plesk with minimal downtime.
Alternative Method: Using A Plugin
Using the method mentioned earlier is both cost-free and generally reliable. However, it can become tedious if your website is large, your internet connection is slow, or you’re not tech-savvy. In such cases, leveraging a backup plugin can streamline the process of transferring your site to Webdock.
Among the numerous backup and migration plugins available, I always depend on UpdraftPlus. While it may have minor imperfections, it successfully accomplishes the task. The best part? Most of its essential features are available at no cost, so that you won’t spend anything. Duplicator is also another great option.
If you already have a preferred backup plugin, feel free to use it instead. The steps are generally similar across different plugins. Additionally, it’s assumed that you have access to some form of cloud storage.
Any option will work, including the free version of Google Drive. Although cloud storage isn’t mandatory, it can greatly accelerate migration. If you decide not to use a storage service, don’t worry. I’ll also walk you through the steps without it. Just keep in mind that if your internet speed is slow, proceeding without cloud storage might take almost as long as the manual method described earlier.
To get started, log into your WordPress dashboard. Hover over the “Plugins” section and select “Add New.” In the search bar, type “UpdraftPlus” and locate the UpdraftPlus WordPress Backup Plugin. Click on “Install Now,” and once the installation is complete, activate the plugin.
After activation, you can choose to follow the introductory tour or skip it if you don’t plan to use the plugin further or if it doesn’t meet your needs.
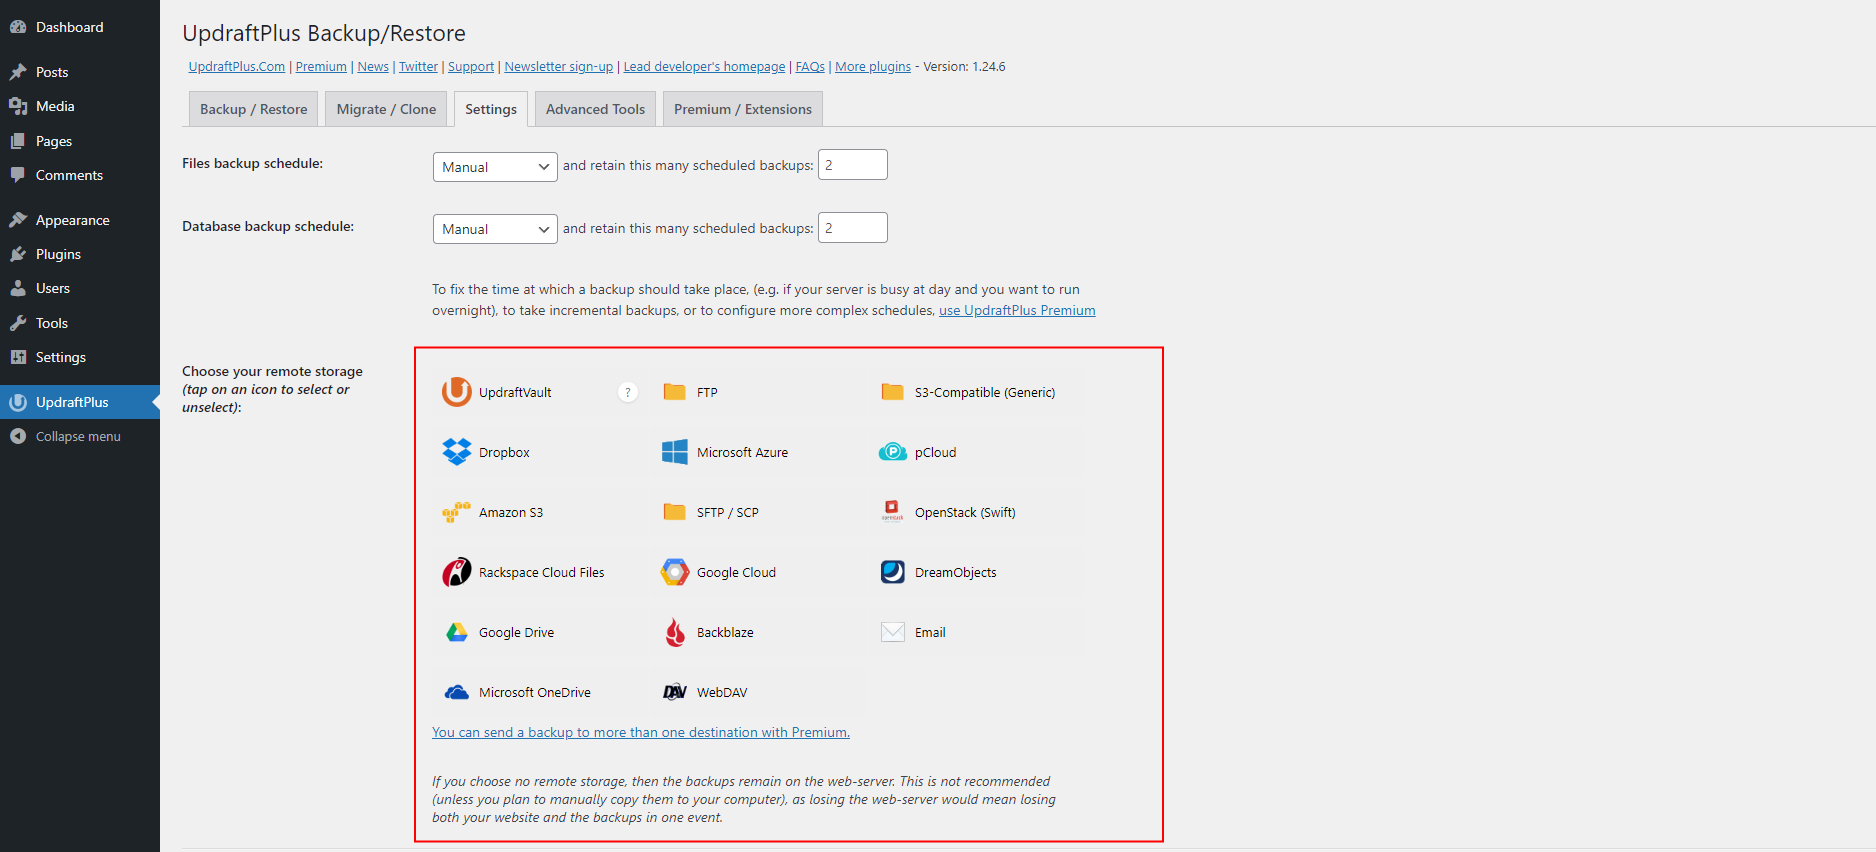
Next, navigate to the UpdraftPlus option on the menu to access the plugin’s settings. Scroll down to the “Choose your remote storage” section, select your preferred cloud storage option, and follow the setup instructions. If you prefer not to use remote storage, simply skip this step.
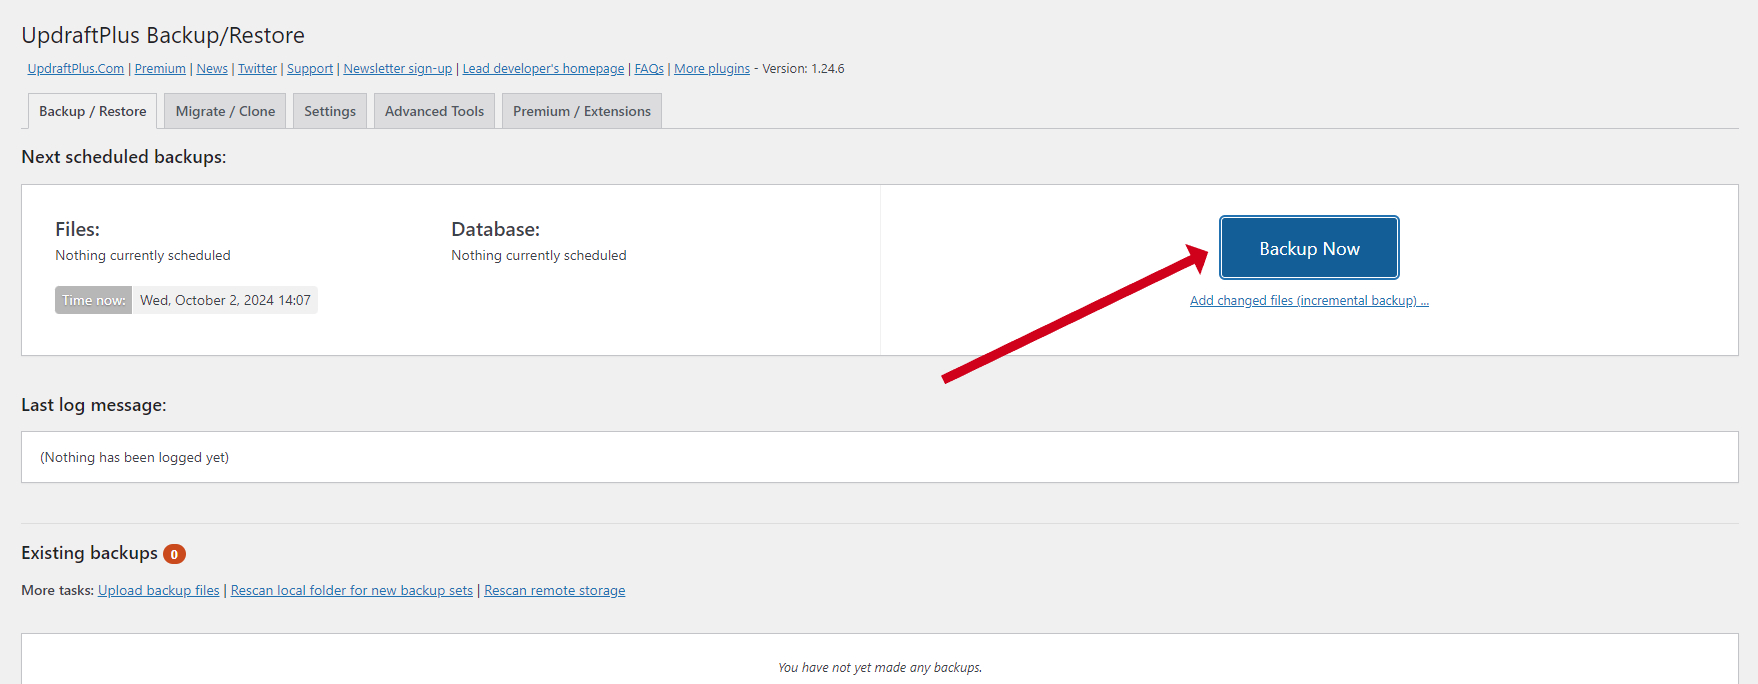
Once the setup is complete, go to the Backup/Restore tab. Click the prominent “Backup Now” button, ensure all the checkboxes are selected, and then click “Backup Now” again to initiate the backup process.
Allow the backup to complete. If you’re not using the remote storage option, scroll down to find the newly created backup. Individually click on each backed-up component to download their respective zip files and keep them safe.
Finally, select a server plan priced at €/$5.99 or higher, customize your profile to match the pricing, and deploy your server on Webdock.
You have two options to move forward: You can link your domain to your server’s IP right away, which is easiest to follow, but your users might see a blank website now. Or you can play around with your computer’s host file. I will go over this method shortly.
In the server identity tab, go ahead and set your domain after you confirm that the DNS has propagated. Then, follow all the steps highlighted in the previous section to install WordPress.
After setting up WordPress, access your dashboard and proceed to install UpdraftPlus or another backup plugin. Reconnect your storage.
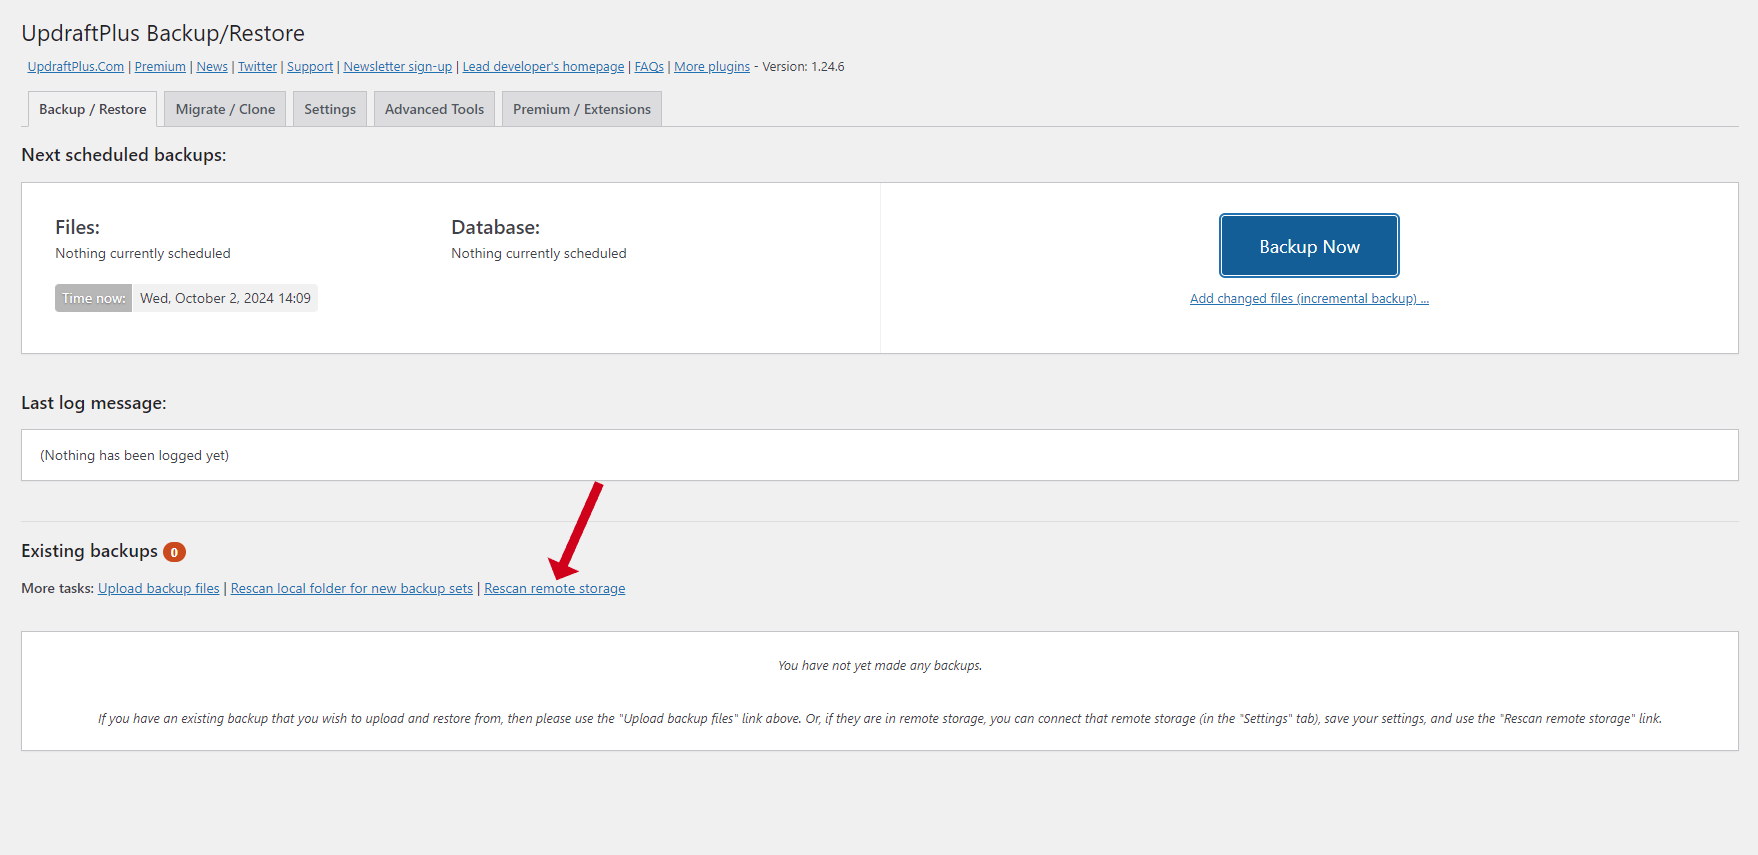
Head over to the Backup/Restore section. In the “Existing Backups” area, you may encounter a note saying, “You have not yet made any backups.” If that’s the case, press the Rescan Remote Storage button. UpdraftPlus will then search for and list any available backups it discovers.
If you’re not utilizing remote storage, you can manually upload backup files by selecting the upload backups option and dragging them into the designated space instead of seeing “You have not yet made any backups.”
When your backup from the Plesk site appears, this message will change. Press the Restore button to initiate restoration;
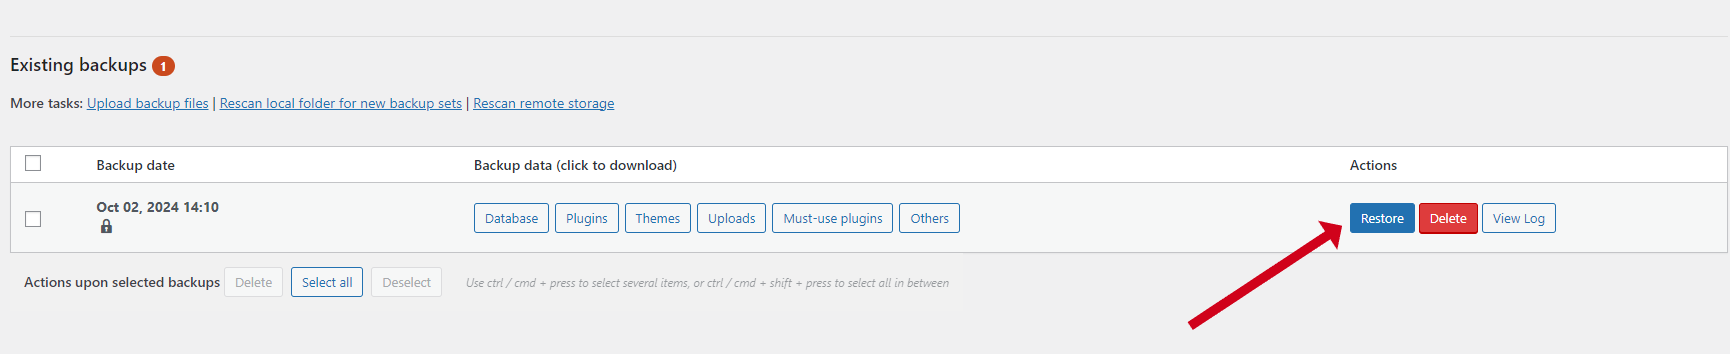
Make sure to select all options under Choose the Components to Restore, then hit Next. For those using remote storage, the plugin will start downloading needed files.
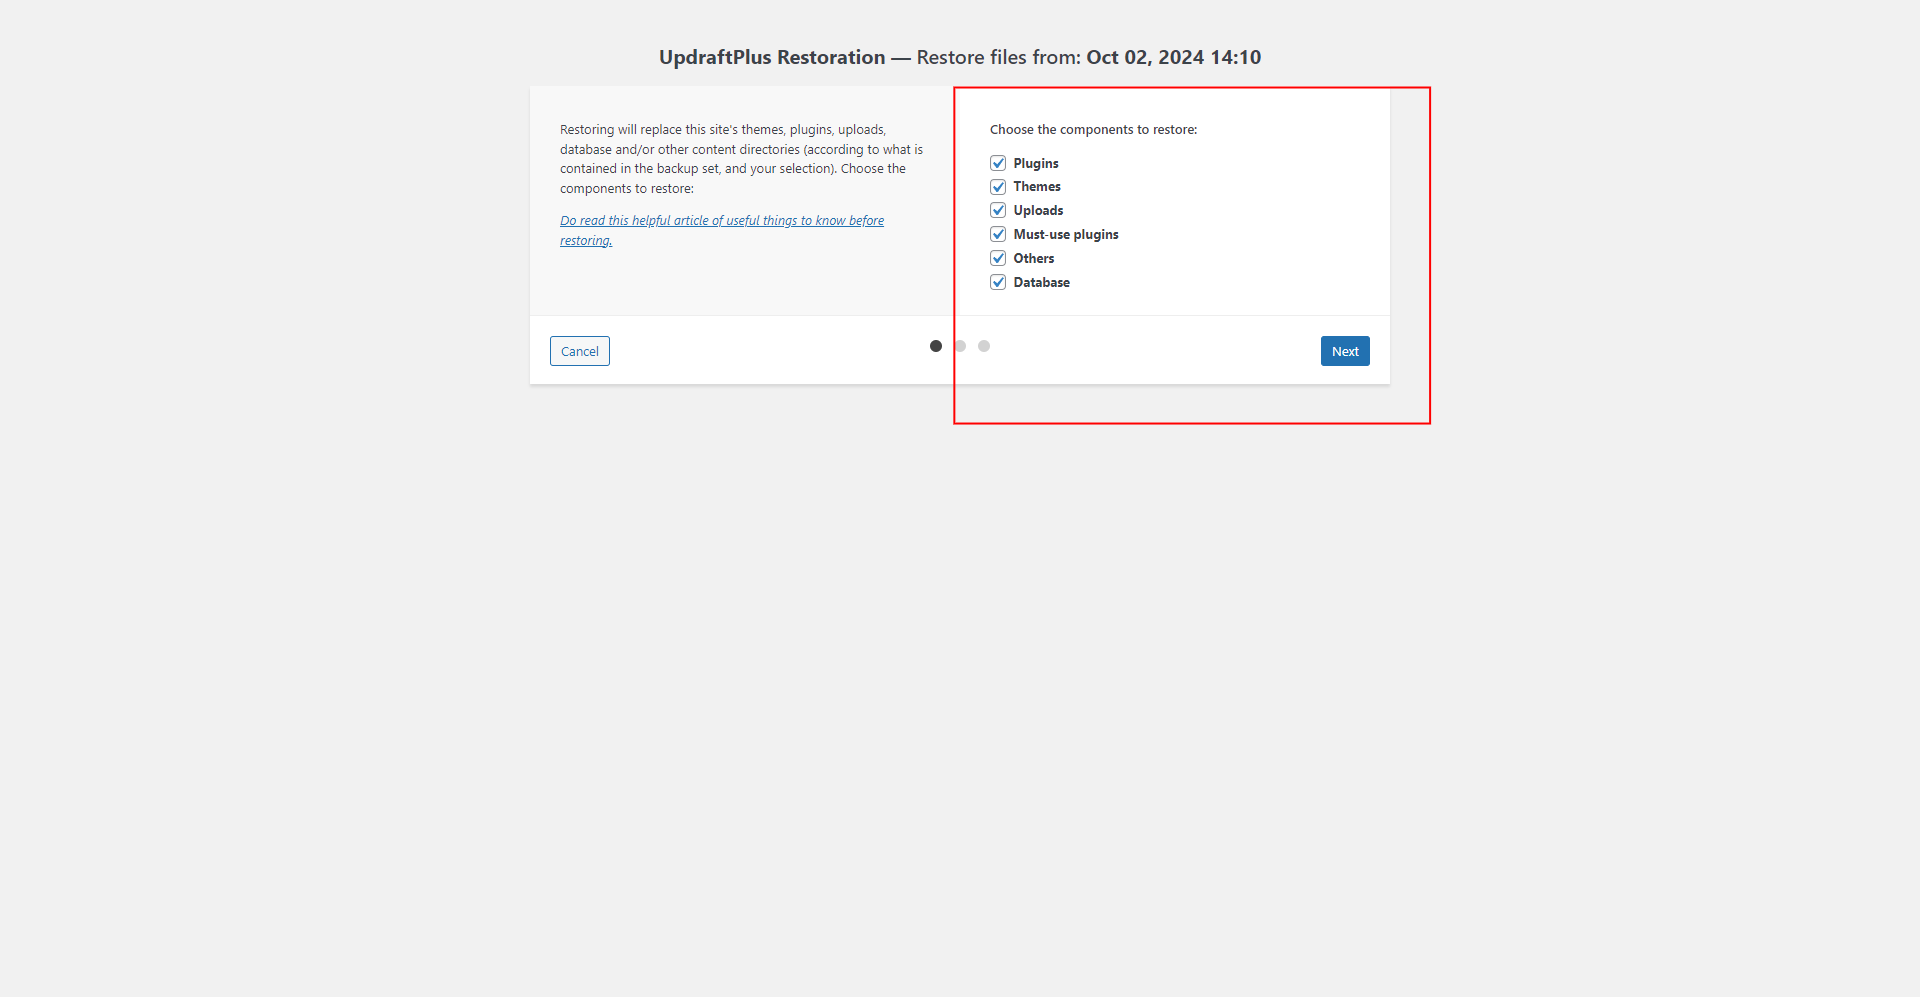
Once all files are downloaded, click Next again and wait for the process to complete. That’s it! Your WordPress site has been successfully transferred from Plesk to Webdock. Check everything to ensure it functions correctly.
Moving Without A “Blank Site” Appearing
If you don’t want your visitors to see a blank site while the migration happens, you can install a maintenance plugin on your WordPress website on Webdock to inform them that the site is under maintenance, as mentioned in the caution section. Numerous free ones are available in the WordPress plugin repo.
Alternatively, if you’re comfortable with some technical stuff, hold off on updating your DNS records until the migration is fully done.
When configuring your domain as the server identity, bypass the Check Domains button and input the domain directly. You’ll encounter an error or warning, but proceed regardless.
Next, locate your Server’s IP address from your Webdock dashboard and access your computer’s host file:
- On Windows: Search for Notepad, right-click it to select “Run as Administrator,” press CTRL + O, and navigate to c:WindowsSystem32Driversetchosts.
- On Mac: Launch the terminal and enter sudo nano /private/etc/hosts (for older Macs) or sudo nano /etc/hosts (for newer Macs).
- On Linux: Open a terminal window, type sudo nano /etc/hosts, hit enter, and log in.
Once you’ve opened the host file, scroll to its end and add your Webdock server’s IP address.
Follow it with a space and list both the www and non-www versions of your domain on separate lines like so:
123.456.789 example.com
123.456.789 www.example.com
Save these changes to the host file and exit out of the editor. To ensure that your computer swiftly associates your domain with the Webdock server, you might need to clear its DNS cache.
Clear the DNS cache by following these steps:
- On Windows: Run Command Prompt as an administrator and type ipconfig /flushdns.
- On Mac: Open Terminal and enter sudo dscacheutil -flushcache.
- On Linux: Open Terminal and type systemd-resolve –flush-caches.
You can now attempt to install WordPress using Webdock’s WordPress manager. If you visit your website’s URL at this stage, a blank WordPress site should appear—this will only be visible on your computer. After confirming this setup works as expected, proceed with any additional tasks required.
Once everything is completed successfully, update your DNS records. Click on Set Identity again to create a new SSL certificate, remove recent entries from your host file, and clear your computer’s DNS cache once more.
In Conclusion
In summary, moving your WordPress site from Plesk to Webdock can be a simple process with minimal downtime if carefully planned. Webdock offers an easy-to-use interface, affordability, and extra features like free server snapshots, transactional emails, and bot protection, making it an attractive alternative to Plesk.
Whether you choose the manual approach or use a backup plugin such as UpdraftPlus, following these guidelines will ensure a seamless transition.
To prevent user disruptions, carry out the tasks when the traffic is the lowest, and update your DNS settings at the end of things. With Webdock, you can enjoy a smooth, secure, and efficient hosting experience for your WordPress site.
Meet Aayush , a WordPress website designer with almost a decade of experience who crafts visually appealing websites and has a knack for writing engaging technology blogs. In his spare time, he enjoys illuminating the minds around him.
