Introduction
Selecting the right hosting control panel is crucial for optimizing your WordPress website’s performance and management.
In this article, we delve into why Webdock may be a better choice compared to SpinupWP, highlighting its cost-effectiveness, intuitive user interface, and advanced security features.
Additionally, we’ll outline the steps required to migrate your website from SpinupWP to Webdock, offering practical tips to reduce downtime and navigate potential challenges.
Whether you’re aiming to cut costs or enhance your site’s functionality, this guide will help you make an informed decision and execute a successful transition. Let’s get started!
How does Webdock fare with SpinupWP?
Let’s explore how Webdock compares to SpinupWP by examining their pricing, features, and performance, helping you choose the best platform for managing your WordPress site:
- Price: When you’re exploring server management options, you might find that SpinupWP offers a 7-day free trial. However, after the trial ends, you’ll need to pay $12 each month for the control panel in addition to your VPS costs.If you’re overseeing multiple servers, an extra $5 per server will apply every month, and these fees will rise as your business grows. In contrast, Webdock includes its control panel at no charge, and many of its servers deliver performance that exceeds industry standards—all while costing significantly less than what you’d pay for SpinupWP.
- Setup time: Adding a new server and a new WordPress website is a time-consuming affair. It takes anywhere near 10 minutes to set up a new server and 6-7 minutes to set up a WordPress website. Multiply this if you have multiple servers to manage. Compared to this, the only time taken to set up anything on Webdock is usually under a minute, and the most time-consuming task is the server provisioning.
- Practical features: The point of a control panel is not to rely much on SSH and external applications for managing a WordPress website and to manage everything from a central location, but it seems the SpinupWP philosophy says otherwise.With SpinupWP, you are required to depend on SSH, FTP, and database software to perform even the most basic tasks, as it lacks built-in tools for file and database management. In contrast, Webdock offers these features in a modular and integrated manner.If you’re worried about the file manager being exploited, there’s no need to stress—simply disable it once you’re finished using it. Additionally, Webdock provides a library of pre-defined scripts that you can execute with just a click, and you have the flexibility to add new scripts to meet your specific needs.
This means you never have to access the terminal for routine tasks while still having the freedom to use any software that fits your workflow seamlessly.
- Included Add-ons: Webdock offers a range of benefits, including free full server snapshots and application-level backups to keep your data secure. No additional cloud storage solution is required. Moreover, it provides free transactional emails through Postmark, known for its top-notch deliverability, for plans above €/$5.99.These features make Webdock a fantastic choice for maintaining your WordPress site’s functionality. Additionally, you can set up email forwarding with ImprovMX at no extra charge. With severe restrictions, buying these services separately can cost you over $30/mo.
Keep these points before starting…
When you’re getting ready to move your website, keeping downtime to a minimum is important. The techniques I’ll share generally help achieve this, and I’ll also provide some additional tips to reduce interruptions even further. However, it’s good to remember that avoiding downtime doesn’t guarantee that every change made during the migration will be captured. To manage this, plan your migration during periods when your site has the least traffic.
This way, any new data added just before the move is less likely to be missed. Tools like WP All Import/Export can be incredibly useful in ensuring that no important information slips through the cracks during the initial transfer.
Alternatively, you might want to use a maintenance plugin. This option allows you to temporarily pause your live site, giving you the peace of mind that everything is being properly transferred to Webdock without affecting your visitors.
Getting Your Website Files
Now, let’s move on to the actual process. There are actually two ways to get your website files:
Option 1: Creating A Backup
To use SpinupWP’s built-in backing-up features, you’ll need a remote storage service such as Amazon S3, Wasabi, and so on to be connected to the service. Without this, you won’t be able to create backups. So, I assume you already have one connected; if not, consider a service according to your needs and budget and connect it using SpinupWP’s documentation.
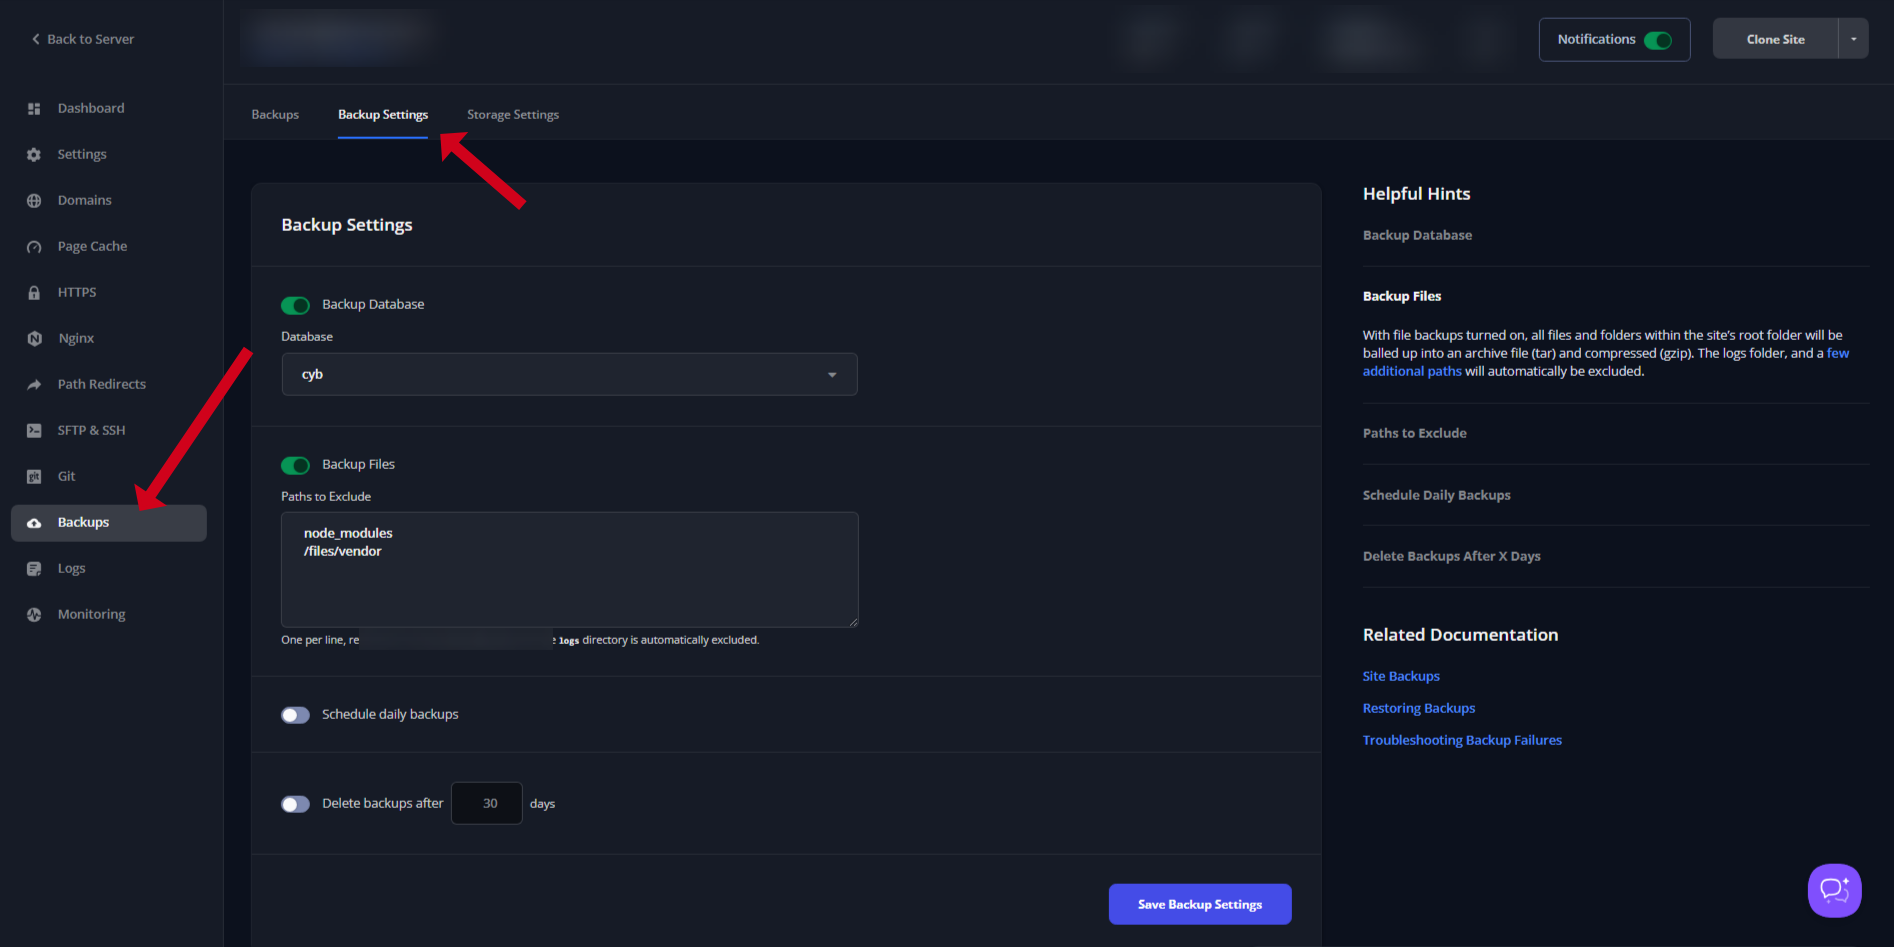
Then, in your website’s dashboard, go to Backups > Backup settings and ensure both the ‘Backup Database’ and ‘Backup Files’ options are checked. Then, go to the backups tab and create a fresh backup.
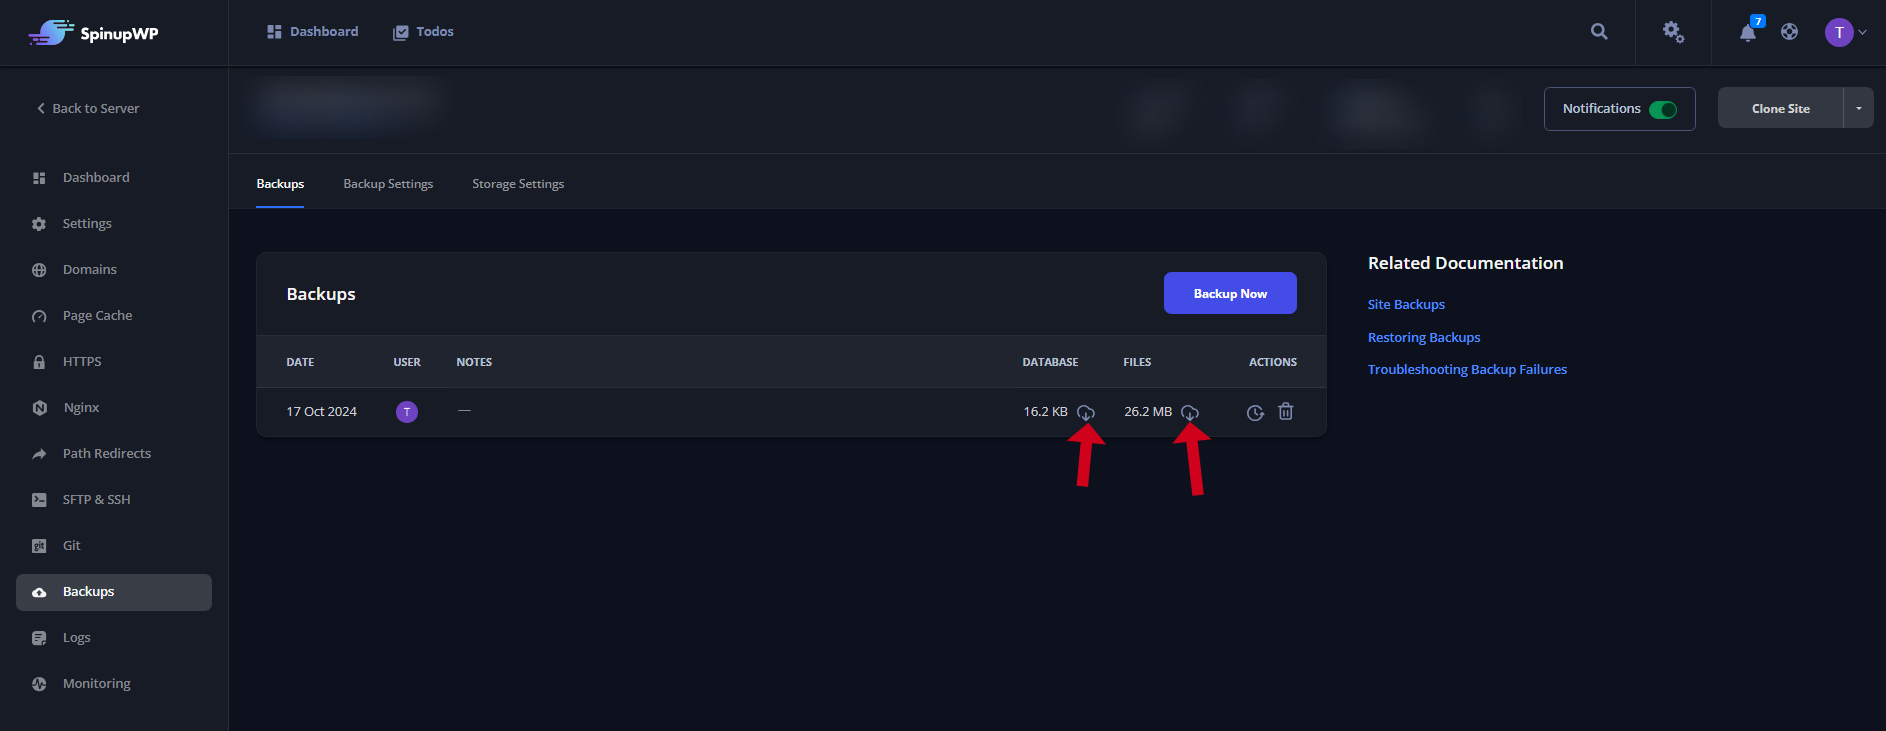
Once the backup is created, go ahead and download the backups created.
For the file backups, a .tar file would be downloaded. Ensure you convert this to a zip file for easier management. The easiest way would be to extract the files and then add them to a new zip file.
Option 2: Use FTP
If setting up an extra storage service isn’t something you want to deal with, using FTP might be the way to go. It requires a bit more effort than the backup method we discussed earlier. That said, I still recommend the backup approach for a smoother and less complicated experience.
To access your database, you might normally reach for phpMyAdmin. However, SpinupWP opts not to include it to “enhance security”, which means you’ll need to set it up manually using SSH if you prefer that method. Instead of going through the more time-consuming setup, I will download the database using SSH.
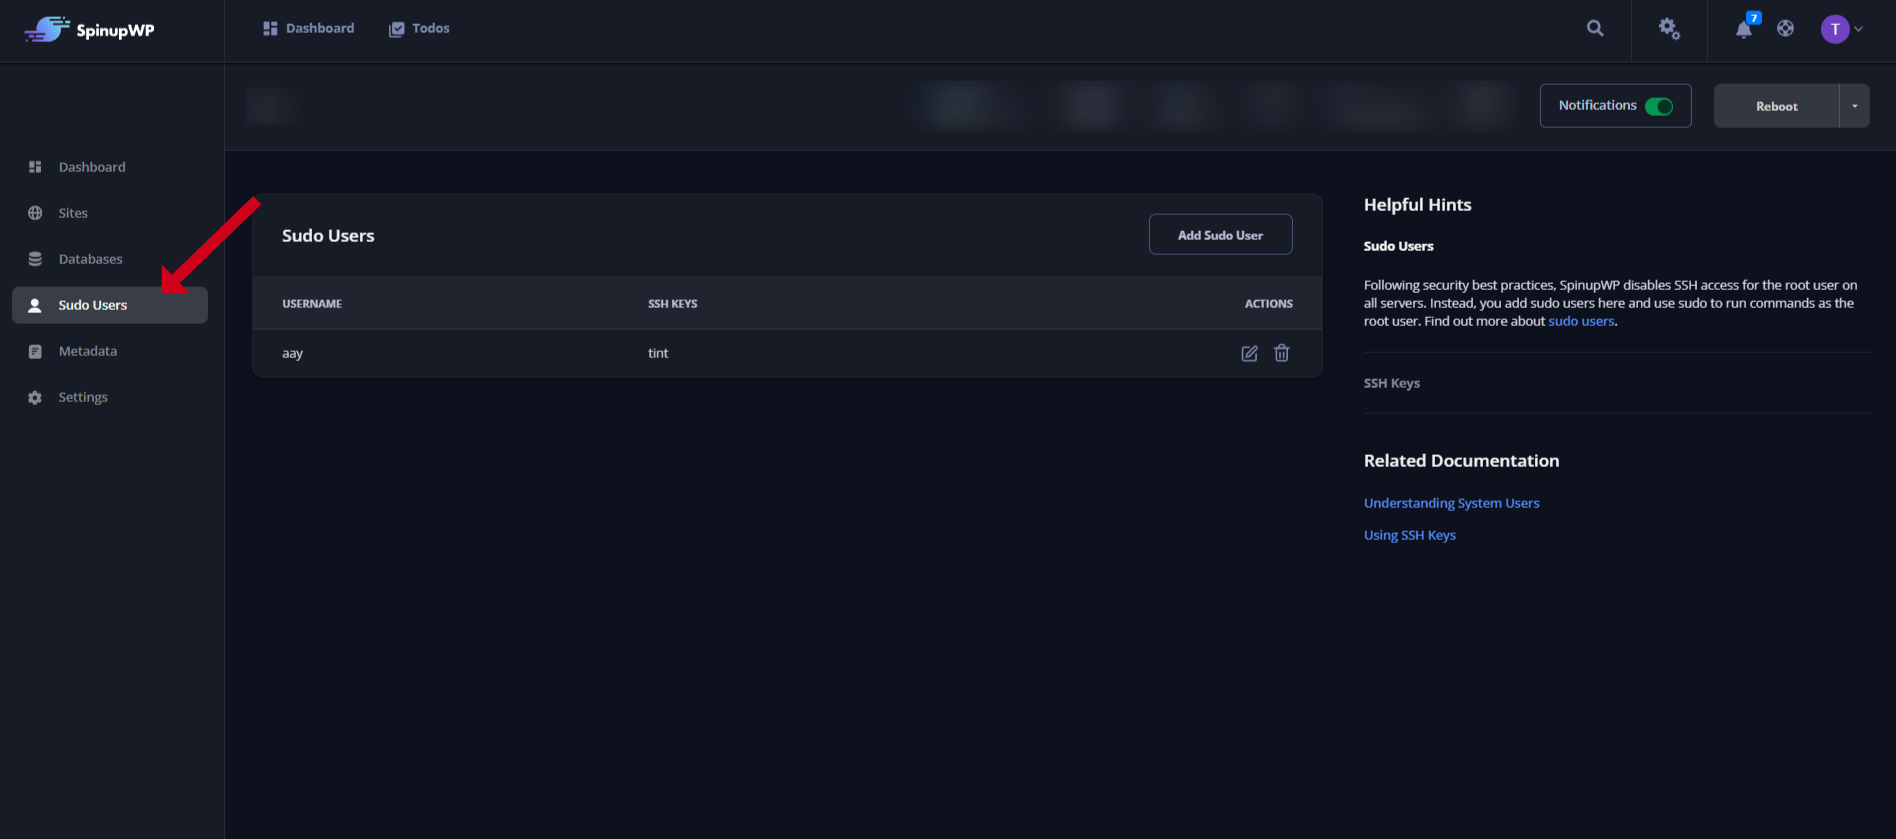
The necessary SSH details are in the Sudo users tab in your server’s control panel. If none are set, go ahead and set up one. Do remember that you’d need an SSH key to log in.
Open your server’s terminal and run the following command:
$ mysqldump -u root -p database_name> file.sql
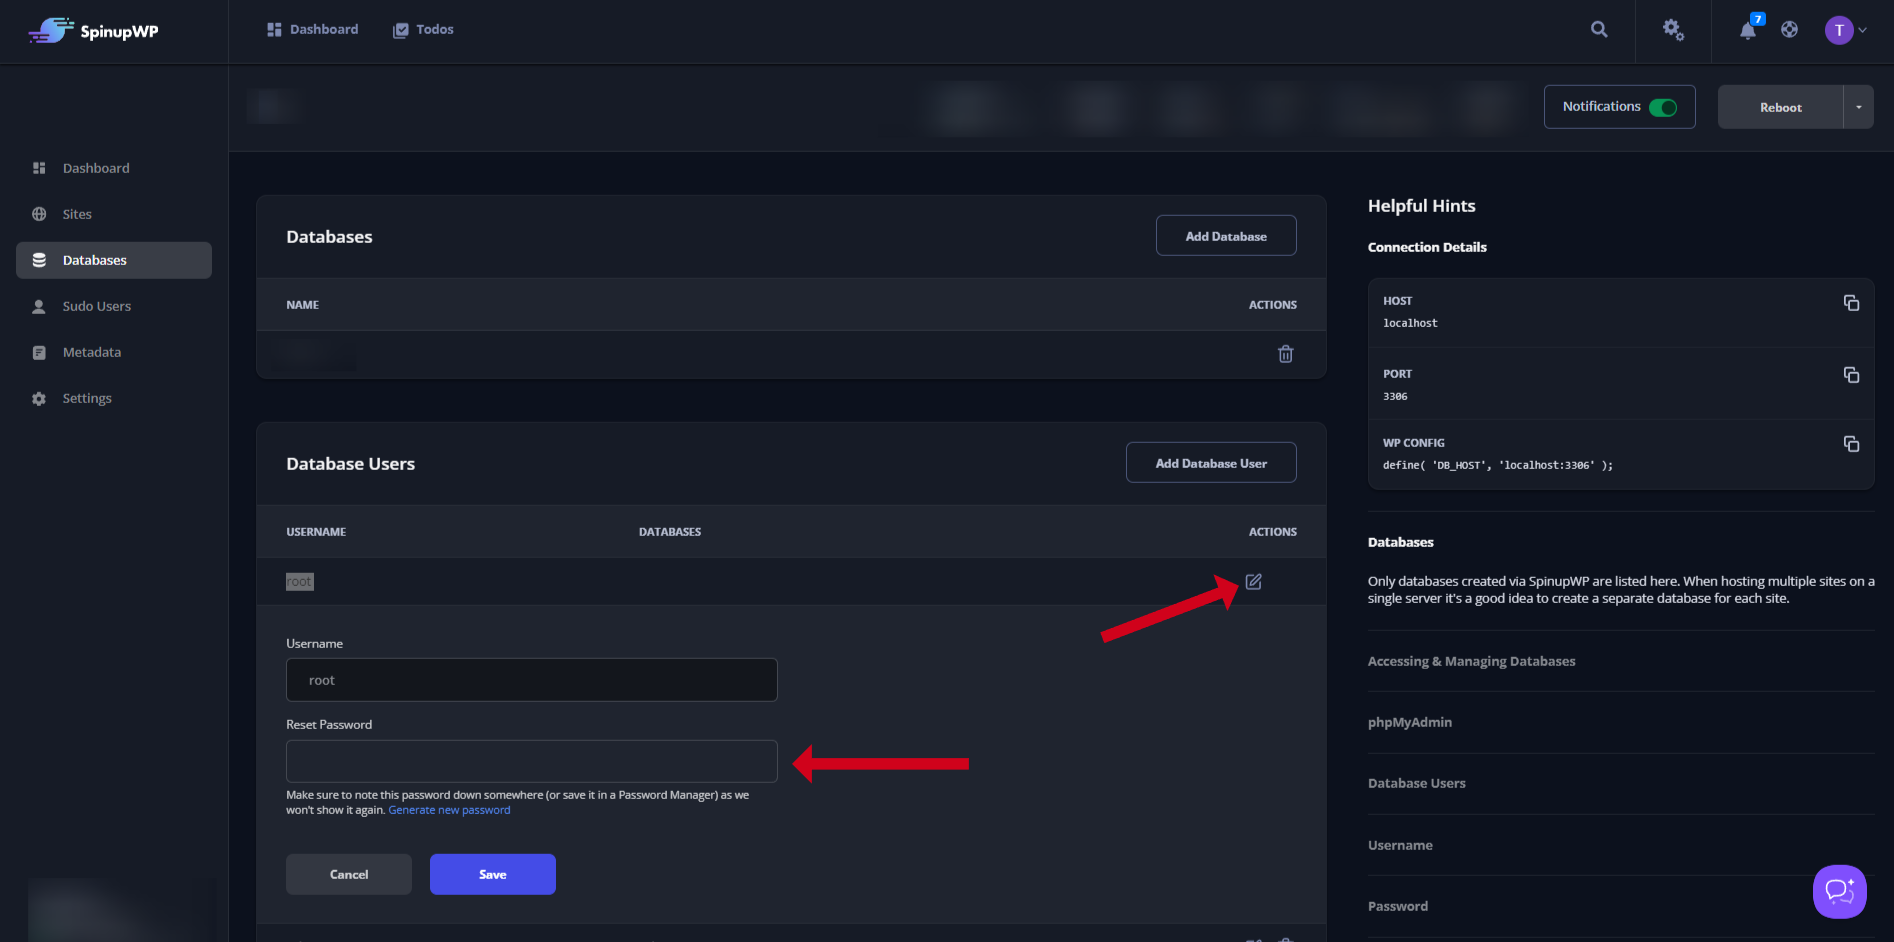
Replacing database_name with your actual database name. You’ll be asked to enter your sudo password when you execute the command. This password is typically provided when you set up a new server. If you can’t recall it, simply navigate to the Database tab in your server panel to reset it.
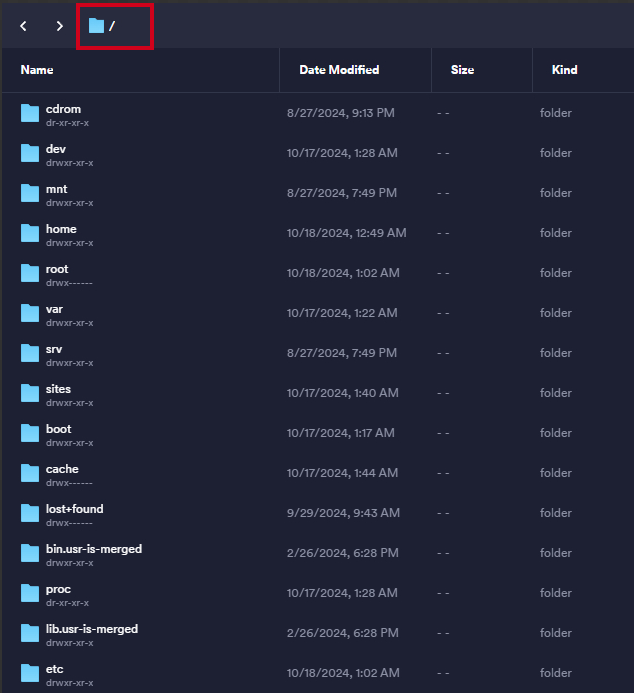
Next, access your server’s files using an SFTP or FTP client. While FileZilla is a popular choice, I prefer using Termius for its efficiency.
Once you’ve logged into the SFTP/FTP manager, you’ll first encounter the database file we created. Simply drag and drop or copy this file to your computer.
Then go back till you reach the end of the path.
Locate the files folder under sites > [your website]. Drag and drop this folder into a secure location on your computer to ensure your files are safely backed up.
Compress the folder containing all your website files into a zip archive to make managing your website files easier. This will keep everything organized and ready for the next steps in your migration process.
Setting Up a Server on Webdock
When you’re ready to get started, visit Webdock and create a new server with a plan that begins at €/$5.99 or more. You have the choice between Apache and NGINX for your server software, with NGINX often being the preferred option due to its performance benefits.
Once your server is successfully launched, head over to its dashboard on Webdock. In the Overview tab, you’ll spot a small pencil icon next to the Alias field—click on it to proceed.
Next, enter your website’s main domain into the designated column in the center. While it’s common to use the Check Domain feature before finalizing your setup, opting to assign your domain directly can help reduce any potential downtime during the migration.
The configuration process typically takes around three to four minutes. You might encounter an error message during this time, but there’s no need to worry — it can be safely disregarded at this stage.
Installing WordPress on Webdock
After setting up your server, go back to the overview page. As you scroll down, you’ll find the Manage WordPress section, which is essential for the next steps.
To proceed, you need to install WP-CLI on your server. Simply click the designated button to start the installation. Once WP-CLI is installed, proceed by selecting the “Install WordPress Now” option. This will open a form where you’ll enter details such as your admin email, domain, path, and database information. In most situations, the default settings will be just right and require no further adjustments.
Keep in mind that you won’t be able to create an admin password manually. Webdock handles this for you by automatically generating a secure password.
Database Transfer
To migrate your WordPress site’s database, open phpMyAdmin. Click the small database icon in the credentials tab. When prompted, enter your Admin username and password to gain access.
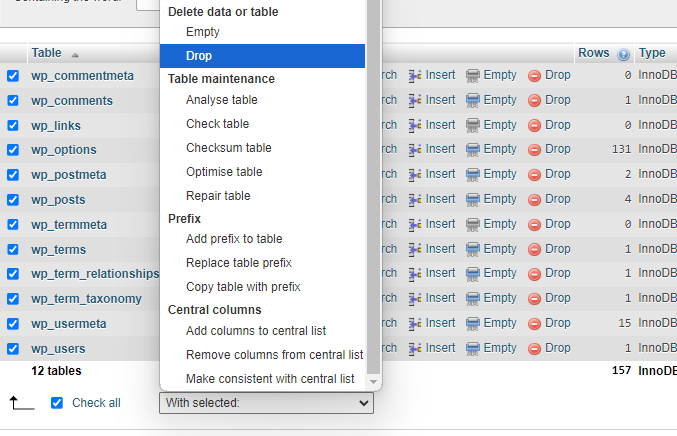
Once you’re inside phpMyAdmin, locate the database that corresponds to your WordPress site. After identifying it, select all the tables within that database and proceed to delete them. This step ensures that you have a clean slate for importing your new data.
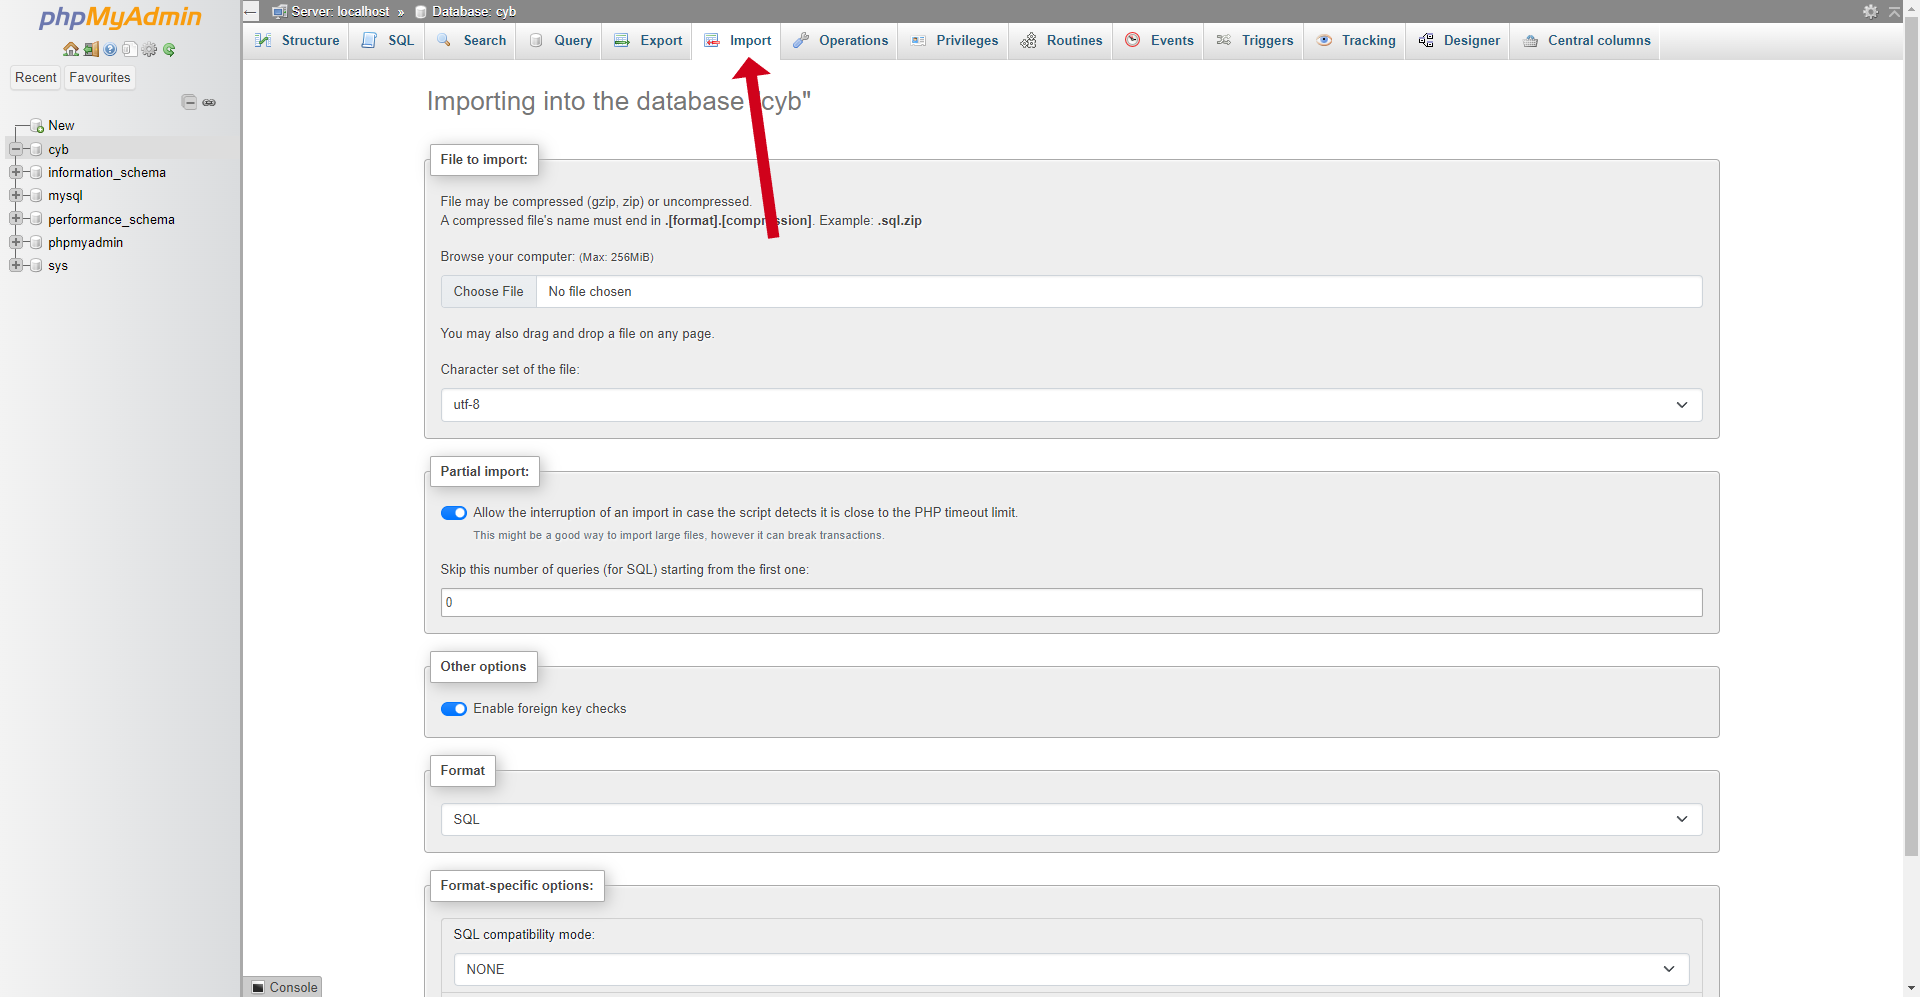
Next, navigate to the import tab within phpMyAdmin. Here, you have two options: you can either drag and drop the .sql file you previously downloaded from the SpinupWP dashboard/backup or manually select the file from your computer. Importing this file will populate your database with all the necessary information your website needs to function correctly.
After the import process is complete, verifying that certain settings are correctly configured is crucial. Open the wp_options table and check the entries for siteurl and home. Make sure that both of these option names reflect your website’s URL in the https:// format. SpinupWP adds a custom prefix to all your databases, so your options table would be something like [prefix]_options.
Site Migration Process
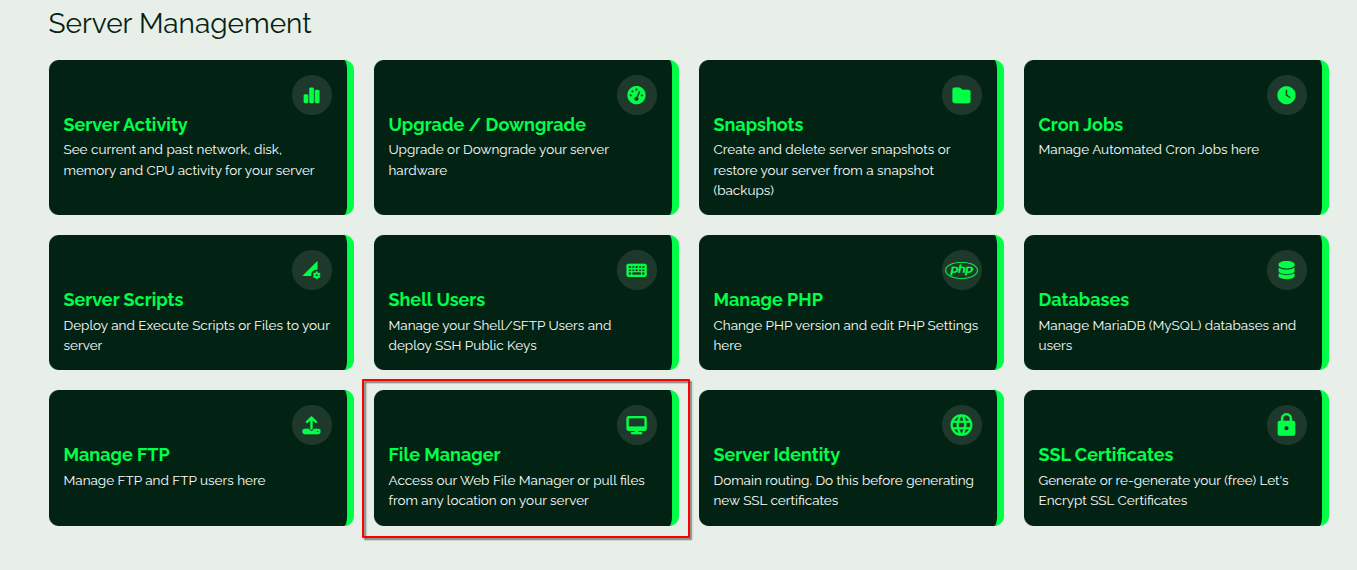
Once you’ve successfully imported and confirmed your database, the next step is to install the File Manager from the overview section and log into it.
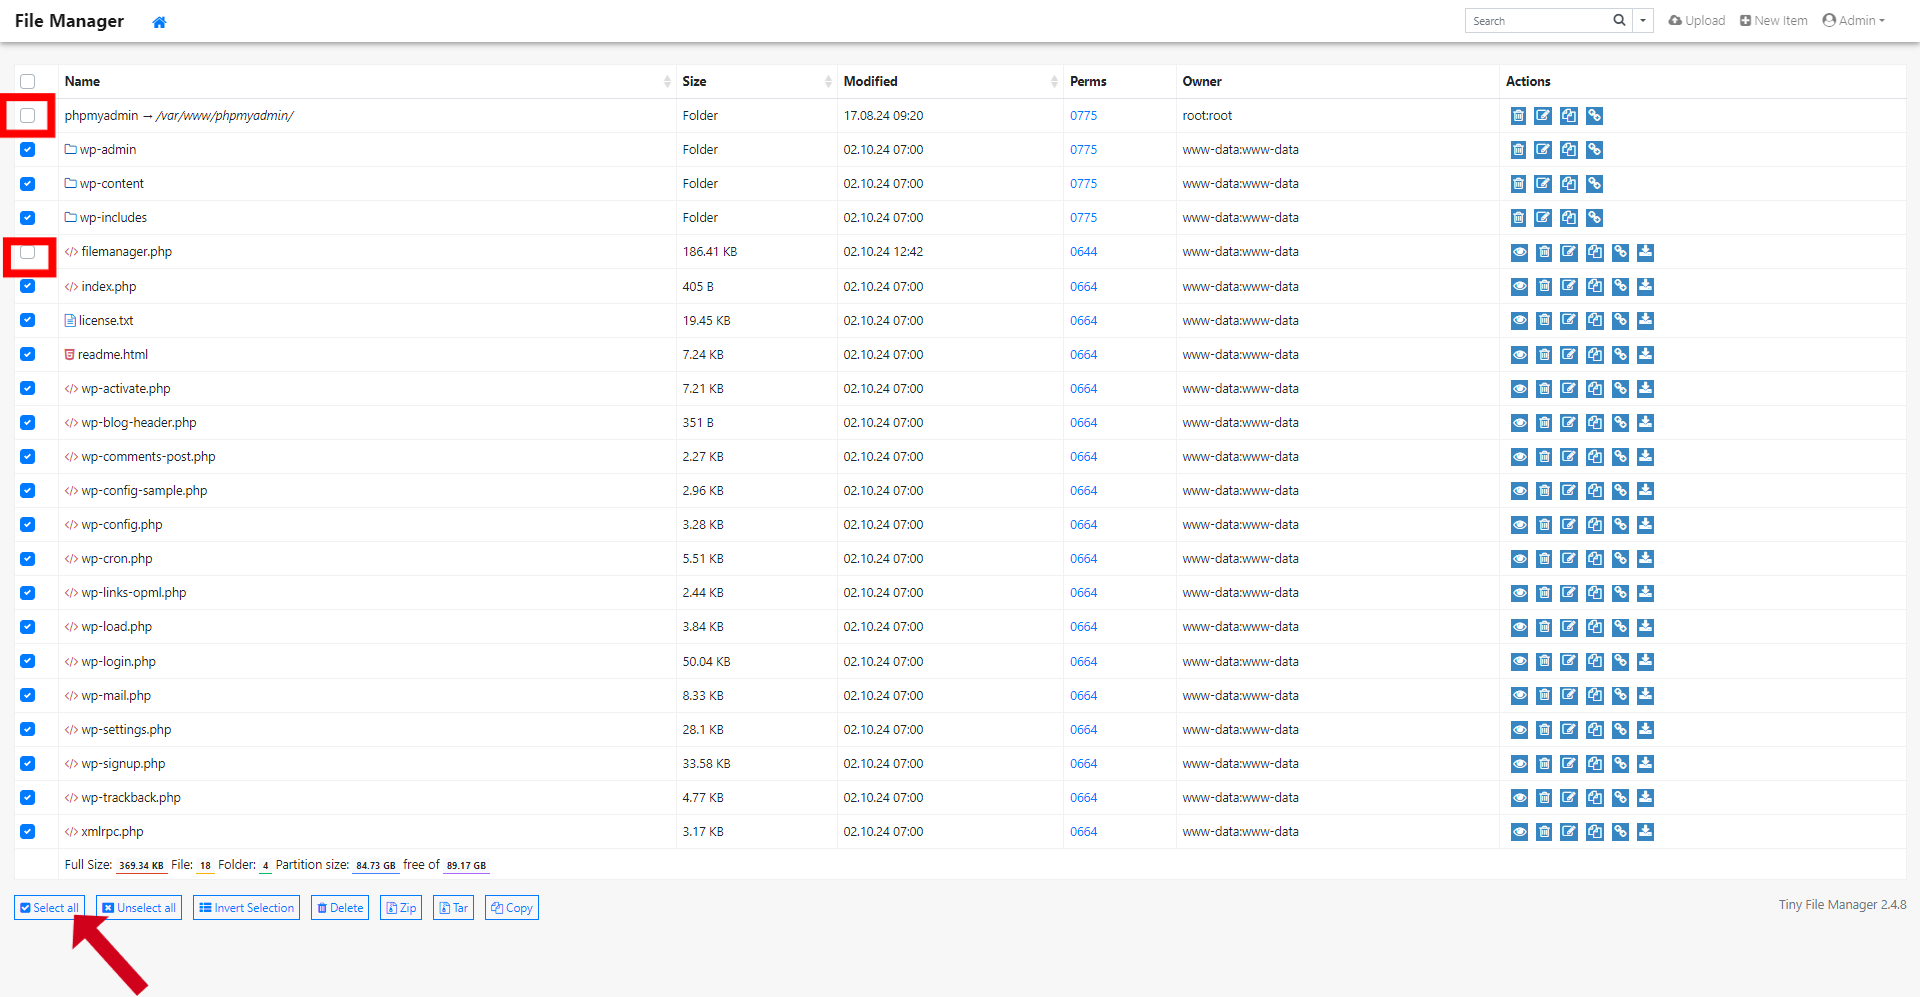
Inside the File Manager, you’ll want to select all the files using the provided option. However, be sure to exclude the PHPMyAdmin folder and the filemanager.php file by unchecking them. After making your selections, proceed to delete all the remaining files.
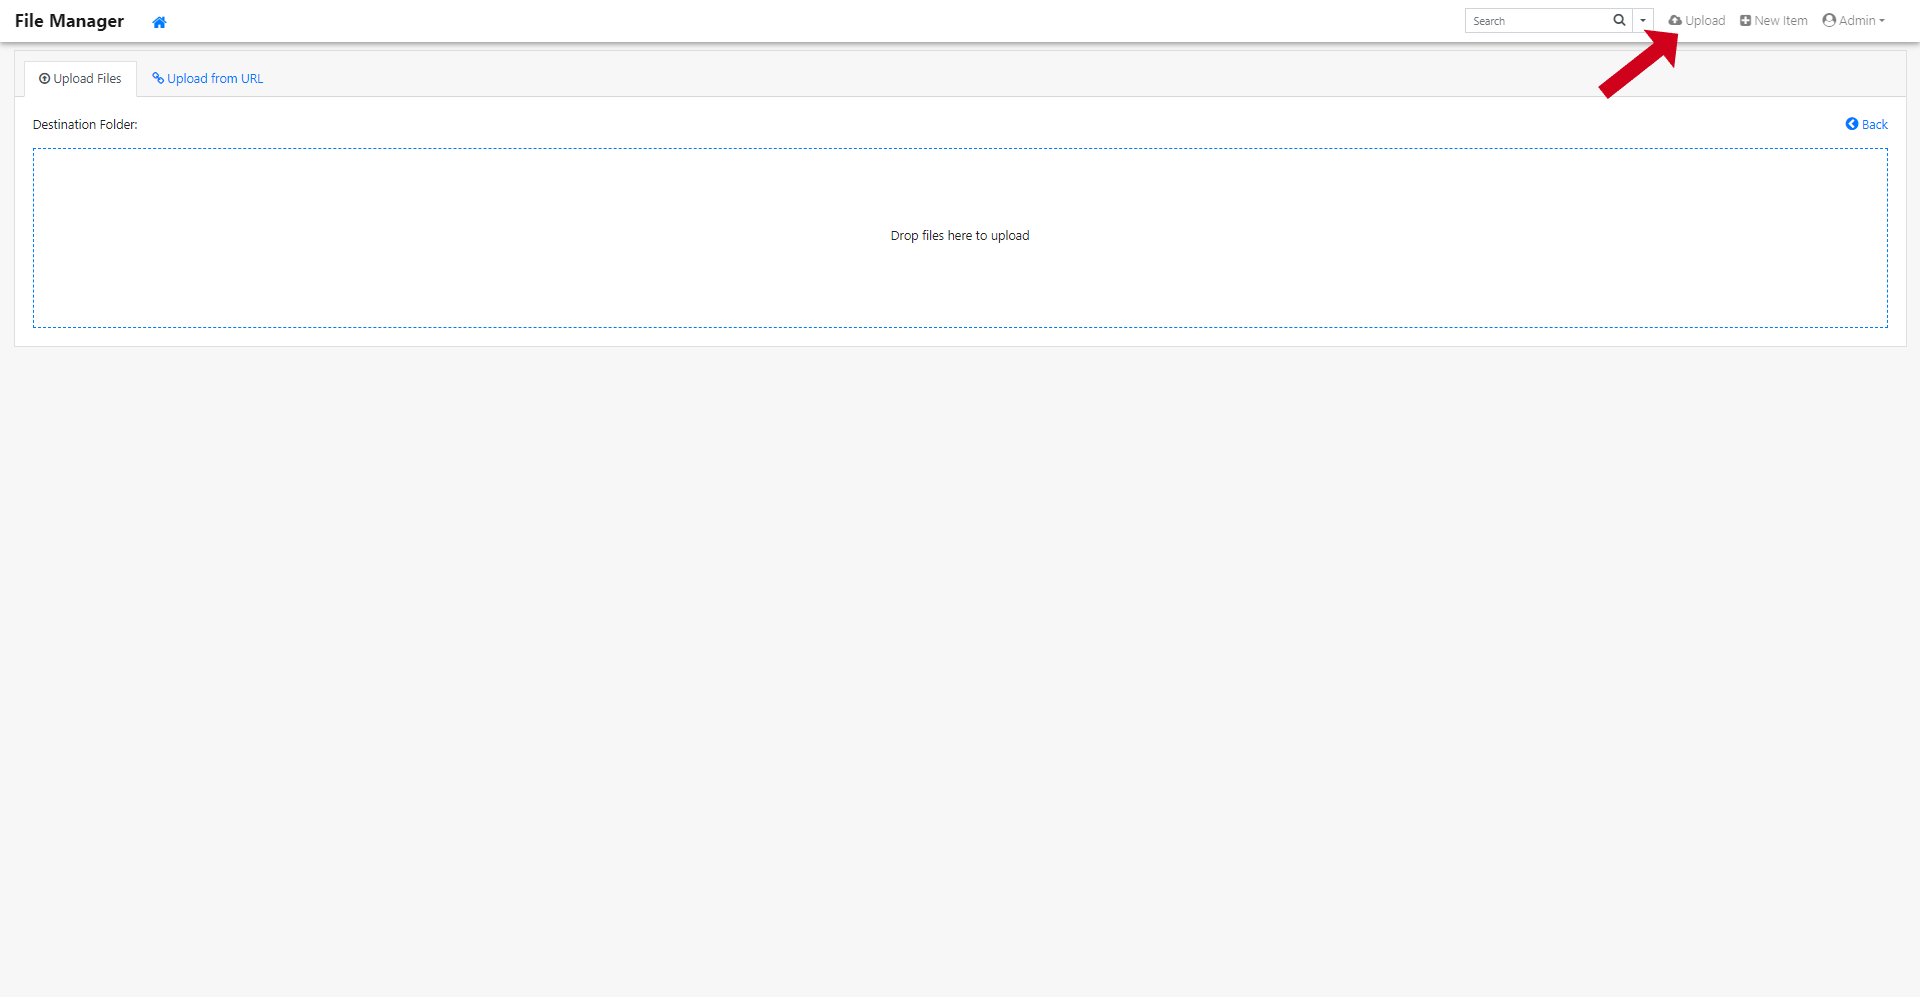
Moving forward, navigate to the top right corner of the File Manager interface and click the upload button.
Here, you’ll upload the website files zip you previously downloaded from the SpinupWP. You can drag and drop the file into the upload area or manually select it from your computer. Once the upload is complete, locate the zip folder, click on it, and choose the option to unzip it.
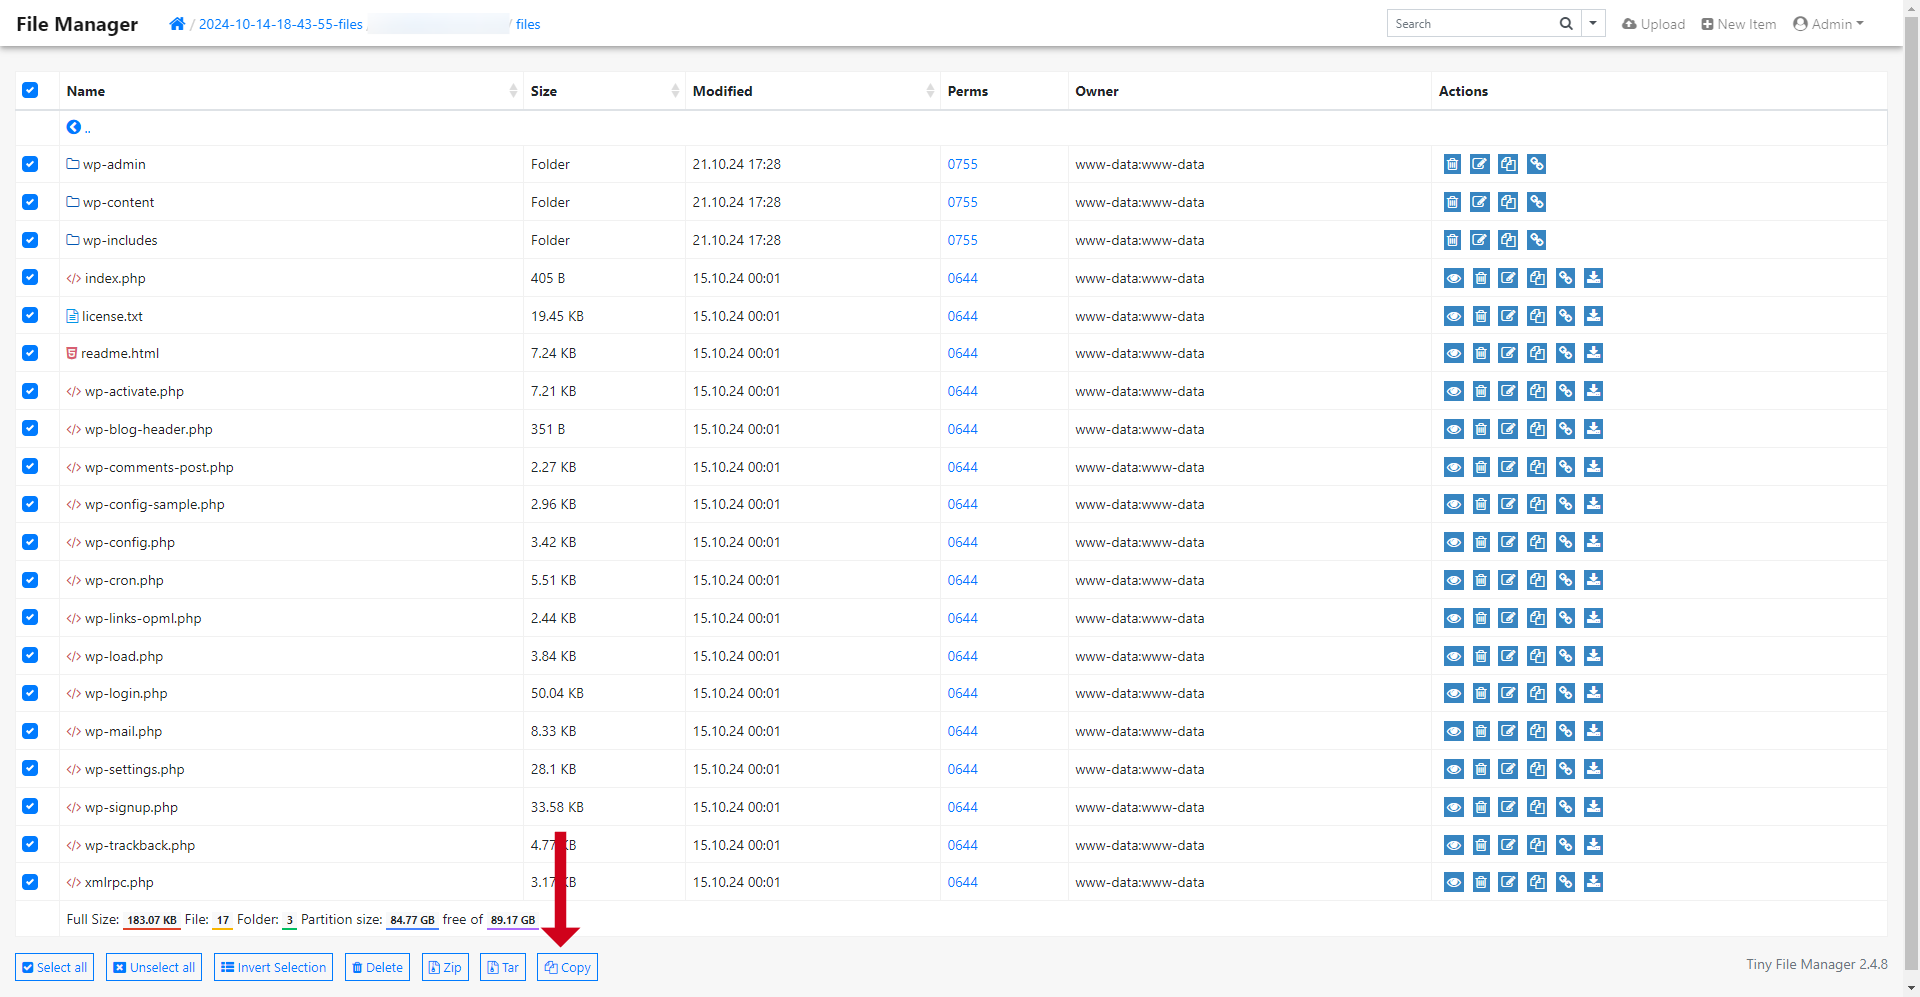
After unzipping, open the newly extracted folder. You’ll find another folder named after your website’s domain. Enter this folder, then files, select its contents, and click the copy button.
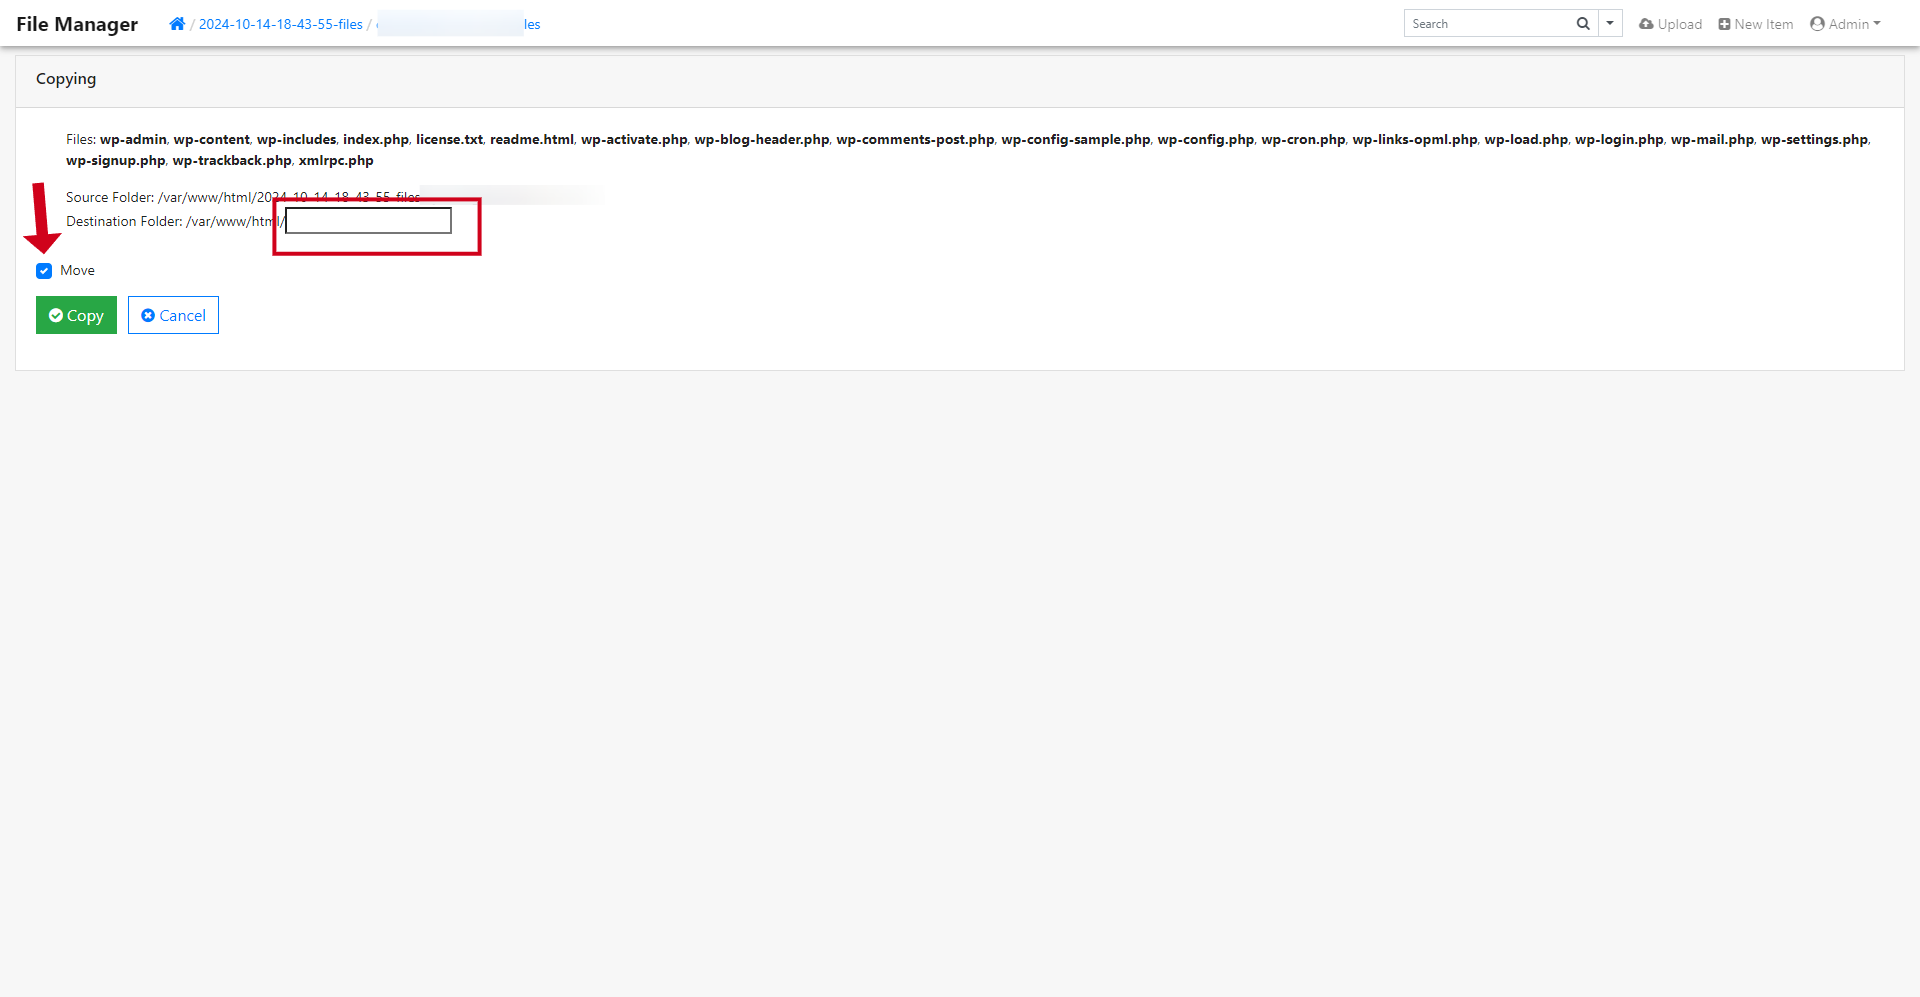
Check the “Move” box in the subsequent screen while leaving the path field empty. This action will move your files to the leading directory.
Finally, you can safely delete both the original zip file and the unzipped folder, keeping your directory clean and organized.
Reconnect Database
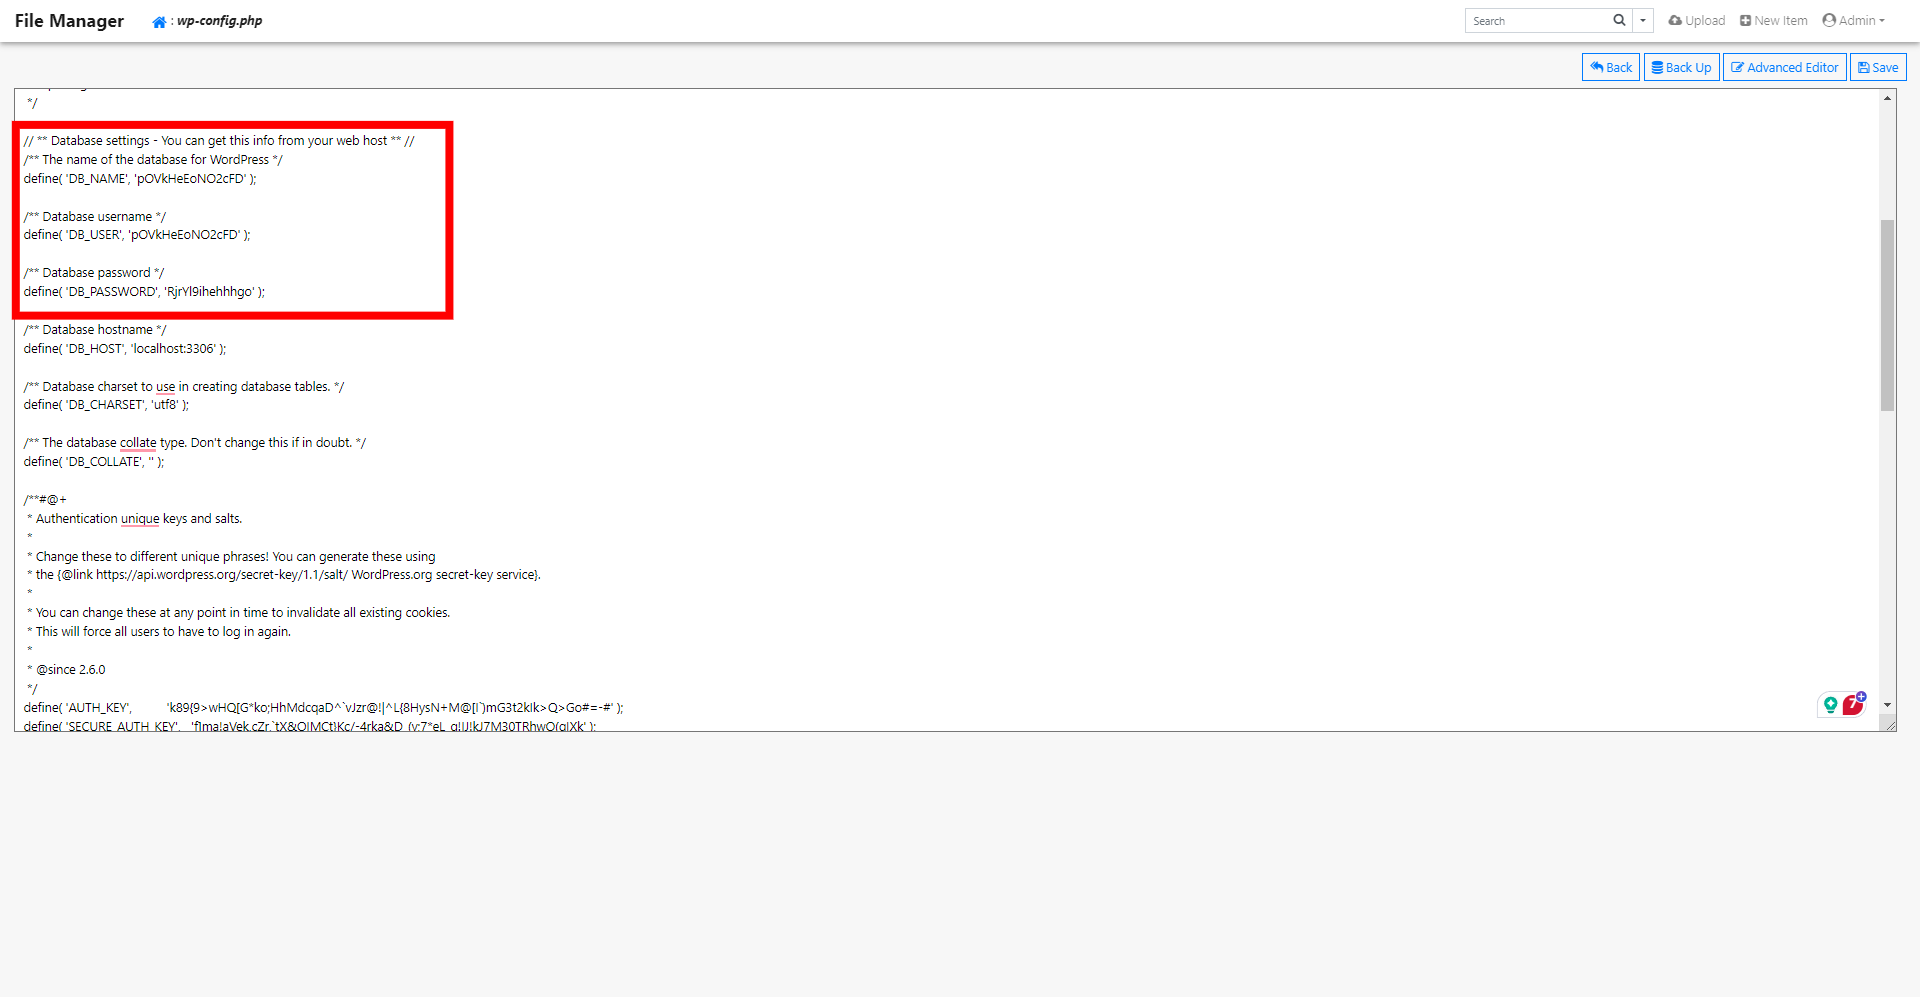
Once all your files are transferred, access the wp-config-sample.php file. Locate the section that contains your database information
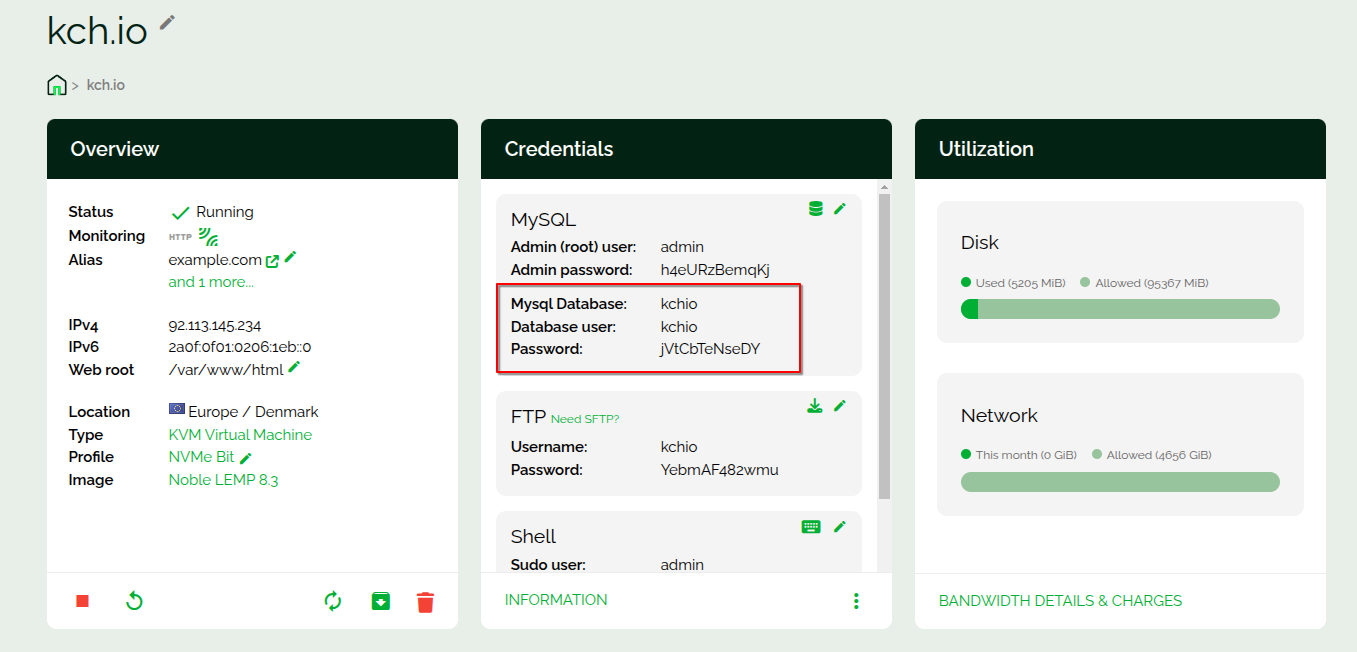
And update it with the new details from your server overview.
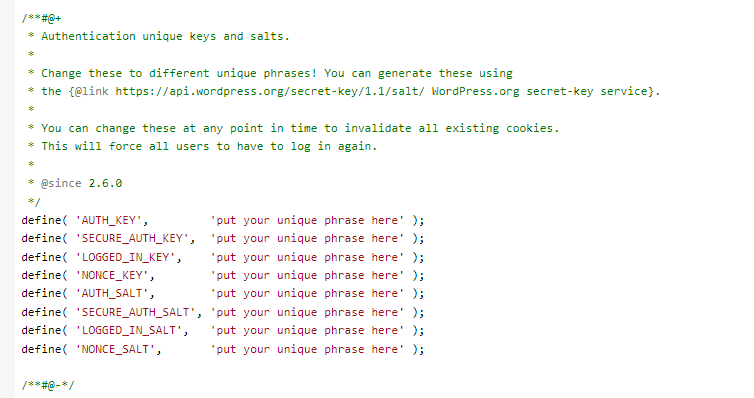
Then, update the WordPress salt. There are several ways, but I always insist on using WordPress’ salt generator. Just copy the generated salts and replace the template with the copied salts.
Likewise, replace wp_ the database prefix with the actual value (as mentioned at the end of the database migration step)
Warning: If you have any custom snippets added to your wp-config, you should add them to the wp-config-sample.php too. Just open the former file and check for any custom snippets you have added.
Once you’ve made the necessary changes, copy the content of the file to ensure it is correct and paste it in the wp-config.php file.
Now, open the wp-content folder and delete the object-cache.php file.
These steps are of utmost importance as SpinupWP amends several core files, which makes it almost impossible to get your site working if you manually move your website.
After handling the configuration files, it’s important to address the File Manager. Even though a password protects it, it can still present a security vulnerability. To enhance your site’s security, disable and uninstall the File Manager. You can easily remove it from the location where you initially enabled it.
Reinstate SSL Certificate
Next, update your domain’s DNS settings to point to your new Webdock VPS IP address. This can be done by creating an A or CNAME record, depending on your preference.
Once your DNS settings are adjusted, return to your server overview on Webdock. Navigate to the Alias section and select the option to check your domain. If everything is in order and your domain validation is successful, set up your domain on the new server.
During this process, SSL certificates for your site will be regenerated, ensuring your website remains secure. With minimal downtime, these steps will successfully migrate your WordPress site from SpinupWP to Webdock.
Alternative Approach: Using a Backup Plugin
You should also consider using a backup plugin, which can make the entire process more manageable. This is especially true if your website has a lot of content or you’re uncomfortable with technical details.
While various plugins are available, UpdraftPlus is my personal favorite because it offers essential features for free, and incorporating cloud storage can speed up the migration significantly, though it is not necessary. Also, if you’re not using UpdraftPlus, the process would be somewhat similar.
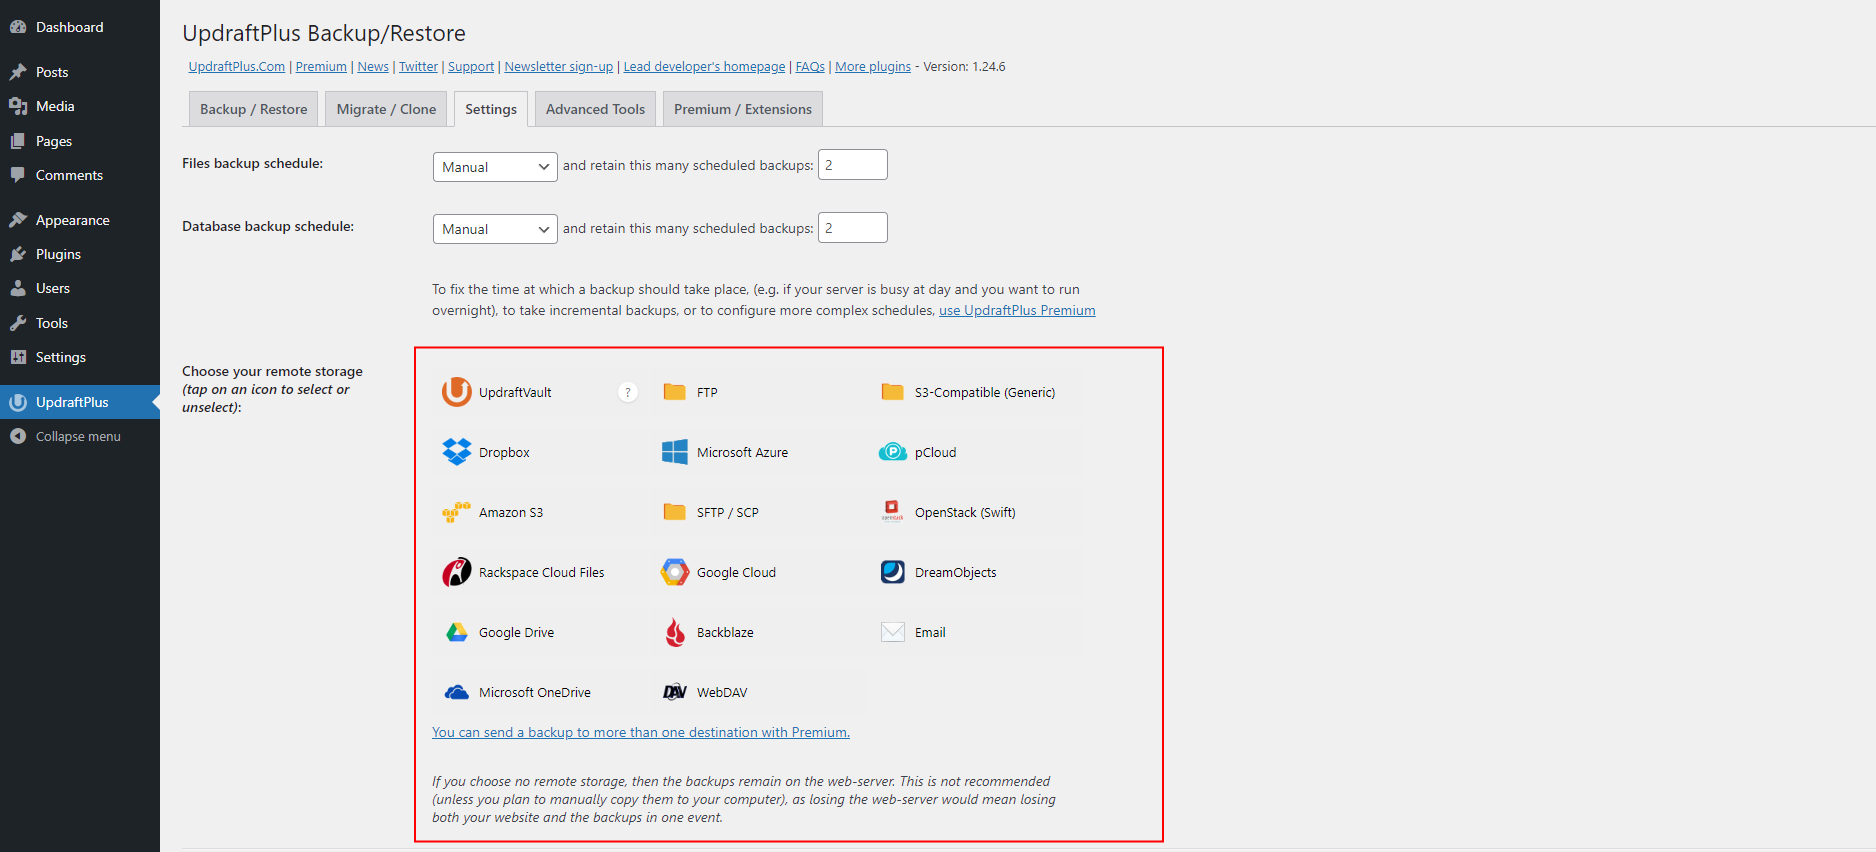
To get started, log into your WordPress dashboard. From there, navigate to the Plugins section and click “Add New.” In the search bar, type “UpdraftPlus” and proceed to install and activate the plugin once you find it. After activation, you must configure the plugin by accessing its settings. You can choose a remote storage option such as Google Drive or Amazon SES.
Although setting up remote storage isn’t mandatory, doing so can save you considerable time and hassle during the migration process.
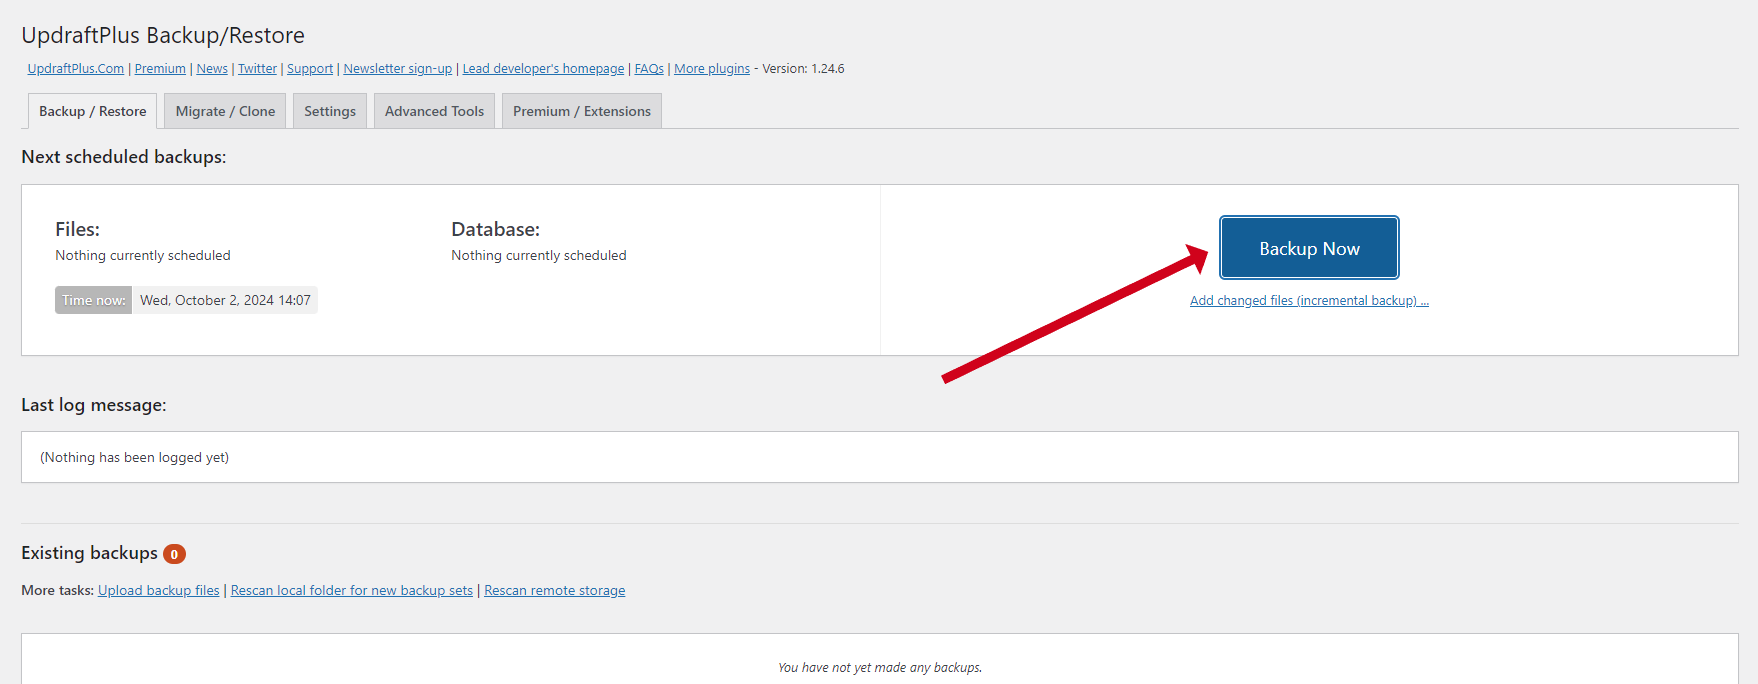
When you’re ready to back up your website, navigate to your dashboard’s Backup/Restore section. Click on “Backup Now,” making sure to select all available options to capture every part of your site.
If you decide not to use remote storage, you’ll need to manually download each backup file by clicking on the respective archive names. This step is crucial to ensure that all your data is safely stored before proceeding.
Next, head to Webdock and choose a server plan that fits your needs, with options beginning at €/$5.99. Once you’ve selected a plan, customize your profile and deploy your new server.
Immediately connect your domain to your server’s IP address. After your DNS settings have fully propagated, go to the server identity tab to set up your domain and follow the straightforward steps to install WordPress on your new server.
With WordPress installed on Webdock, it’s time to bring back your site’s backups. Begin by reinstalling the UpdraftPlus plugin and reconnecting it to your chosen storage option.
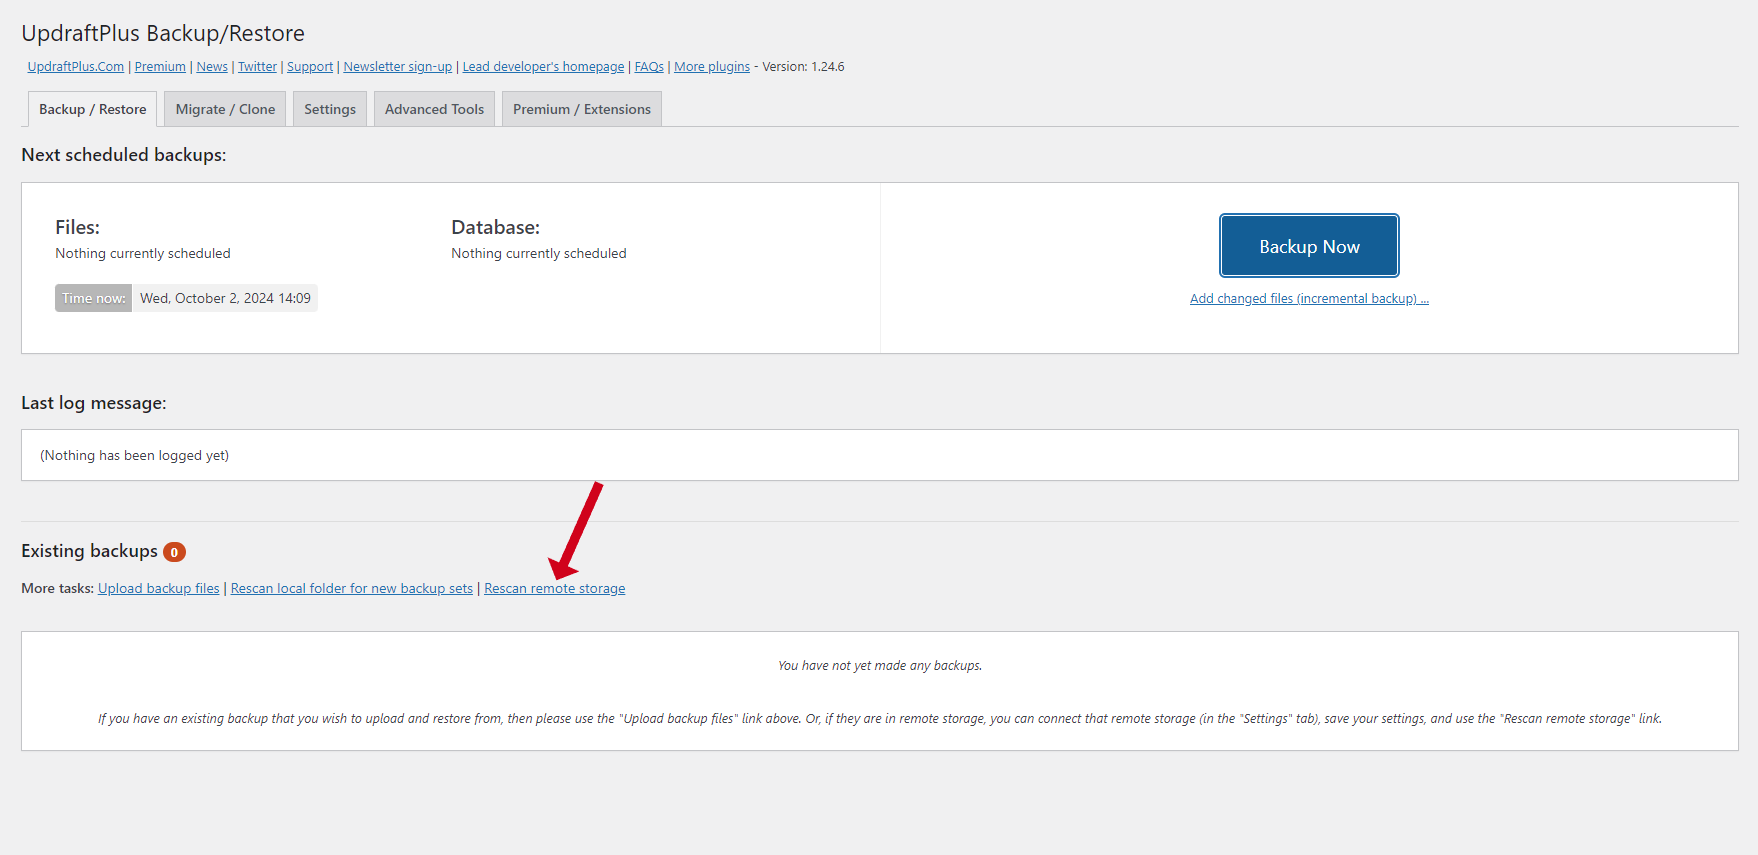
If you’re using remote storage, you might need to rescan to find your available backups.
If you’re not using remote storage, you can manually upload your backup files by clicking the ‘Upload Backup Files’ button.
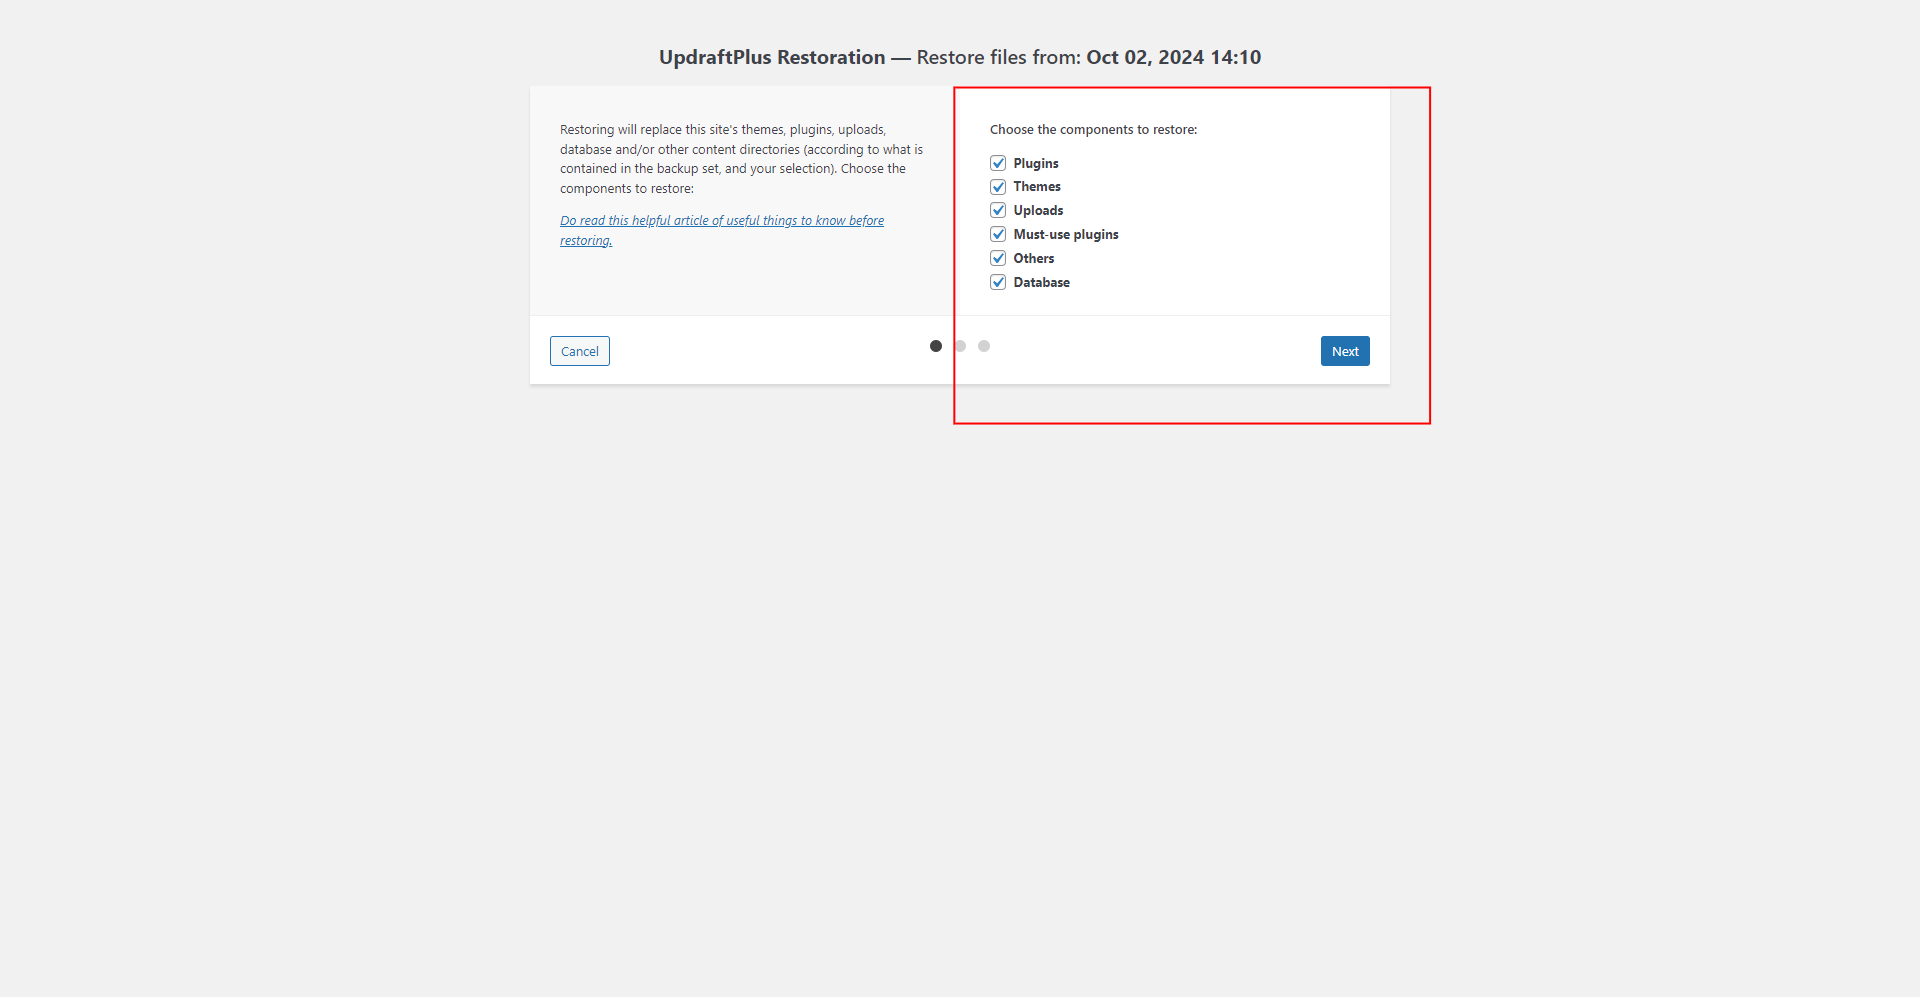
Once your backups appear in the list, click Restore
You will be prompted to select all the necessary components to restore. Do that and proceed with the restoration process.
Finally, once the restoration is complete, thoroughly check your website to ensure everything has been transferred correctly and functions as expected. Following these steps will successfully migrate your WordPress site from SpinupWP to Webdock, and it will be pretty easy to use a backup plugin.
Transferring Without a “Blank Page” Showing Up
When you’re preparing to migrate your website, you might worry about a blank screen appearing during the transition. To prevent this, you can either use a WordPress maintenance plugin or delay updating your DNS until the migration is fully complete. If you’re comfortable with some technical steps, here’s how you can proceed.
Start by setting up your server alias on Webdock. Instead of using the Check Domains button, enter your domain directly into the server alias field. Don’t be alarmed if you encounter any errors or warnings; simply continue the process.
Next, you’ll need to modify your hosts file to point your domain to the new server. Depending on your operating system, the method varies slightly:
- On Windows, open Notepad as an administrator and navigate to c:WindowsSystem32Driversetchosts.
- For Mac users, launch Terminal and type sudo nano /etc/hosts.
- Linux users should also use Terminal to enter sudo nano /etc/hosts.
Once you have the hosts file open, add your Webdock server’s IP address alongside your domain names like so:
123.456.789 example.com
123.456.789 www.example.com
After updating the hosts file, it’s important to clear your DNS cache to ensure the changes take effect.
- On Windows, open Command Prompt and run ipconfig /flushdns
- For Mac, use the command sudo dscacheutil -flushcache in Terminal
- On Linux, execute system-resolve –flush-caches in Terminal
With these settings in place, proceed to install WordPress through Webdock’s management interface. Once installed, visit your site’s URL to confirm that you see a blank site. The changes will only be visible on your computer due to the hosts file modification. Now, install the backup plugin and follow the previously outlined steps to restore your site.
After confirming that your website has been successfully relocated to Webdock, it’s time to make the final adjustments. Update your DNS records to point to the new server, and generate a new SSL certificate by setting your server alias again—simply click the set identity button. Don’t forget to remove the entries you added to the hosts file and clear your DNS cache once more to ensure that your site is fully operational on the new server.
By following these steps, you’ll ensure a smooth migration of your WordPress site to Webdock without any downtime or display issues. Again, any data that might be created on your site between these processes might not be transferred just yet, so you should check and import missed data using a plugin like WPAllImport/WPAllExport.
Conclusion
In conclusion, Webdock outshines SpinupWP with its cost-effective pricing and comprehensive feature set. By offering a free control panel, integrated file and database management, and valuable add-ons like server snapshots and bot protection, Webdock provides exceptional value without the ongoing fees associated with SpinupWP.
While requiring some effort, the migration process is manageable. However, I recommend using a backup plugin to migrate your website, as it is much easier to manage and ensures a much smoother transition process. W
Webdock’s flexibility and robust performance make it the superior choice for hosting and scaling your WordPress presence. Make the switch to enhance your site’s efficiency and security today.
Meet Aayush , a WordPress website designer with almost a decade of experience who crafts visually appealing websites and has a knack for writing engaging technology blogs. In his spare time, he enjoys illuminating the minds around him.
