Introduction
ServerPilot charges premium prices for economy features. Their bare-bones control panel forces users to SSH into servers for basic tasks, and the bills keep mounting with each new site.
Moving away from third-party managers allows you to experience the raw speed of a native solution – a key factor in the managed wordpress hosting vs vps debate.
This migration guide shows you how to move WordPress sites to Webdock’s more capable platform, where better features come included at no extra cost. Let’s get started without further ado.
ServerPilot v/s Webdock: A Quick Rundown
I see ServerPilot as an overpriced monitoring tool pretending to be a control panel. Even the website highlights site monitoring first, which is telling.
While I can’t assess how well their monitoring works, paying $5, $10, or even $20 per server monthly is hard to justify. Plus, there’s an extra fee for each website hosted, leading to a hefty bill on top of your server costs.
The idea that any exceptional feature justifies the price is laughable. ServerPilot goes beyond minimal to nearly useless.
You can’t manage files, databases, cron jobs, or add new software. For many tasks, you’ll need to SSH into your server. Why even have a control panel if users enjoy acting as sysadmins for simple tasks? EasyEngine is a much better free option for adding WordPress sites.
ServerPilot’s user interface is frustratingly sparse and lacks proper buttons. I often clicked on plain text, thinking it was a button.
In contrast, Webdock includes its control panel at no extra cost for all servers, making it a smarter choice financially. The interface may not be flashy, but it’s intuitive and easy to navigate.
Webdock plans starting at €/$5.99 offer free features that enhance server functionality. For example, you get unlimited transactional emails through Postmark, which is known for solid deliverability.
Unlike ServerPilot, which offers no backup options, Webdock automatically takes snapshots of your server twice daily at no charge. You might pay over $20 a month for monitoring with ServerPilot, while Webdock provides it for free.
Additionally, Webdock gives you access to ImprovMX Pro at no cost. These features would typically cost more than $30 a month if purchased separately.
Getting Your Website Files & Database
First thing right off the bat, if you remember your database name and password, you won’t even need to log into ServerPilot because everything we’ll need to do will be through the terminal. Server control panel, much useful!
So, if you don’t know the password to your WordPress website’s database, log in to the ServerPilot dashboard, go to Servers > [Server Name]
Then, Apps > [Website Name] > Databases and click on the Database name.
Here, you will find the option to update the password.
Also, the method I am using typically results in very little downtime (I’ll provide additional tips later to help reduce it even more). However, limited downtime doesn’t guarantee that every change made during the migration will be captured.
To improve the process, consider scheduling your migration during periods of low traffic. Tools like WP All Import or WP All Export can assist in transferring any new data that might not have been included in the initial migration.
Another option is to implement a maintenance plugin, which lets you temporarily take your live site offline until the entire transfer to Webdock is complete.
With these out of hand, first, you’ll need to log in to your server using SSH as a ROOT user. You may use your computer’s native terminal, PuTTy, or Termius. I am going with the latter. The steps will remain more or less the same.
First, we’ll need to get the database file. Run the following command:
# mysqldump -u [database user] -p [database name] > file.sql --no-tablespaces
This command will back up (dump) a MySQL database by creating a .sql file containing SQL statements to recreate the database. The [database name] placeholder is replaced with the actual database you wish to back up. Upon running, you will be prompted to enter a password. This is the password you may have updated in the first step.
The –no-tablespaces option excludes tablespace information from the dump, which is useful when transferring the database to a Webdock server. Otherwise, you will encounter an error when you run the command.
If everything goes well, you will see no output. The SQL dump will be stored in the /root/ folder.
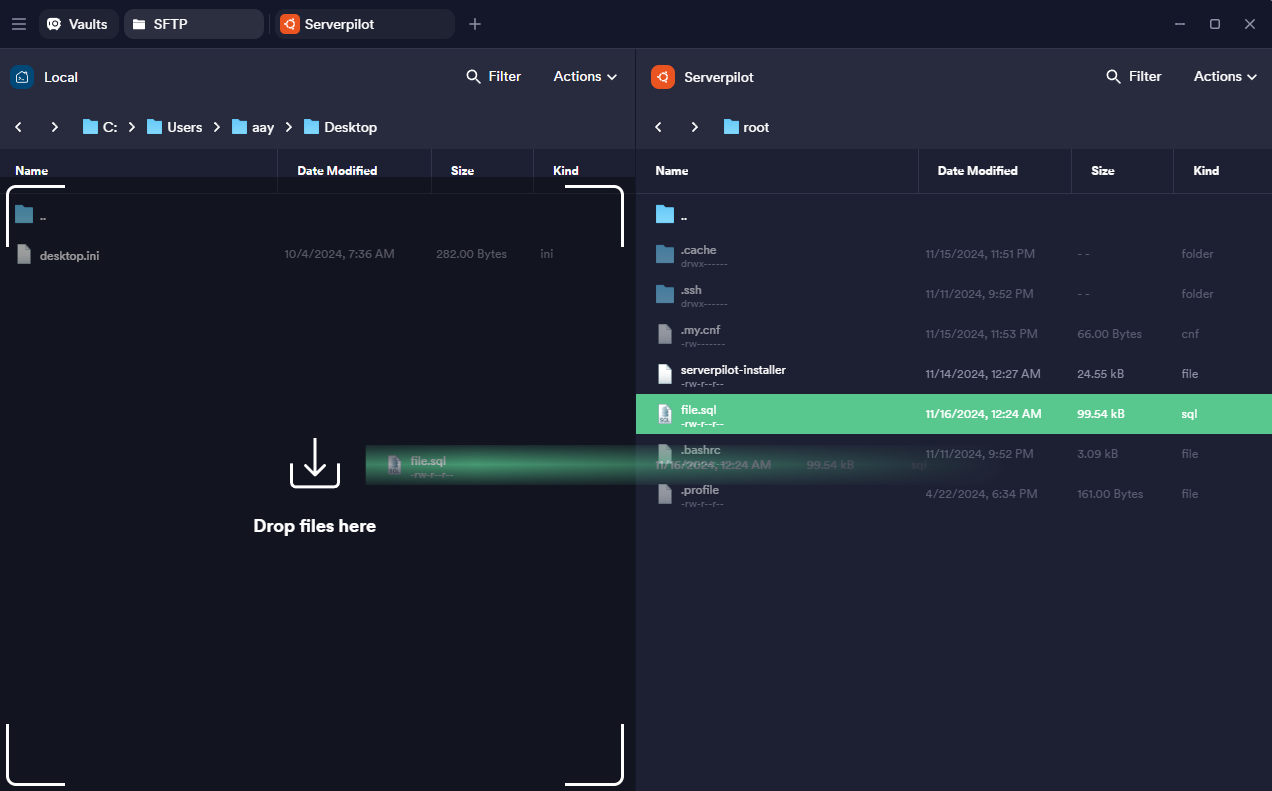
Now, log in to an SFTP software. FileZilla, Cyberduck, it’s your call. Termius has one built in, so I will stick to that. By default, when you log in as a root user, you’ll be logged into the /root/ folder. Here, you can find the dump we just created. Download it and save it to your device.
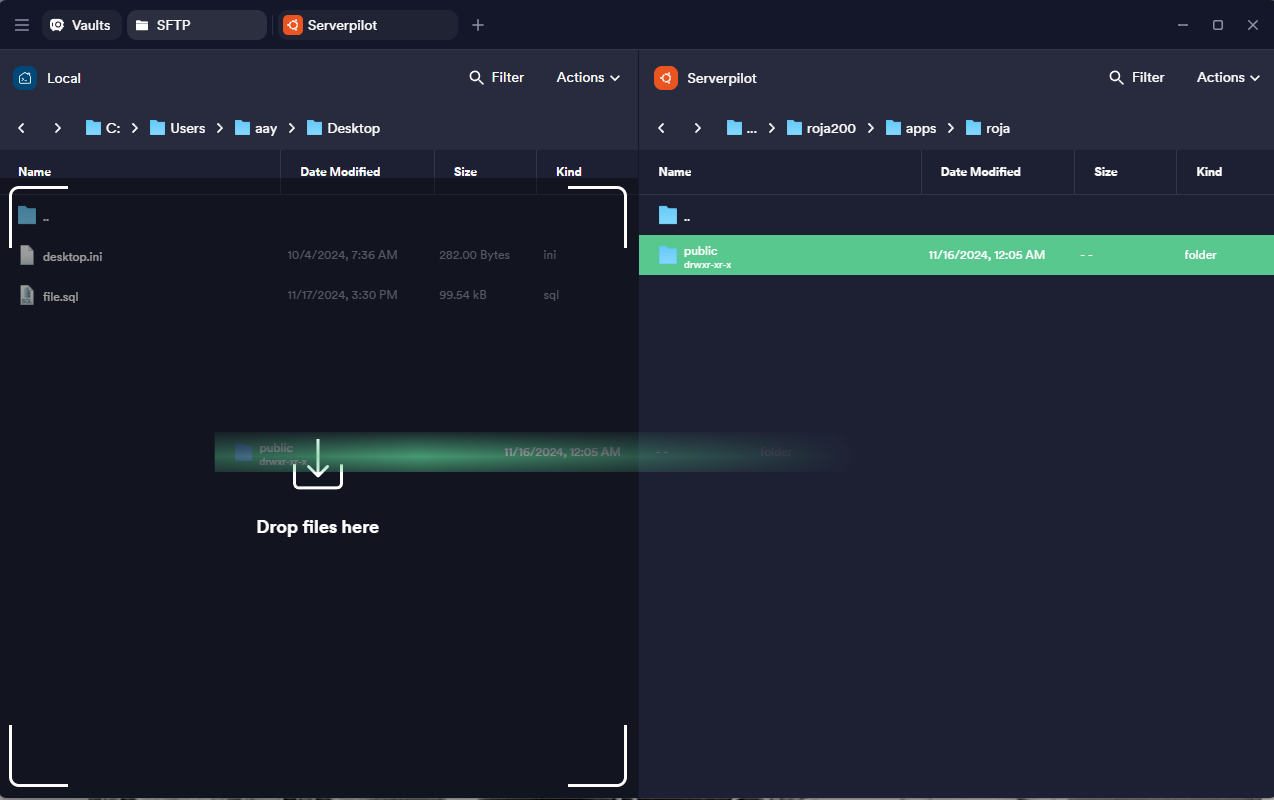
Now, go to the / folder (by going back to the parent folders till the option disappears.) Then to srv > [user] > apps > [website name]. Here, you will find a folder named ‘public’. Copy it to your machine.
Depending on the SFTP software you are using, you might have the option to compress the folder before transferring it to your computer. If this feature is accessible, it can significantly reduce the time required. If not, compress this folder into a zip file and keep it ready with the database dump.
Selecting a Webdock Server and Setting Up WordPress
Visit Webdock to set up a server plan that starts at €/$5.99 or higher. You’ll have the option to choose between Apache or NGINX for your server software, and I suggest going with NGINX.
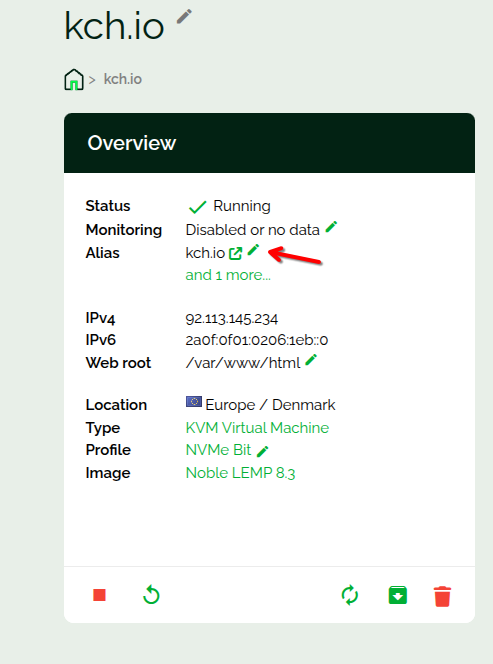
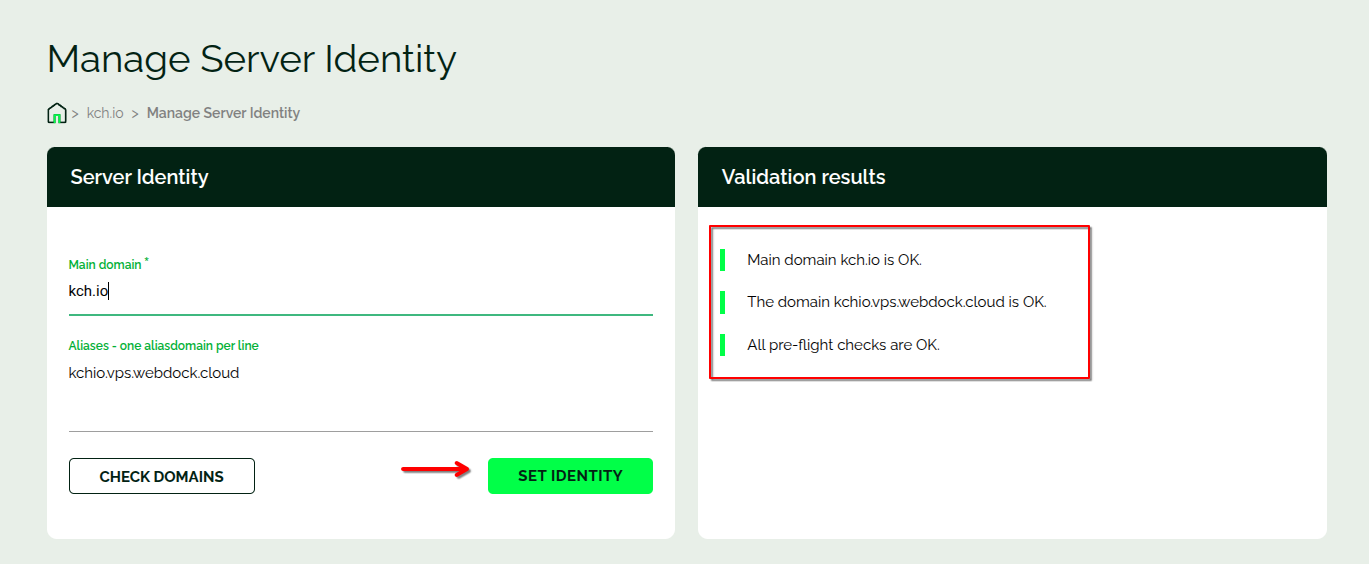
Once your server is set up, head over to its dashboard on Webdock. Find the small pencil icon next to the Alias field in the Overview tab and click on it.
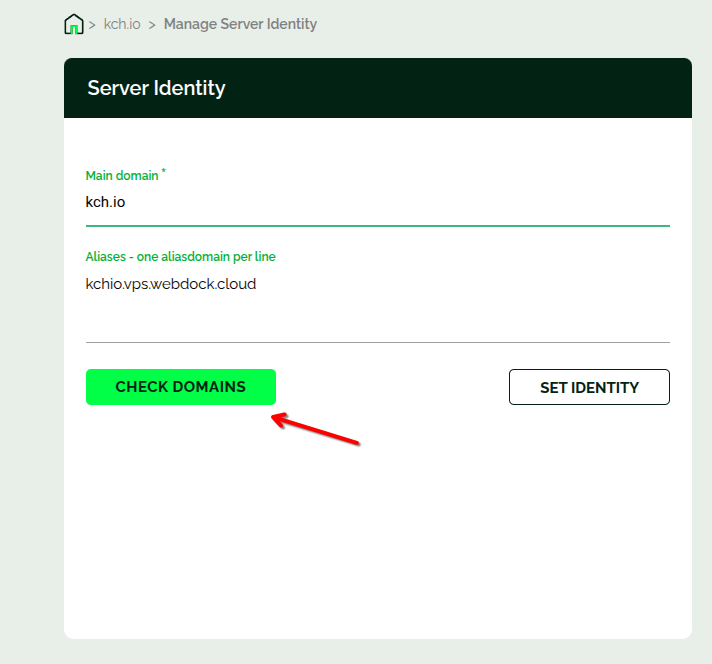
In the main domain column, enter your website’s primary domain and click on Set Identity. Normally, you would verify the domain before setting the identity, but to minimize downtime, you can assign your website’s domain as the primary one right away.
The setup process should take around 3-4 minutes. You might see an error message during this time, but you can ignore it for now.
Once you’re back on your server’s overview page, find the Manage WordPress section.
You’ll need to install WP-CLI on your server. Click the button to begin the installation. After WP-CLI is successfully installed, click the Install WordPress Now button. A form will appear asking for information like admin email, domain, path, database, and more. In most cases, the default settings will work just fine.
Please note that you cannot manually create an admin password; Webdock will generate one for you automatically.
Migrating Your Website To Webdock
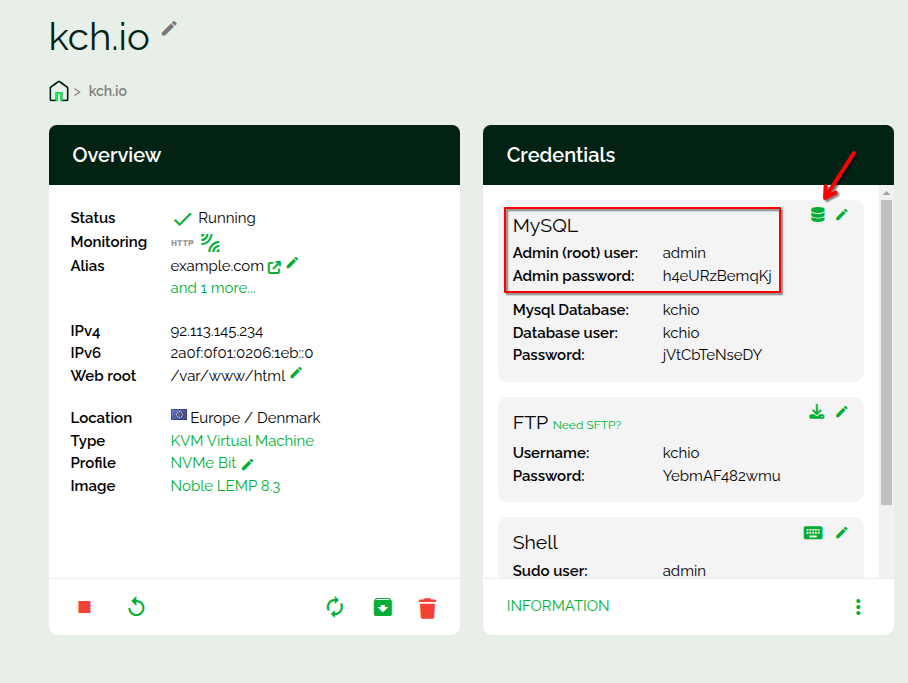
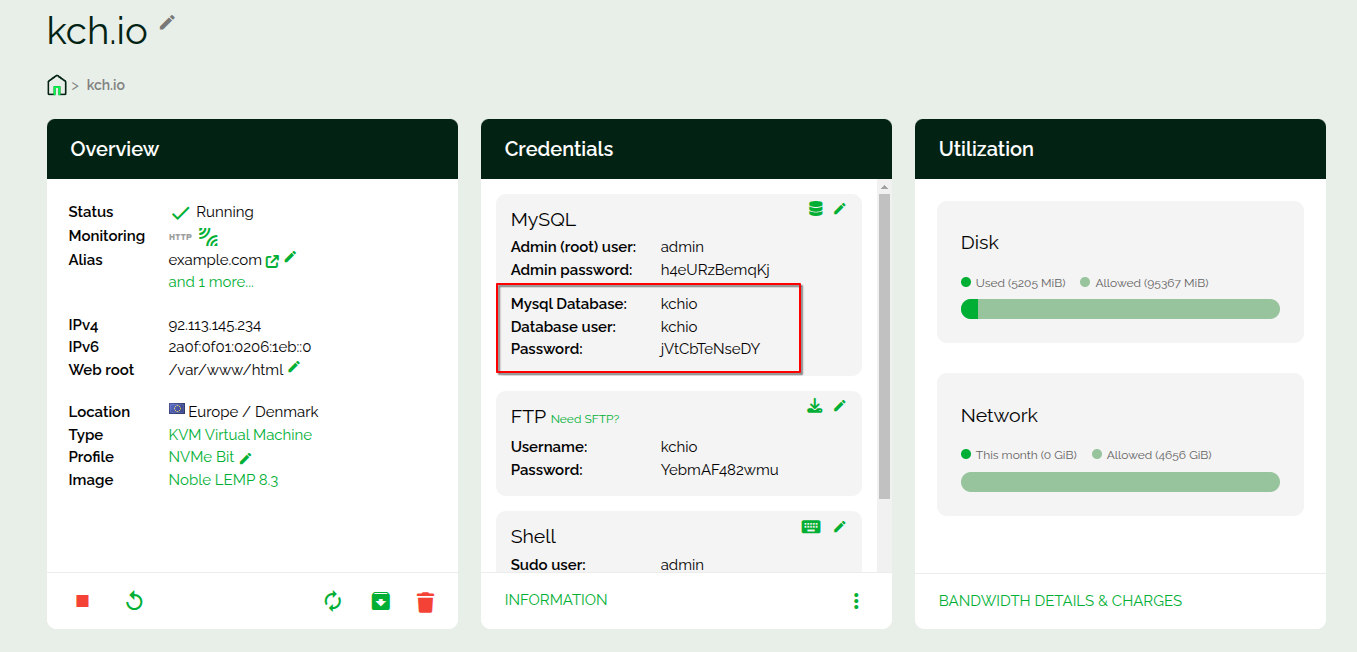
First, we’ll start by importing the website database. Click the small database icon in the credentials tab and access phpMyAdmin.
When prompted, enter your admin username and password.
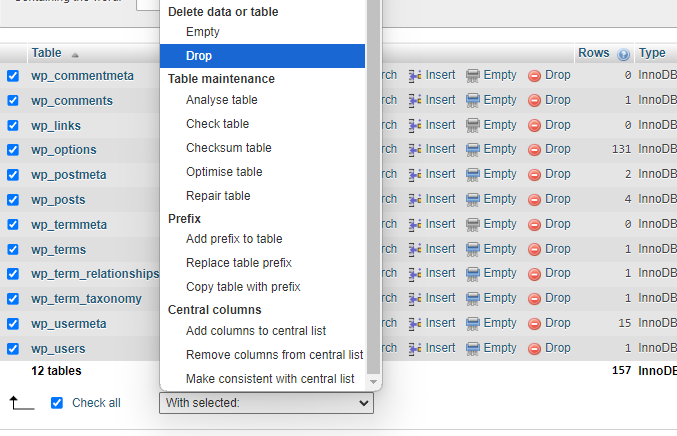
Once you’re in phpMyAdmin, locate your WordPress site’s database, select all the tables within it, and proceed to drop (delete) them.
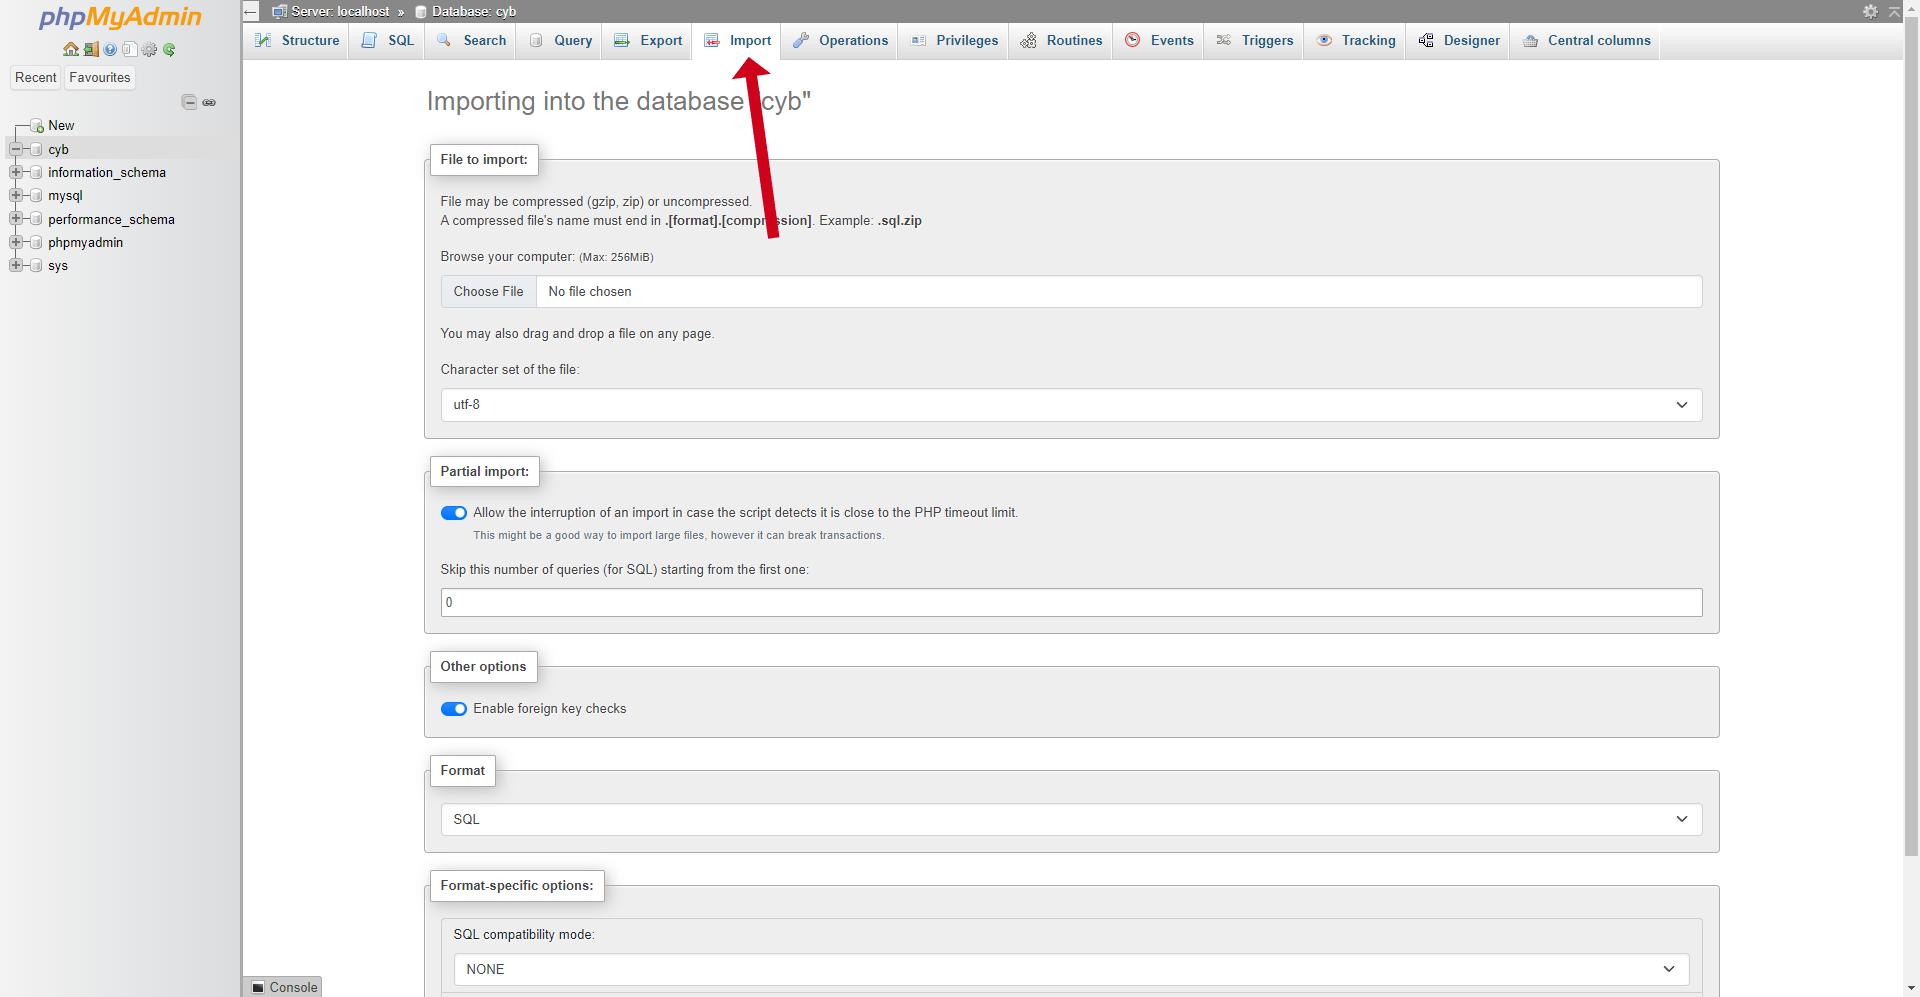
Next, go to the import tab. Here, you can either drag and drop the .sql file you downloaded from the root folder or manually select it from your computer. This SQL file will fill your database with all the required data.
After that, open the “wp_options” table and check that both the siteurl and home option_names contain the https:// version of your website’s URL.
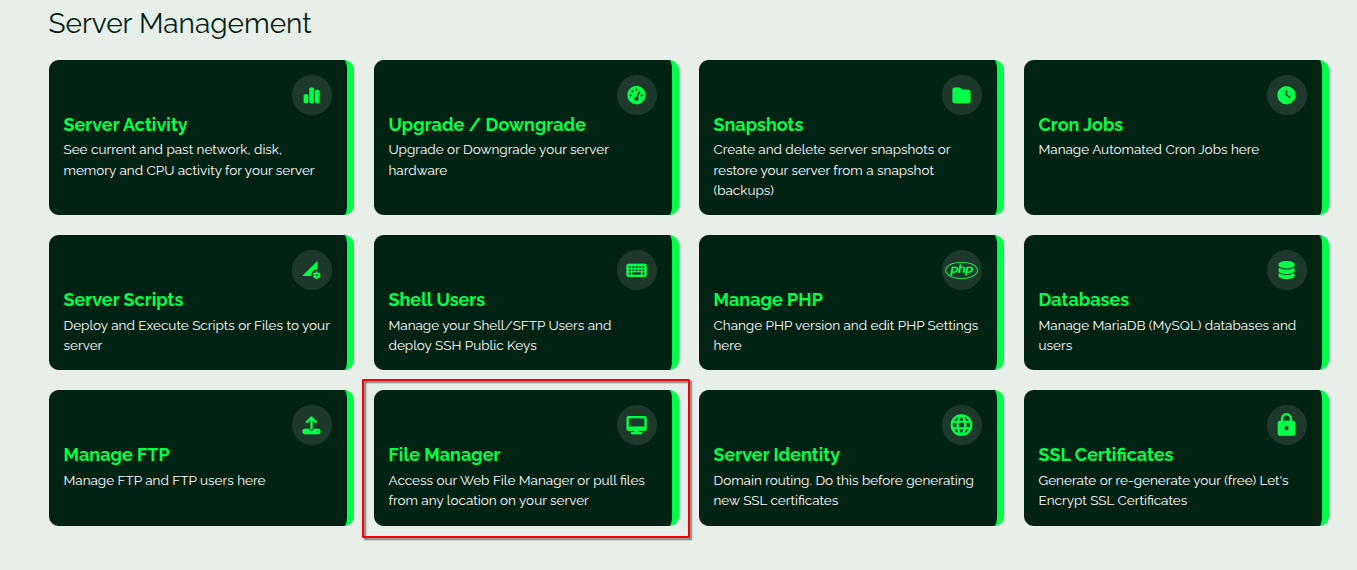
Once you’ve imported and confirmed your database, install the File Manager from the overview section and log in.
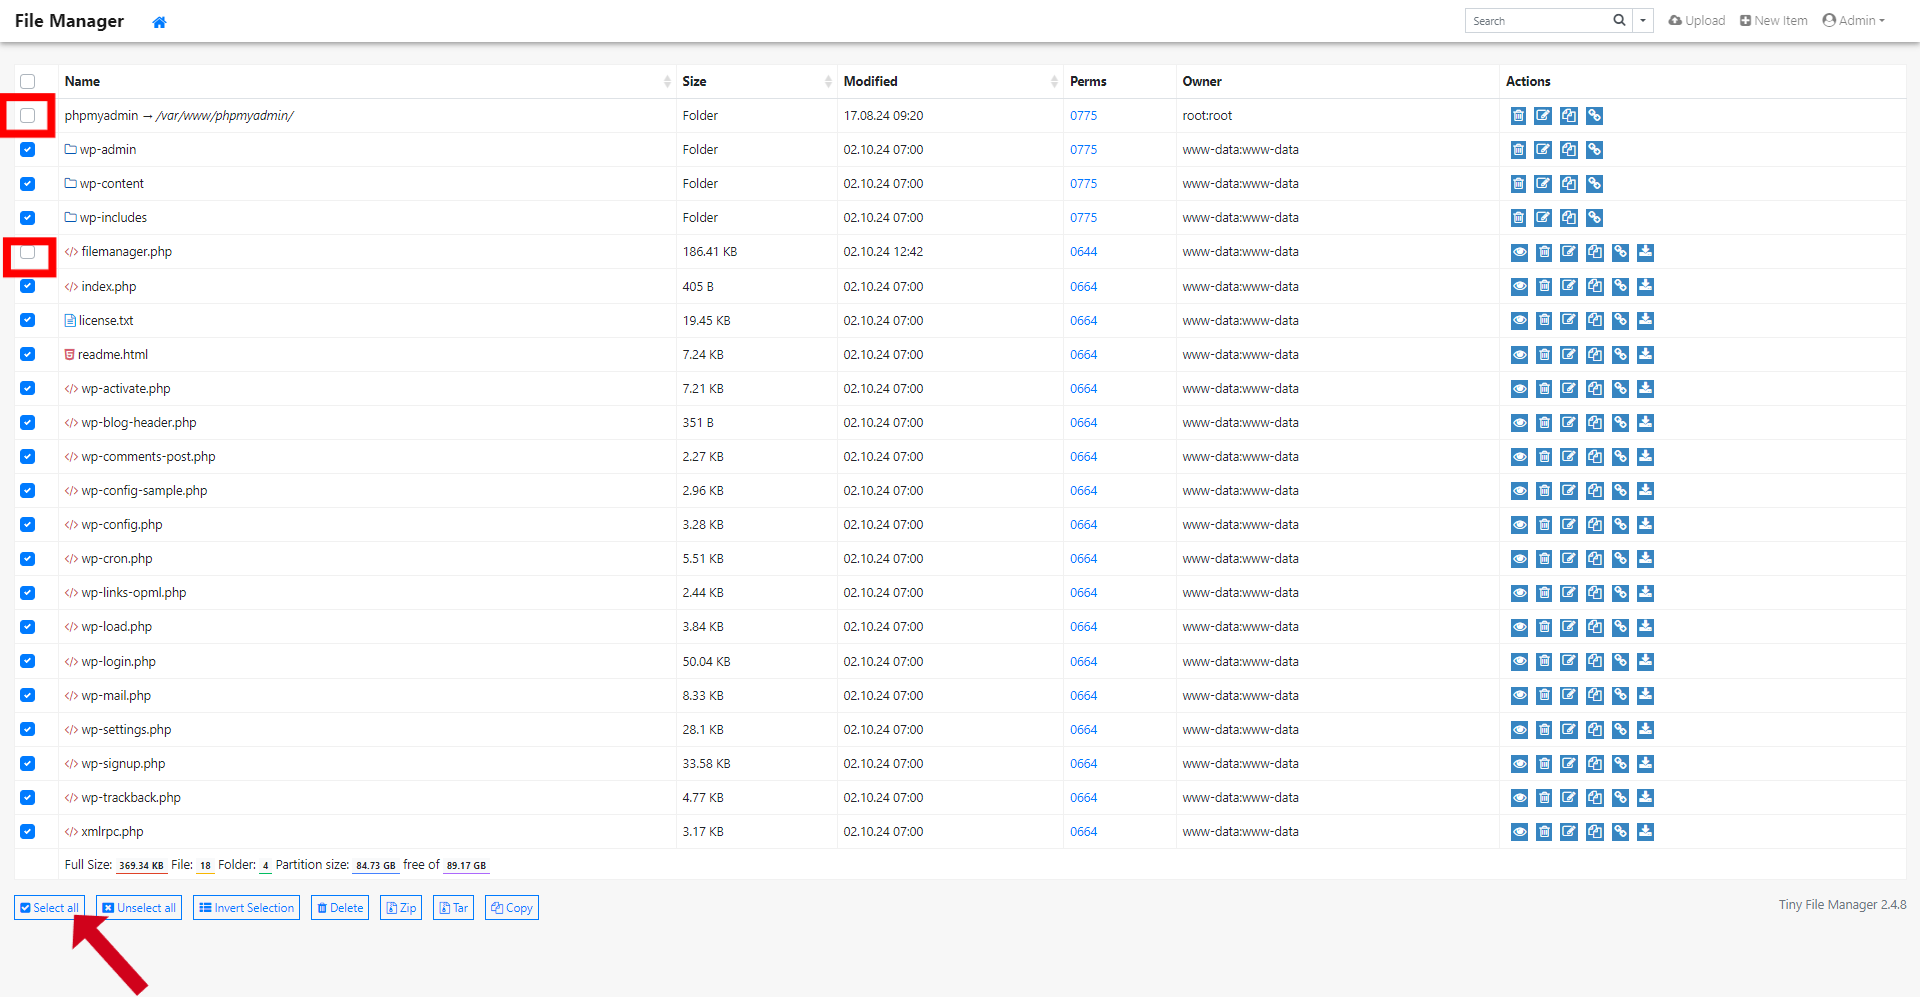
Inside the file manager, select all files using the provided option, but remember to uncheck the PHPMyAdmin folder and the filemanager.php file. Delete all the other files that remain.
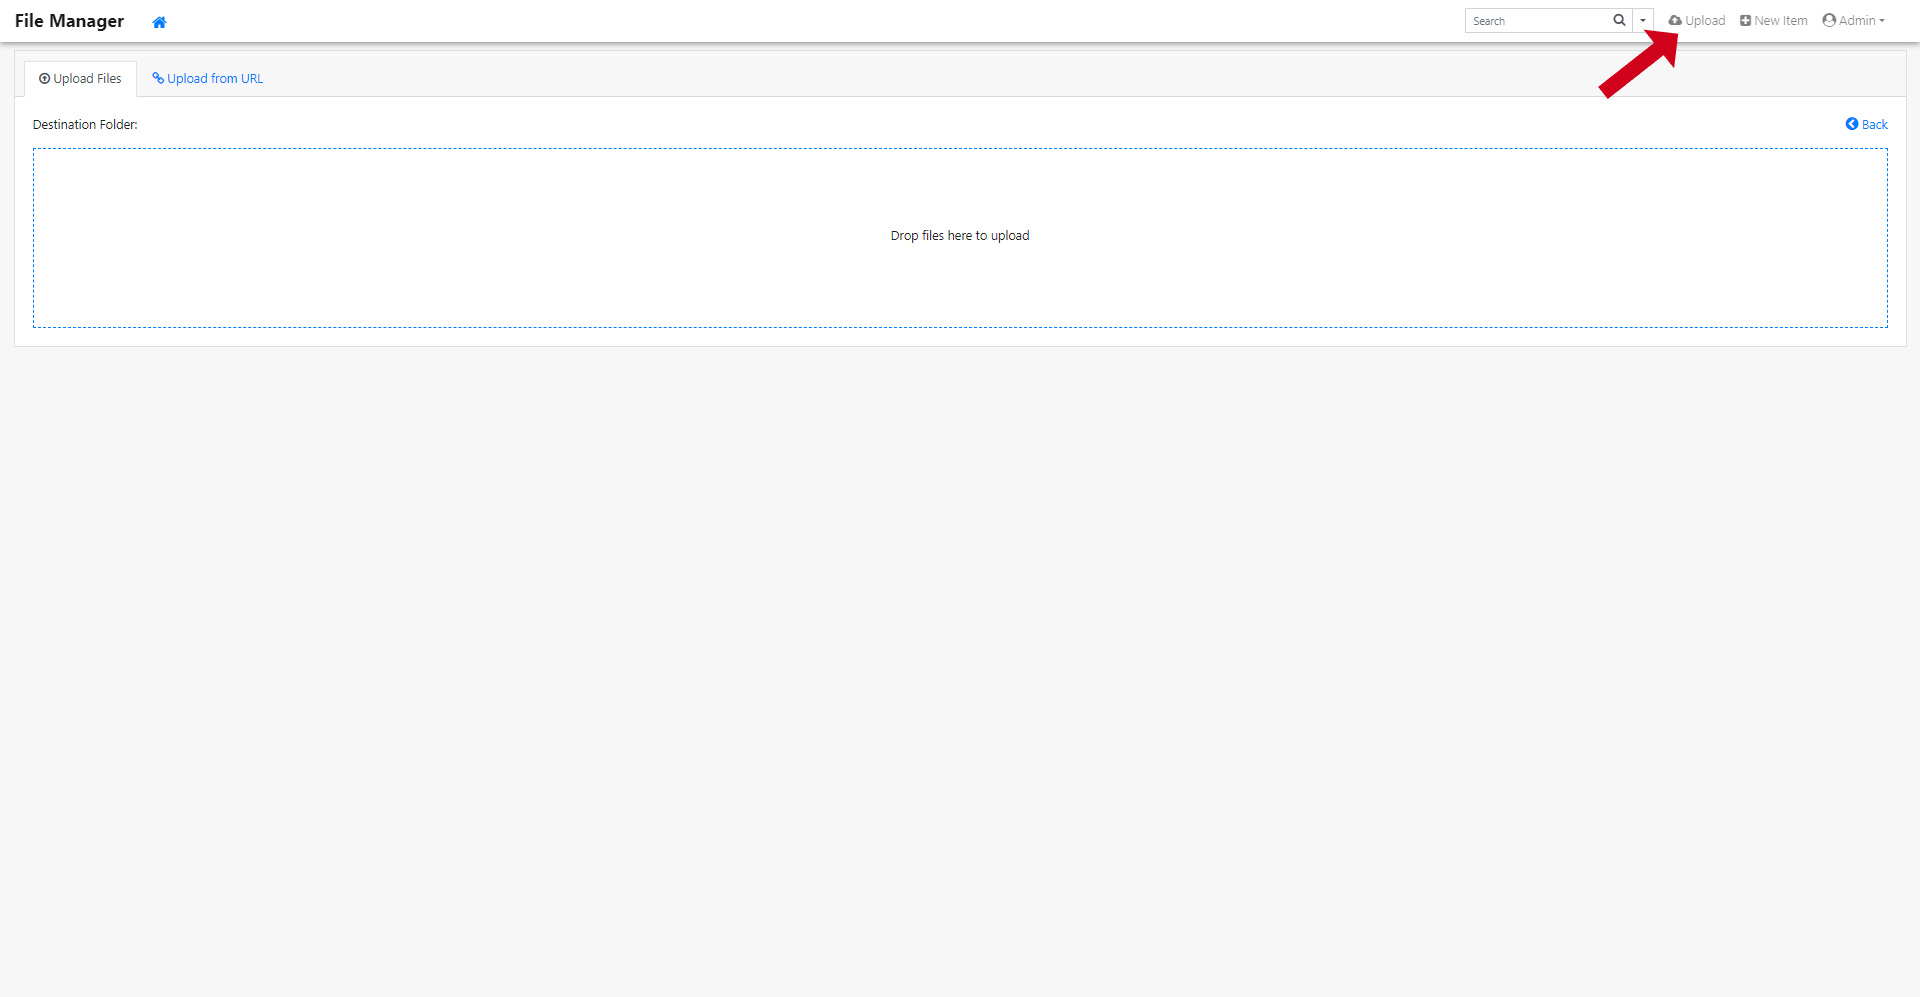
Next, look for the upload button in the top right corner. Click it to upload the public zip file you downloaded earlier. You can do this by either dragging and dropping the file or selecting it manually from your computer.
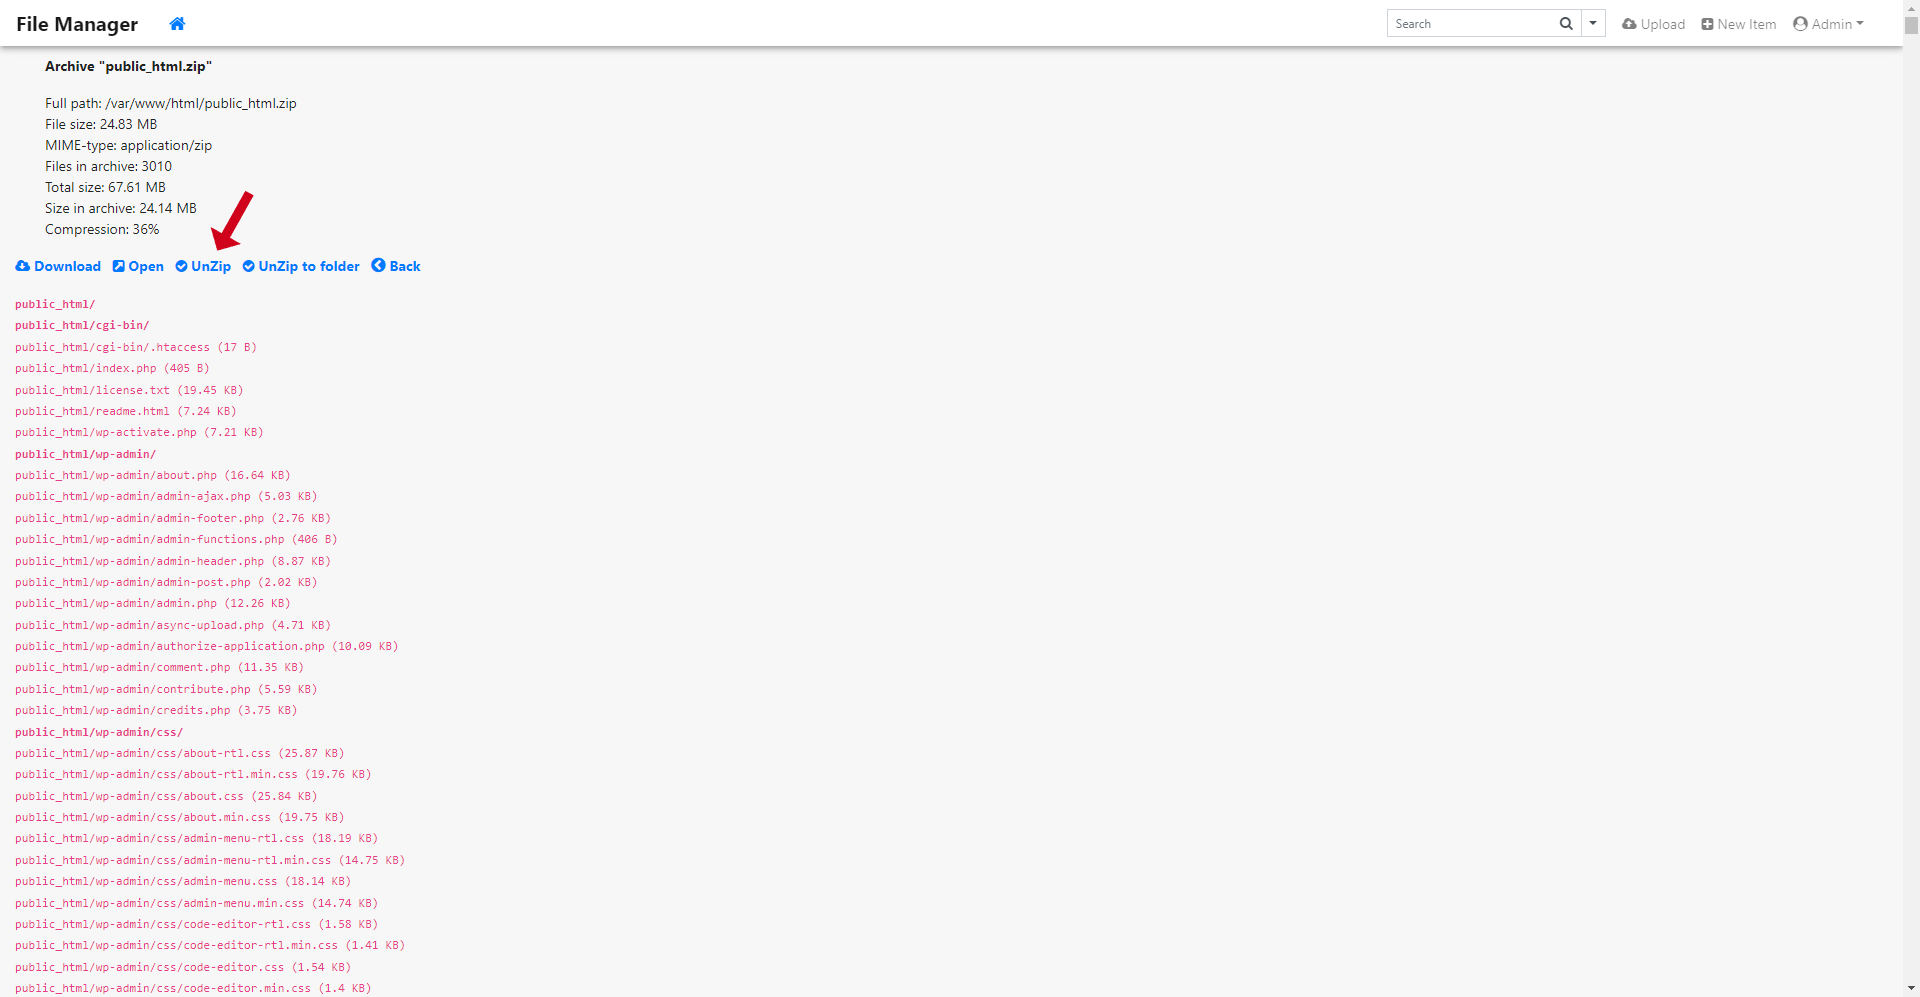
After the zip file is uploaded, find it and choose the option to extract it.
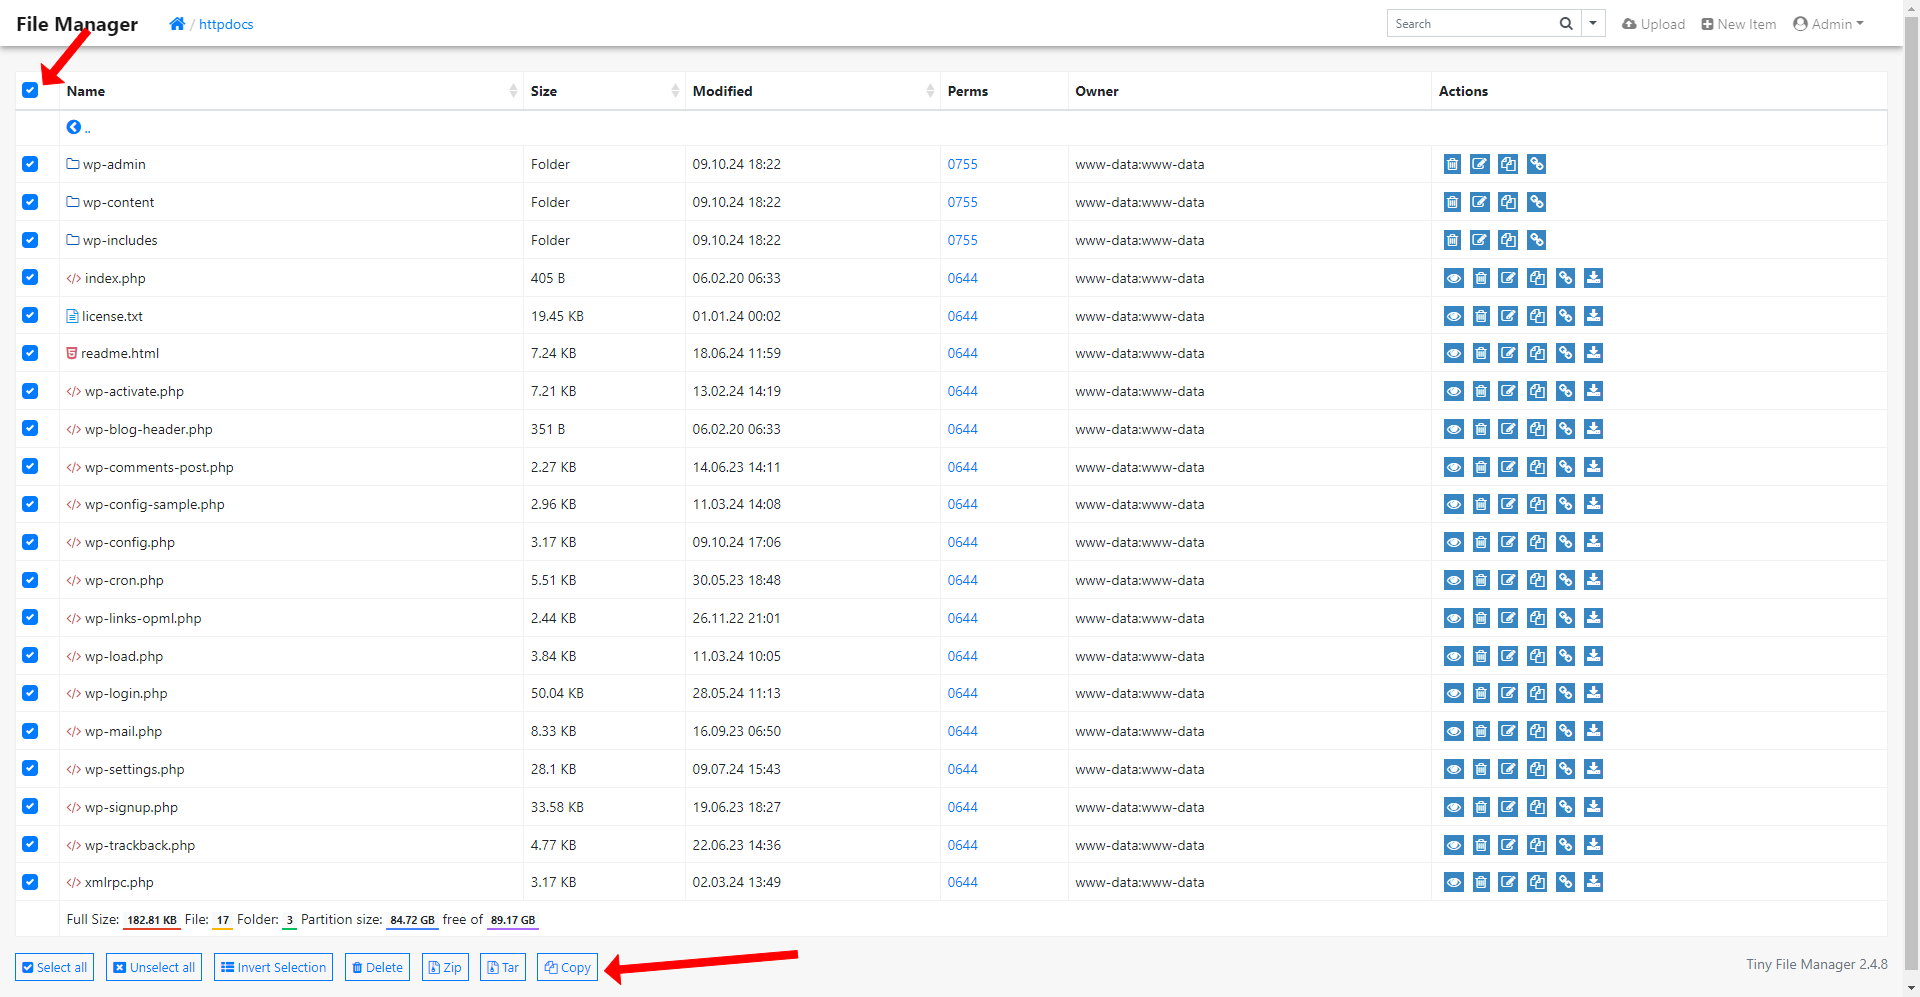
Once extracted, open the new folder and select all of its files. Click on the copy button.
In the following screen, check the “Move” option while leaving the path field blank.
With your files now in the main directory, you can safely delete both the original zip file and the unzipped folder.
Establishing Database Connection and Configuring SSL Certificate
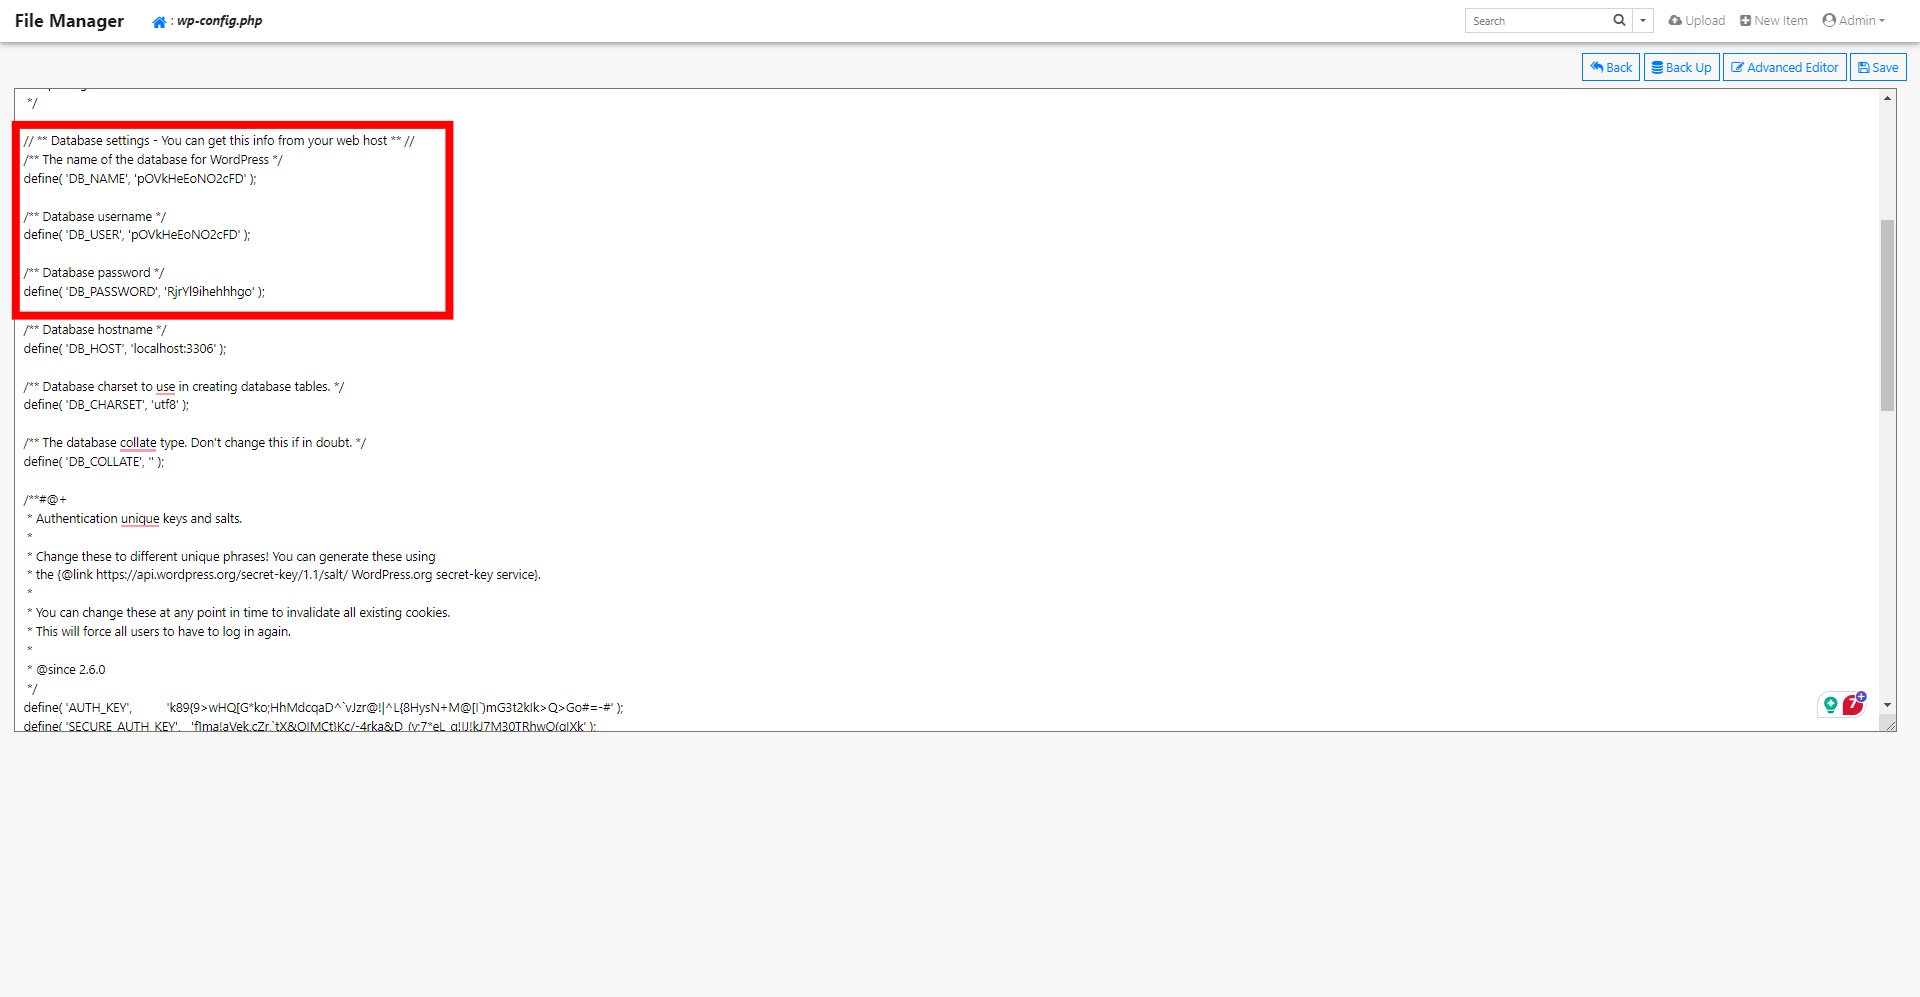
Now, let’s wrap things up: Open the wp-config.php file and find the section that contains the database details.
Replace this information with the latest details from your server overview.
After making these updates, don’t forget to save the file.
Once you’ve completed all your file-related tasks, it’s a good idea to disable and remove the File Manager. Even though it’s secured with a password, it can still create security vulnerabilities, so it’s best to get rid of it when you’re finished. You’ll find a straightforward option to delete the File Manager in the same area where you initially activated it.
Next, adjust your domain’s DNS settings to direct to your Webdock VPS IP address using an A/CNAME record.
As mentioned, return to your server overview, navigate to the Alias section, and click the check domain button. If everything looks good in the validation section, set the domain.
This step will also regenerate your site’s SSL certificates. And that’s a wrap—your WordPress website is now live on Webdock through ServerPilot with minimal downtime.
Easier Option: Employing a Plugin
Using the previously mentioned approach is both free and typically effective. However, it might become a bit overwhelming if your website is extensive, your internet speed is sluggish, or if you’re not particularly tech-savvy. In those situations, utilizing a backup plugin can simplify the process of moving your site to Webdock.
Out of the many backup and migration plugins available, I tend to rely on UpdraftPlus. While it has a few minor flaws, it consistently gets the job done. The best aspect? Most of its key features are free, meaning you won’t incur any costs. Duplicator is also an excellent alternative.
If you already have a favorite backup plugin that you prefer, go ahead and use it. The procedures are generally quite similar across various plugins. Also, it’s assumed that you have access to some kind of cloud storage for your backups.
You can choose any option, even the free version of Google Drive. While cloud storage isn’t a strict requirement, it can help speed up migration. If you decide not to use a storage service, that’s okay! I’ll make sure to guide you through the steps without it.
Just remember, if your internet is slow, migrating without cloud storage might take almost as long as doing it manually.
To get started, log into your WordPress dashboard. Move your mouse to the “Plugins” section and click “Add New.” In the search field, type “UpdraftPlus” to find the UpdraftPlus WordPress Backup Plugin. Hit “Install Now,” once it’s finished installing, activate the plugin.
After you activate it, you can take a quick introductory tour or skip it if you don’t plan on using the plugin much or if it doesn’t seem like a good fit for you.
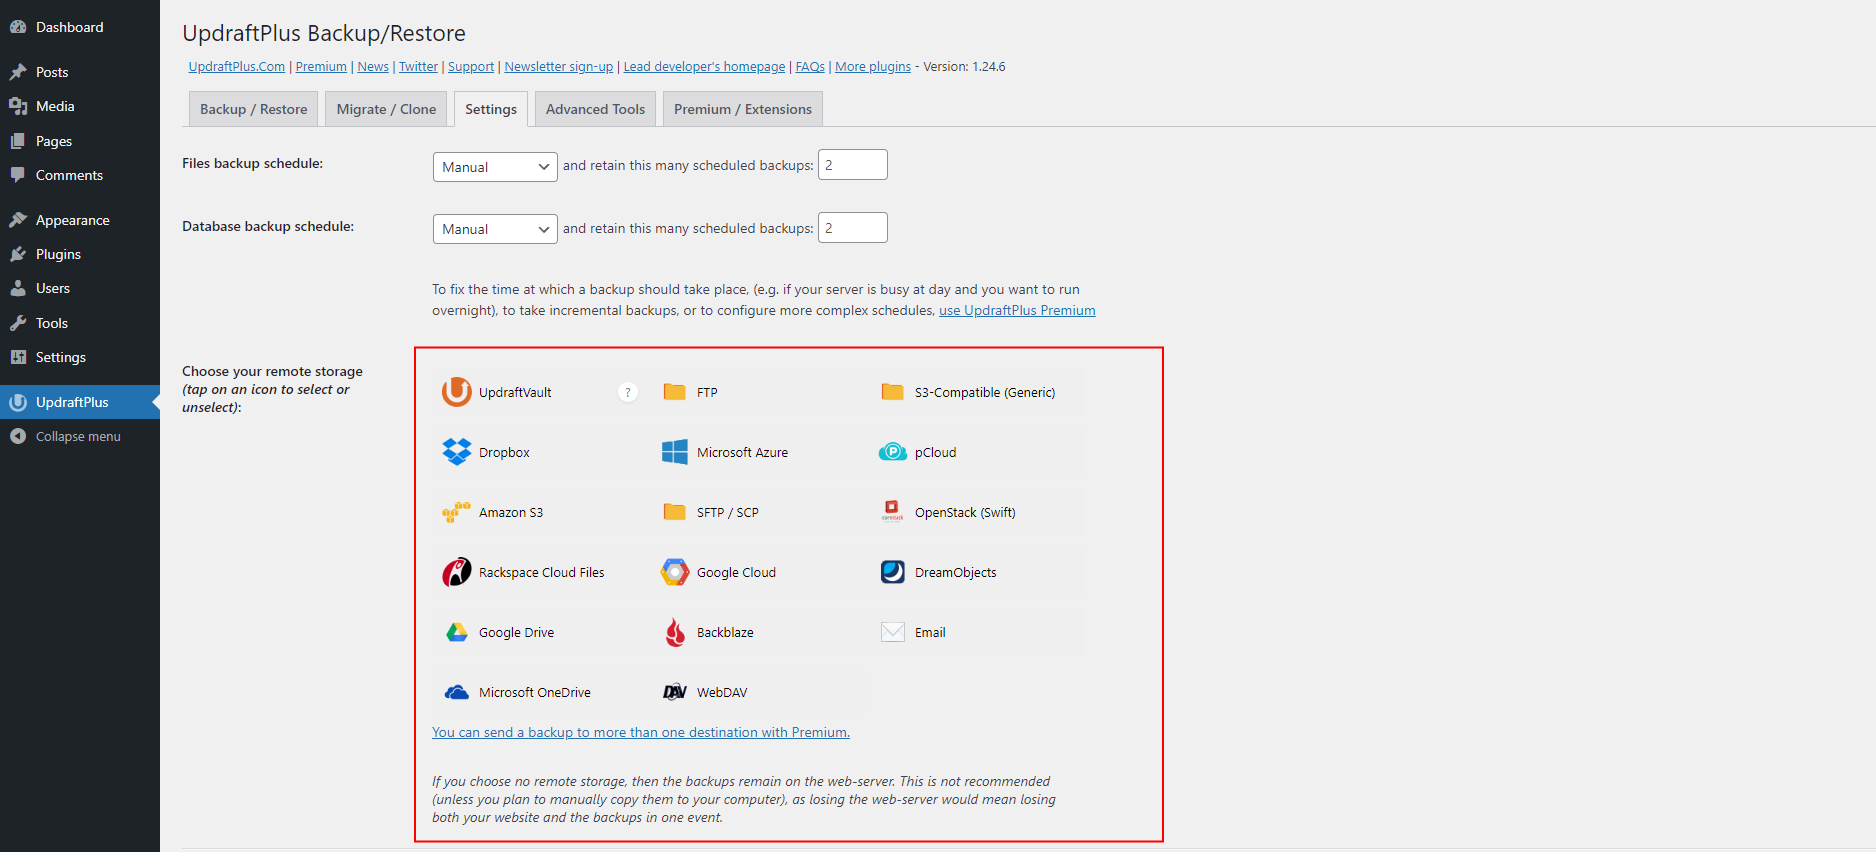
Next, access the UpdraftPlus menu option to access its settings. Scroll down to the “Choose your remote storage” area, pick your preferred cloud storage option, and follow the setup instructions. If you prefer not to use any remote storage, feel free to skip this part.
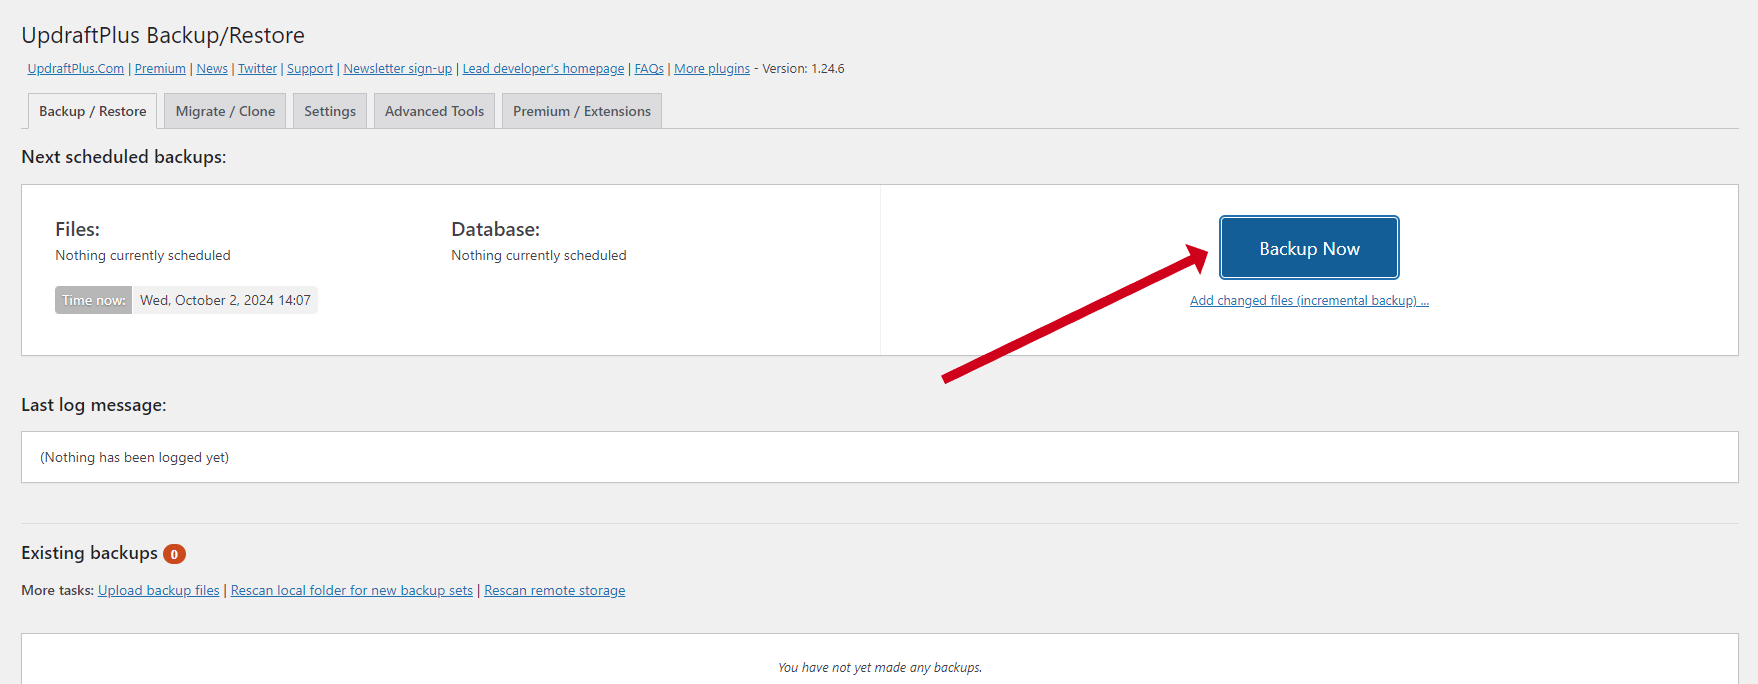
After you’ve finished the setup, head over to the Backup/Restore tab. Click on the prominent “Backup Now” button, make sure all the checkboxes are selected, and then click “Backup Now” once more to start the backup process.
Give the backup some time to finish. If you’re not using remote storage, scroll down to locate the newly created backup. You’ll need to click on each backed-up component individually to download and store their zip files safely.
Lastly, choose a server plan that costs €/$5.99 or more, adjust your profile to align with the pricing, and launch your server on Webdock.
You have two choices for moving forward: You can link your domain directly to your server’s IP address right away. This option is the simplest, but it may result in your users seeing a blank website initially. Alternatively, you could modify your computer’s host file to test things out. I’ll explain that method shortly.
In the server identity tab, enter your domain name once you’ve confirmed that the DNS has propagated. Then, follow the steps outlined in the previous section to install WordPress.
Once WordPress is set up, log into your dashboard and install UpdraftPlus or another backup plugin of your choice. Make sure to reconnect your storage afterward.
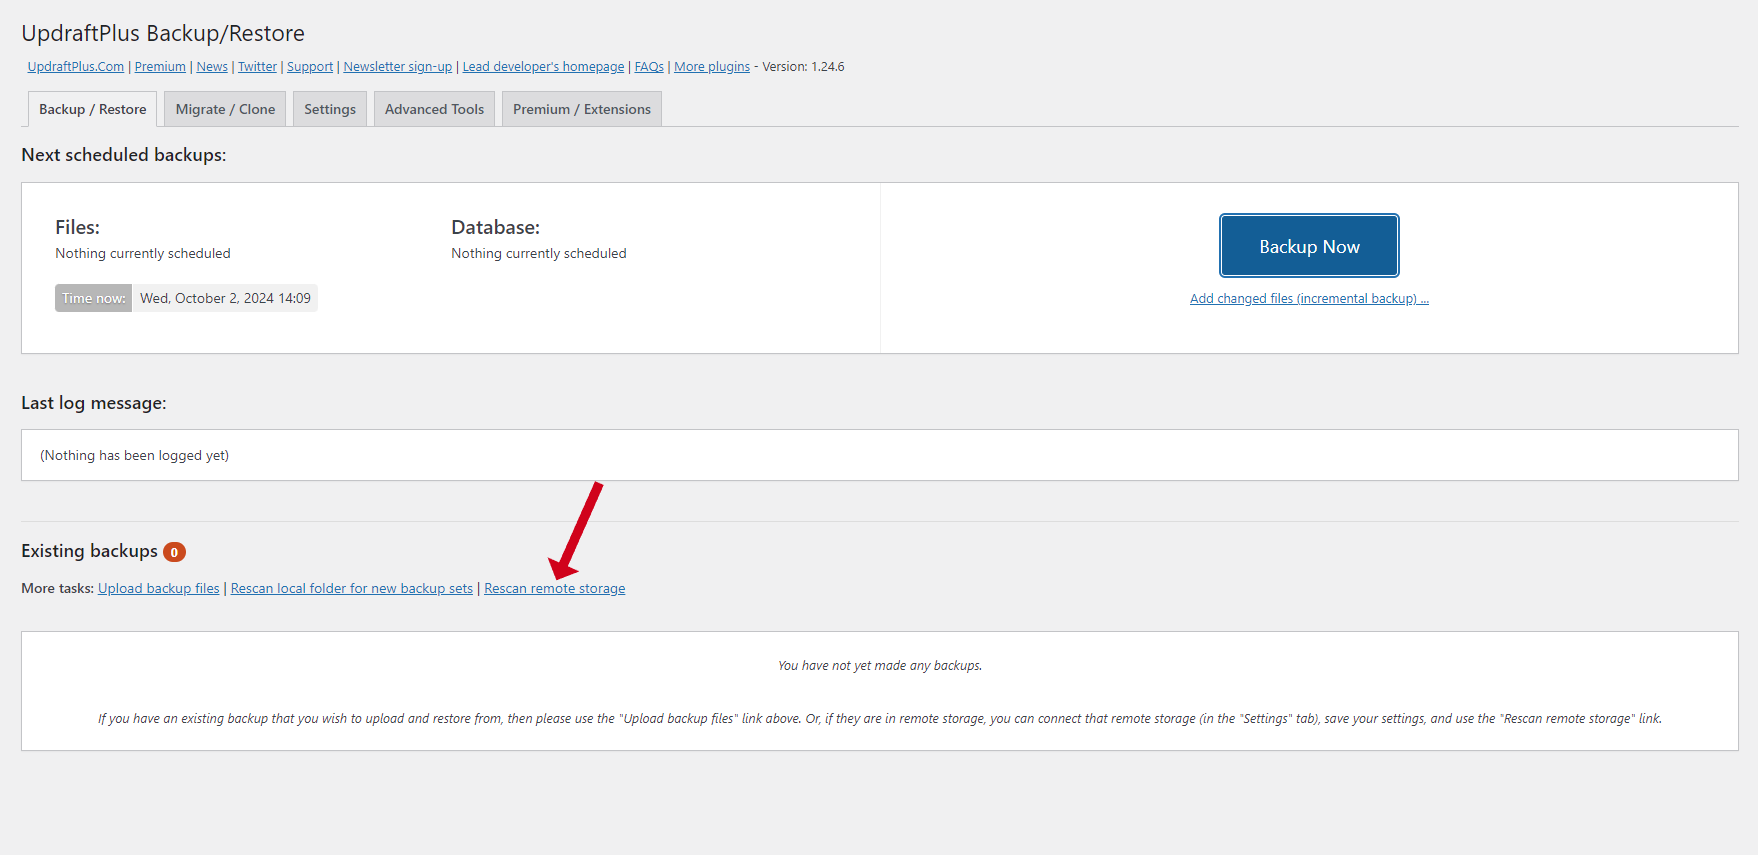
Go to the Backup/Restore section. In the “Existing Backups” area, you might see a message stating, “You have not yet made any backups.” If that’s the case, click on the Rescan Remote Storage button. This will prompt UpdraftPlus to search for and display any available backups it finds.
If you’re not using remote storage, you can upload backup files manually. Just select the upload backups option and drag your files into the designated area instead of seeing the “You have not yet made any backups” message.
This message will change once your backup from the ServerPilot site appears. Click the Restore button to begin the restoration process.
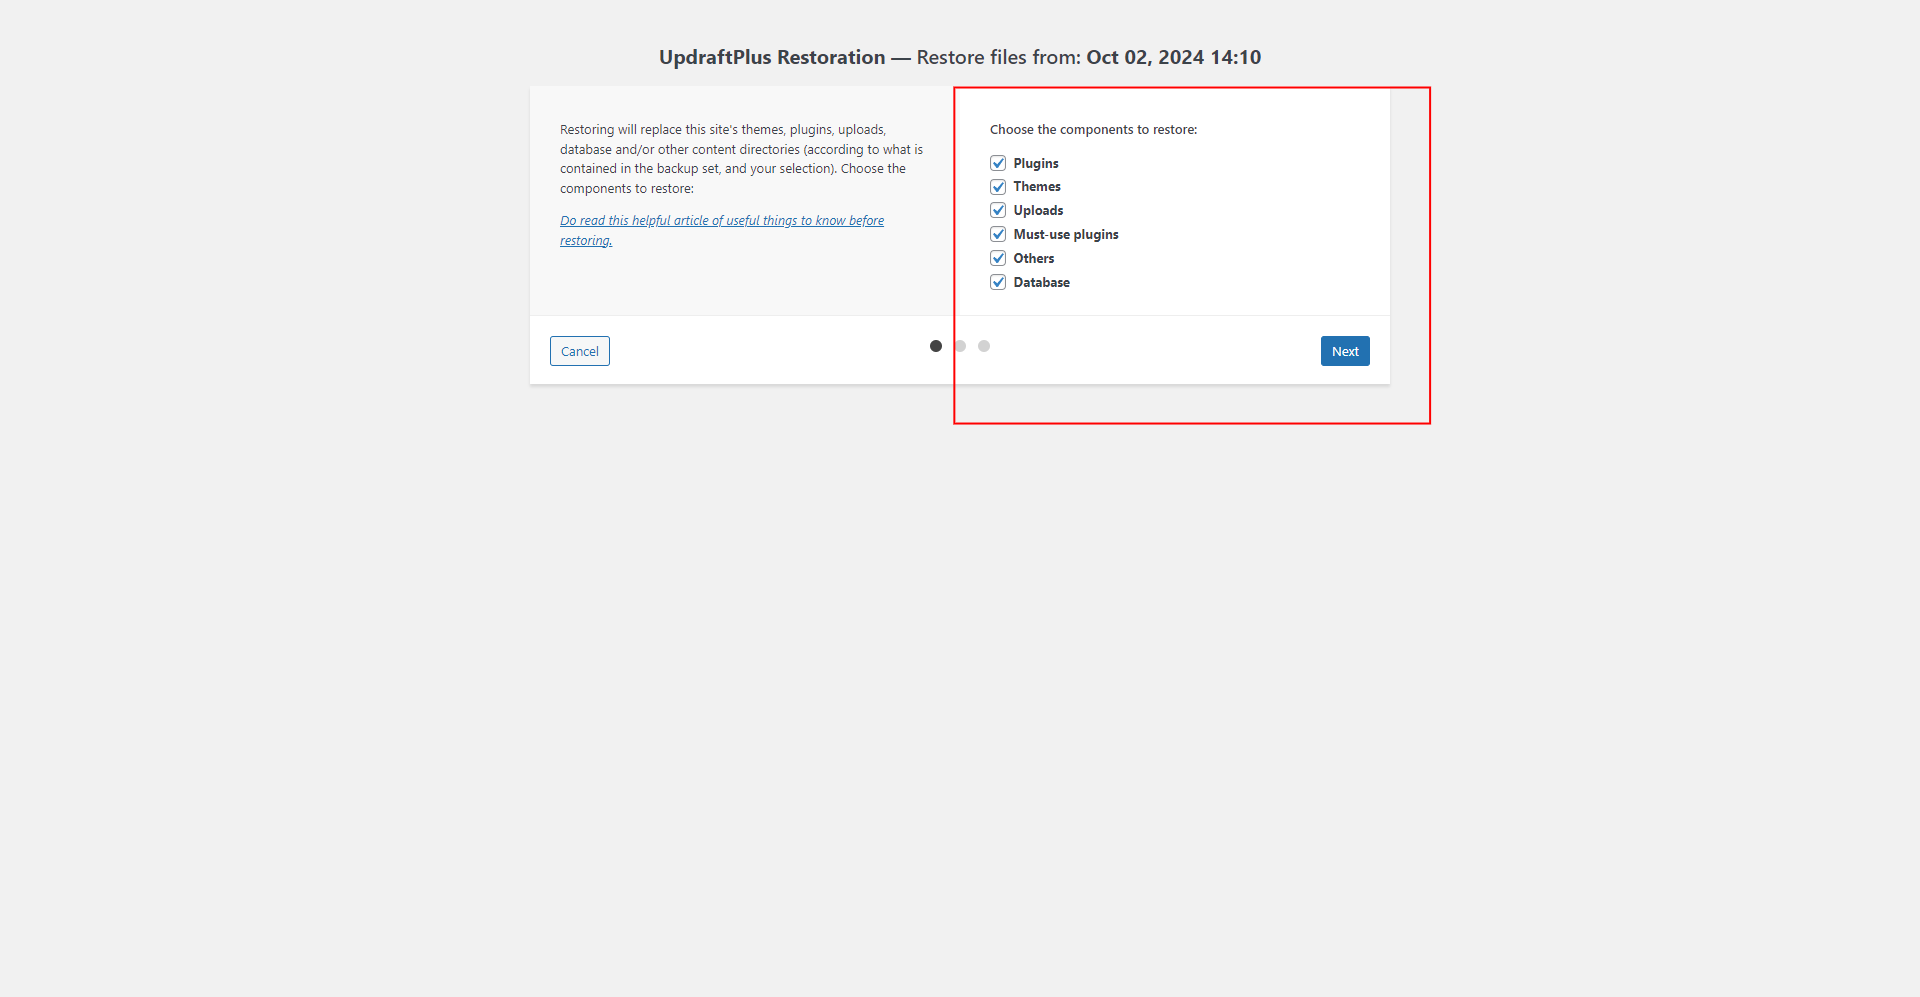
Ensure that you select all options under Choose the Components to Restore, then click Next. If you’re using remote storage, the plugin will start downloading the necessary files at this stage.
After downloading all the files, click Next again and be patient while the process finishes. That’s it! Your WordPress site has been successfully moved from ServerPilot to Webdock. Take a moment to check everything and make sure it’s working correctly.
Moving Without a “Empty Page” Showing
If you prefer that your visitors don’t see a blank site during the migration, consider installing a maintenance plugin on your WordPress site. This will let them know that the site is currently undergoing maintenance, as noted in the caution section. There are plenty of free options available in the WordPress plugin repository.
On the other hand, if you’re comfortable with some technical work, you can wait to update your DNS records until the migration is completely finished.
When setting up your domain as the server identity, skip the Check Domains button and enter the domain directly. You may receive an error or warning, but feel free to continue regardless.
Next, find your server’s IP address in your Webdock dashboard and access your computer’s host file:
- For Windows: Search for Notepad, right-click it, and select “Run as Administrator.” Then press CTRL + O and navigate to c:WindowsSystem32Driversetchosts.
- For Mac: Open the terminal and enter sudo nano /private/etc/hosts (for older Macs) or sudo nano /etc/hosts (for newer Macs).
- For Linux: Open a terminal window, type sudo nano /etc/hosts, hit enter, and log in.
Once you have the host file open, scroll to the bottom and add your Webdock server’s IP address.
Follow it with a space, then list both the www and non-www versions of your domain on separate lines like this:
123.456.789 example.com
123.456.789 www.example.com
Save your changes to the host file and exit the editor. To help your computer quickly link your domain to the Webdock server, you may need to clear the DNS cache.
Here’s how to clear the DNS cache:
- For Windows: Open Command Prompt as an administrator and type ipconfig /flushdns.
- For Mac: Launch Terminal and enter sudo dscacheutil -flushcache.
- For Linux: Open Terminal and type systemd-resolve –flush-caches.
Now, you can try installing WordPress using Webdock’s WordPress manager. If you visit your website’s URL at this point, you should see a blank WordPress site—this will only be visible on your computer. Once you verify that everything is set up correctly, you can move on to any additional tasks you need to complete.
After successfully finishing all tasks, update your DNS records. Click on Set Identity again to generate a new SSL certificate, remove the recent entries from your host file, and clear your computer’s DNS cache one more time.
Conclusion
Those monthly ServerPilot charges add up fast, especially when basic features hide behind premium paywalls.
Now you’ve seen both migration paths — pick the one that fits your comfort level, migrate to Webdock stress-free, and wave goodbye to paying extra for monitoring. Your wallet will thank you, and your WordPress sites won’t miss a thing.
Meet Aayush , a WordPress website designer with almost a decade of experience who crafts visually appealing websites and has a knack for writing engaging technology blogs. In his spare time, he enjoys illuminating the minds around him.
