Introduction
Thinking about moving your WordPress site from DirectAdmin to Webdock? You’re in the right place!
Webdock offers a user-friendly experience, letting you manage your site with fewer restrictions and better security. Plus, its intuitive layout makes everything feel straightforward.
Follow along as I break down the steps to get your website up and running smoothly on Webdock so you can enjoy all its awesome benefits without any hassle.
Why Is Webdock Better Than DirectAdmin?
Webdock offers several advantages over DirectAdmin. Let’s take a closer look at these benefits:
- User Interface: DirectAdmin’s user interface is outdated and highly confusing to navigate. Options are dispersed everywhere, and the menus and search features often fail to function effectively. Each page feels cluttered with an overwhelming number of options, making navigation both confusing and inconsistent. Moreover, installing DirectAdmin takes a lot of time. One of the processes, CustomBuild, took almost half an hour to complete. In contrast, Webdock’s interface is straightforward and intuitive, even if it’s not flashy. All options are neatly organized and located precisely where you need them, eliminating the need for guesswork—it just works seamlessly. There’s also no need to install anything on your servers, saving you a lot of time.
- WordPress Management: DirectAdmin offers some WordPress-related features, primarily assisting with the installation of WordPress. Beyond that, it doesn’t provide much functionality related to managing WordPress. In contrast, Webdock allows you to install WordPress with a single click through their Control Panel and enhances security by offering options to lock it down against most potential hacks. Additionally, Webdock enables you to manage PHP settings, databases, FTP, Cron Jobs, SSL Certificates, and even Root SSH access. These comprehensive management tools make Webdock a superior choice for handling your WordPress site.
- Cost Comparison: DirectAdmin’s pricing begins at $5 per month, but this plan restricts you to just two users and 20 domains. Additionally, they don’t offer any free trials for you to evaluate their platform, and this cost is on top of what you’d already pay for a server. Conversely, Webdock provides a superior control panel with no restrictions on the number of server users or domains. You are only charged based on the server you select. Furthermore, every server option comes with a completely free “up to 24-hour” trial, allowing you plenty of time to test and assess its capabilities without any financial commitment.
- Plenty of Addons: Webdock provides a host of valuable benefits, making it an excellent choice for maintaining your WordPress site’s functionality. Key features include free full server snapshots and application-level backups to ensure your data remains secure. Additionally, Webdock offers free transactional emails through Postmark, renowned for its exceptional deliverability, for plans priced above €/$5.99. Another advantage is the ability to set up email forwarding with ImprovMX at no extra cost. Purchasing these services separately could cost you over $30 per month and come with significant limitations. These comprehensive features make Webdock a superb option for your hosting needs.
Disclaimer: The strategies I am about to show usually will ensure minimal downtime (and I’ll share tips to reduce it even further). However, no downtime doesn’t mean that all changes made during the migration will be captured. That’s why it’s smart to plan your migration during a period of low traffic. To ensure any new data isn’t missed in the initial move, consider using tools like WP All Import/Export.
Alternatively, an under-maintenance plugin can temporarily pause your live site until everything is successfully transferred to Webdock.
Creating Backups
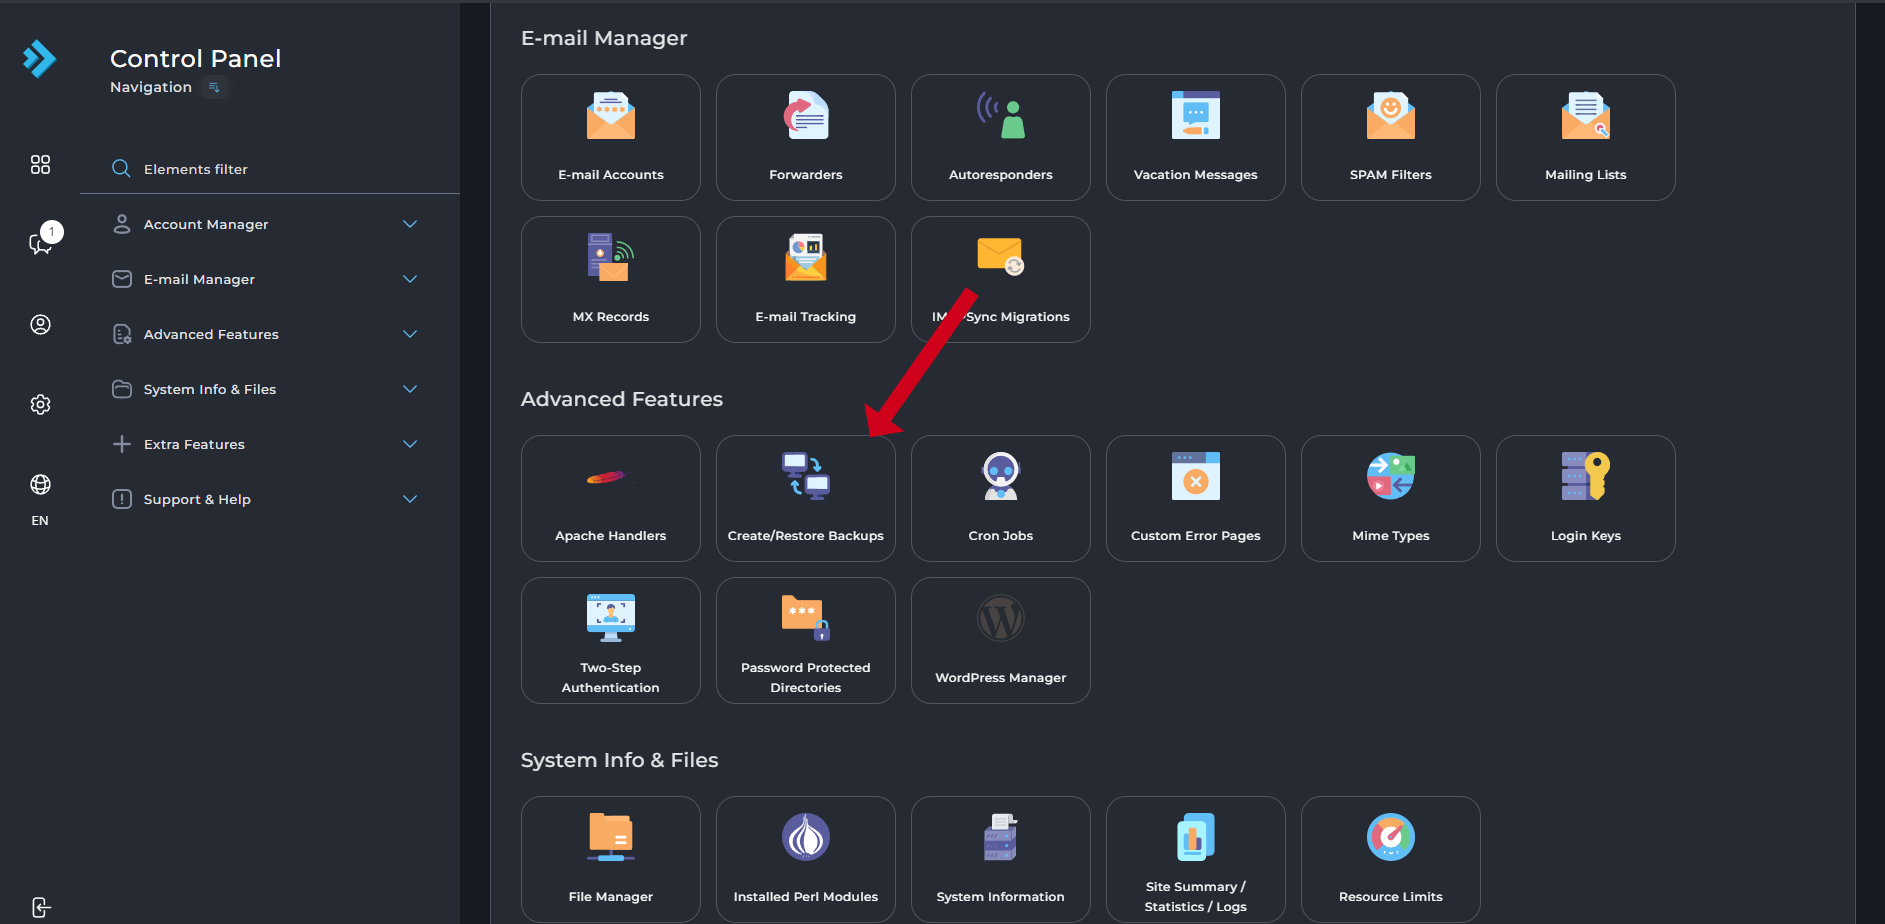
Locate the Advanced Features section on your DirectAdmin dashboard and select the Create/Restore Backups option under the advanced features section.
On the following page, choose your site’s domain by selecting the ‘Selected Domains’ radio button. Next, check the boxes for ‘Website Data’ and ‘Database,’ then click on the Create Backups button in the bottom right corner.
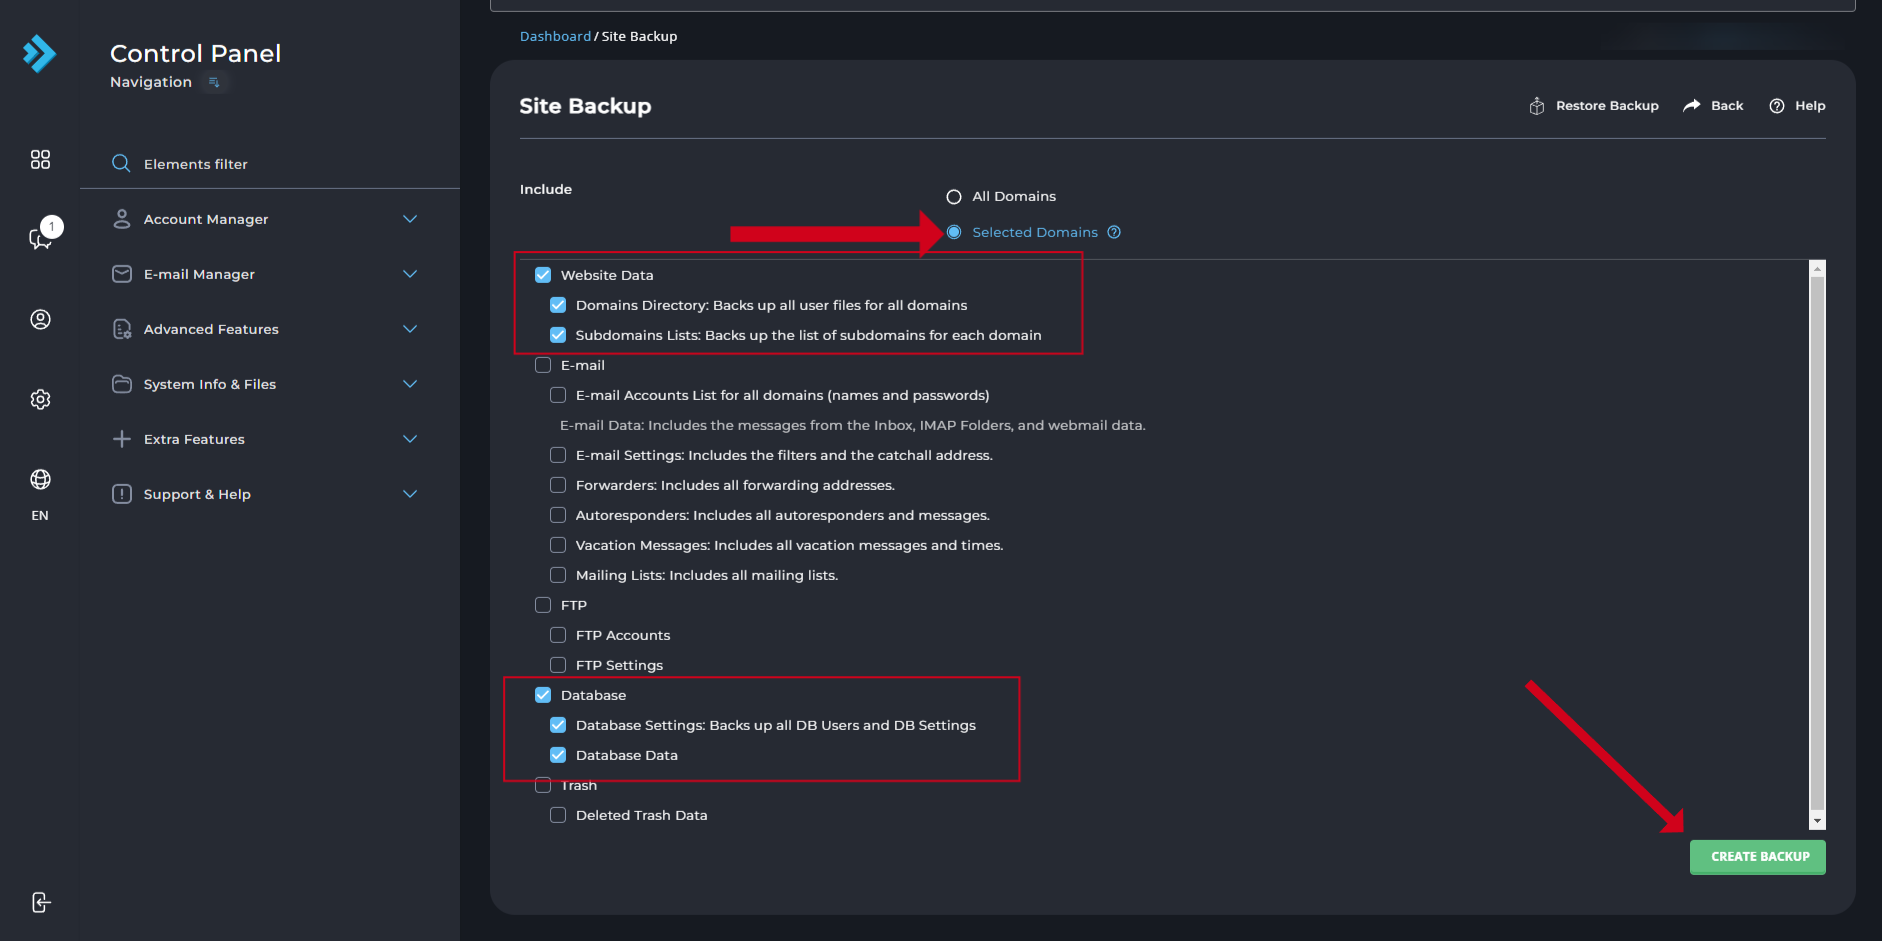
Depending on your website’s size, the backup process may take a while. You will receive a notification once the backups are ready.
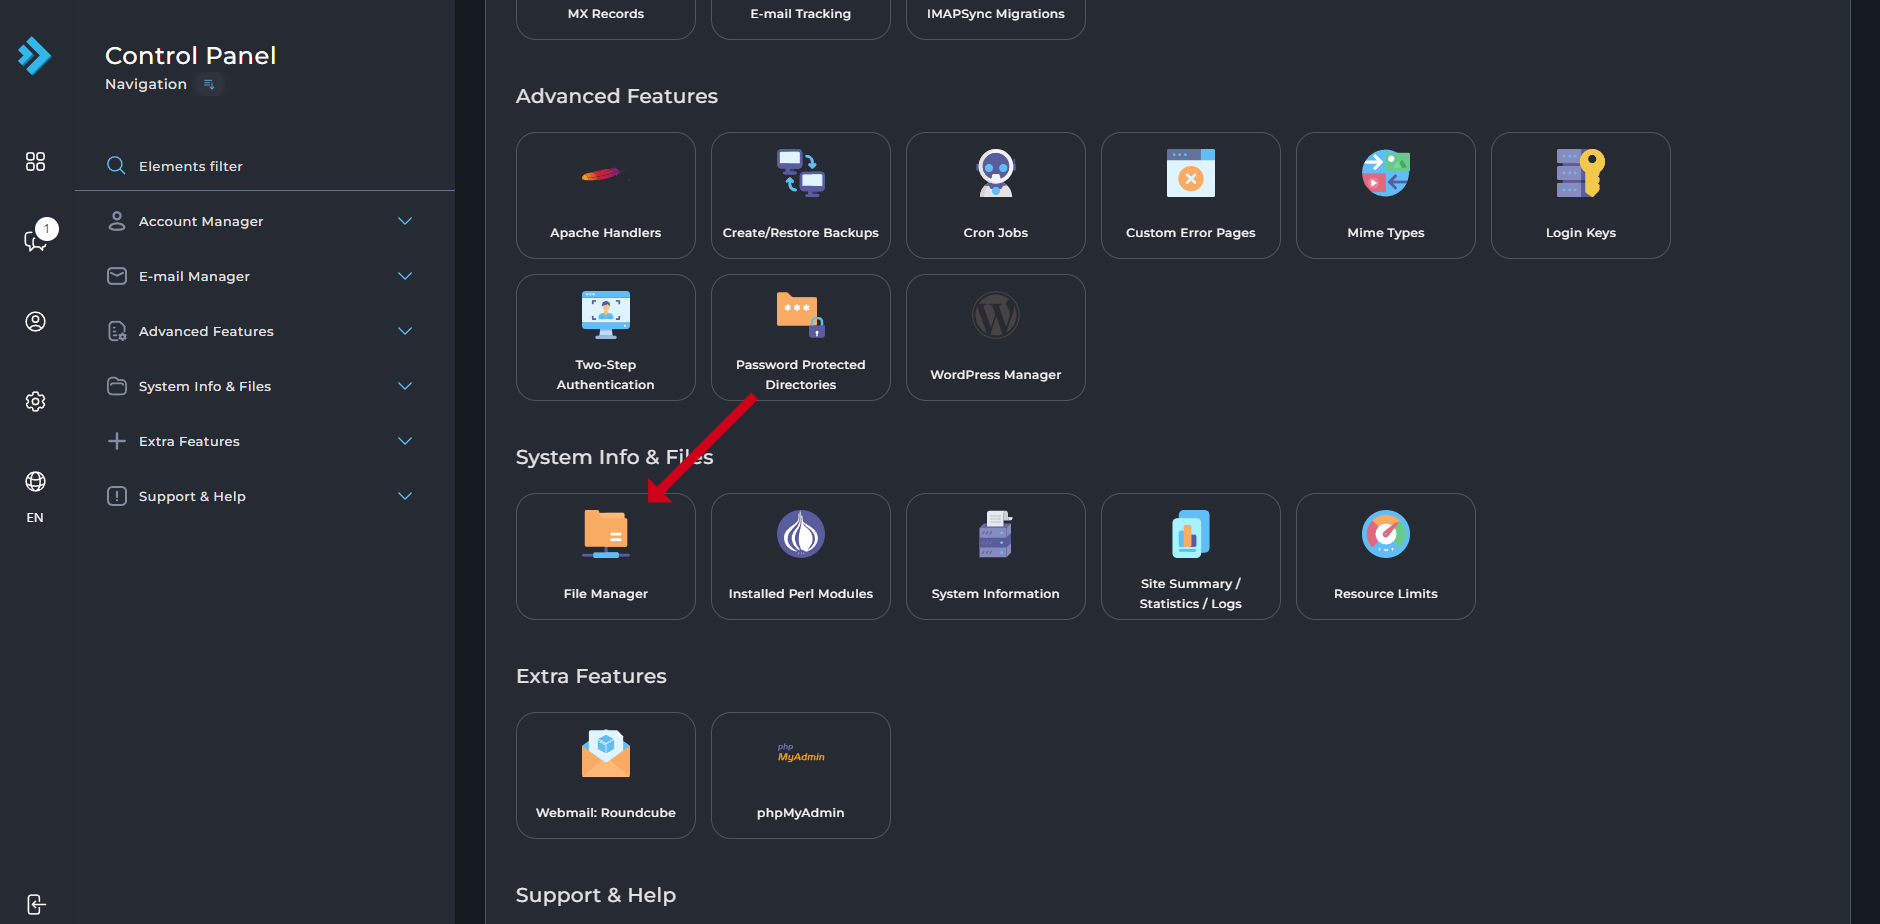
When your backups are ready, head to the System Info & Files section and click on File Manager.
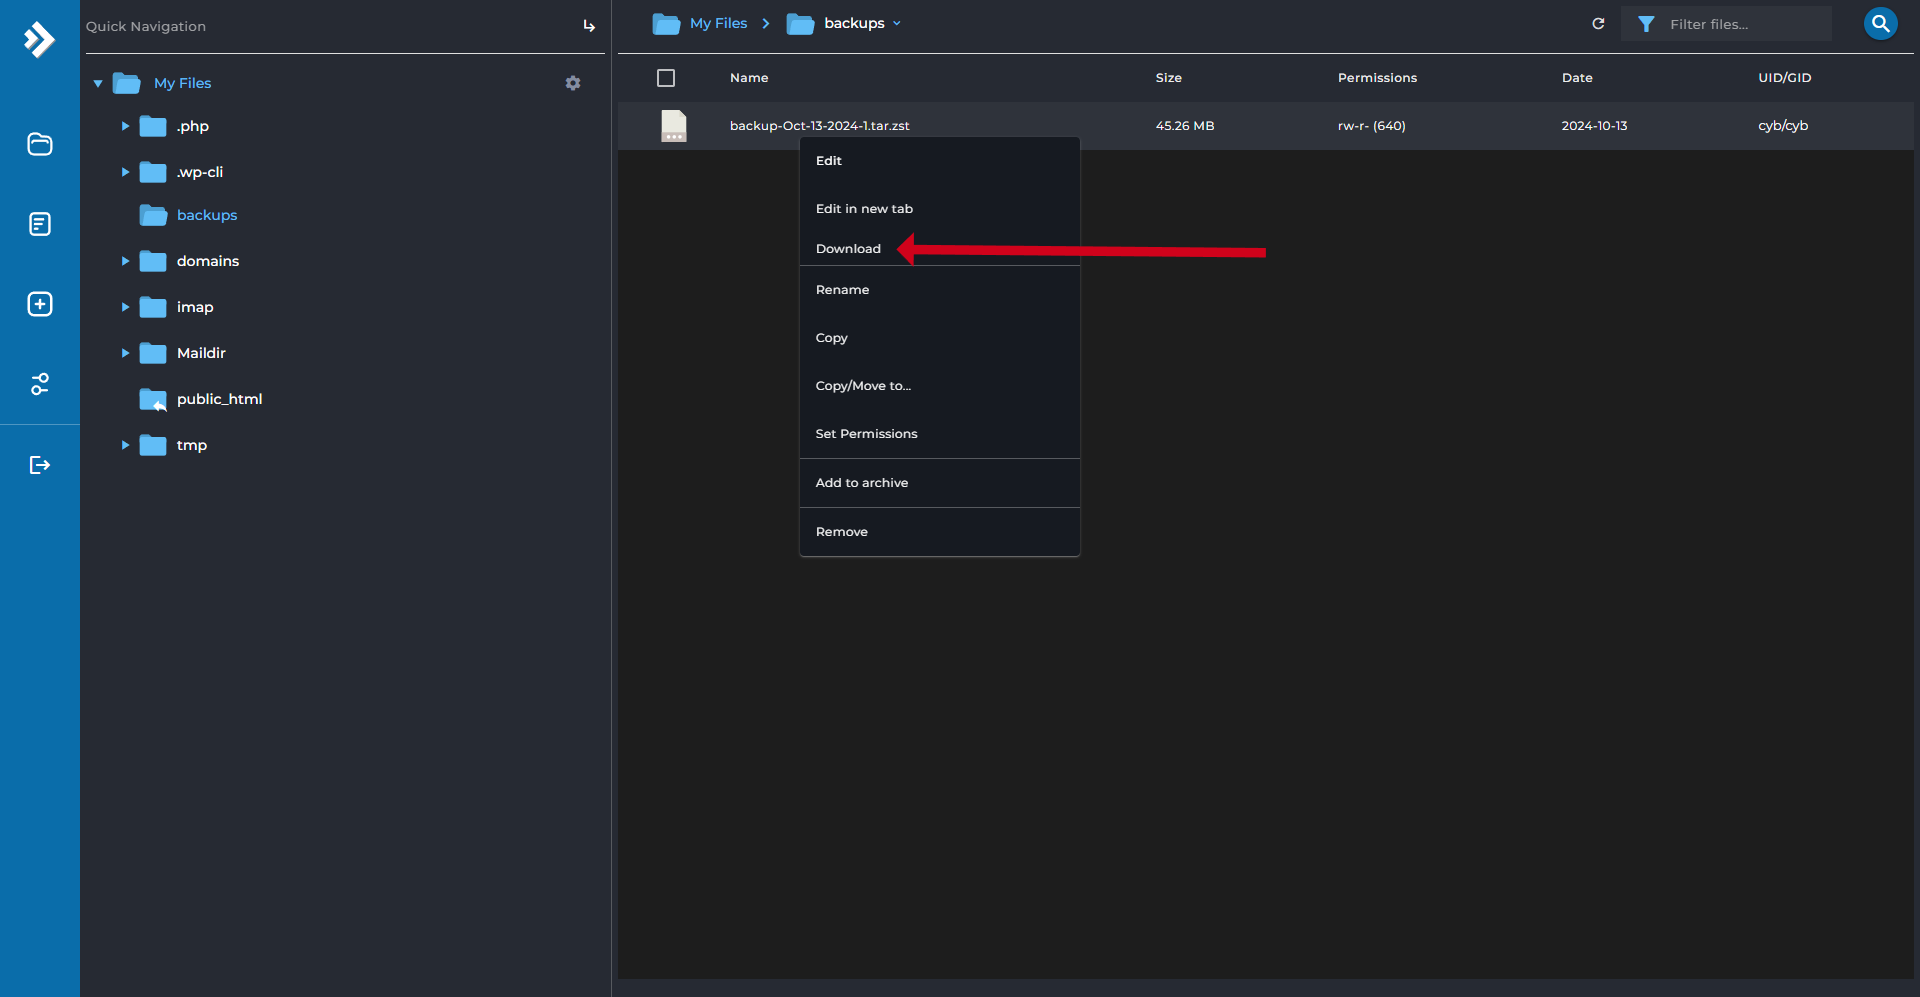
Navigate to the backups folder, find the backup file you just created (they’re organized by date), right-click on it, and choose the download option.
Extract The Backups
Extract the downloaded archive into a folder. Although you’ll see many files and folders, you only need one specific folder and one file to migrate your WordPress site.
First, locate the folder containing all your website files, named ‘public_html,’ which is found under domains > [your domain]. Compress this folder into a zip file.
Next, for the database, look for the file named after your domain but with underscores replacing periods and having the .sql file extension in the backups folder.
You can either remember these locations or copy these files into another folder for easier access later.
Setting Up a Server on Webdock
Head to Webdock and set up a server with a starting price of €/$5.99 or higher. You can choose between Apache and NGINX as your server software; NGINX is often recommended.
Once your server is up and running, go to its dashboard on Webdock. Look for the small pencil icon next to the Alias field in the Overview tab and click on it.
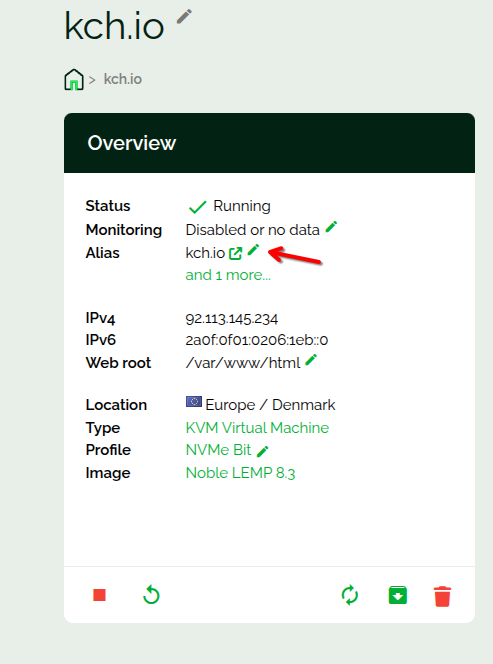
Input your website’s primary domain into the central domain column. Usually, you would use the Check Domain feature before setting an identity, but to ensure minimal downtime, go ahead and directly assign your website’s domain as the primary one.

The setup process might take about 3-4 minutes, and you may see an error message—this can be ignored at this stage.
Installing WordPress On Webdock
Navigate back to your server’s overview page and scroll until you find the Manage WordPress section.
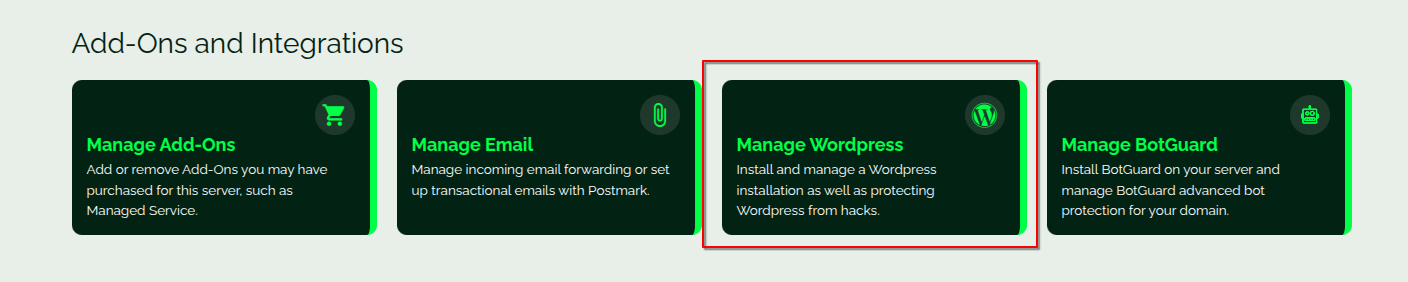
You’ll need to install WP-CLI on your server. Click the button provided to initiate the installation. Once WP-CLI is ready, click on the Install WordPress Now button. This action will create a form with fields for admin email, domain, path, database, and other details. In most cases, the default settings will work perfectly fine.
Remember that you won’t be able to set an admin password yourself — Webdock will automatically generate one for you.
Database Migration
After setting up WordPress, access phpMyAdmin by clicking the small database icon in the credentials tab, you’ll need to enter your Admin username and password when prompted.
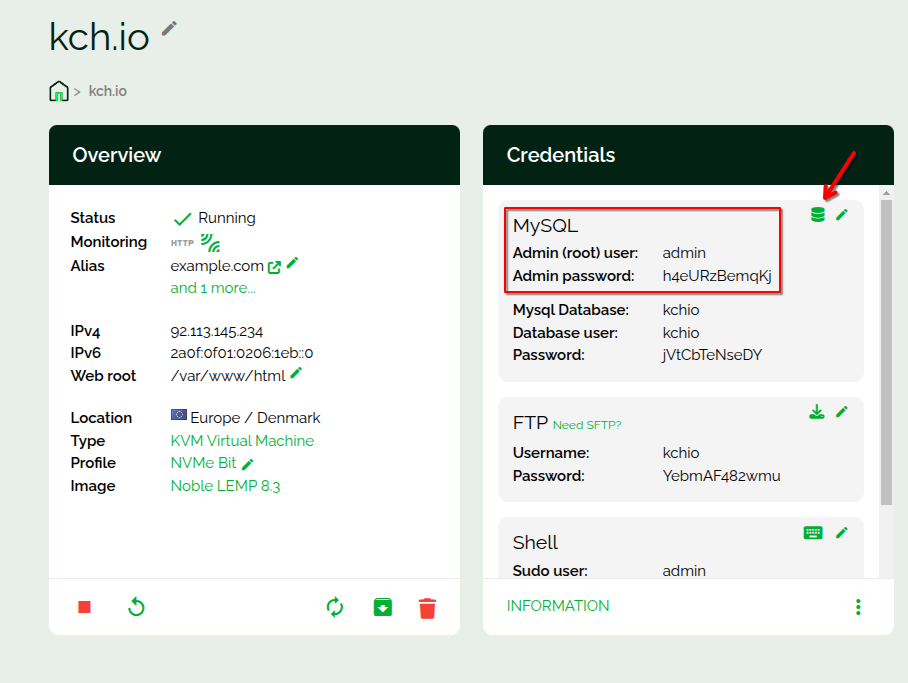
Find the database associated with your WordPress site, select all the tables within it, and proceed to delete them.
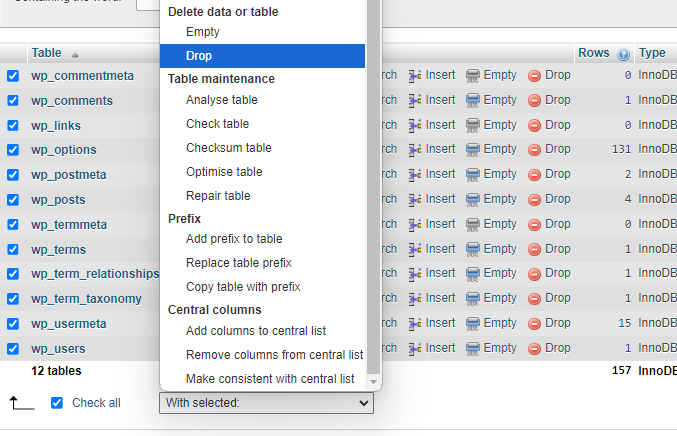
Then, go to the import tab. Here, you can either drag and drop the .sql file that you downloaded from the DirectAdmin dashboard or manually select it from your computer. This file will fill your database with all the essential data.
Finally, open the “wp_options” table and ensure that both the siteurl and home option_names have your website’s URL in its https:// format.
Site Migration
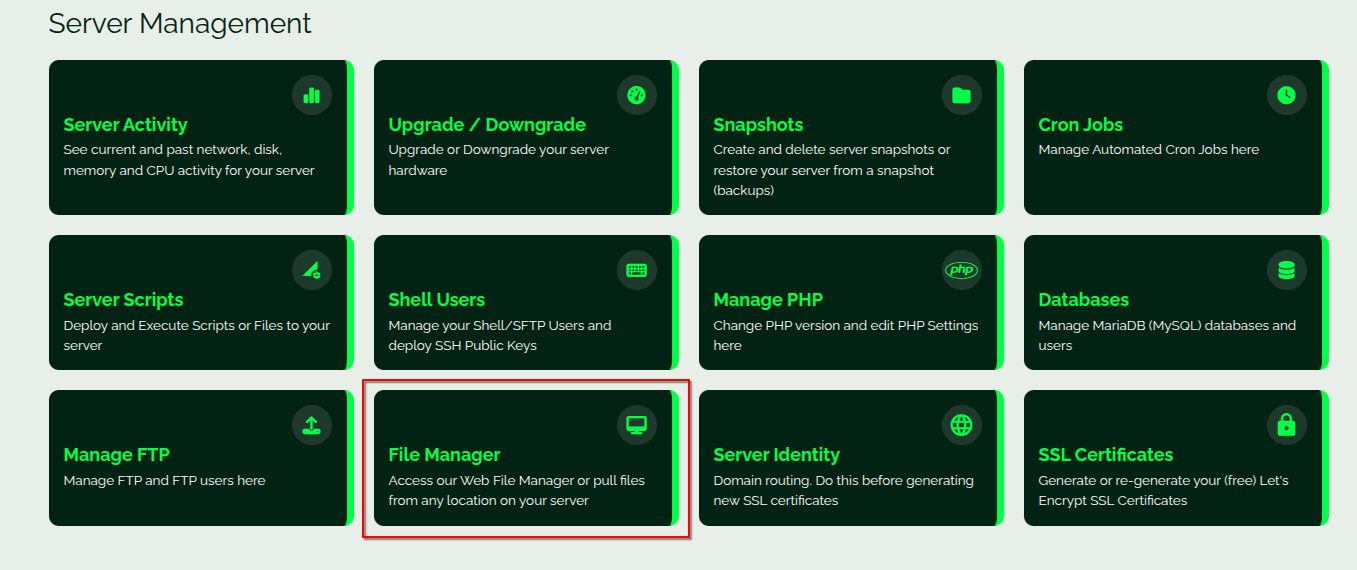
After importing and verifying your database, install the File Manager from the overview section and log in.
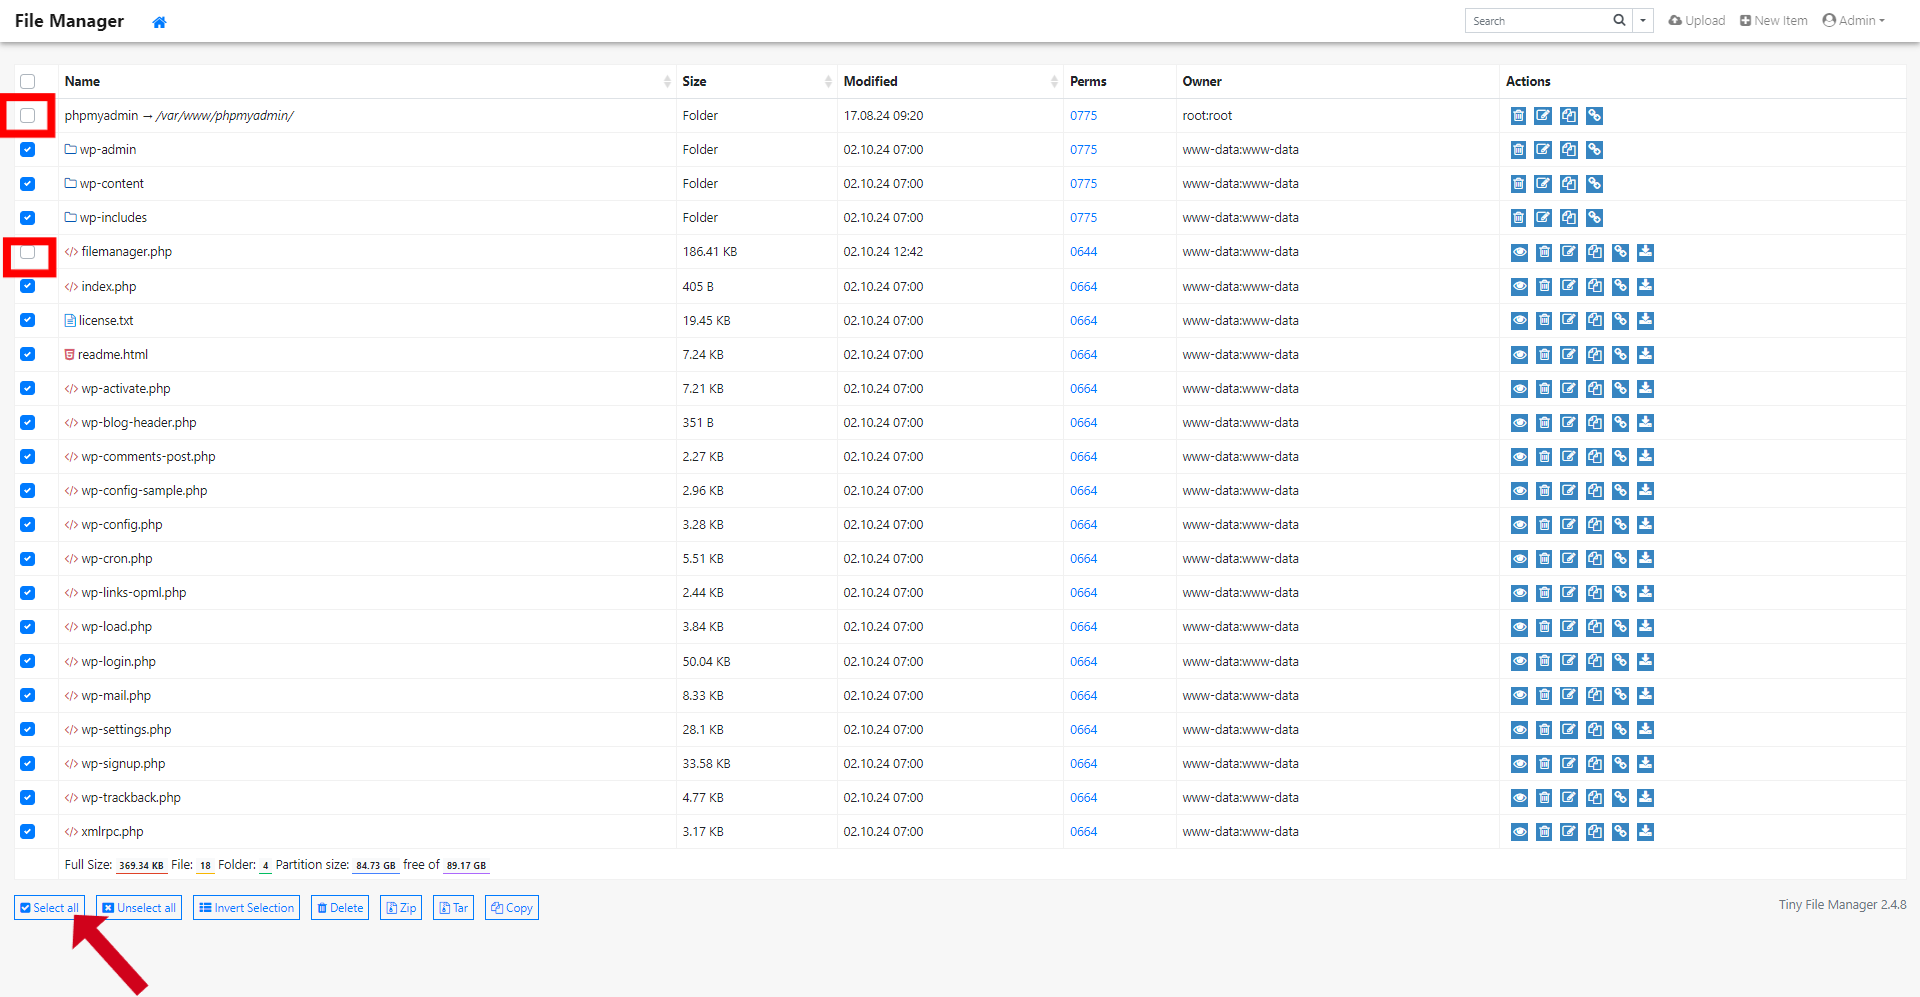
Once you’re inside the File Manager, use the Select all option to highlight all files. Make sure to deselect both the PHPMyAdmin folder and the filemanager.php file. Delete all other files.
Next, go to the top right corner and click on the upload button. Upload the public_html zip file you previously downloaded from DirectAdmin by either dragging it into the window or manually selecting it from your computer.
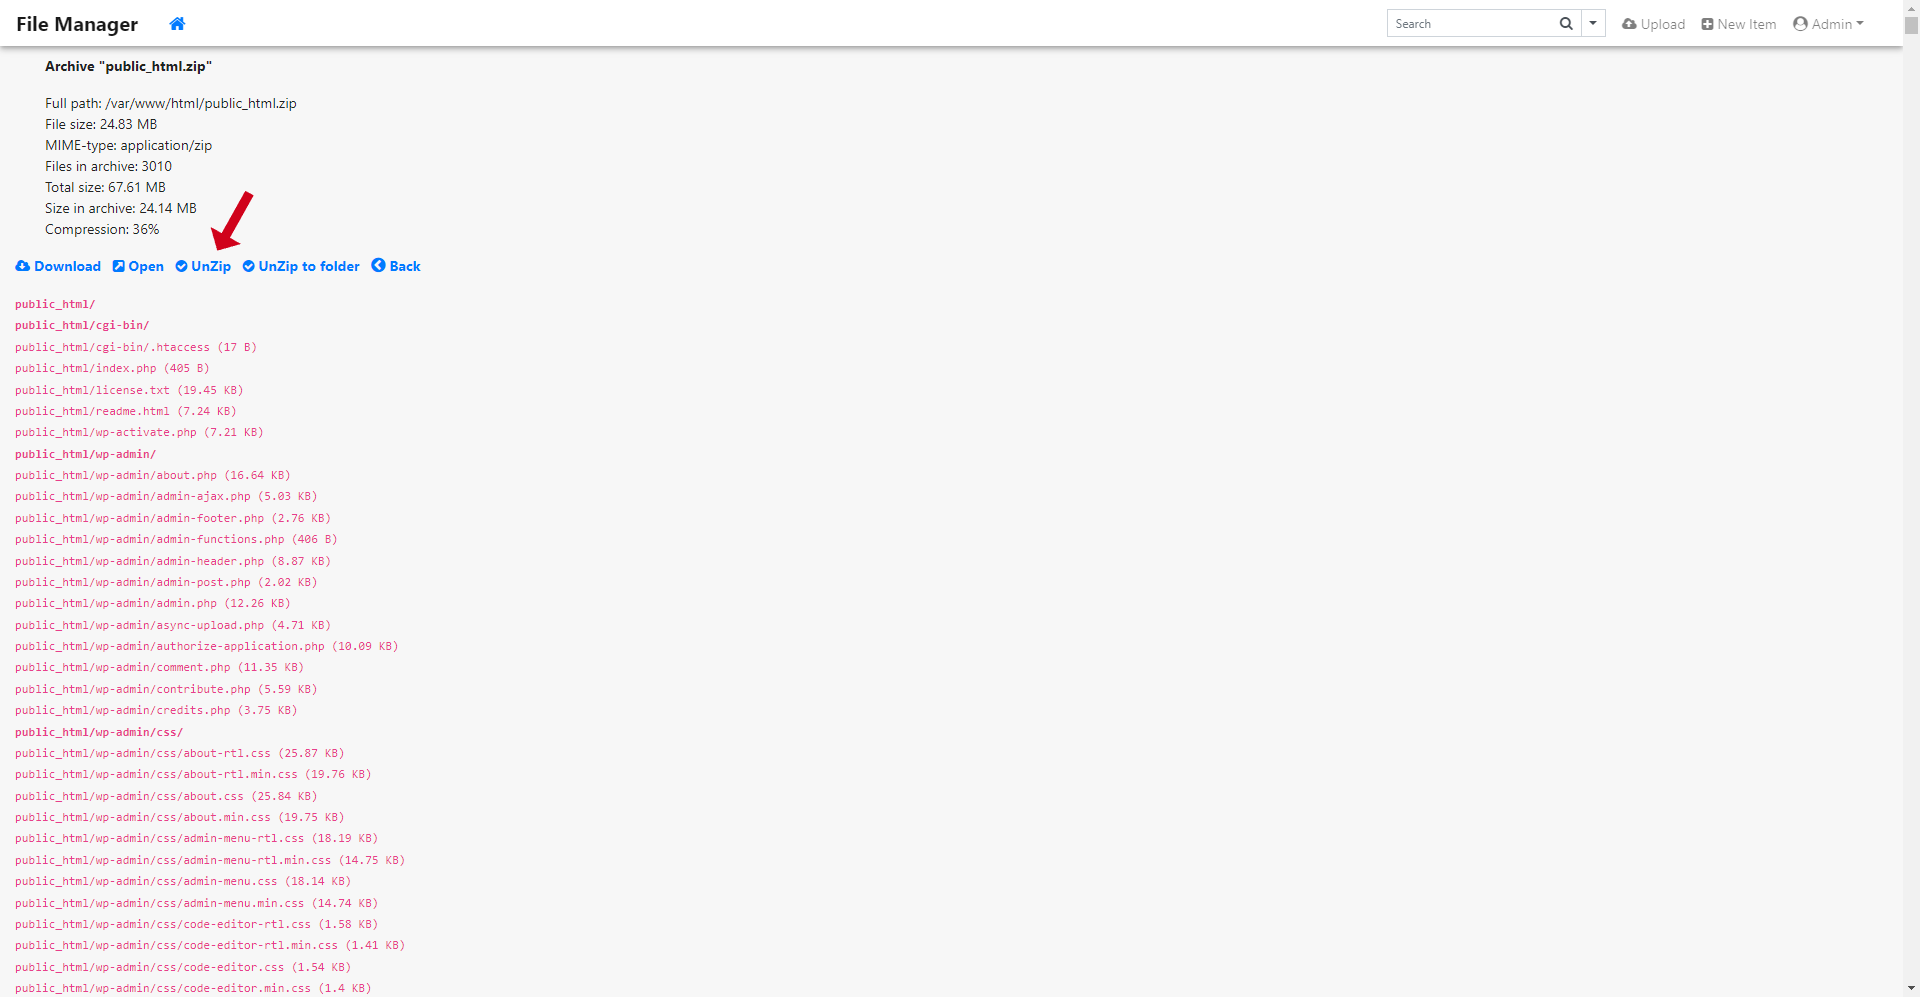
After uploading, locate the zip file, click on it, and choose the option to unzip it.
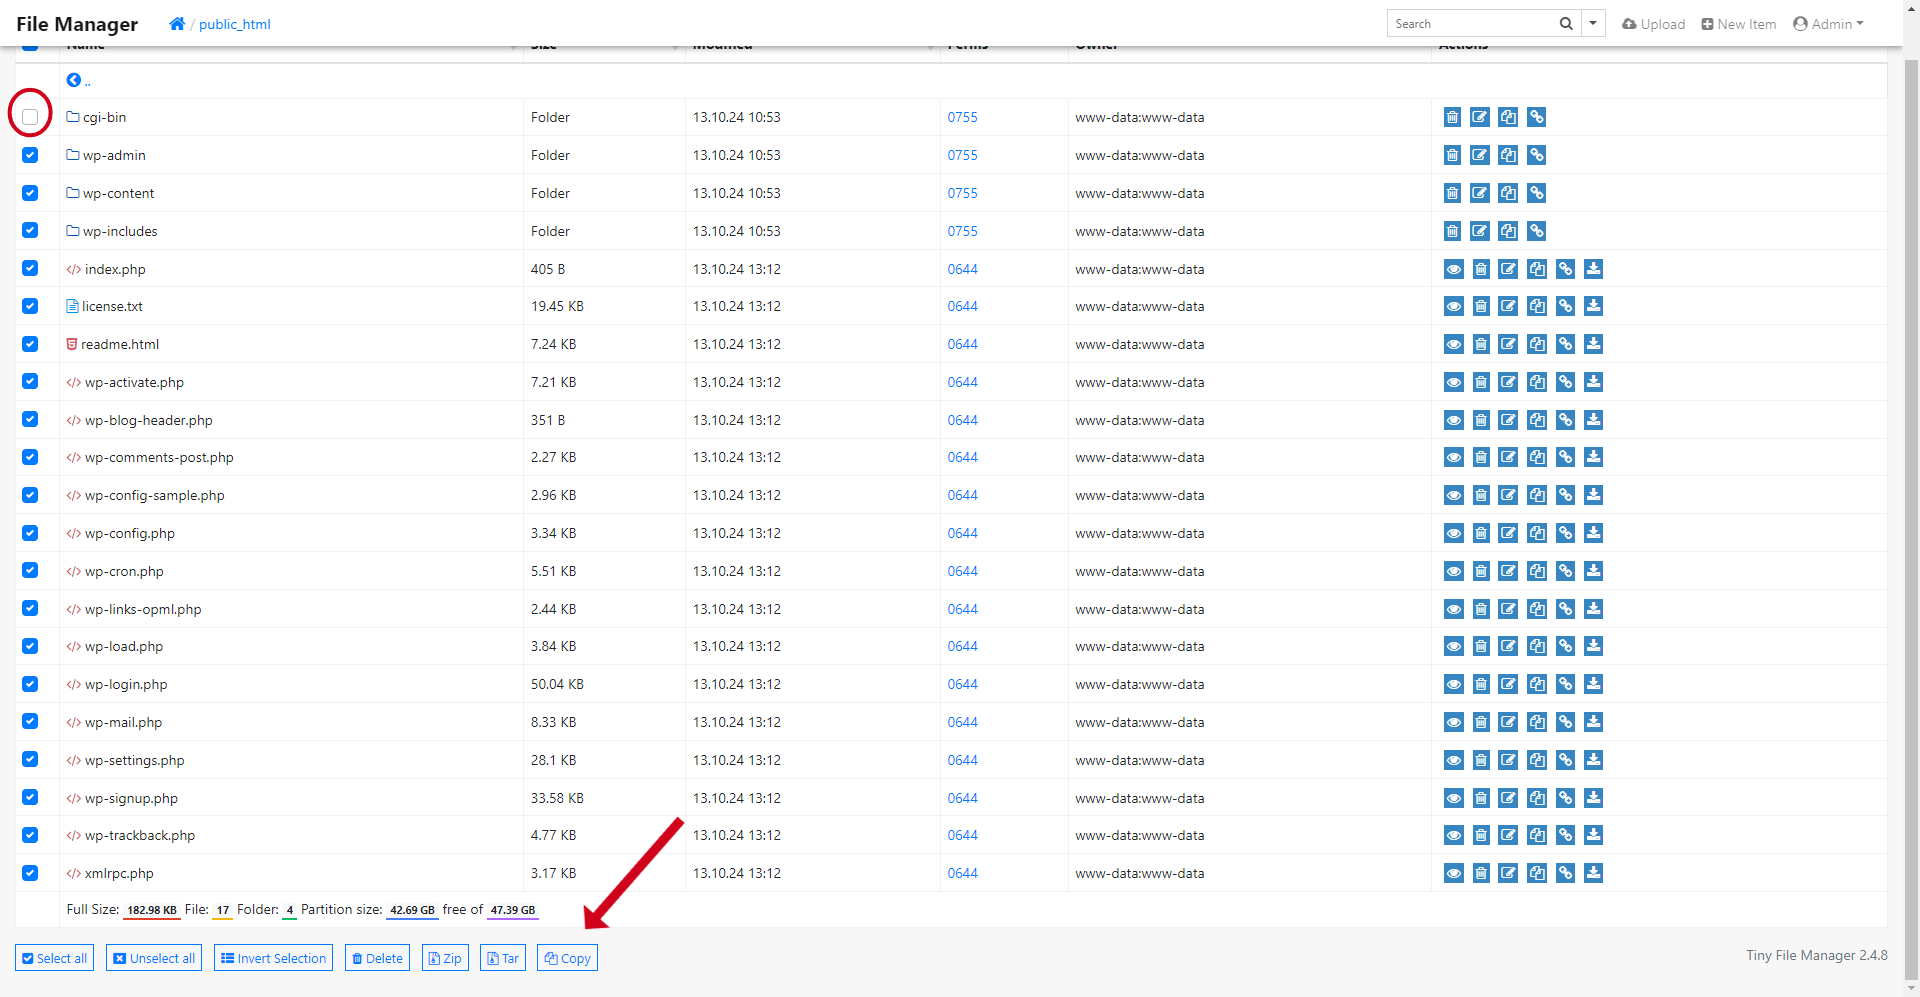
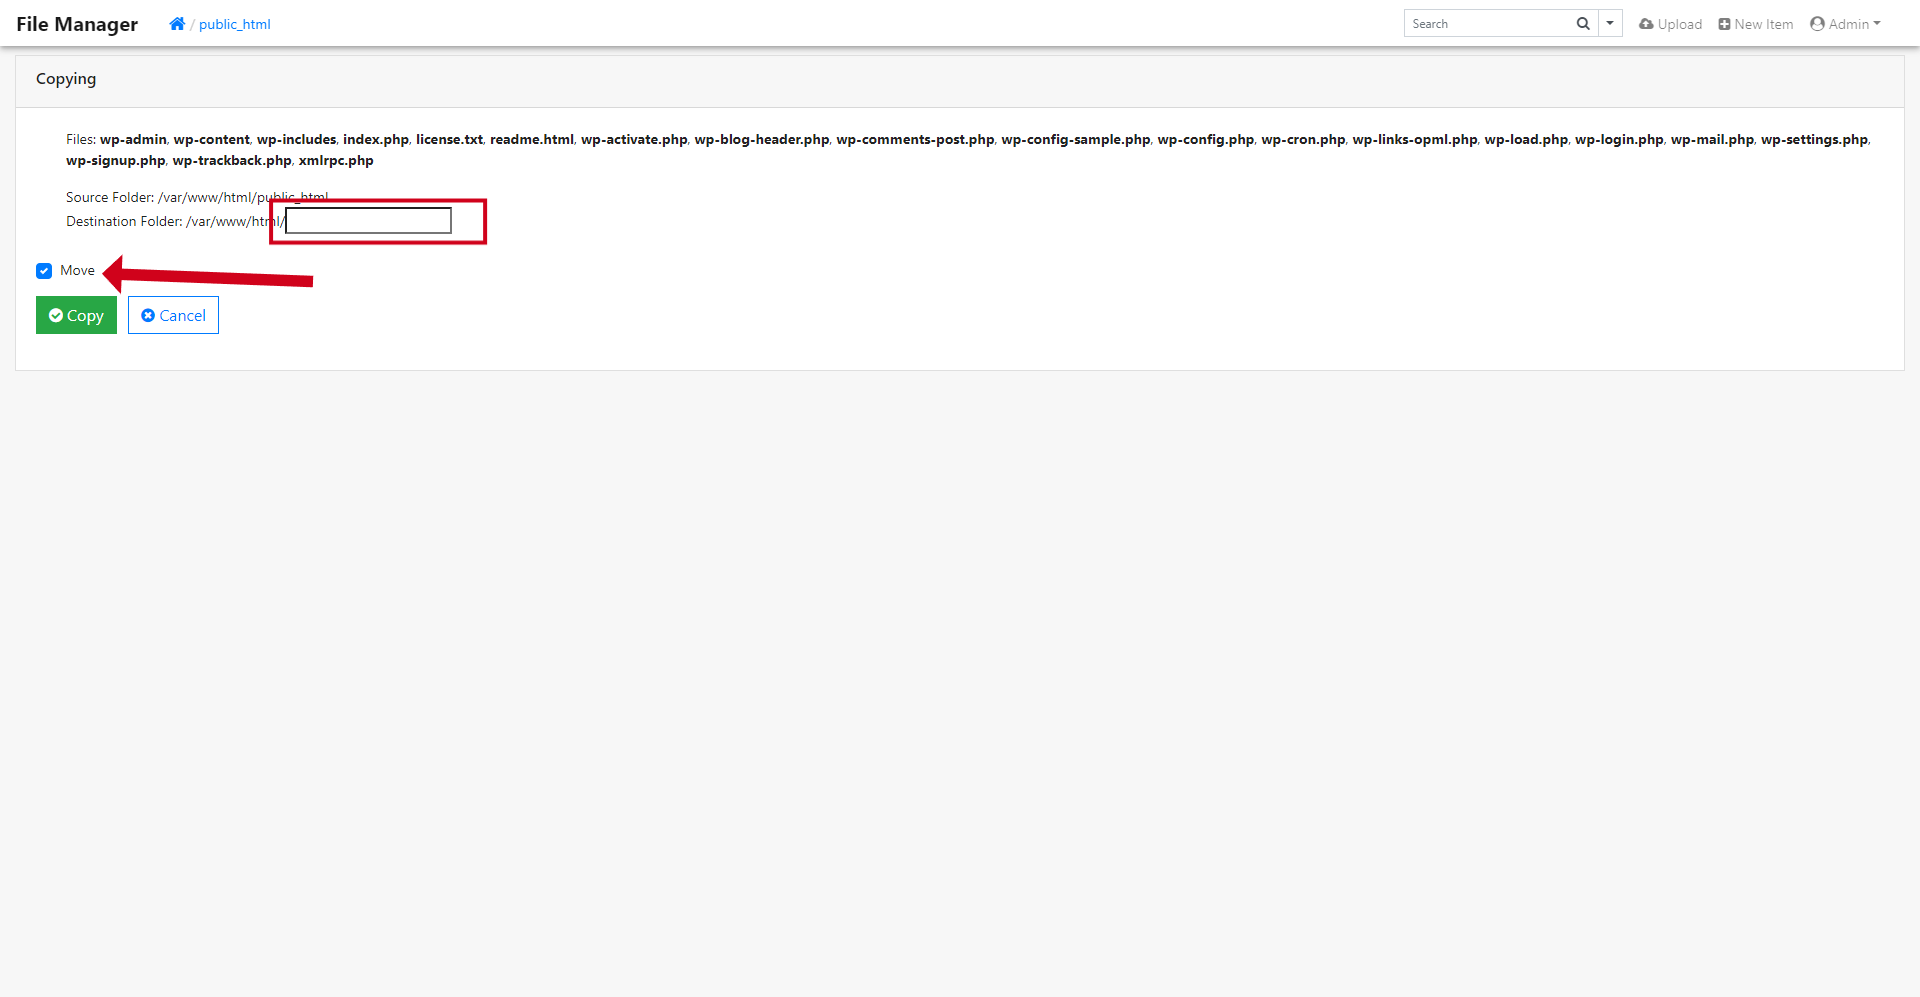
Once unzipped, open the resulting folder and select all its contents except the cgi_bin folder. Click on the copy button.
In the next screen that appears, check off “Move” while leaving the path field empty to ensure everything is transferred to your main directory.
Now that your files are in place, you can delete both the original zip file and its unzipped folder.
Connecting Database And Assigning SSL Certificate
Open the wp-config.php file and find the section with your database information.
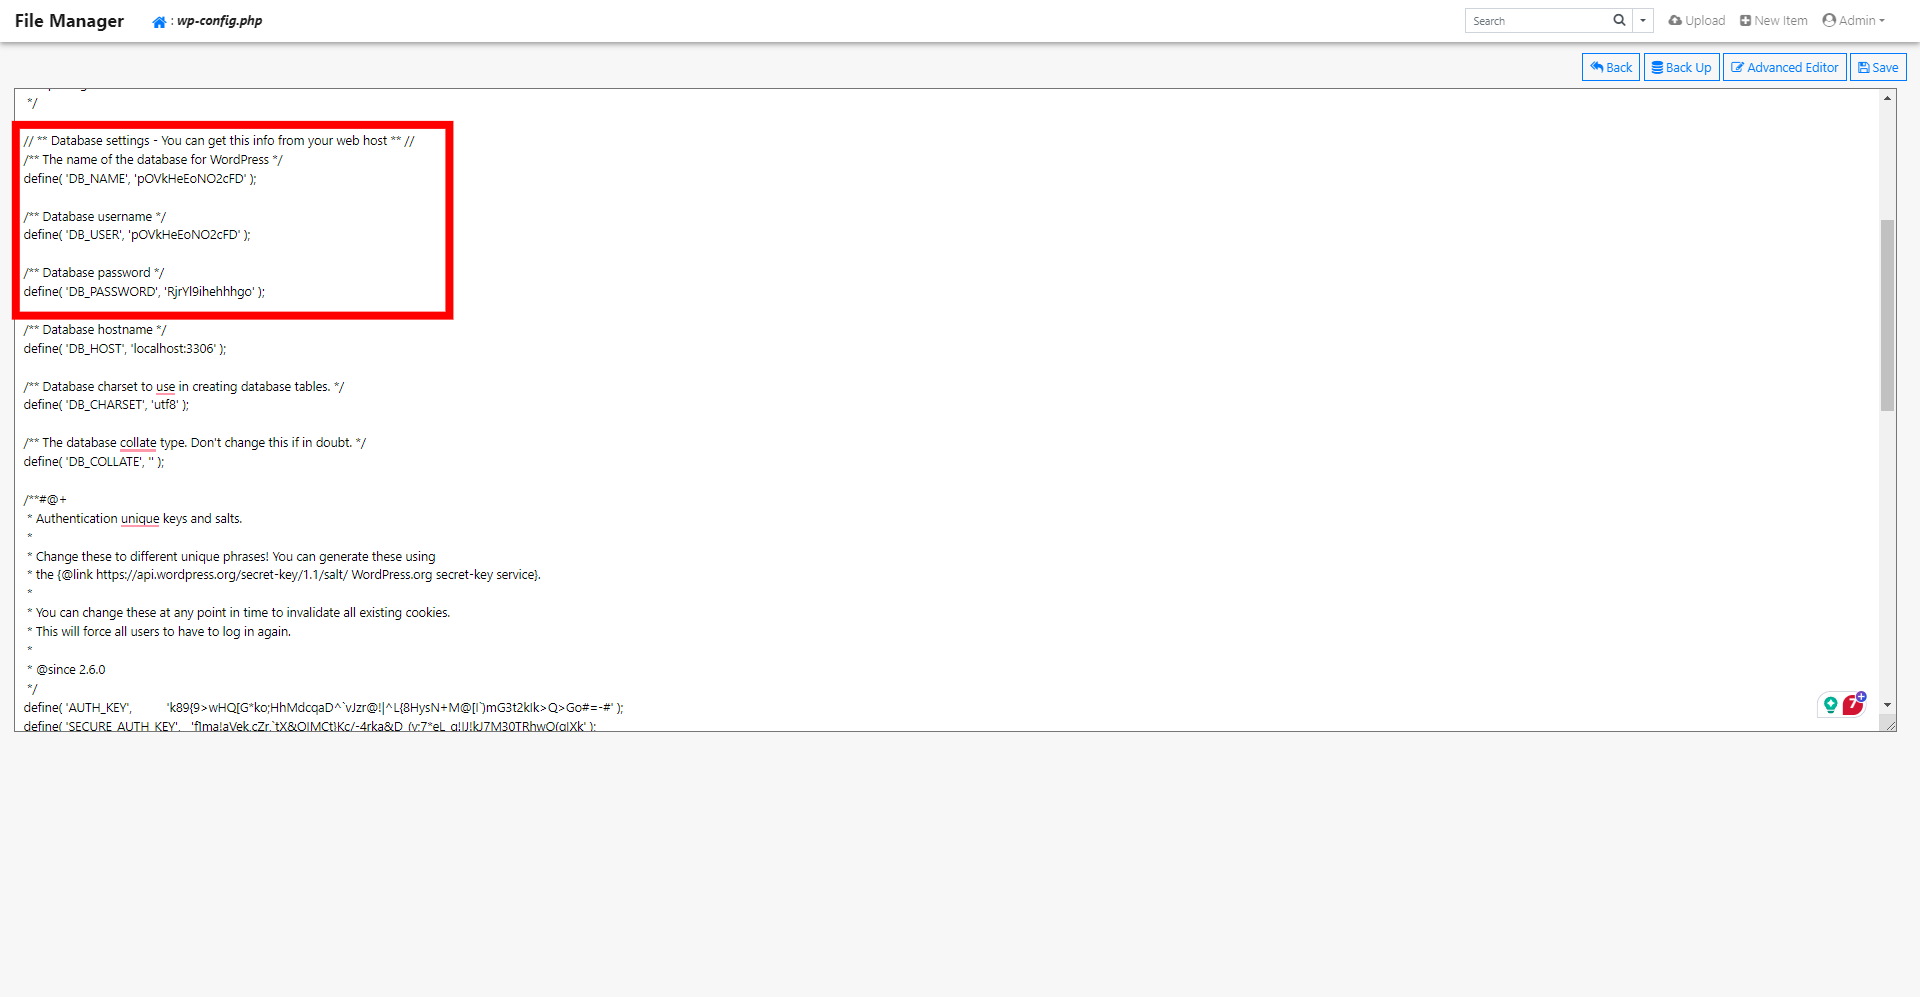
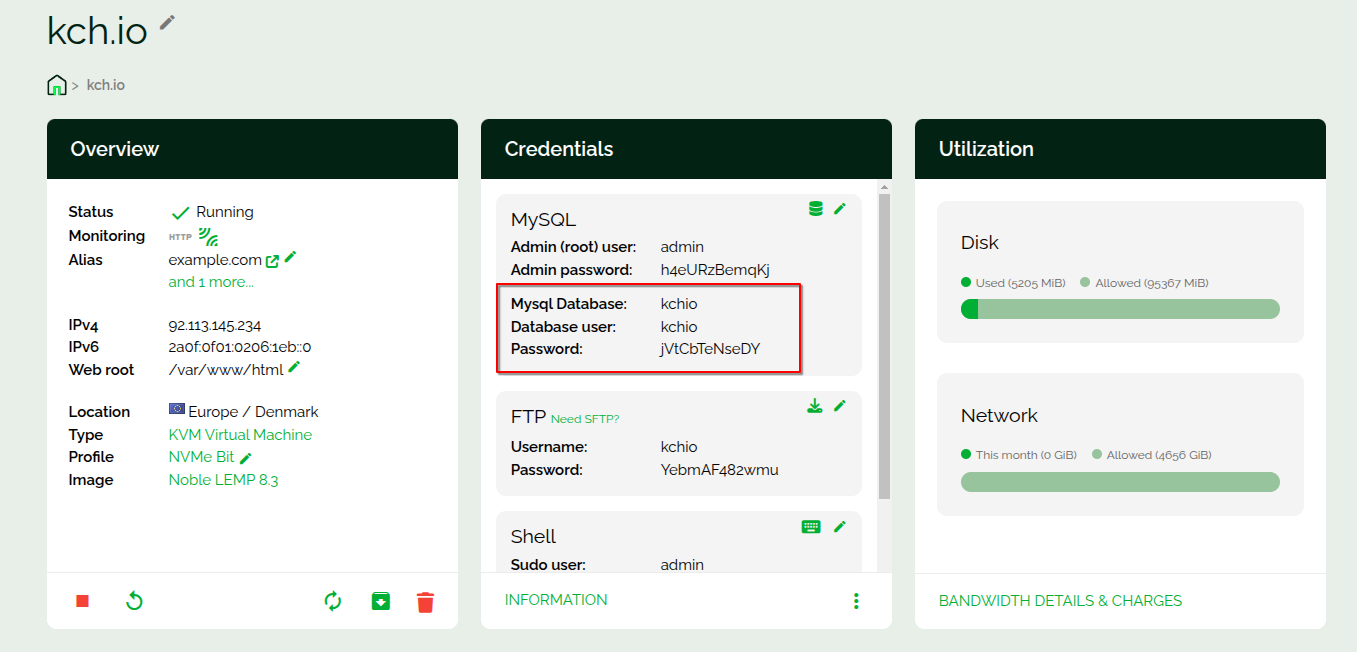
Update this section using the latest details from your server overview
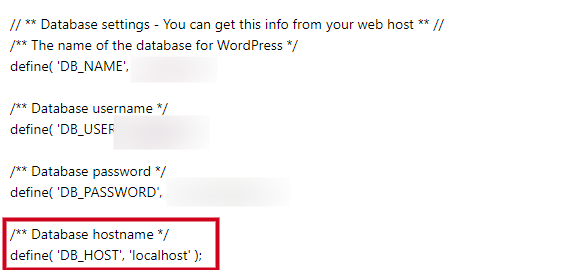
Also, ensure to keep the path to just localhost in the /** Database hostname */ section, then save your changes.
Once you’re done handling files, it’s essential to disable and uninstall the File Manager. Despite being password-protected, it still poses a security risk. It’s best to remove it once you’re finished. You can quickly delete the File Manager in the area where you initially activated it.
Next, adjust your domain’s DNS settings to point towards your Webdock VPS IP address using an A or CNAME record.
As previously suggested, return to your server overview, head to Alias, and click the check domain button. If everything validates successfully, proceed with setting up the domain.
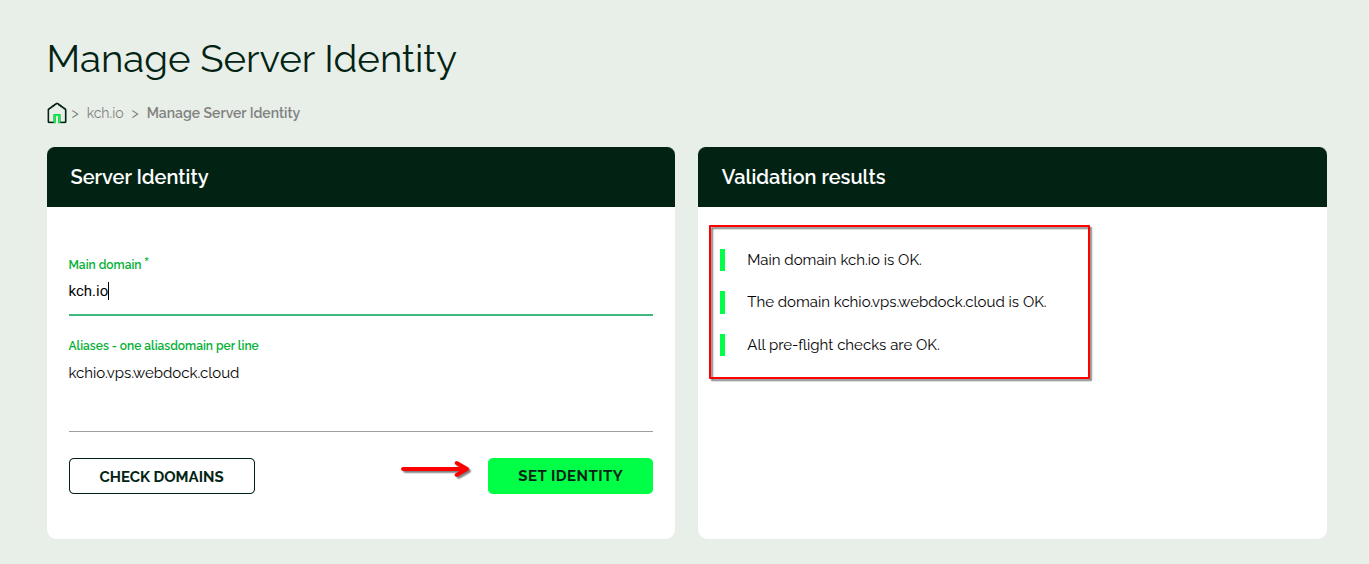
This step will also regenerate SSL certificates for your site. And there you have it—your WordPress website is now up and running on Webdock after migrating from DirectAdmin with minimal downtime.
Alternative Method: Using a Backup Plugin
A backup plugin like UpdraftPlus can significantly simplify moving your website to Webdock. This is particularly helpful if your site is extensive or you’re not very tech-savvy. You may use any, but the one I mentioned provides crucial features at no cost, and using cloud storage can make the migration process quicker.
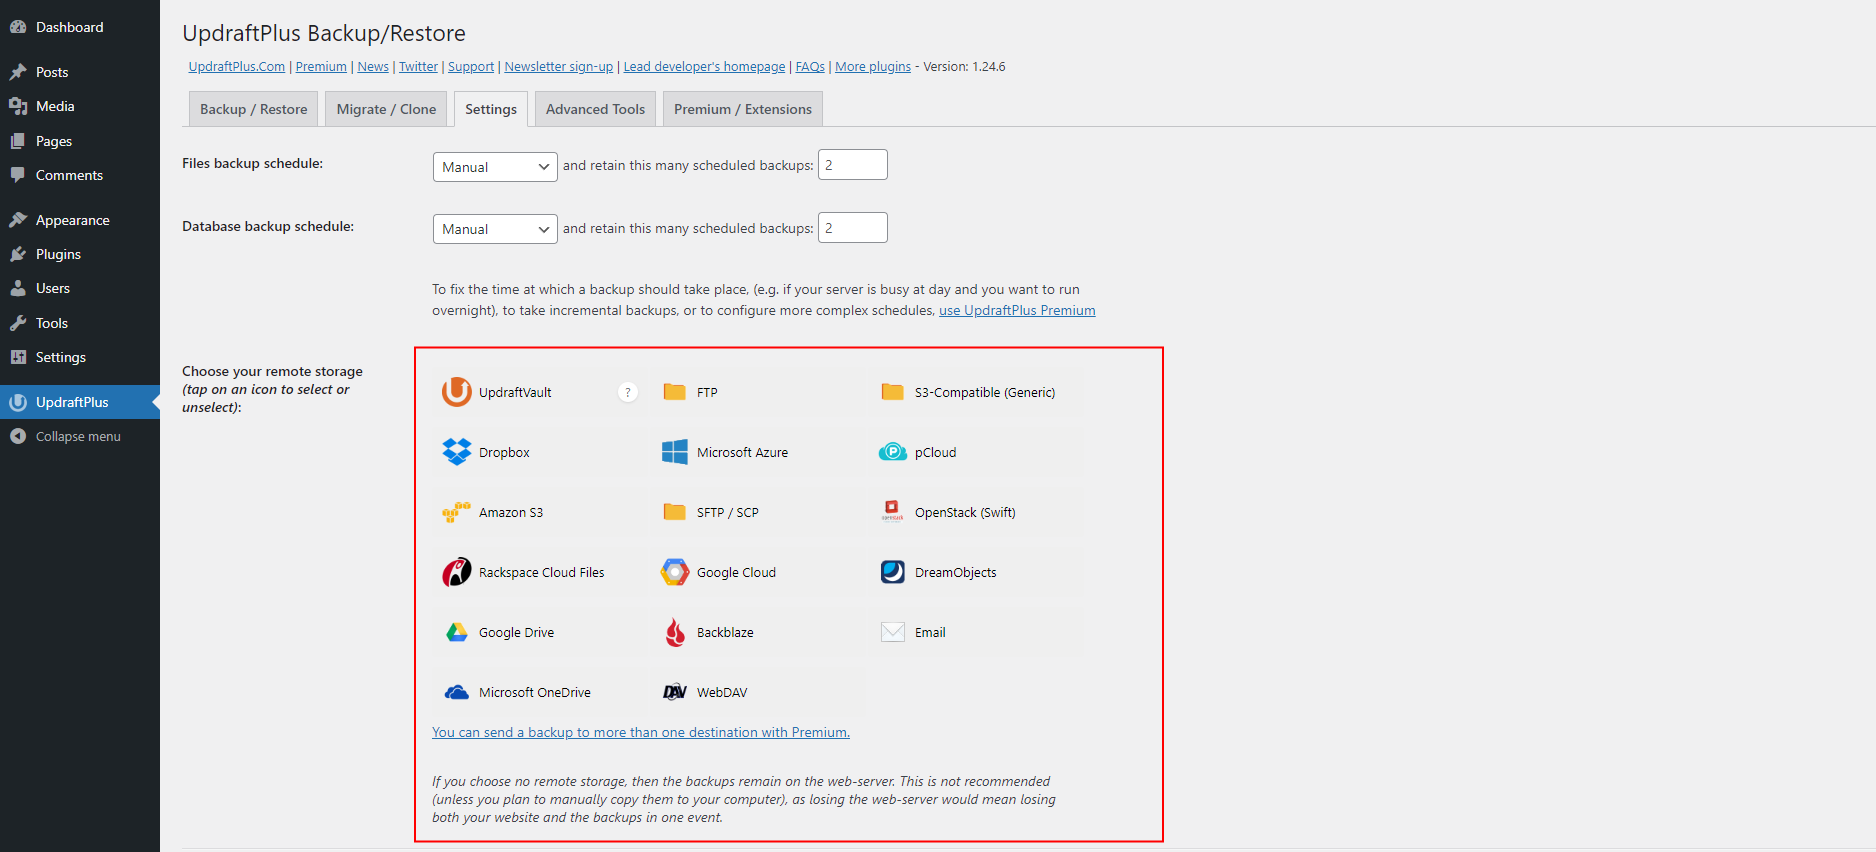
First, log into your WordPress dashboard. Head to the Plugins section, click “Add New,” and look for “UpdraftPlus.” Install and activate the plugin. After activation, go to the UpdraftPlus settings and set up remote storage. You can select remote storage like Google Drive, Amazon SES, etc. It isn’t compulsory, but it will save you a lot of time.
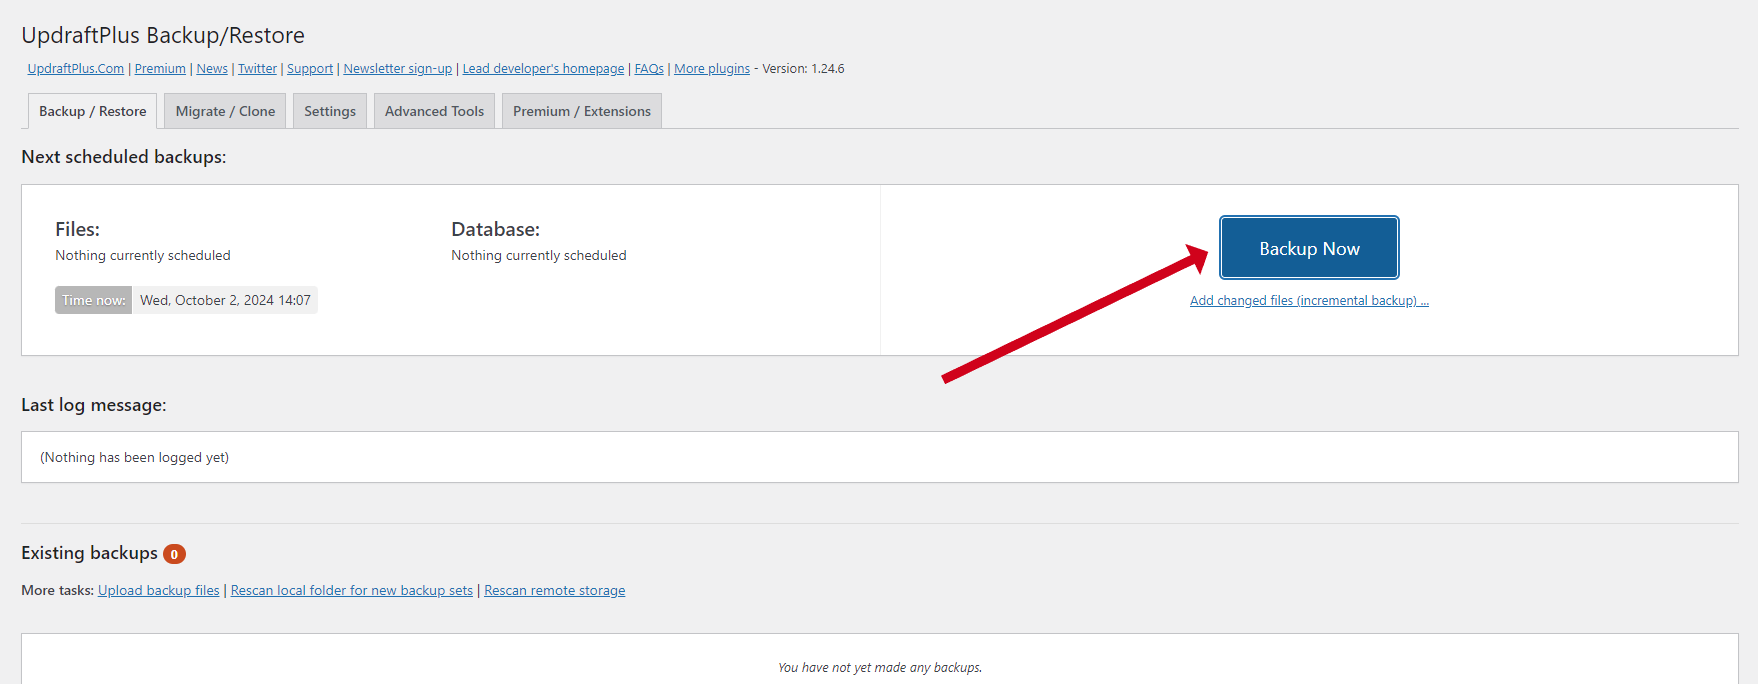
To back up your site, visit the Backup/Restore tab and hit “Backup Now,” ensuring all options are selected. If you don’t opt for remote storage, you must download each backup file manually by clicking on the archive name.
Then, choose a server plan on Webdock starting at €/$5.99 or above, adjust your profile as needed, and deploy your server. You can immediately link your domain to your server’s IP address or alter your computer’s host file for initial testing. Once DNS propagation is complete, set up your domain in the server identity tab and follow similar steps to install WordPress.
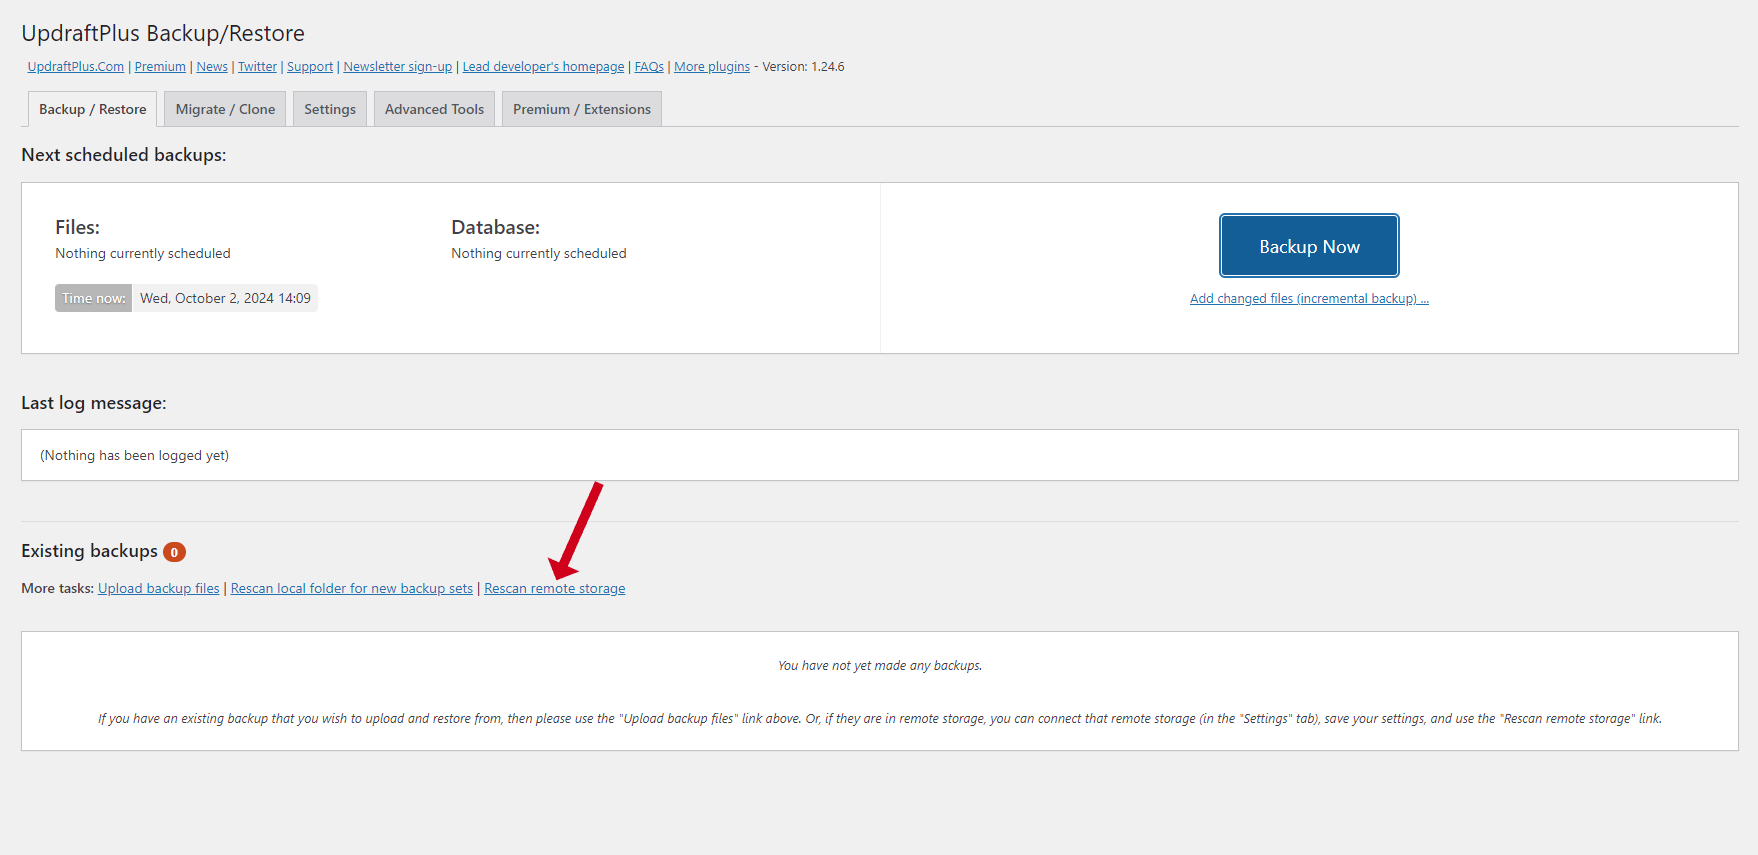
After installing WordPress on Webdock, as shown above, reinstall UpdraftPlus and reconnect with your chosen storage option. Within the Backup/Restore section, you might need to rescan remote storage to locate available backups.
If not using remote storage, upload backup files manually instead by manually clicking the ‘Upload Backups Files’ button. Once you see your backup listed, click Restore, select all necessary components, and continue the process.
Your WordPress site should now be fully moved from DirectAdmin to Webdock — ensure everything operates correctly by checking thoroughly.
Relocating Without a “Blank Page” Showing Up
To avoid displaying a blank site during migration, consider using a WordPress maintenance plugin or hold off on updating DNS until you’ve completed the migration and follow these steps if you’re comfortable handling some technical aspects:
First, bypass the Check Domains button while setting the server alias on your Webdock server and place your domain directly. Continue even if you see errors or warnings.
Then Open Your Hosts File:
- On Windows: Open Notepad as Administrator and navigate to c:WindowsSystem32Driversetchosts.
- On Mac: Use Terminal and enter sudo nano /etc/hosts.
- On Linux: Use Terminal and type sudo nano /etc/hosts.
Add your Webdock server’s IP address like this with your domain:
123.456.789 example.com
123.456.789 www.example.com
Following this, clear your DNS Cache:
- For Windows: Type ipconfig /flushdns in Command Prompt.
- For Mac: Enter sudo dscacheutil -flushcache in Terminal.
- For Linux: Use system-resolve –flush-caches in Terminal.
Proceed to install WordPress through Webdock’s manager, then visit your site URL to verify the setup—note that this will only be visible on your computer. Go ahead and install the backup plugin and follow the steps above.
Once you verify that the site has been relocated, update your DNS records, generate a new SSL certificate by setting your server alias again (just click on the set identity button), remove entries from the host file, and clear the DNS cache once more to finalize everything.
In Conclusion
When you follow the proper steps, switching your WordPress site from DirectAdmin to Webdock can be smooth. With its intuitive interface, powerful management tools, and budget-friendly plans, Webdock is an excellent choice for hosting your WordPress site.
Whether you opt for a manual migration or a backup plugin like UpdraftPlus, this guide aims to simplify and clear the process. Once your site runs on Webdock, you’ll enjoy better security, improved performance, and a more effortless management experience. Make a move and take advantage of everything Webdock has to offer for your WordPress site!
Meet Aayush , a WordPress website designer with almost a decade of experience who crafts visually appealing websites and has a knack for writing engaging technology blogs. In his spare time, he enjoys illuminating the minds around him.
