Introduction
Switching web hosting providers can be a strategic move for improving your site’s capabilities and reducing costs. While RunCloud offers a reliable service, Webdock presents a compelling alternative that prioritizes user control and customization.
This article details the advantages of migrating from RunCloud to Webdock, providing a clear guide to help you transition your WordPress website with ease and minimal downtime.
Why Switch from RunCloud to Webdock?
I don’t have many complaints about RunCloud. The platform is well-designed and includes all the features you would expect from a control panel. With support for various VPS providers, RunCloud lets users choose their preferred infrastructure while offering essential tools like one-click SSL certificates, server health checks, and isolated web applications for improved security.
However, with prices starting at $9 monthly, RunCloud offers nothing remarkable. Additionally, if you manage multiple servers, these costs can accumulate with the server pricing.
In contrast, Webdock provides a fantastic user interface for managing your servers, featuring a GUI that is both intuitive and easy to navigate. You can assign SSL certificates to your domains with a single click and add software to your server, among other functionalities. This is free for every server - you only pay for the hardware.
Webdock is all about savings. Different from the cookie-cutter plans offered by providers that RunCloud supports, where you often end up overpaying or underutilizing resources, Webdock allows you to customize your hardware precisely. Need more RAM but not much storage? No problem. We need extra CPU and storage but are OK with less RAM. That’s available, too. You’ll never pay for resources you don’t need.
Furthermore, Webdock includes numerous free features for plans priced above €/$5.99 that will enhance your WordPress website. For example, you can enjoy unlimited transactional emails through Postmark, which is renowned for its excellent deliverability. Webdock also automatically takes snapshots of your server for free twice a day.
Additionally, Webdock provides access to ImprovMX Pro at no additional cost. If you were to buy these features separately, they would typically cost over $30 per month. As a bonus, you can easily enable monitoring on your server with just one click, all at no extra cost. Once again, this is all offered through an intuitive interface without the added price tag.
Creating a Backup
To begin, let’s make a backup of your WordPress website. If you already have backups configured on your server, you can skip the next steps.
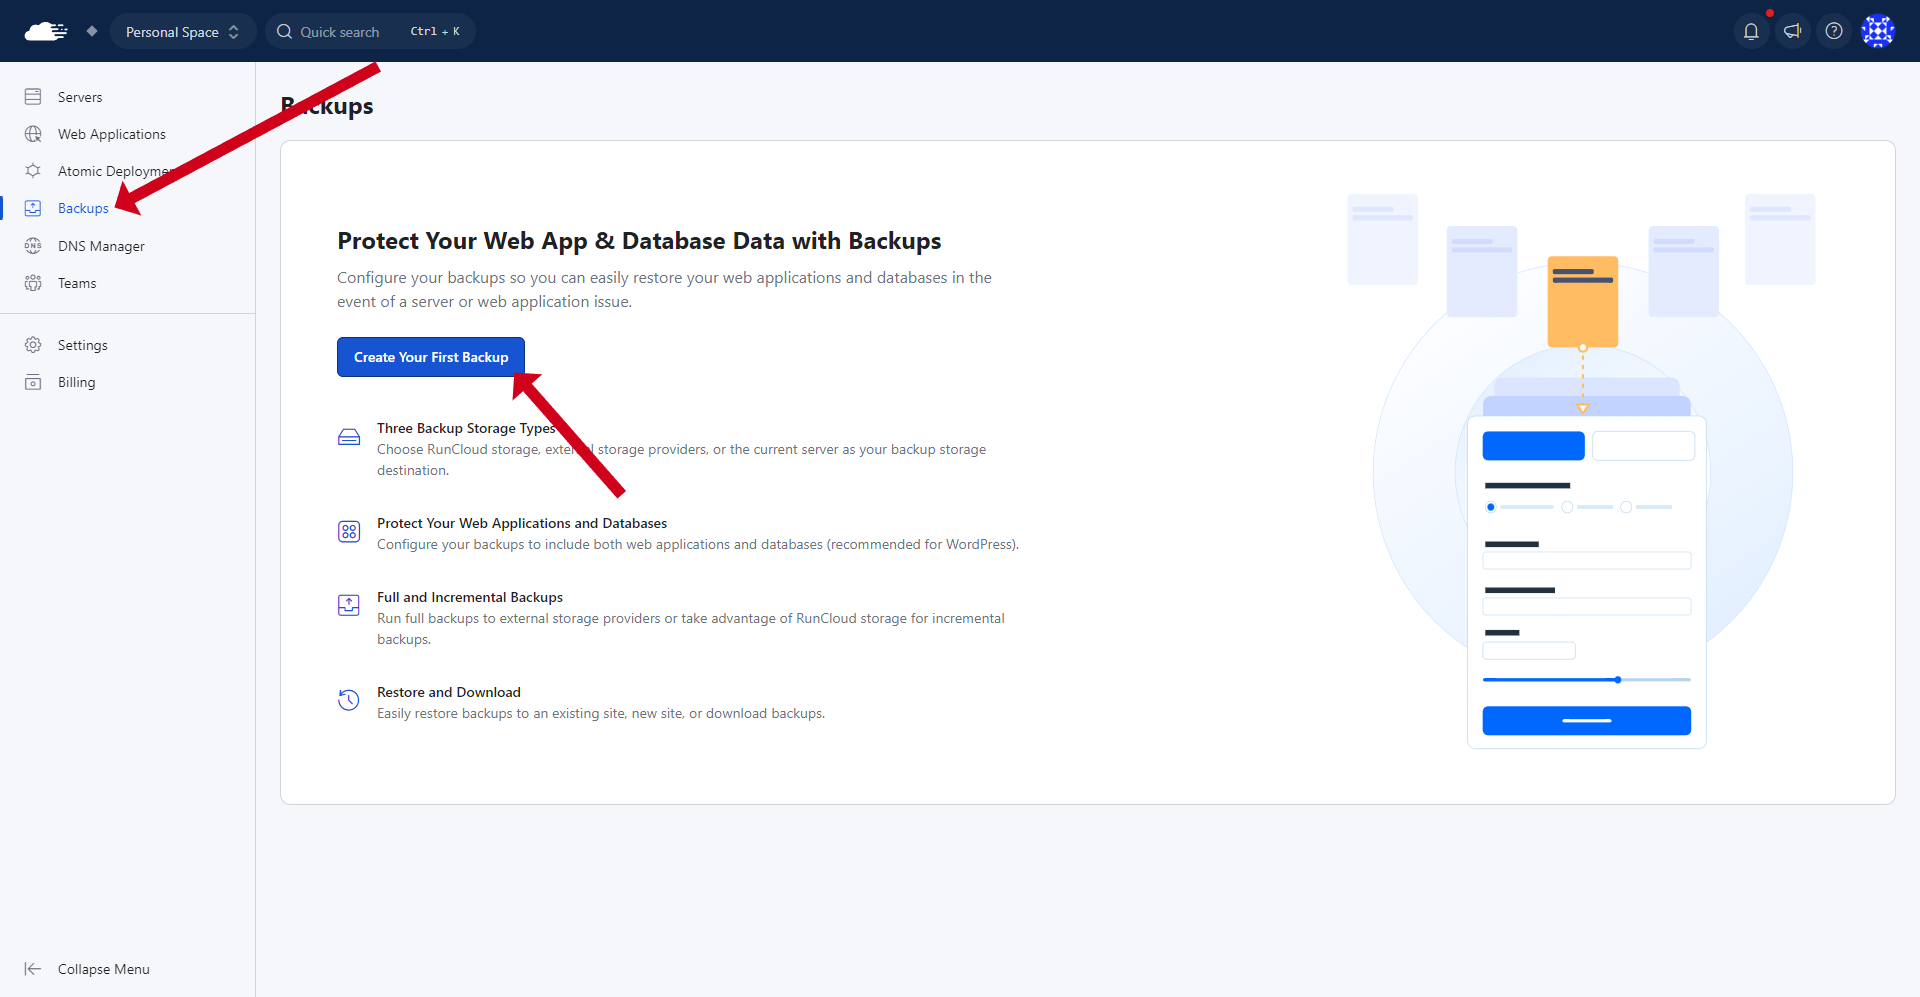
On your RunCloud dashboard, navigate to the backups section. If you haven’t created a backup yet, you’ll find a button that says “Create Your First Backup.” Click on it.
Before initiating the backup, ensure your destination VPS for WordPress is provisioned.
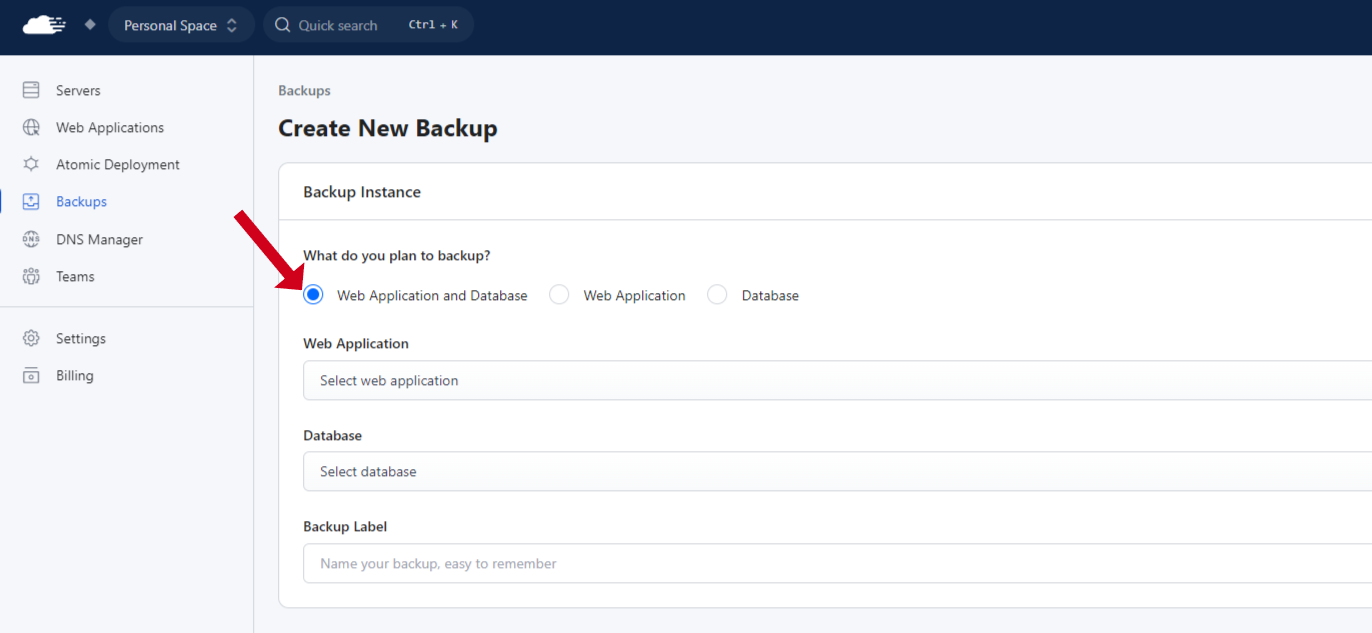
Next, choose the Web Application and Database option under “What do you plan to back up?” and select your website. Also, add a label for easy reference.
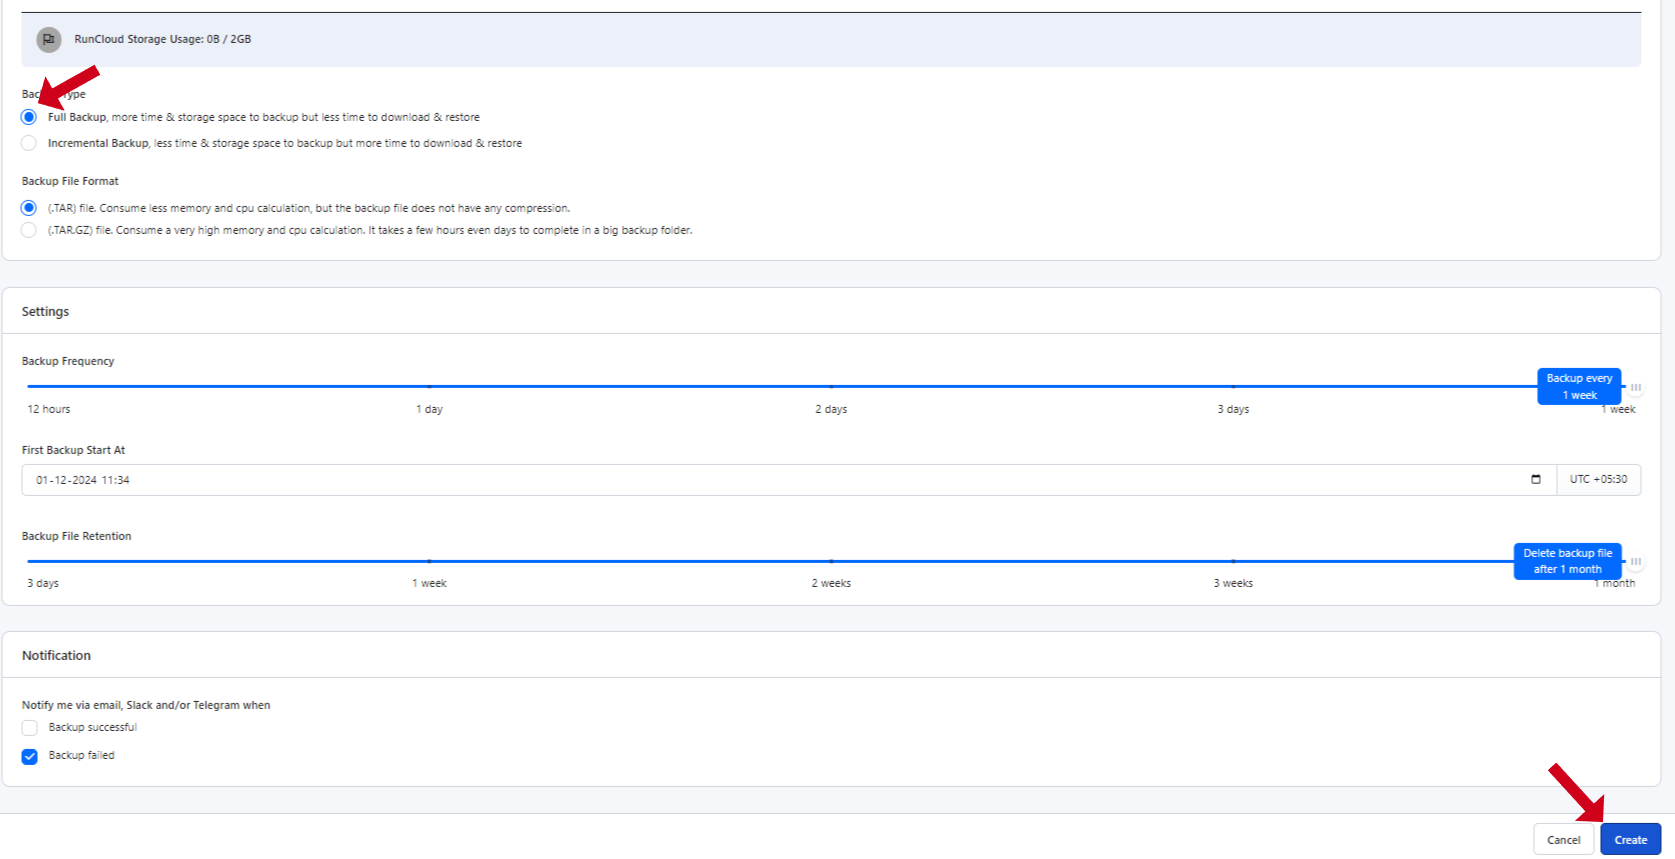
I recommend selecting RunCloud storage for storage. This way, you can download your backups directly from the RunCloud dashboard. While you can set up external backups, this task might take more time than necessary.
Alternatively, you could opt to save the backups on your own server. However, remember that this method won’t allow you to download them directly from the dashboard. Instead, you’d need to use SFTP or SSH to access the backup location on your server, which could be a bit time-consuming for a relatively simple task.
Just below that, ensure to select full backup instead of incremental. The rest of the options are not really useful for us since we're moving away, so I won't go over it and click on 'Create' instead.
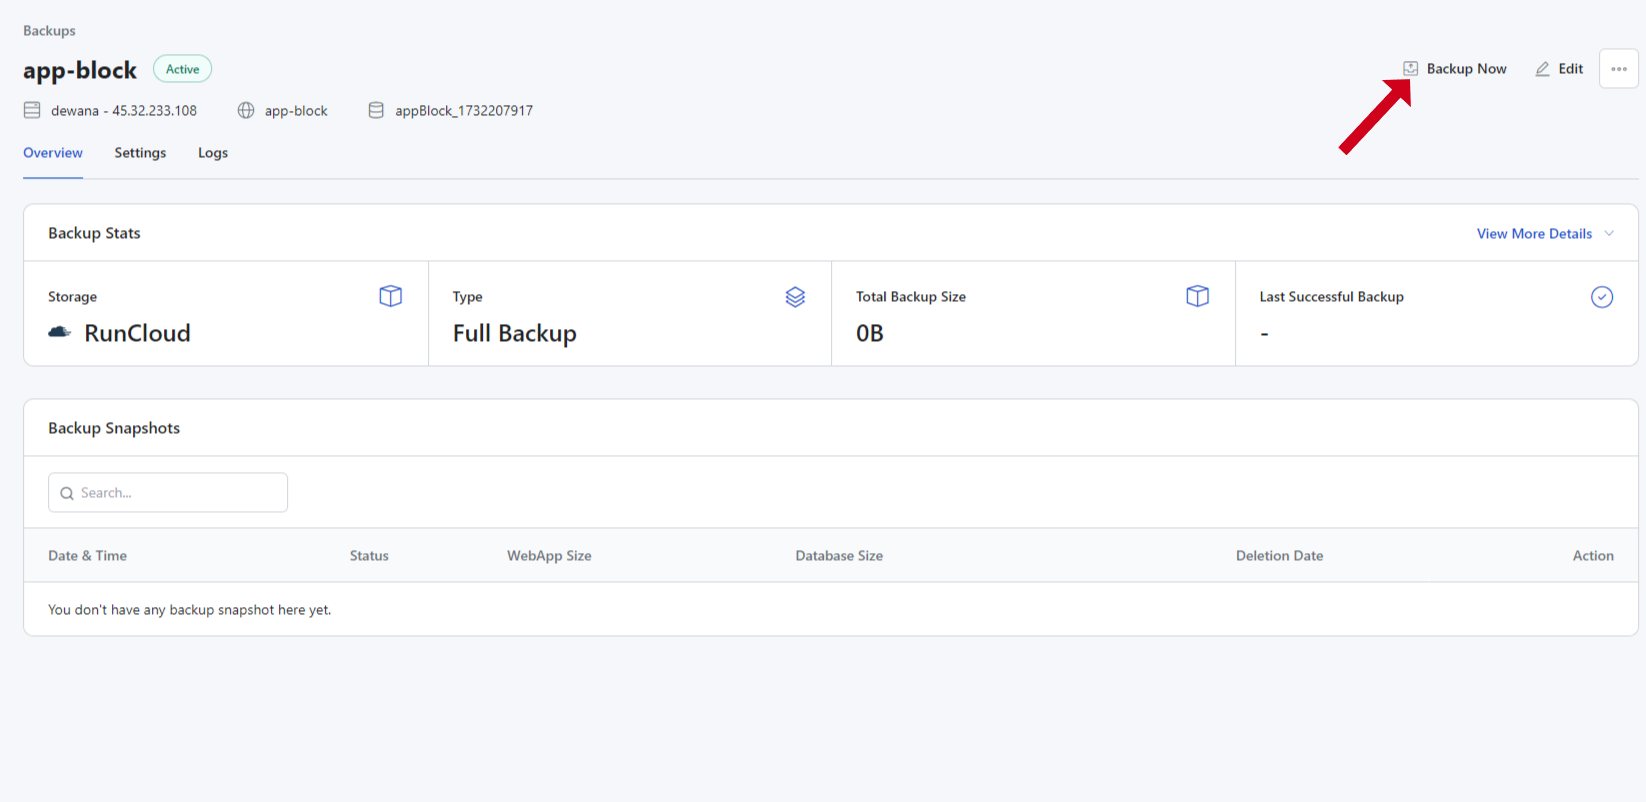
This will create a backup instance, and you'll be directed to the instance options page. Here, find the "Backup Now" button and click on it to create a backup.
You might be presented with a warning. It is safe to ignore it and proceed anyway. Depending on the size of your website, the backup will take some time. A great time to hydrate yourself.
Once the backups are created, click on the kebab menu under the action header for the listed backup and download the backups for the database and files.
Again, depending on your website’s size, it may take time to download on your device. Once downloaded, you must convert the website .tar files to .zip files for easier migration. My preferred method is to extract it as a folder and then recompress it into a zip file.
This might seem benign, but the .tar file will create errors down the road. Similarly, extract the database .tar and keep the .sql file ready with the website files archive.
Before moving forward…
This method generally leads to minimal downtime (I'll share more tips later to help further reduce it). However, having limited downtime does not ensure that every change made during the migration will be captured.
To enhance the process, try scheduling your migration during off-peak hours. Tools like WP All Import or WP All Export can help transfer any new data that may not have been included in the initial migration.
Another option is a maintenance plugin, which allows you to temporarily take your live site offline until the entire transfer to Webdock is finished.
With that sorted out, let’s move ahead.
Setting Up a Server & WordPress Website on Webdock
Go to Webdock and create a server with a starting price of €/$5.99 or more. You can select either Apache or NGINX as your server software, with NGINX being a common recommendation.
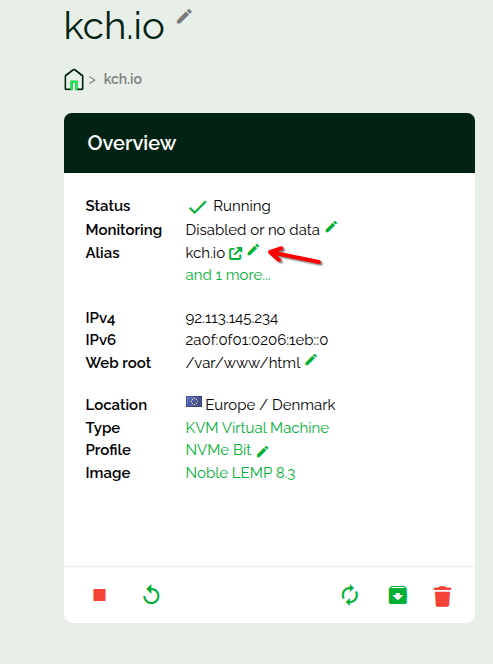
After your server is operational, navigate to its dashboard on Webdock. Find the small pencil icon next to the Alias field in the Overview tab and click on it.
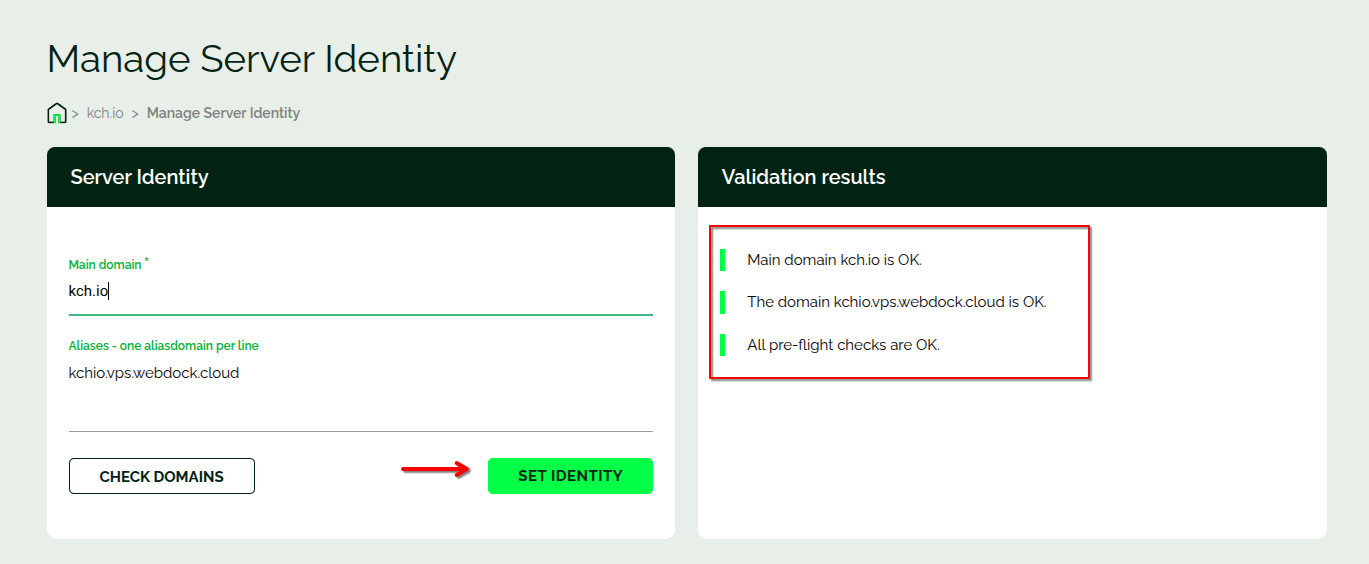
Enter your website’s primary domain in the main domain column. Normally, you would use the Check Domain feature before assigning an identity, but to minimize downtime, it’s OK to set your website’s domain as the primary one directly.
The setup process should take 3-4 minutes, and you might encounter an error message — this can be safely ignored for now.
Return to your server’s overview page and scroll down until you locate the Manage WordPress section.
You will need to install WP-CLI on your server. Click the button that is available to start the installation process. Once WP-CLI is set up, click on the Install WordPress Now button. This will bring up a form asking for details such as admin email, domain, path, database, and other information. In most situations, the default settings will suffice.
Please note that you won’t be able to create your own admin password — Webdock will generate one automatically for you.
Migrate Your Database
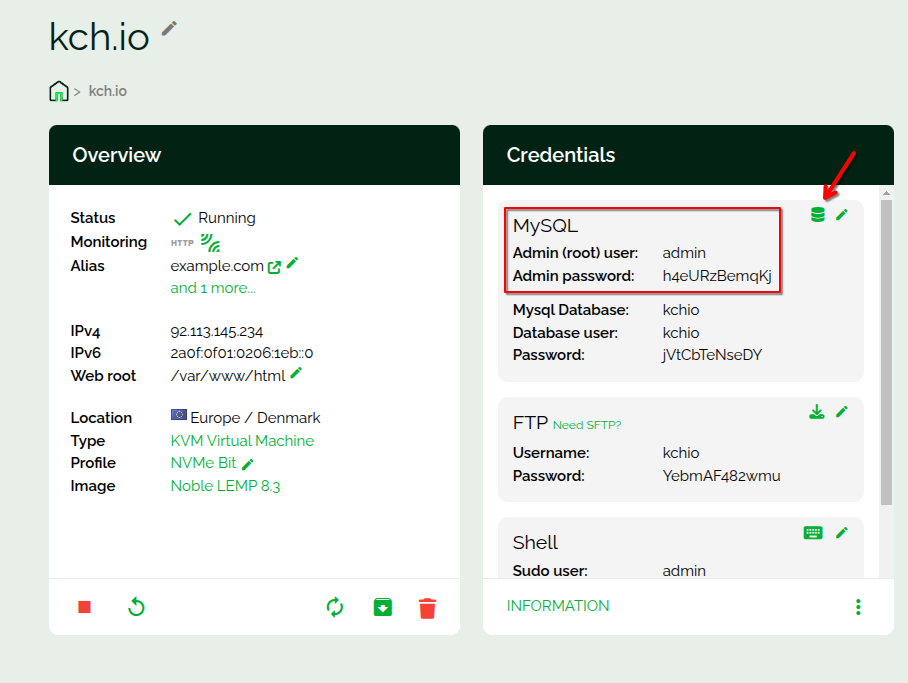
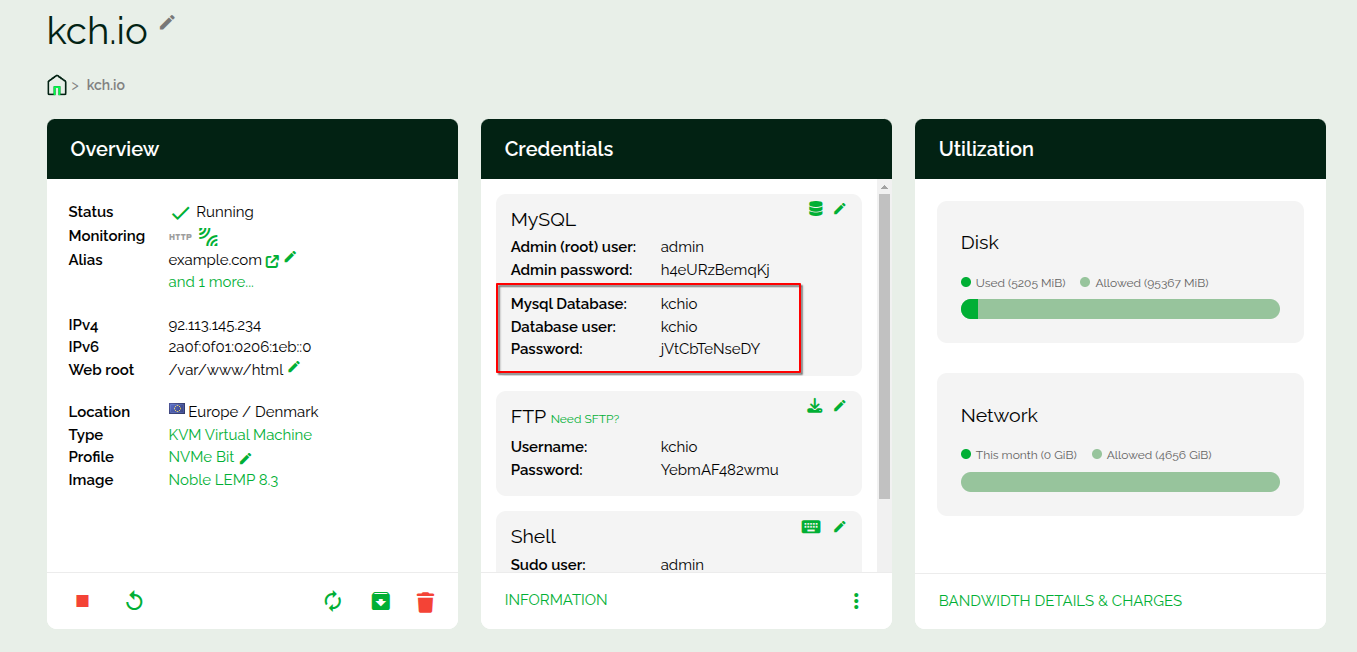
Once WordPress is set up, access phpMyAdmin by clicking the small database icon in the credentials tab. You will need to enter your Admin username and password when prompted.
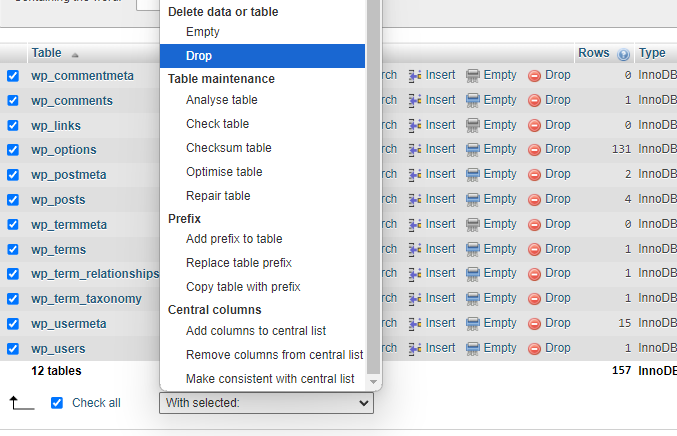
Locate the database linked to your WordPress site, select all tables within it, and proceed to drop (delete) them.
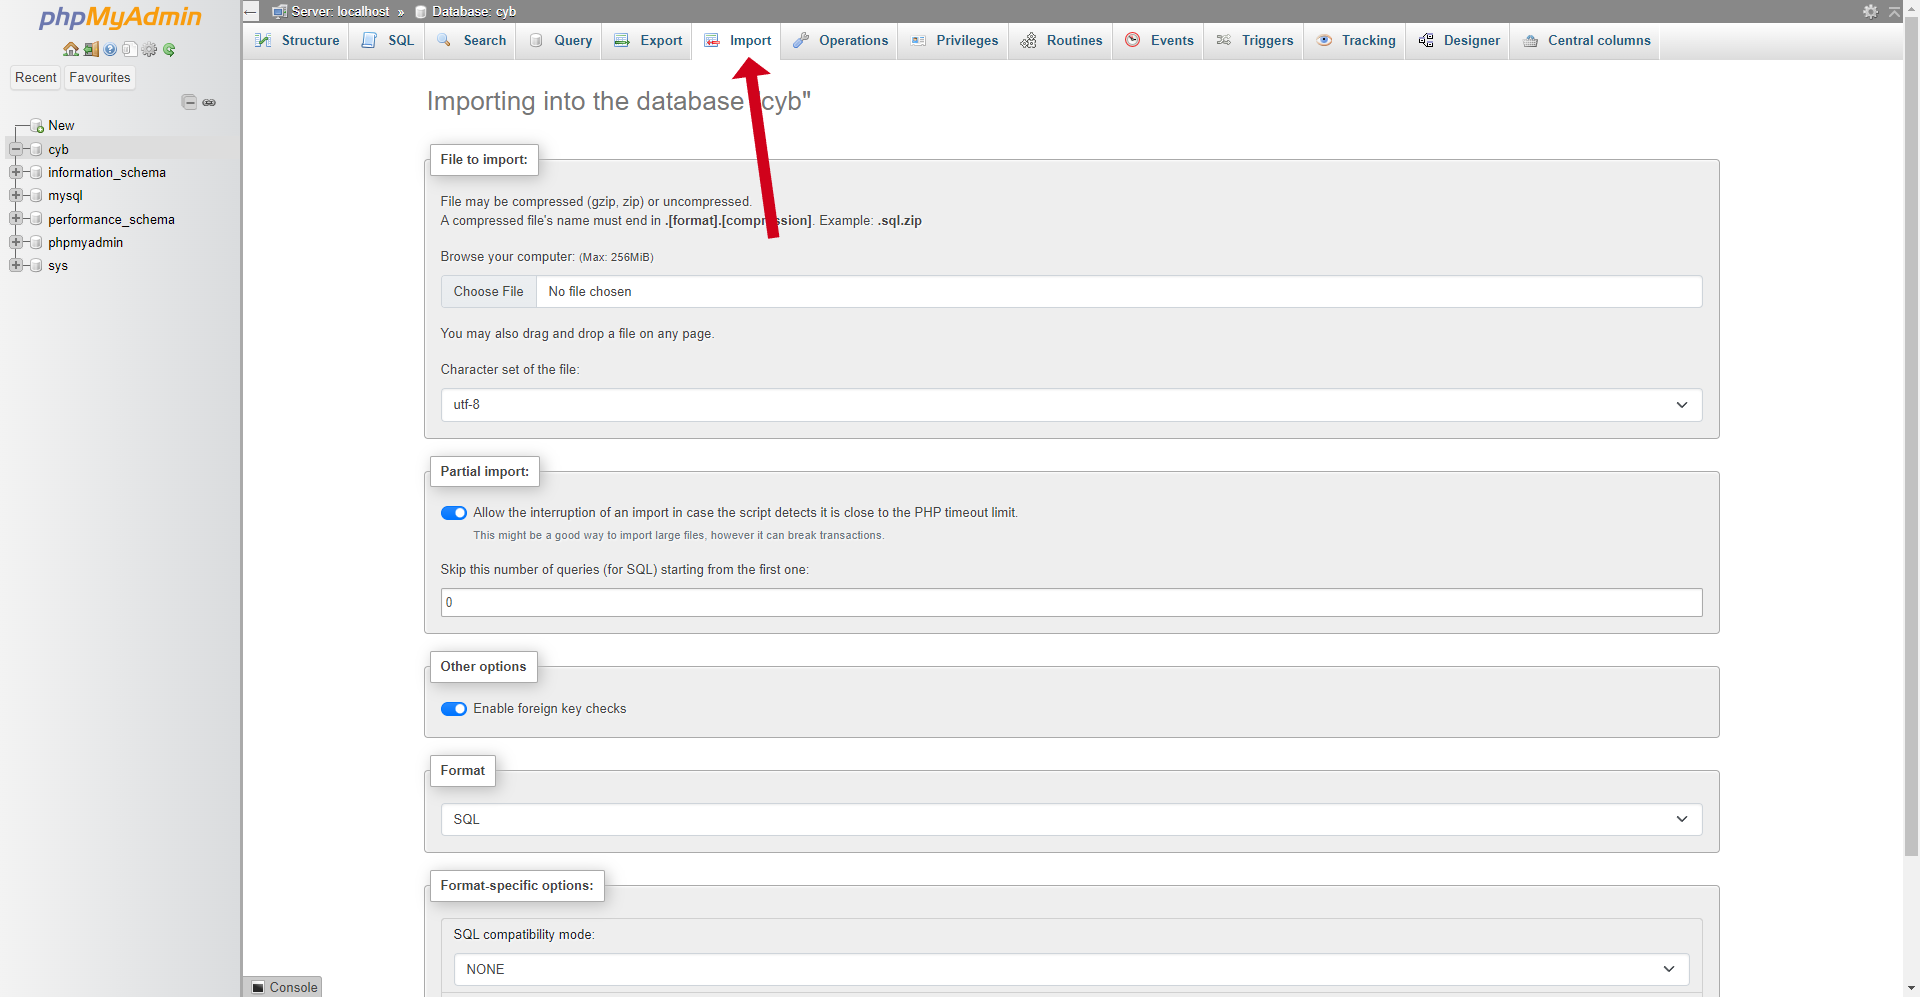
Next, head to the import tab. You can either drag and drop the database .sql file you downloaded from the RunCloud dashboard or choose it manually from your computer. This file will populate your database with all the necessary data.
Lastly, open the “wp_options” table and verify that both the site URL and home option_names have your website’s URL in the https:// format.
Migrate Your Website
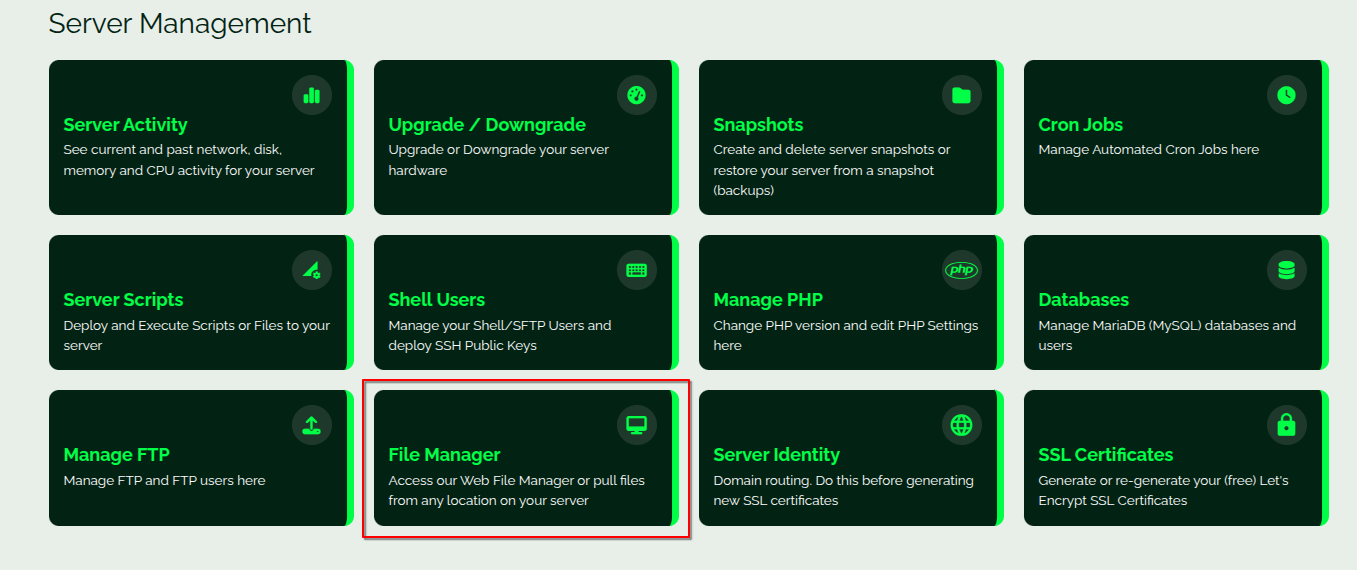
After importing and confirming your database, install the File Manager from the overview section and log in.
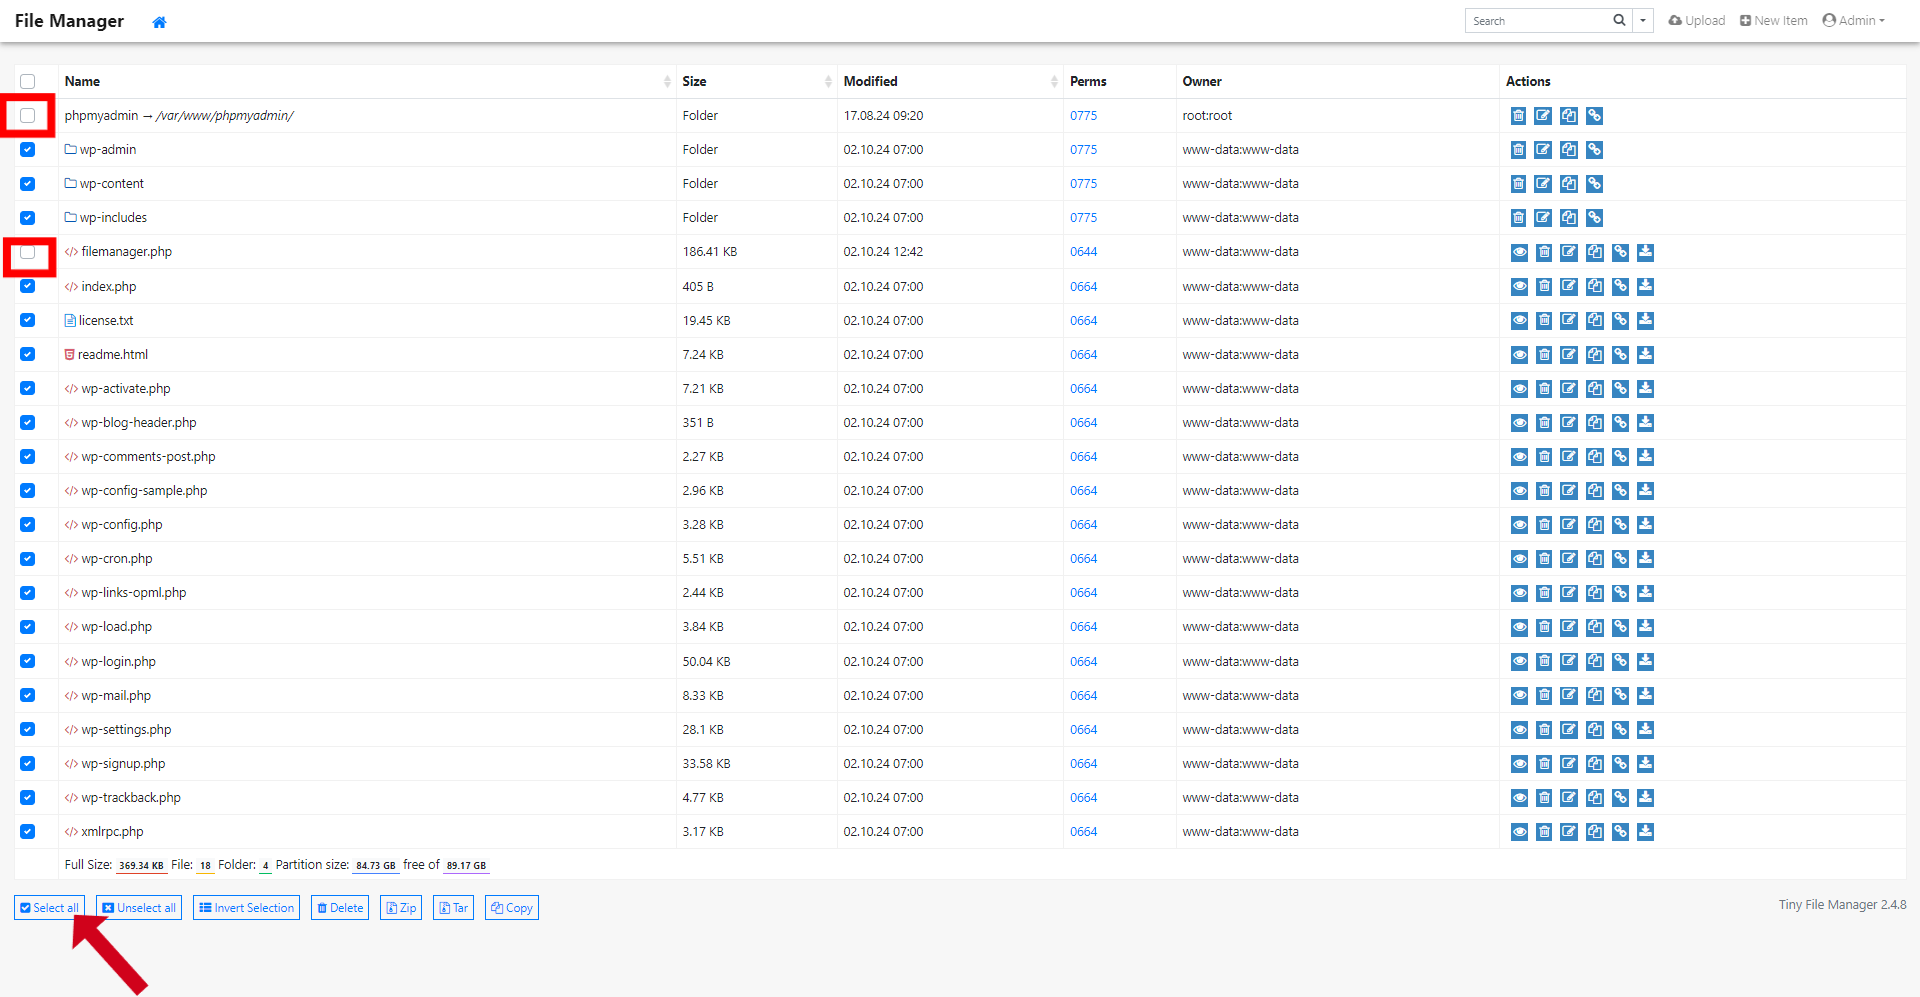
Once you're in the File Manager, choose the Select All option to highlight all files. Be sure to uncheck both the PHPMyAdmin folder and the filemanager.php file. Then, delete all other files.
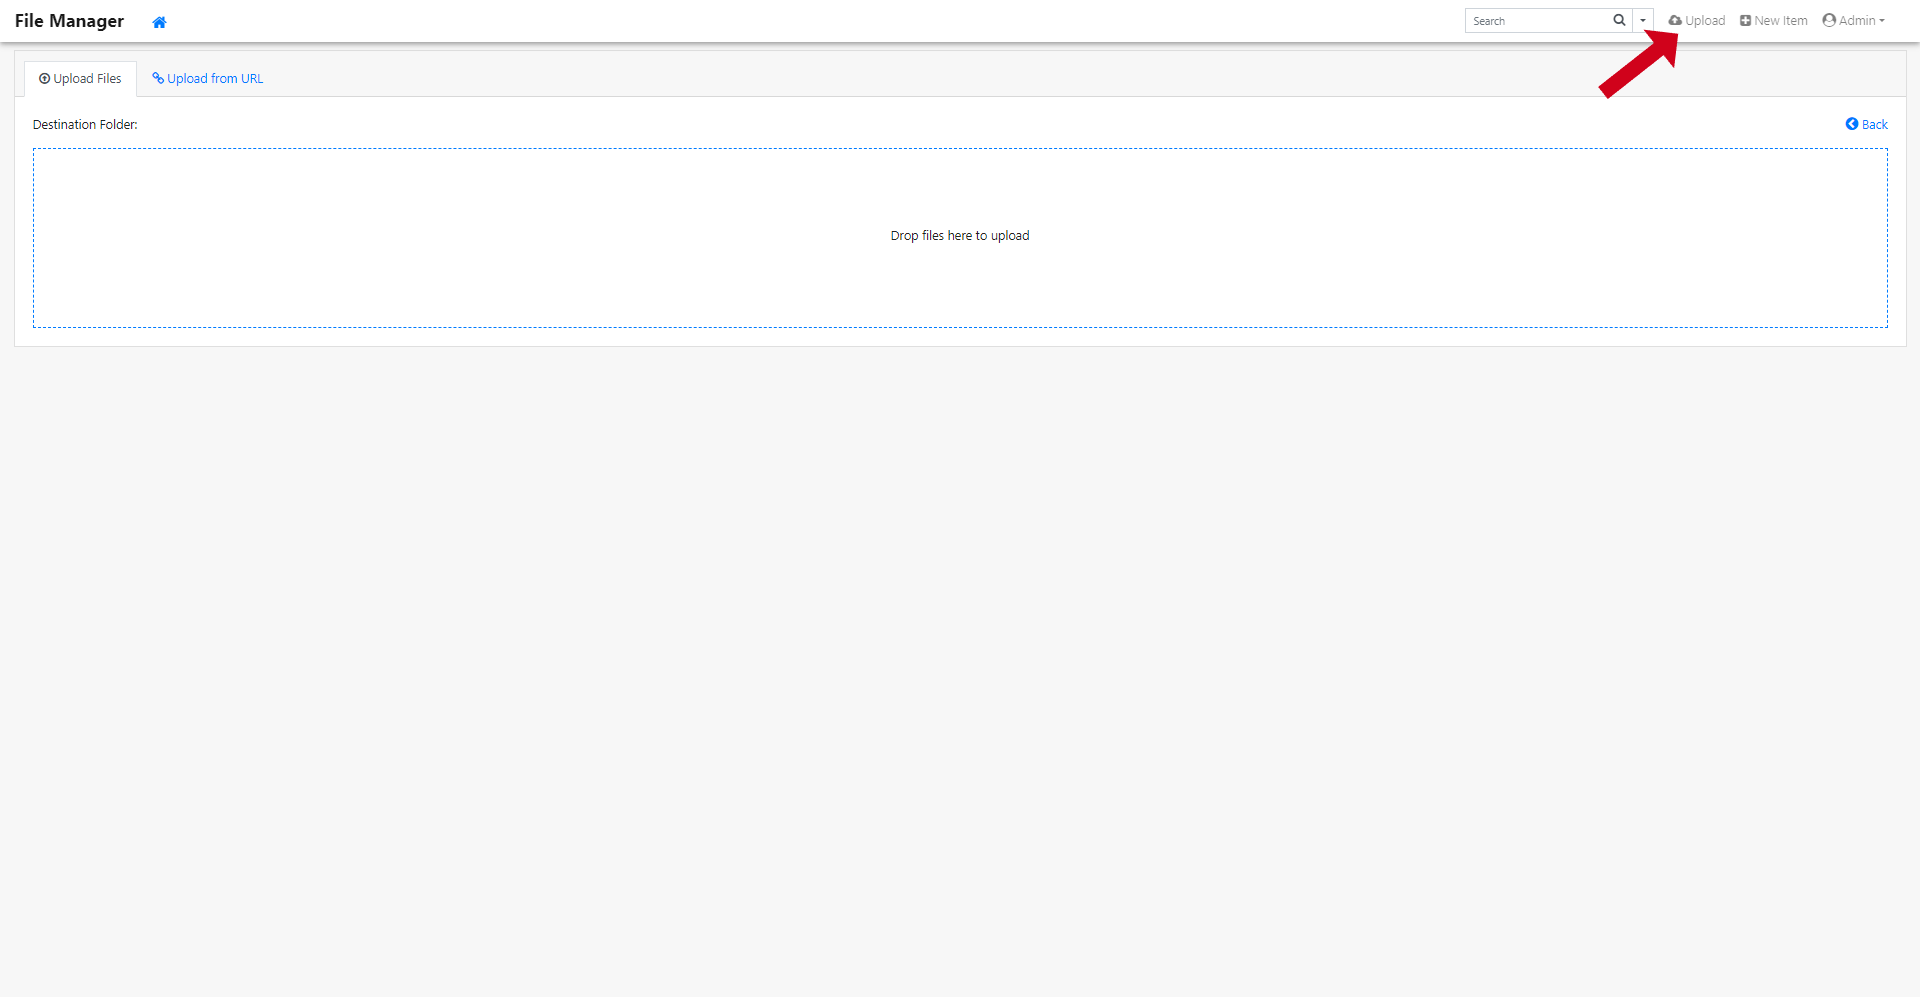
Next, navigate to the top right corner and select the upload button. You can upload the website .zip file that you created earlier from the RunCloud archive by either dragging it into the window or choosing it manually from your computer.
After uploading the zip file, find it, click on it, and select the option to unzip it.
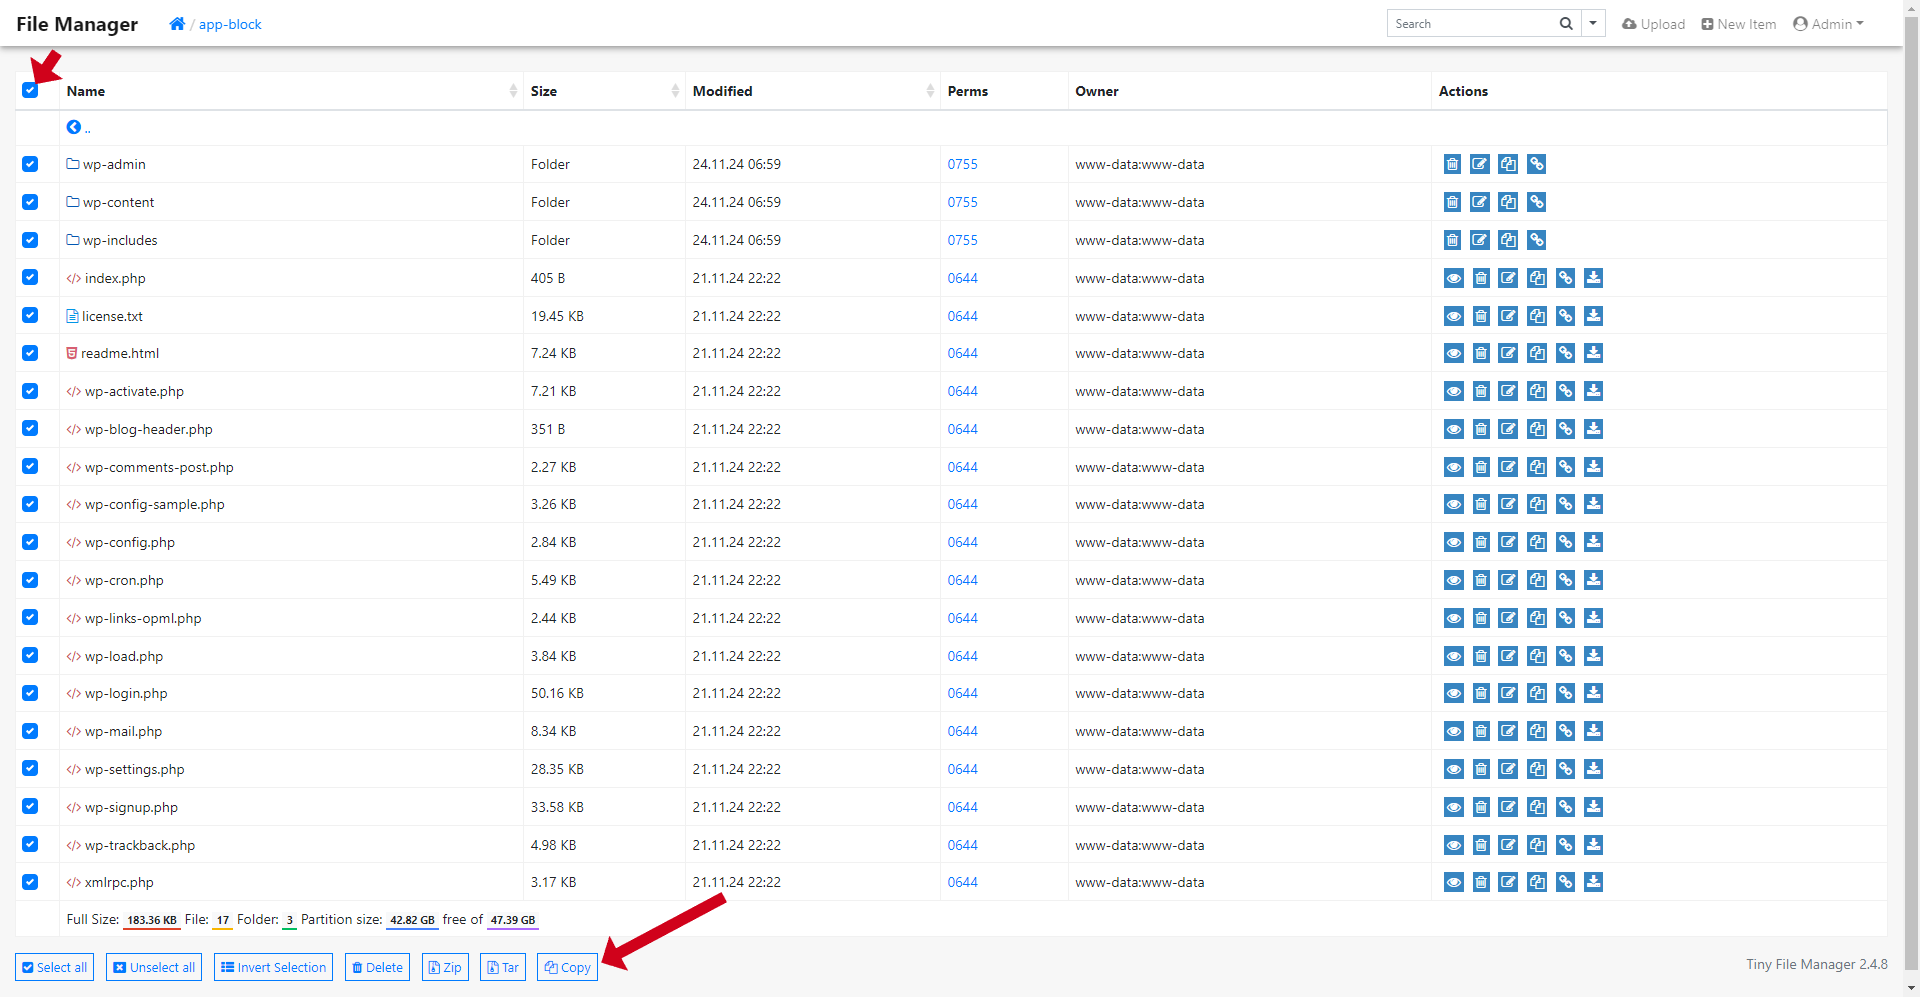
Once the extraction is complete, open the new folder and select all its contents; click on the copy button.
In the next screen that appears, check the “Move” option while leaving the path field empty to ensure everything is moved to your main directory.
With your files now in the correct location, you can delete both the original zip file and the folder that was created during extraction.
Connecting the Database
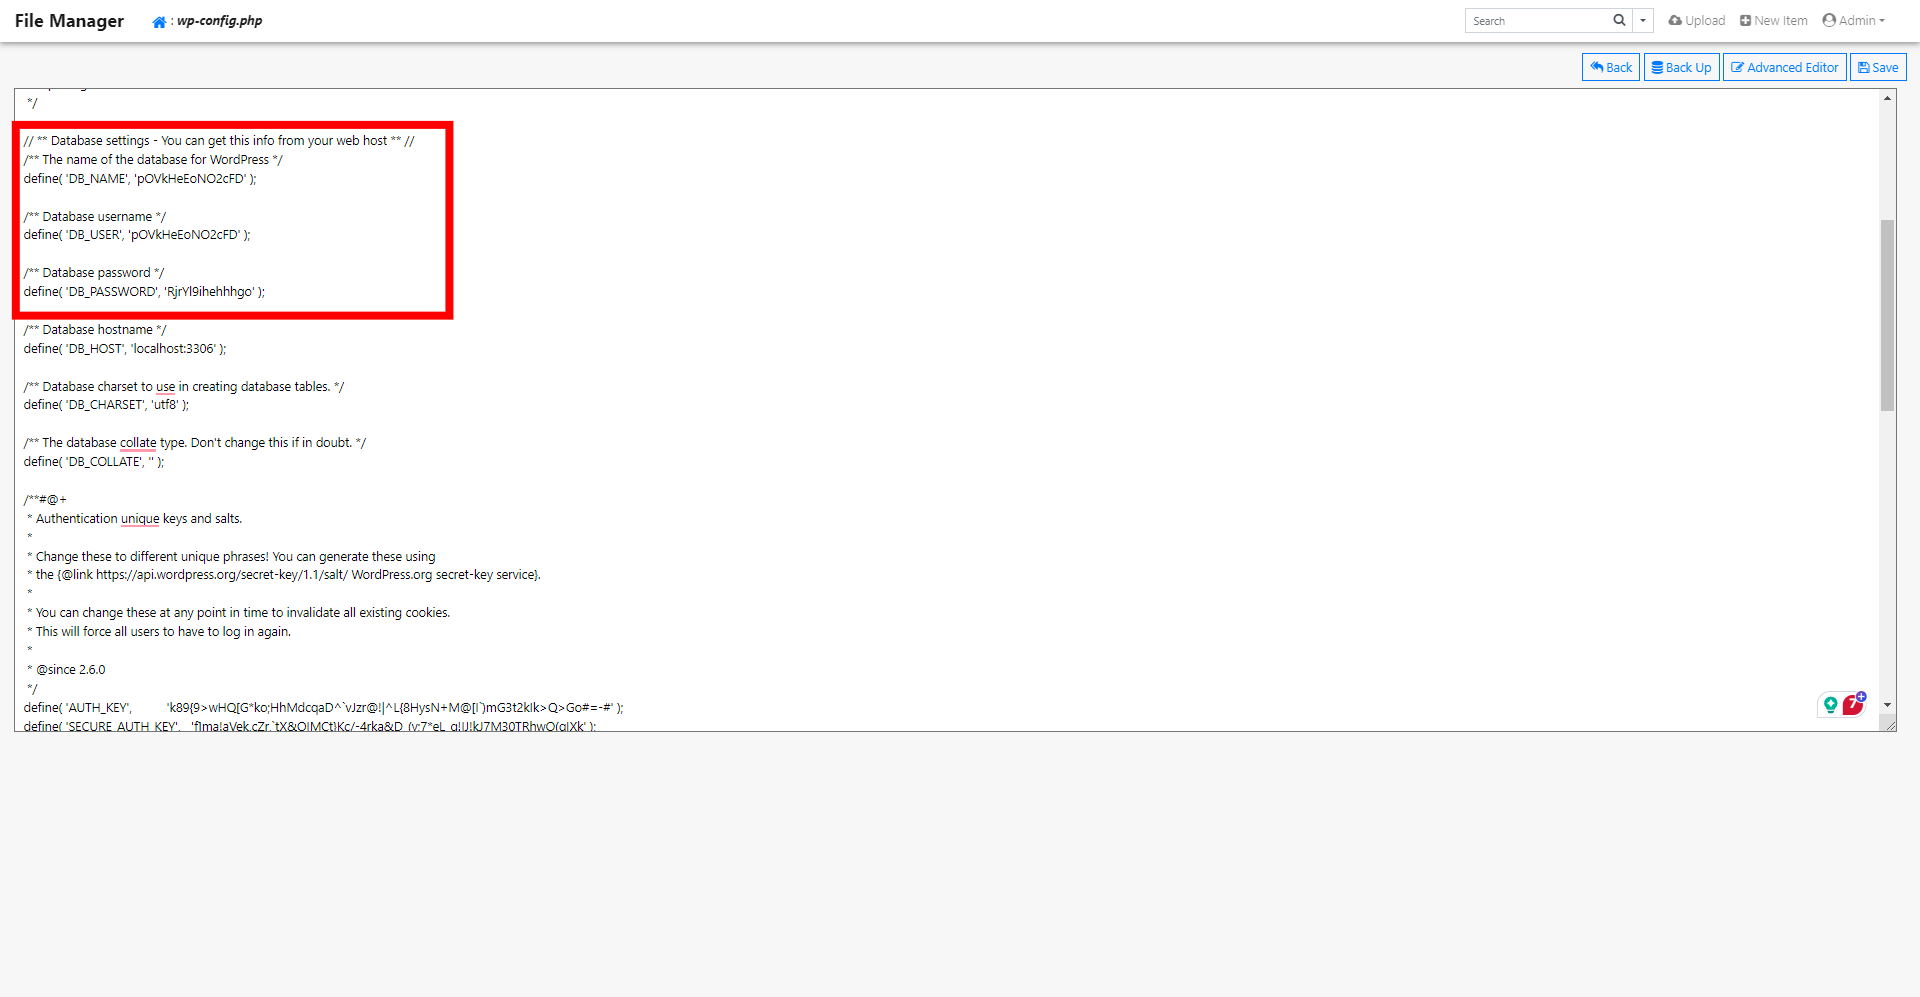
Open the wp-config.php file and locate the section that contains your database information.
Update this section with the latest details from your server overview.
After you’ve finished working with the files, it’s essential to disable and uninstall the File Manager. Even though it’s password-protected, it still presents a security risk. It’s advisable to remove it once you’re done. You can quickly delete the File Manager from the area where you first activated it.
Assigning SSL
Next, update your domain’s DNS settings to direct to your Webdock VPS IP address using an A or CNAME record.
As mentioned earlier, go back to your server overview, find the Alias section, and click the check domain button. If everything is validated successfully, move forward with setting the domain.
This step will also regenerate SSL certificates for your site. And that's it — your WordPress website is now live on Webdock, migrated from RunCloud, with minimal downtime.
Different Approach: Migrating With A Backup Plugin
If you plan to move your website to Webdock, a backup plugin like UpdraftPlus can make things easier. This is especially true if your website has a lot of pages or if you're not super experienced with tech. You can go for any backup solution, but UpdraftPlus has some great features available for free, and using cloud storage can help speed things along.
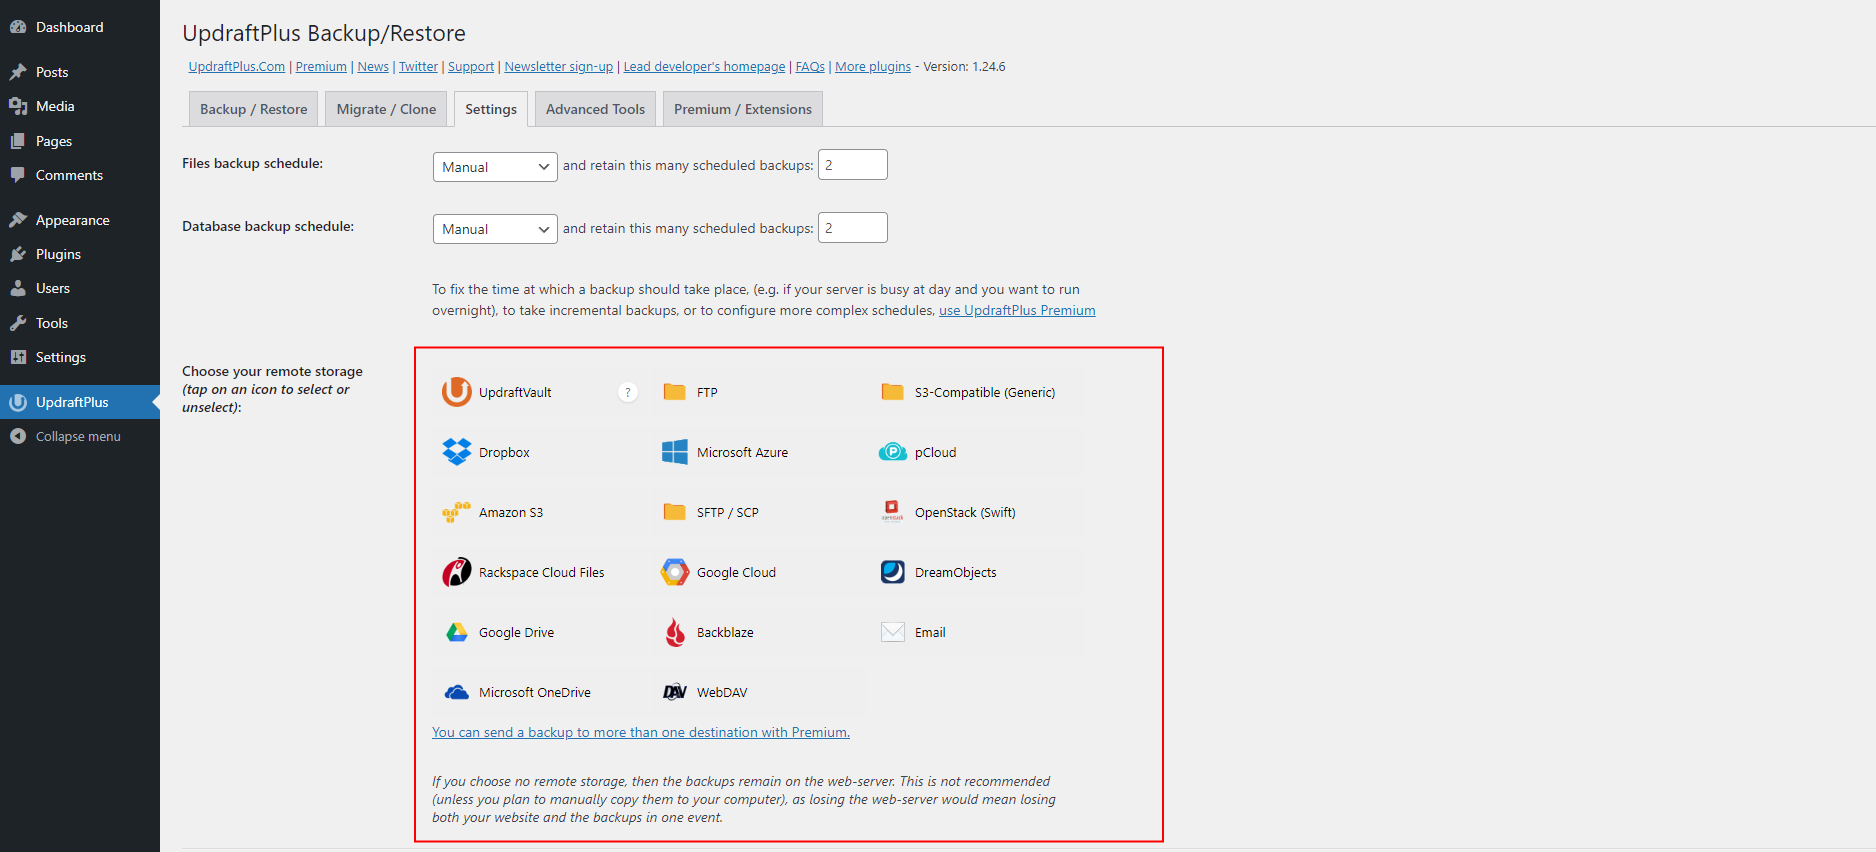
To start, log into your WordPress dashboard. Find the Plugins section, click "Add New," and search for "UpdraftPlus." Once you see it, go ahead and install and activate it. After that, navigate to the UpdraftPlus settings to set up remote storage options. You can choose from services like Google Drive or Amazon S3. It's not a must-do, but it will definitely save you some time during the migration.
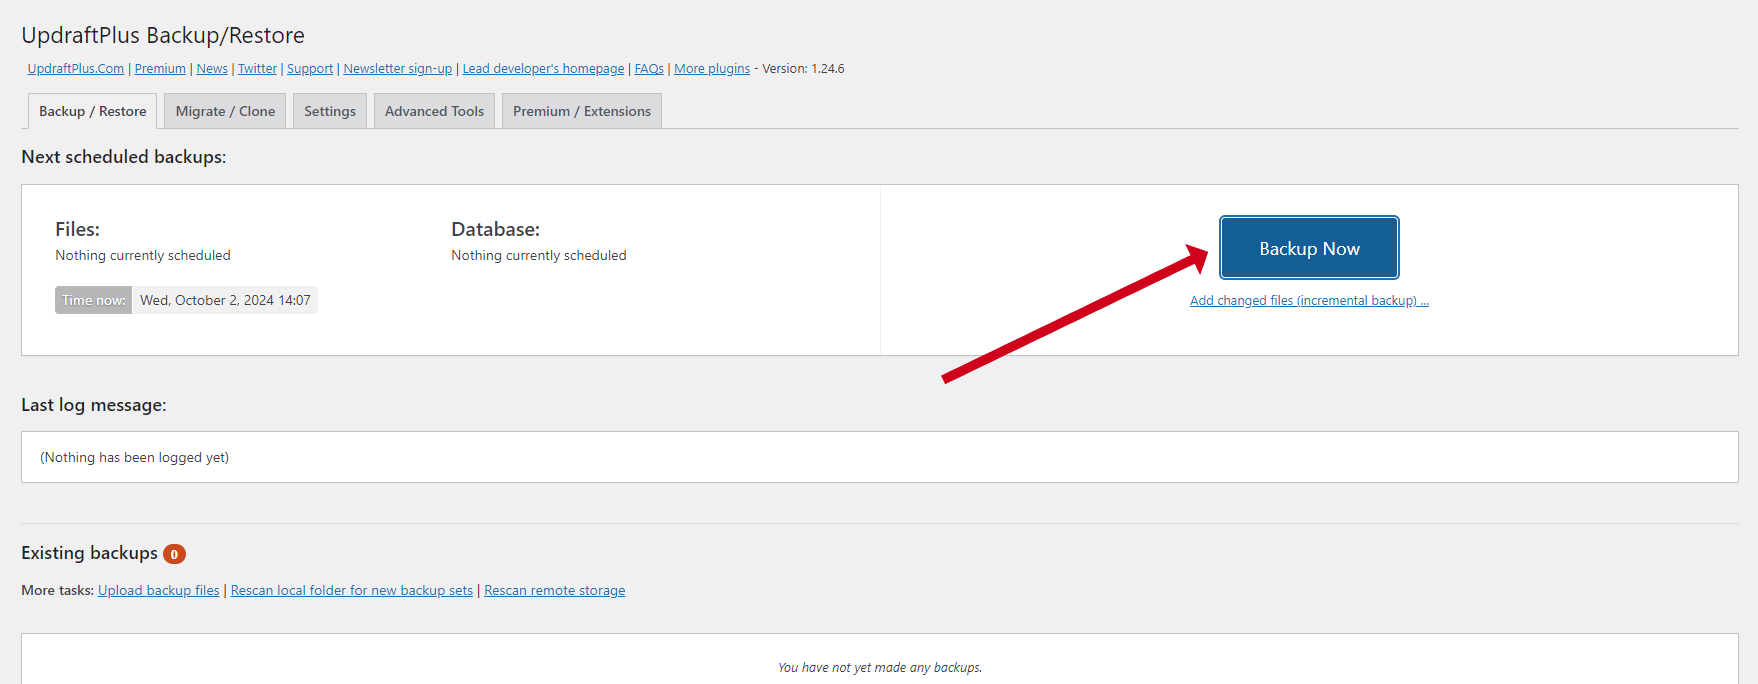
To back up your website, navigate to the Backup/Restore tab and click “Backup Now,” ensuring all options are checked. If you choose not to use remote storage, you must download each backup file individually by clicking on the archive name.
Next, select a server plan on Webdock, which starts at €/$5.99 or more. Adjust your profile settings as needed and deploy your server. You can immediately link your domain to your server’s IP address or modify your computer’s host file for initial testing. Once DNS propagation is complete, configure your domain in the server identity tab and follow similar procedures to install WordPress.
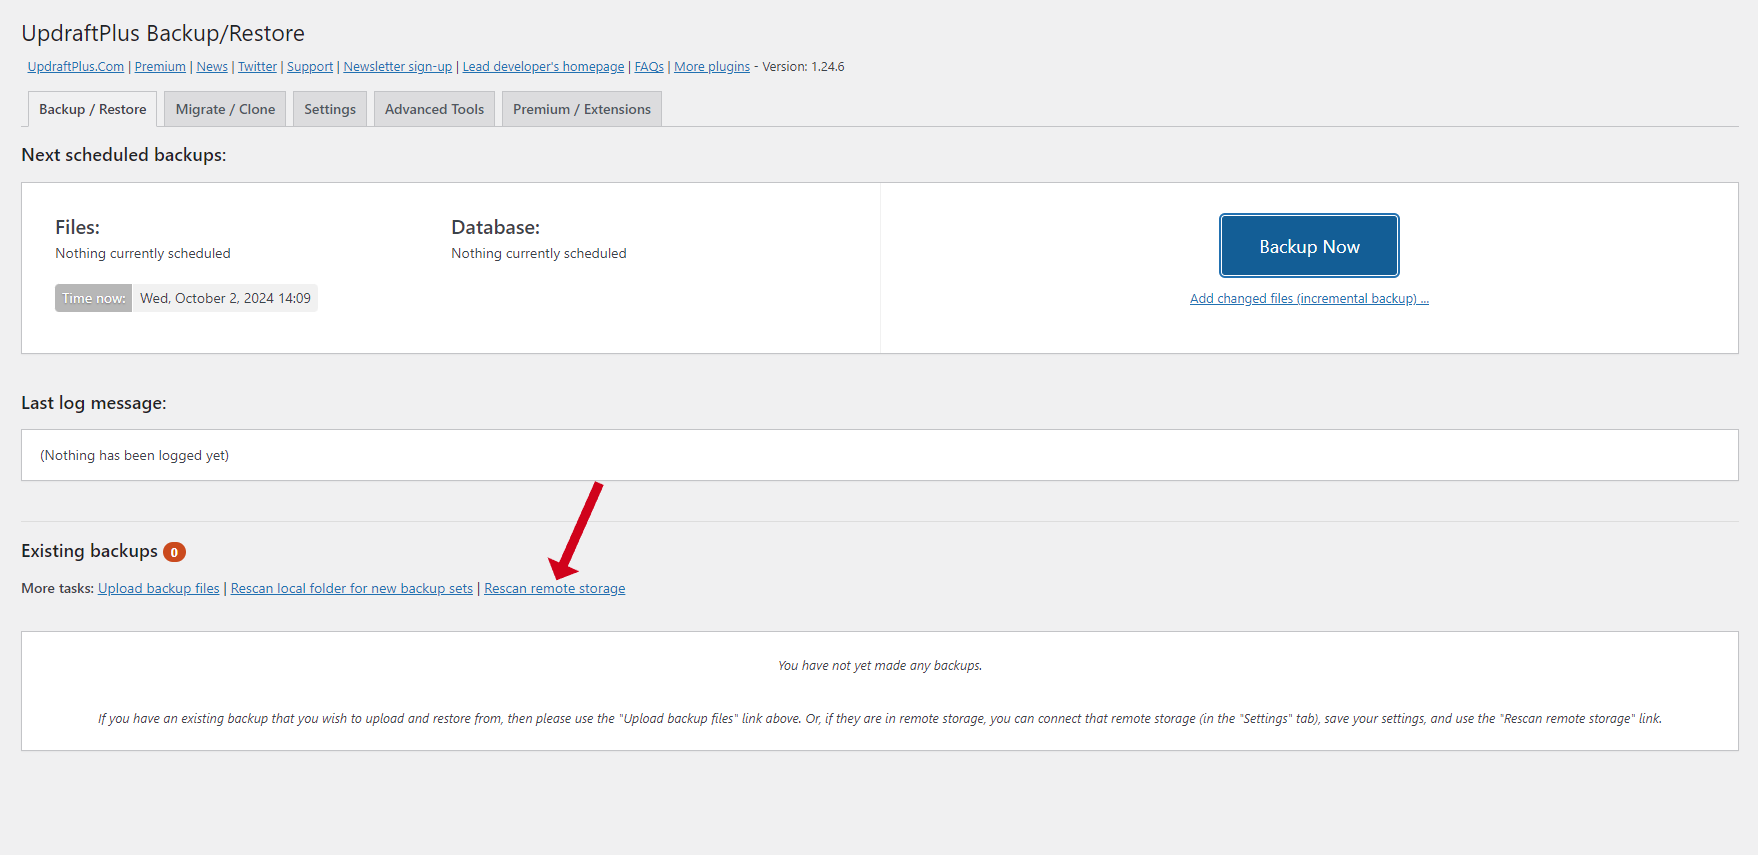
As mentioned earlier, after you’ve installed WordPress on Webdock, reinstall UpdraftPlus and reconnect it to your selected storage option. In the Backup/Restore section, you may need to rescan remote storage to find your available backups.
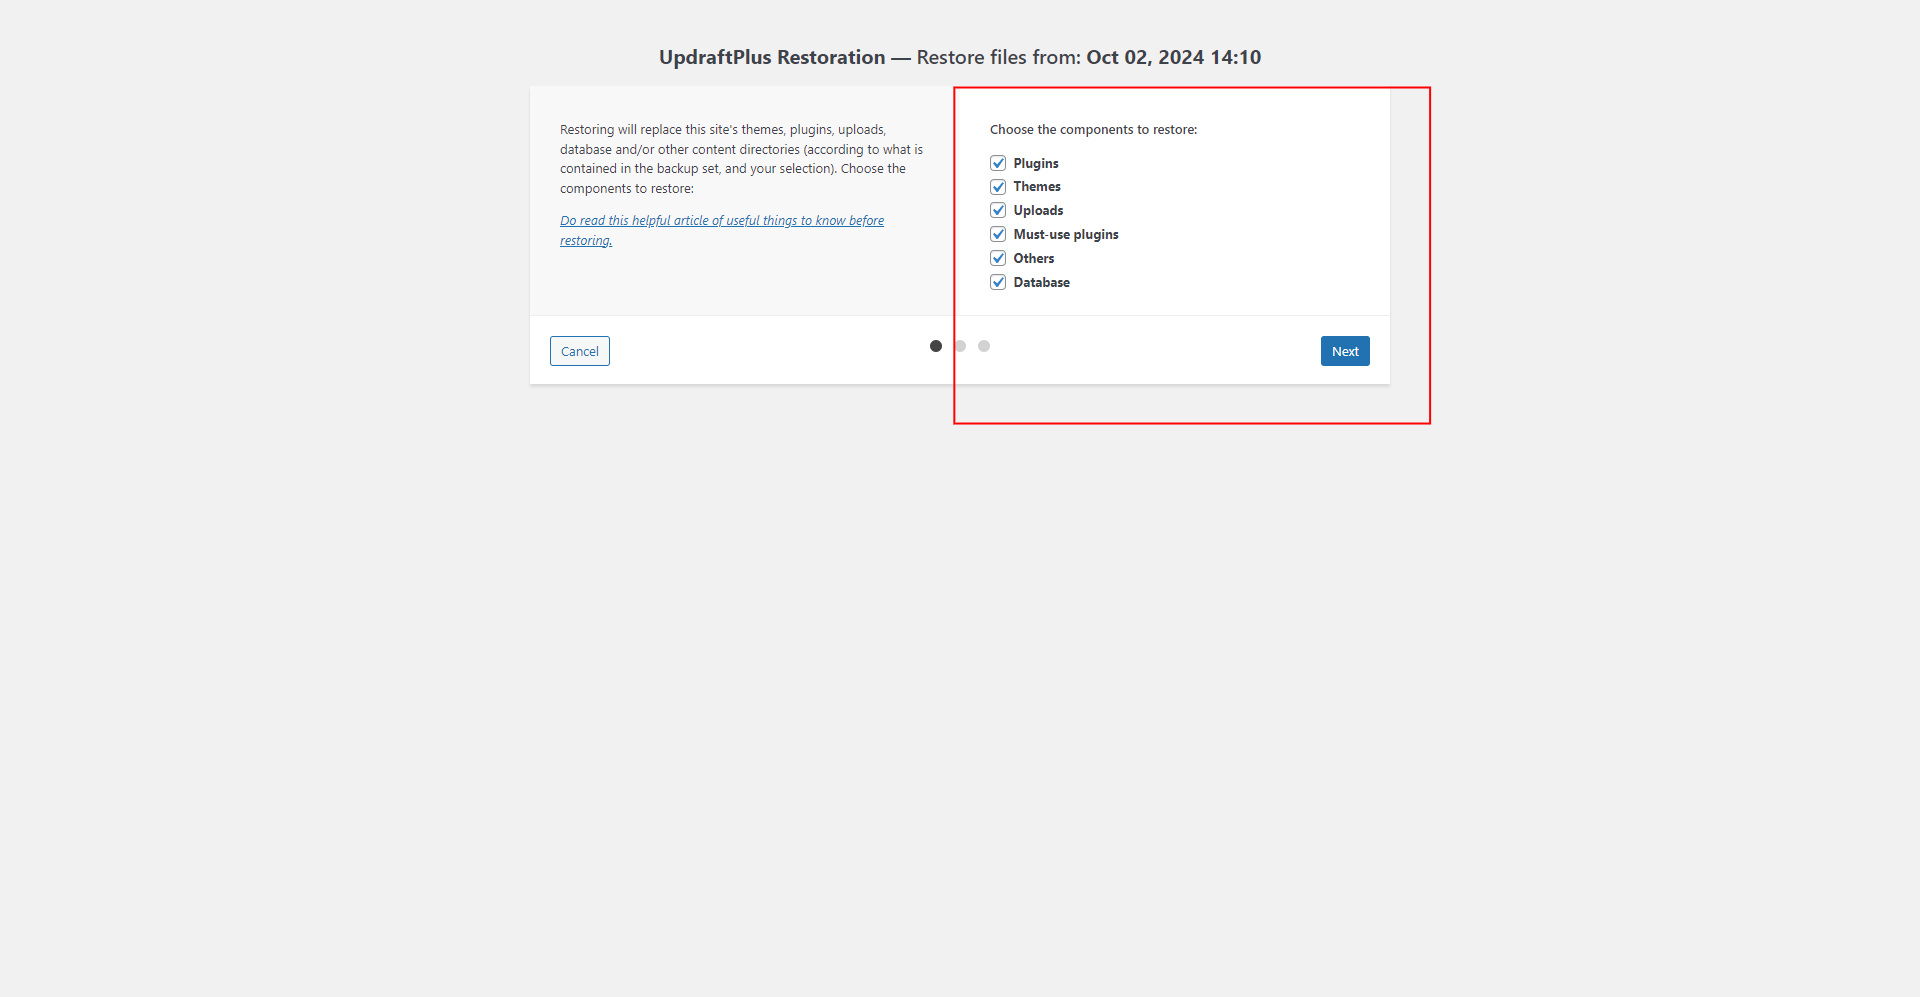
If you decide not to use remote storage, you can upload your backup files manually by clicking the ‘Upload Backup Files’ button. Once your backup appears in the list, click on Restore, choose all the required components, and proceed with the restoration.
Your WordPress site should now be completely transferred from RunCloud to Webdock. Conduct a thorough check to verify that everything is functioning properly.
Shifting Without a ‘Blank Site’
To prevent your site from showing a blank page during the migration, you might want to use a WordPress maintenance plugin or delay updating your DNS until after the migration is complete. If you’re comfortable with some technical tasks, follow these steps:
First, when setting the server alias on your Webdock server, skip the Check Domains button and input your domain directly. Proceed even if you encounter any errors or warnings.
Next, access your Hosts File:
- For Windows: Open Notepad as an Administrator and navigate to c:WindowsSystem32Driversetchosts.
- For Mac: Open Terminal and type sudo nano /etc/hosts.
- For Linux: Open Terminal and enter sudo nano /etc/hosts.
After opening the host file, scroll down to the end and add your Webdock server’s IP address.
Next, add a space and then list both the www and non-www versions of your domain on separate lines like this:
123.456.789 example.com
123.456.789 www.example.com
Once you’ve made these changes, save the host file and close the editor. To ensure your computer can quickly connect your domain to the Webdock server, you might need to clear the DNS cache.
For Windows, enter ipconfig /flushdns in Command Prompt. For Mac, type sudo dscacheutil -flushcache in Terminal. For Linux, use system-resolve –flush-caches in Terminal.
Next, proceed to install WordPress using Webdock’s manager, then check your site URL to confirm the setup—keep in mind that it will only be accessible from your computer. After that, install the backup plugin and follow the previous instructions.
Once you confirm that the site has been successfully moved, update your DNS records, create a new SSL certificate by resetting your server alias (just click on the set identity button), remove the entries from the host file, and clear the DNS cache one final time to complete the process.
In Conclusion
Migrating from RunCloud to Webdock can unlock greater flexibility and cost savings for your WordPress website. By leveraging Webdock's intuitive interface and customizable server options, you can tailor your hosting environment to meet your specific needs.
The step-by-step migration process outlined here ensures that you can make the switch smoothly, allowing you to focus on what truly matters — growing your online presence without the hassle of overpaying.
Meet Aayush , a WordPress website designer with almost a decade of experience who crafts visually appealing websites and has a knack for writing engaging technology blogs. In his spare time, he enjoys illuminating the minds around him.
