Introduction
CyberPanel is the most recommended server control panel among LiteSpeed enthusiasts for robust WordPress server management.
However, you’re bound to encounter limitations in scalability, specialized optimizations, or streamlined workflows. If you’re seeking enhanced performance, greater flexibility, or a more simplified management experience, Webdock is your choice.
This guide will walk you through the process of migrating your WordPress site from CyberPanel to Webdock effortlessly, ensuring a smooth transition with minimal downtime and friction.
Why use Webdock instead of CyberPanel?
Webdock offers several advantages over CyberPanel. Let’s take a look:
- Included Addons: With Webdock, you can benefit from free full server snapshots and application-level backups, ensuring your data is always safe. Additionally, Webdock provides free transactional emails from Postmark, perhaps the email-sending service with the highest deliverability, making it an excellent option for keeping your WordPress website running and happening. You can even set up email forwarding from ImprovMX free of cost.
- Price: The cost of operation nicely ties into the above point. CyberPanel has a free version, but the layout is laden with “dark patterns” masquerading as genuine options that just ask you to buy its paid plans to use. Yikes! The user interface, too, is outdated and complicated to figure out. Webdock’s Control Panel comes free with all plans and has a much nicer interface, neat organization, and naught of ads or upsells.
- Limited Software Support: Another major downside of CyberPanel is its sole support for LiteSpeed/OpenLiteSpeed, which, while great, isn’t compatible with intricate WordPress setups. Moreover, LiteSpeed Enterprise, necessary for any serious WordPress website, is ridiculously overpriced and charges based on your server hardware. This means that when the time comes to scale your website, you pay for not only the server hardware but also the software and CyberPanel itself.Webdock shines out of the box with its support for multiple free, open-source, and true-tested web server stacks, including Apache and NGINX. You can even install OLS or other software like Caddy if you’re keen to use it, though you may not be able to take advantage of some Webdock features this way.
Using Webdock for your WordPress site is like having a Swiss Army. It handles all the essential tasks with ease and keeps your site secure, saving you time, hassle, and money.
Migrating Your Website
Now, let’s take a look at the actual task of migrating the website from CyberPanel to Webdock. There are mainly two methods. Do remember that these methods will result in downtime, so try to migrate your site when the traffic is the lowest. In the next section, I’ll also review a neat trick to minimize downtime. Now to the actual methods:
Using A Plugin
There are plenty of backup and migration plugins out there, but my go-to is UpdraftPlus. I don’t have any ties with the creators, yet I find it a neat plugin. While it’s not flawless, it gets the job done effectively. The best part? Most of its features are available for free, so it won’t cost you a dime.
That said, if you have a backup plugin you prefer, feel free to use it. The process is likely quite similar, regardless of the plugin.
I also assume you have access to some form of cloud storage. Any option will work, even the free version of Google Drive. While using cloud storage isn’t mandatory, it can significantly speed up the process. If you’re not interested in using a storage service, don’t worry. I’ll also guide you on how to proceed without one.
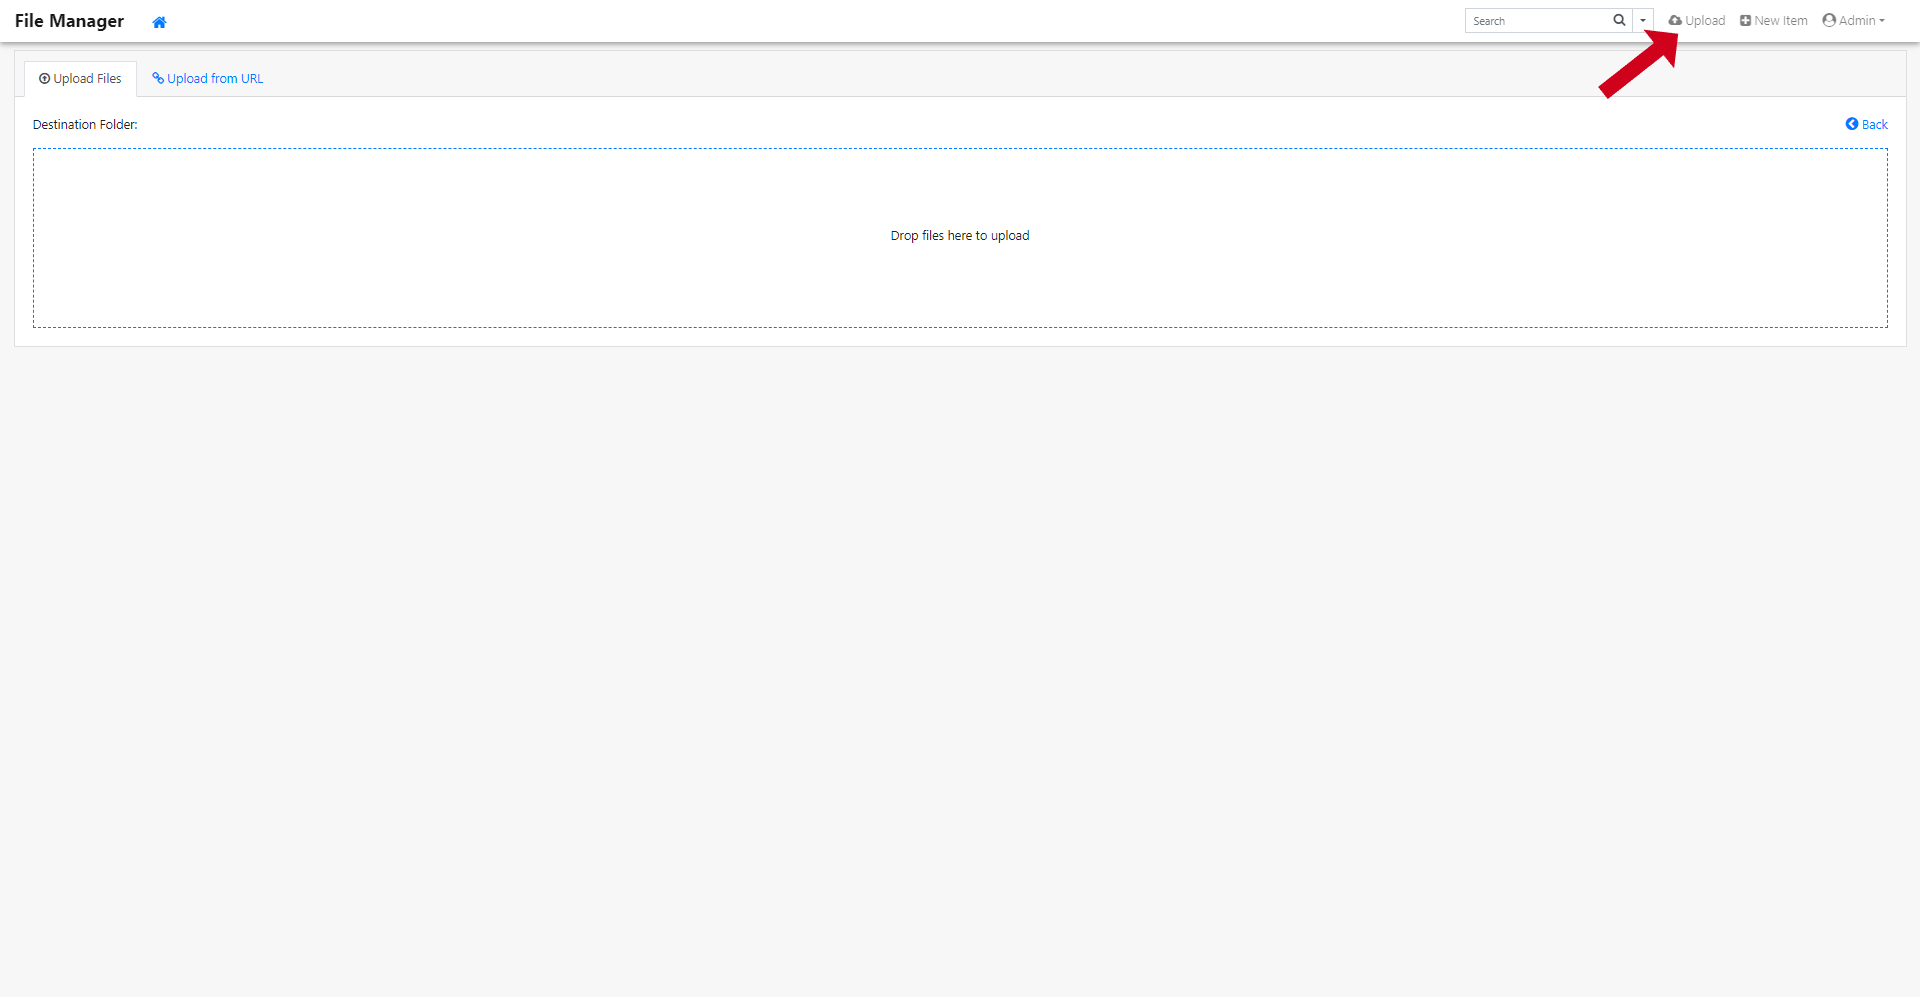
Access your WordPress dashboard, navigate to the “Plugins” section by hovering over it, and select “Add New.”
In the search bar, type “UpdraftPlus” and locate the UpdraftPlus WordPress Backup Plugin. Click “Install Now,” once the installation finishes, activate the plugin.
You can choose to go through the introductory tour or skip it if you don’t intend to use the plugin further or if it doesn’t suit your needs.
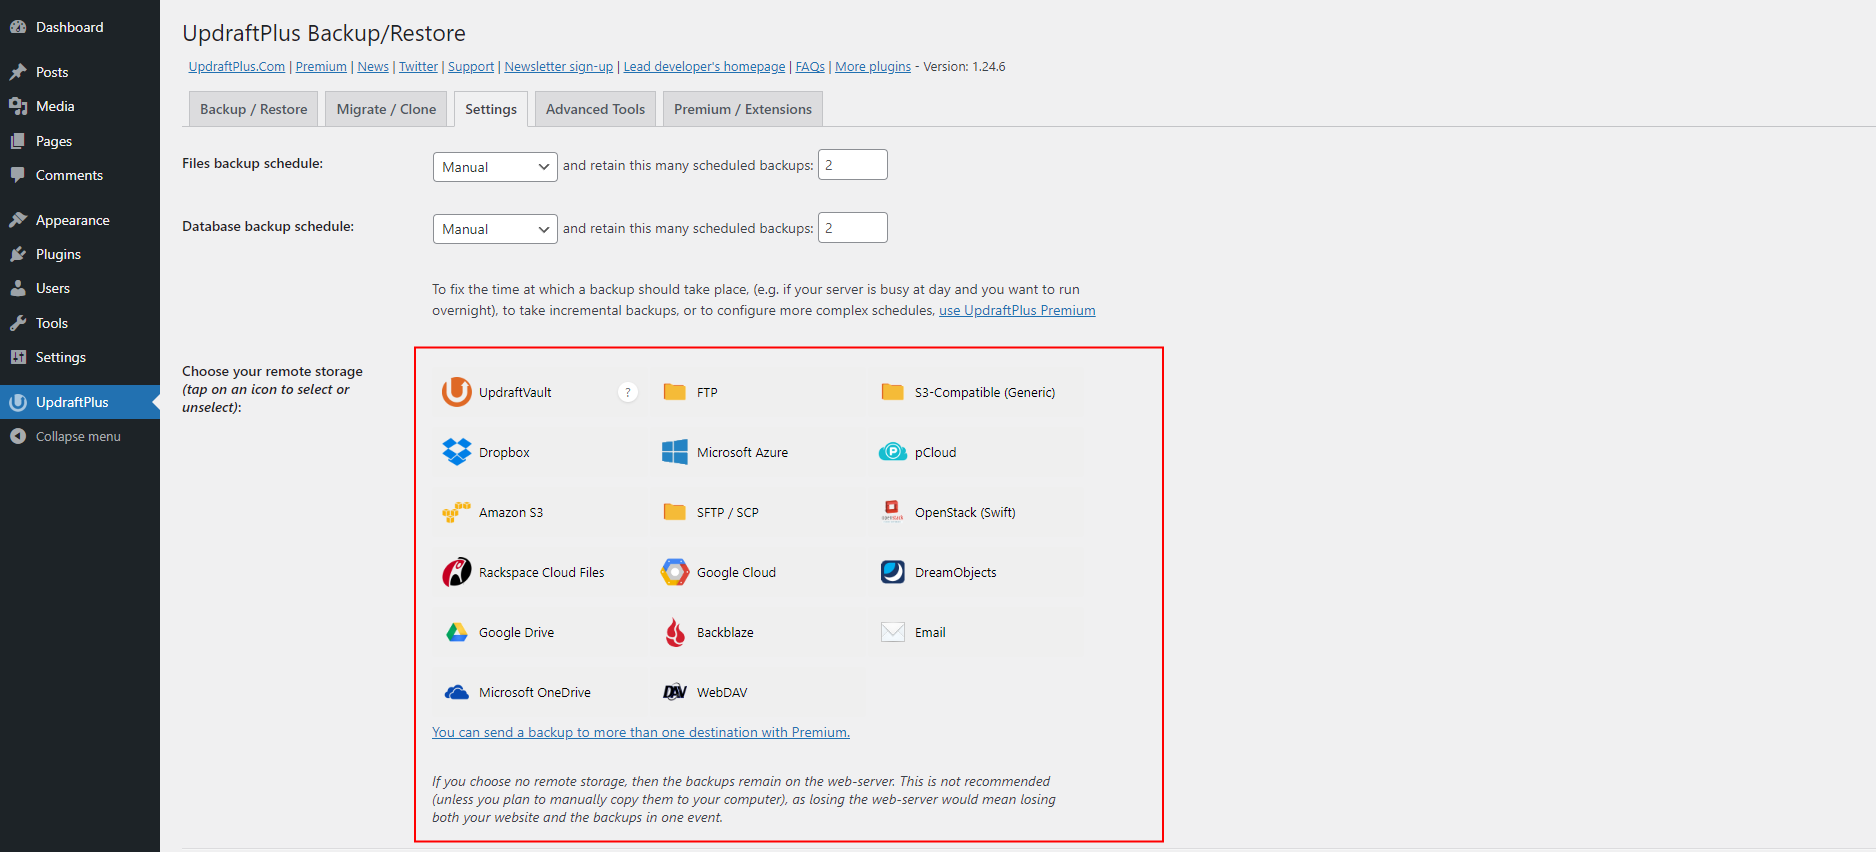
After activation, go to Settings > UpdraftPlus Backups to access the UpdraftPlus settings. Scroll to the “Choose your remote storage” section, select your preferred remote storage option, and follow the steps to set it up. Ignore this step if you don’t want to use one.
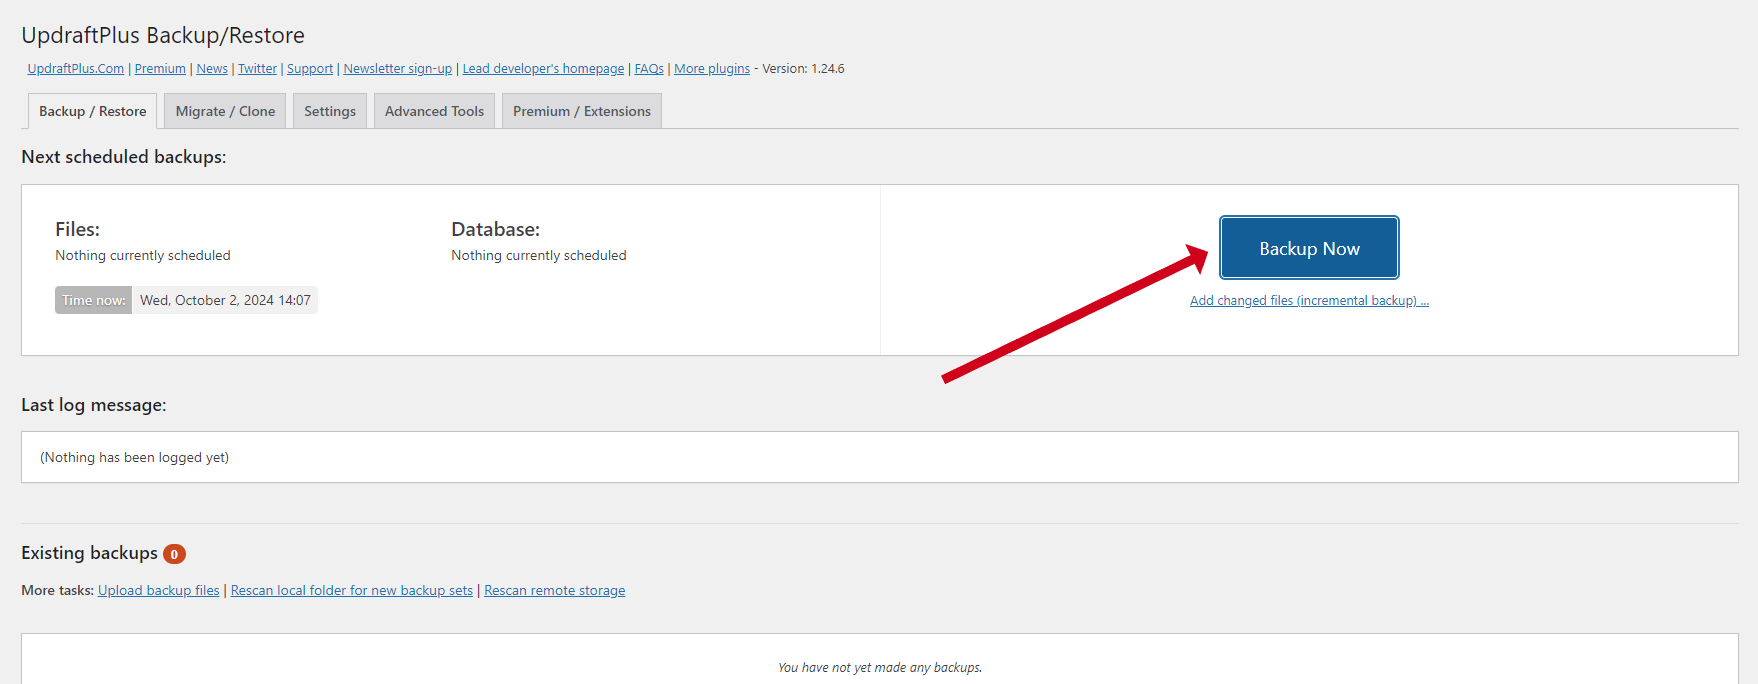
Once the process is complete, go to the Backup/Restore tab, click on the prominent “Backup Now” button, check all boxes, and click on the Backup Now button again.
Wait for the backup to run its course. If you are not using the remote storage option, scroll down, find the backup just created, and individually click on the backed-up components to download their zip files. Keep these files ready.
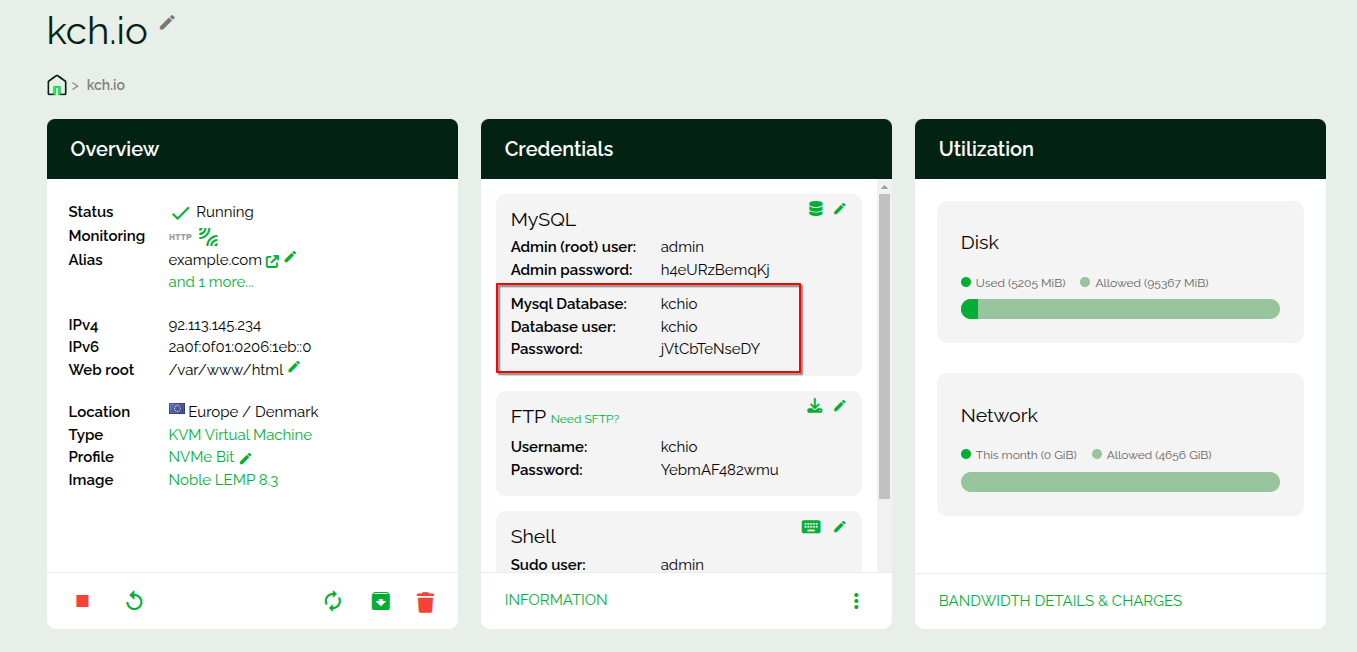
Now, choose any €/$5.99+ server or build your own profile to match the price and deploy the server on Webdock.
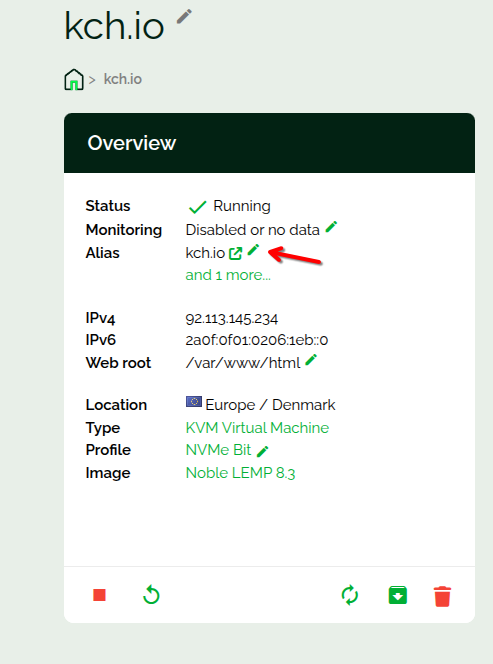
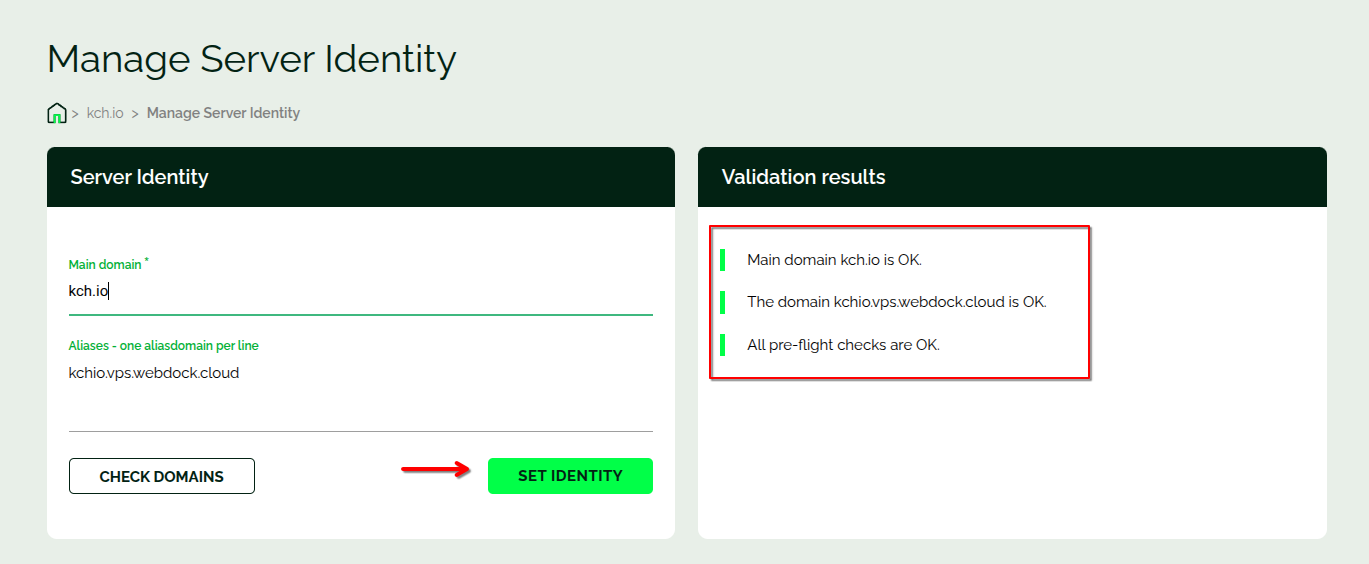
Once deployed, point your domain to the server’s IP using an A or CNAME record. Then, on your server’s dashboard on Webdock, under the Overview tab, click on the little pencil icon beside the Alias text
Add your website’s primary domain to the main domain column. Just click on the Check Domain button to ensure that the DNS has already been propagated.
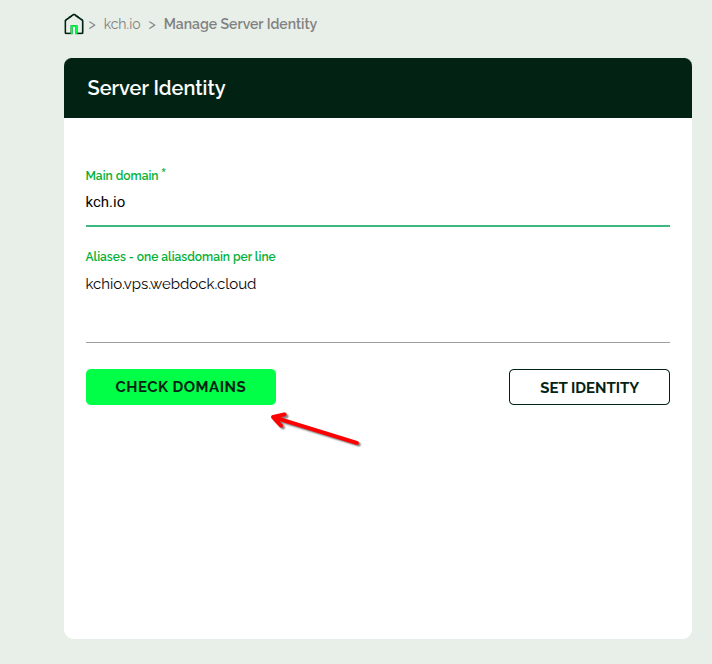
If everything is set up correctly, you’ll get an OK message. If so, go ahead and click on the Set Identity button. The process might take 3-4 minutes.

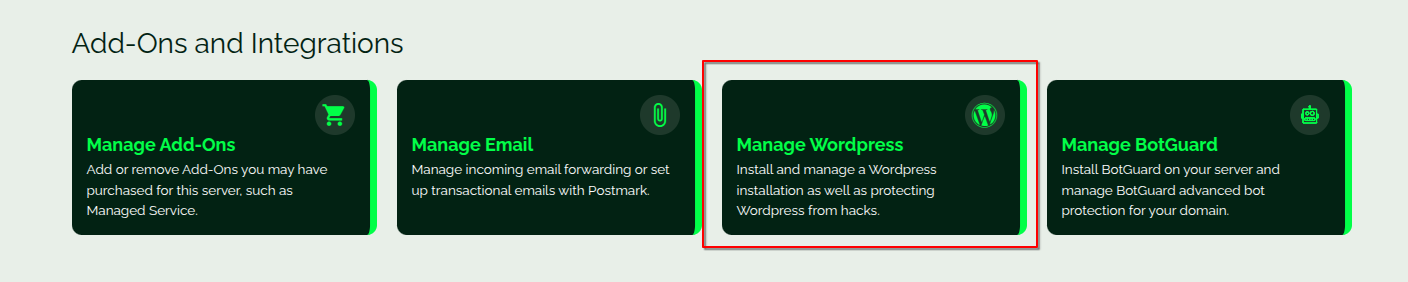
Go back to your server’s overview, scroll down, and find the Manage WordPress option.
You’ll be prompted to install WP-CLI on your server. Go ahead and install it by clicking on the button. Once the WP-CLI is installed, click on the Install WordPress Now button. You’ll be presented with all the necessary fields, such as admin email, domain, path, database, etc. For most cases, the default here will be good enough.
You won’t be presented with an option to set up an admin password as Webdock auto-generates it for you.
Once WordPress is installed, log in to your dashboard, install UpdraftPlus (or other backup plugins), and connect your storage again.
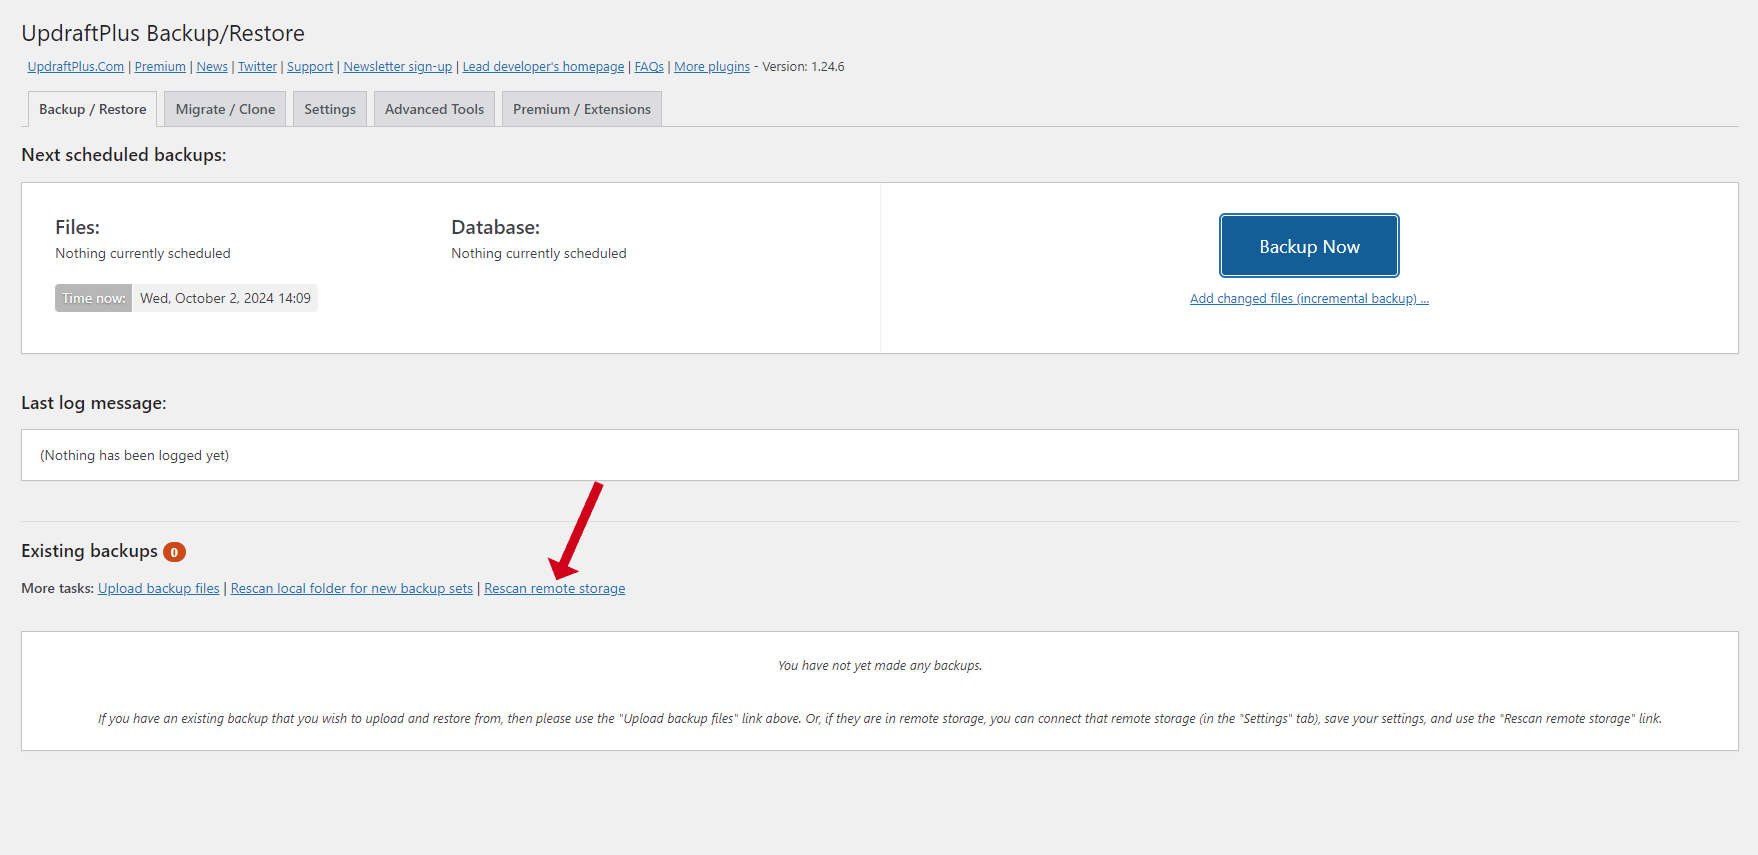
Navigate back to the Backup/Restore section. In the “Existing Backups” area, you might see a message stating, “You have not yet made any backups.” If so, click the Rescan Remote Storage button. UpdraftPlus will automatically search for and display any available backups it finds.
If you aren’t using remote storage, you can manually add backup files by dragging and dropping them into the area labeled “You have not yet made any backups.”
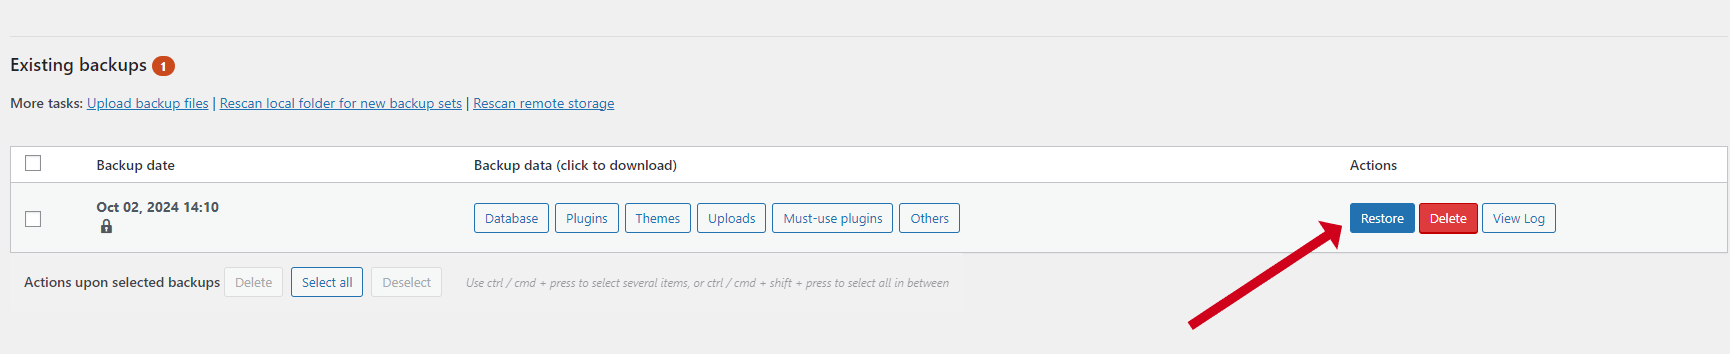
Once your backup from the CyberPanel website appears, the message “You have not yet made any backups” will be replaced. Click the Restore button to restore the files.
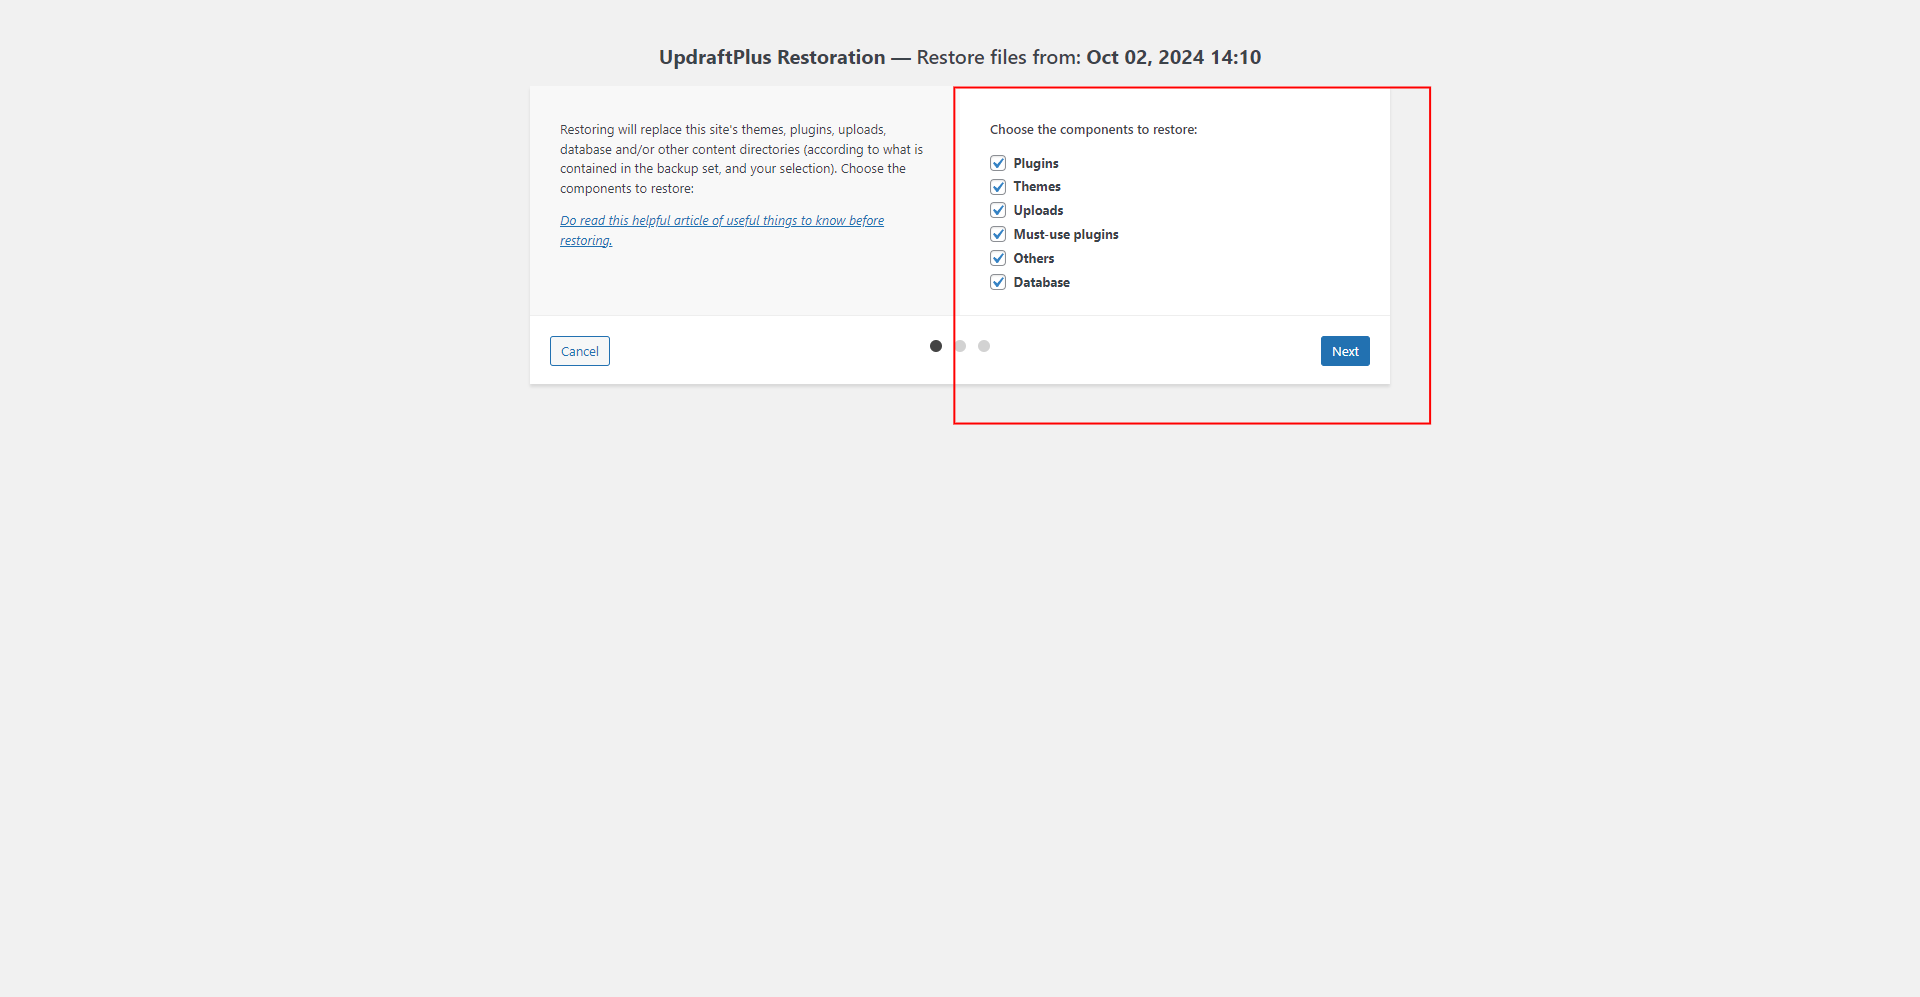
Select all options in the Choose the Components to Restore section and click Next. The plugin will begin downloading the necessary files.
After all files have been downloaded, click Next once more and wait for the restoration to finalize.
That’s all. Your WordPress website has now been moved from CyberPanel to Webdock. Verify if everything works well. If you were using the LS cache plugin, you can go ahead and remove this from the site as well, as it requires LiteSpeed/OpenLiteSpeed to work (unless your Webdock server is running OLS/LiteSpeed).
You should clear the caches once if you’re using another cache plugin. Also, go to Settings > Permalinks and click on the Save Changes button once. Don’t make any changes; just click on save changes.
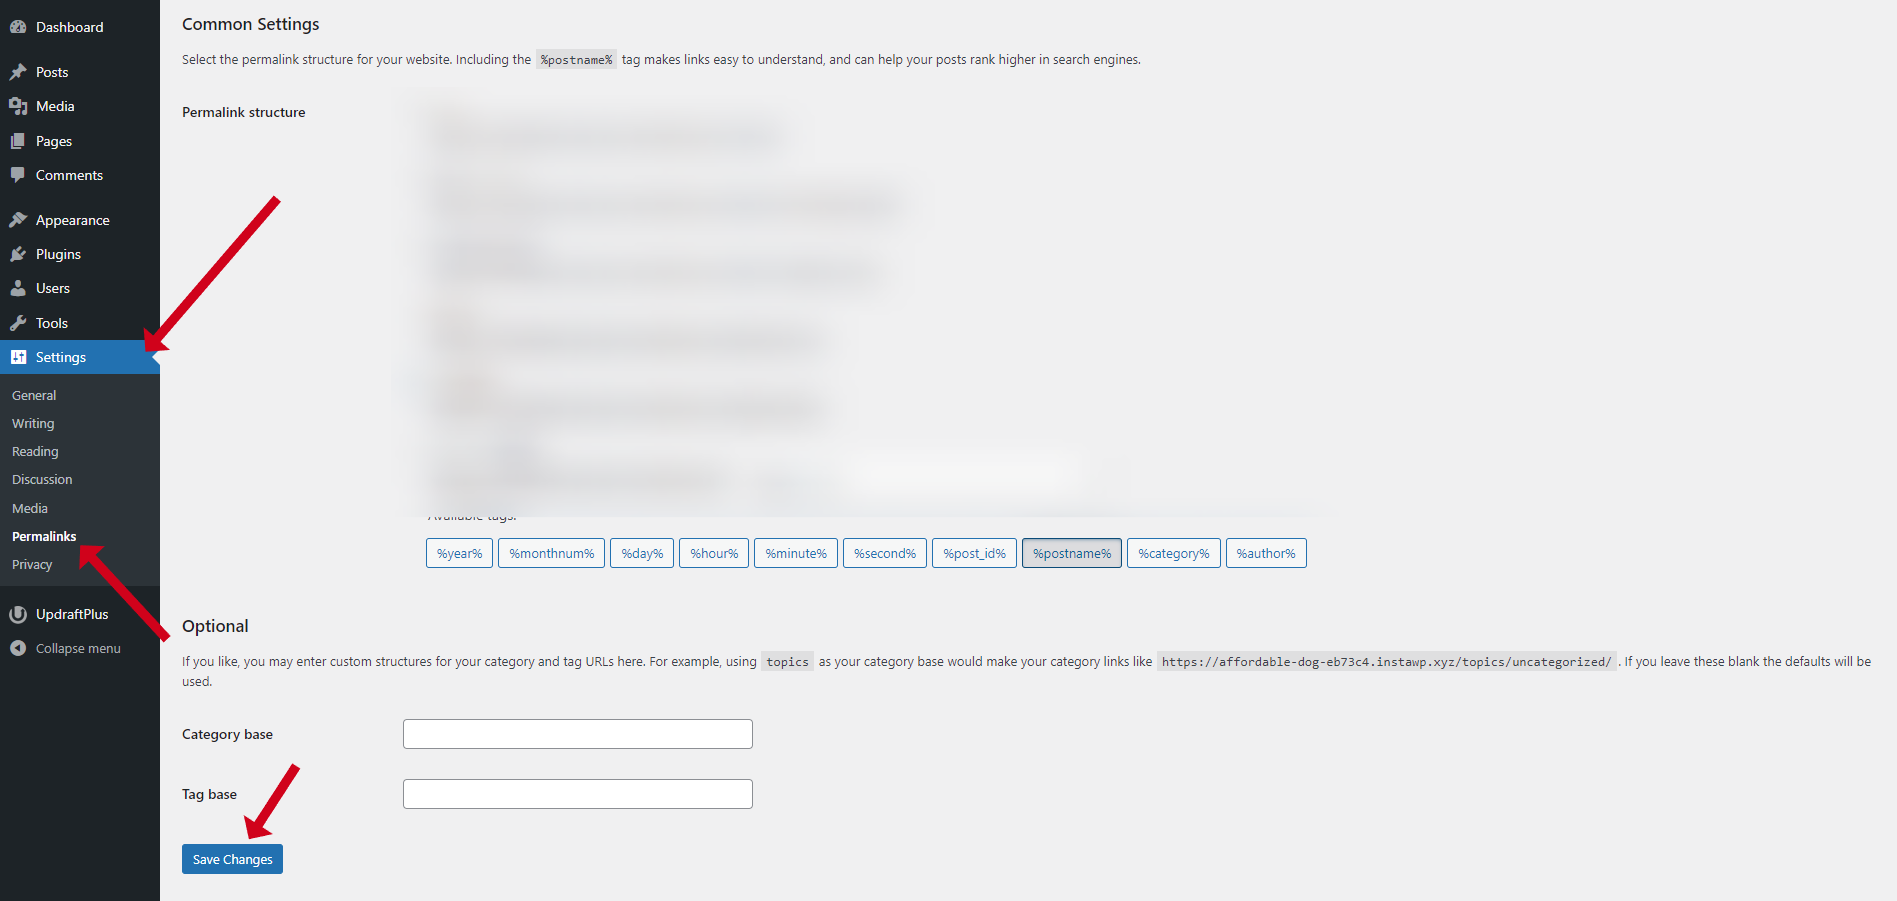
This will invalidate all permalink caches and generate new ones, which is essential if your website has changed the server environment.
Manually
The above method is easy to use, but you may experience various pitstops when using a third-party plugin, such as restrictions and paywalls. Whatever your reasoning, let’s look at how you can manually migrate your website from CyberPanel.
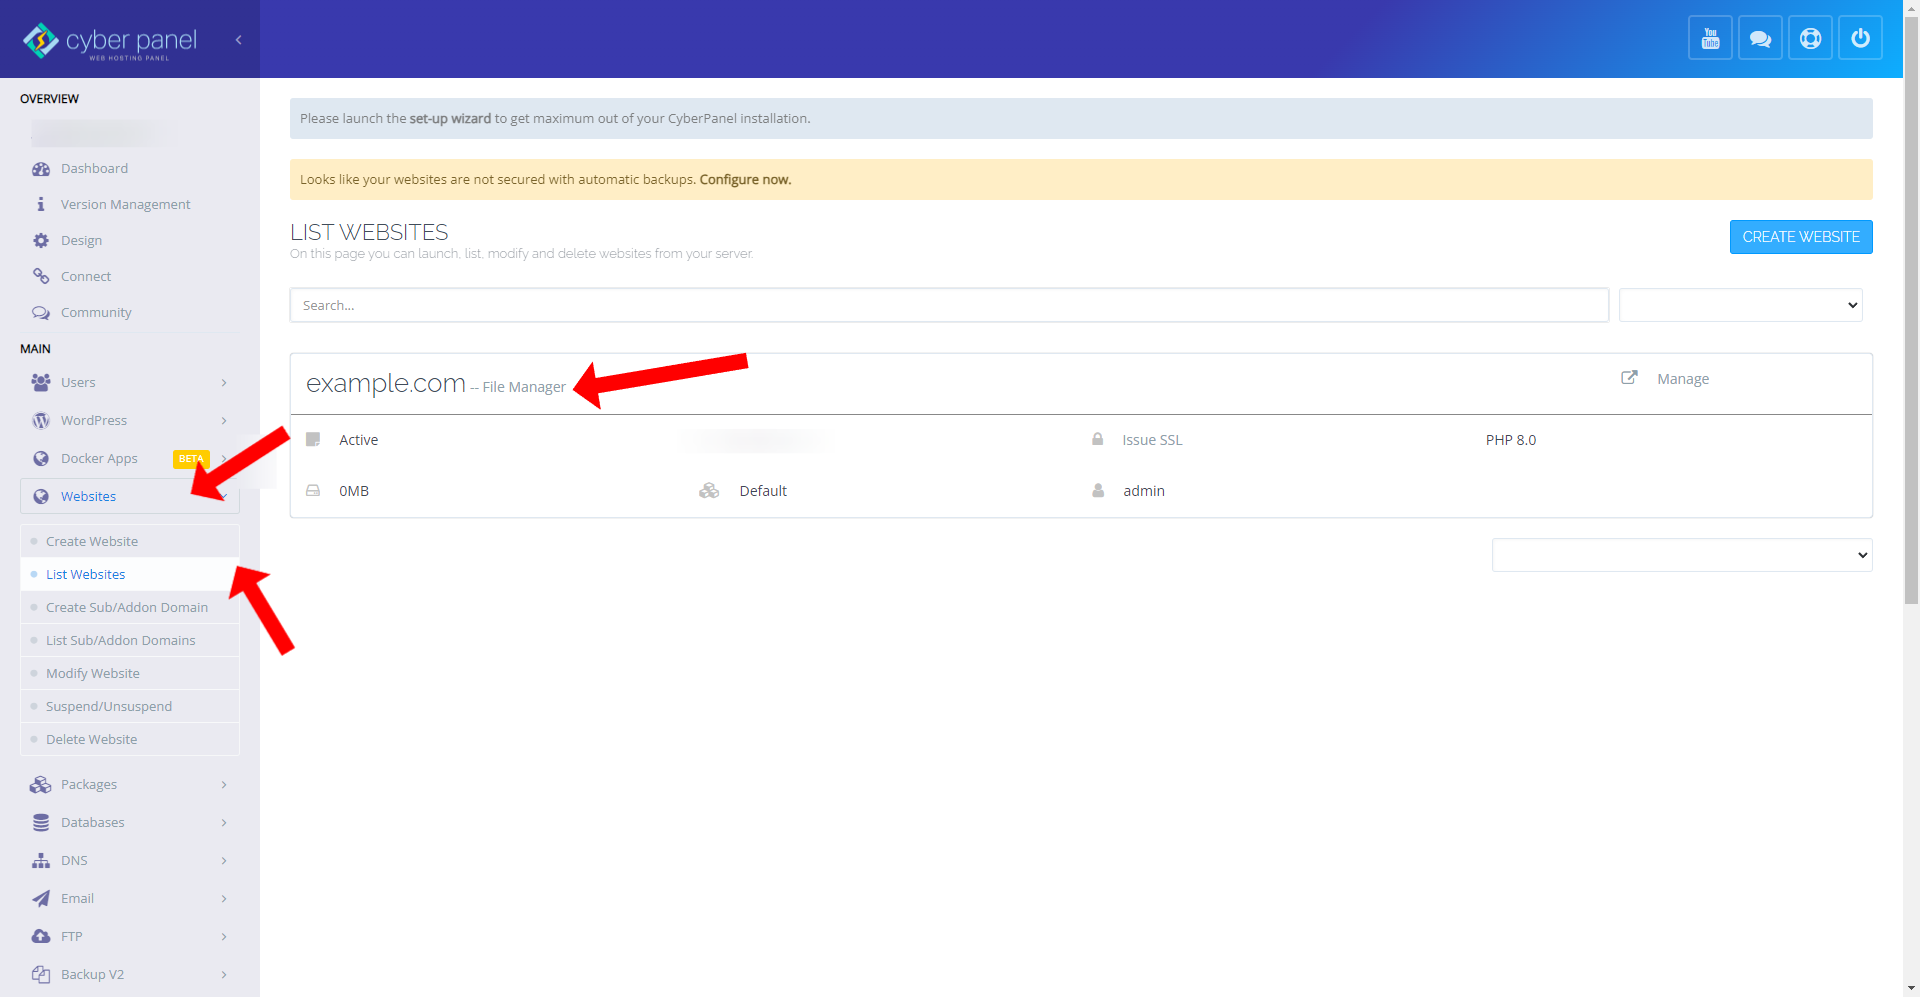
On your CyberPanel dashboard, go to Websites > List Websites and select the “File Manager” option beside the name of the website you want to migrate.
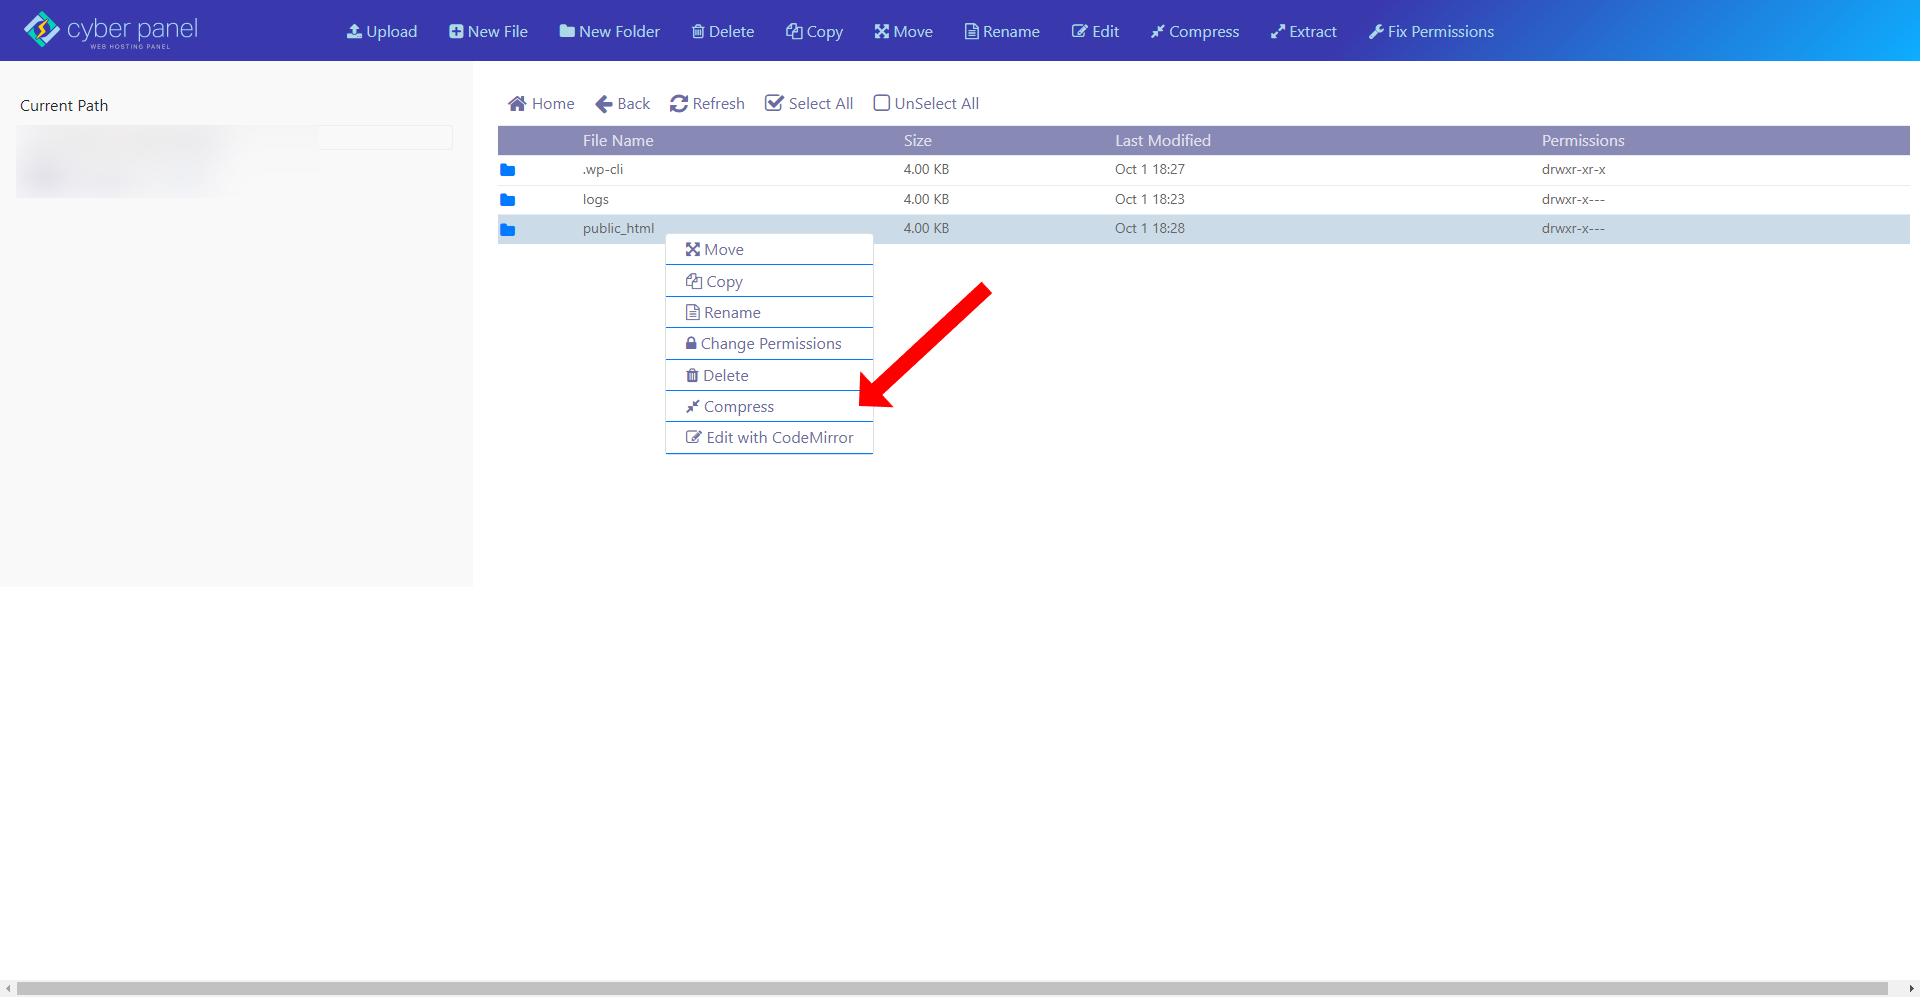
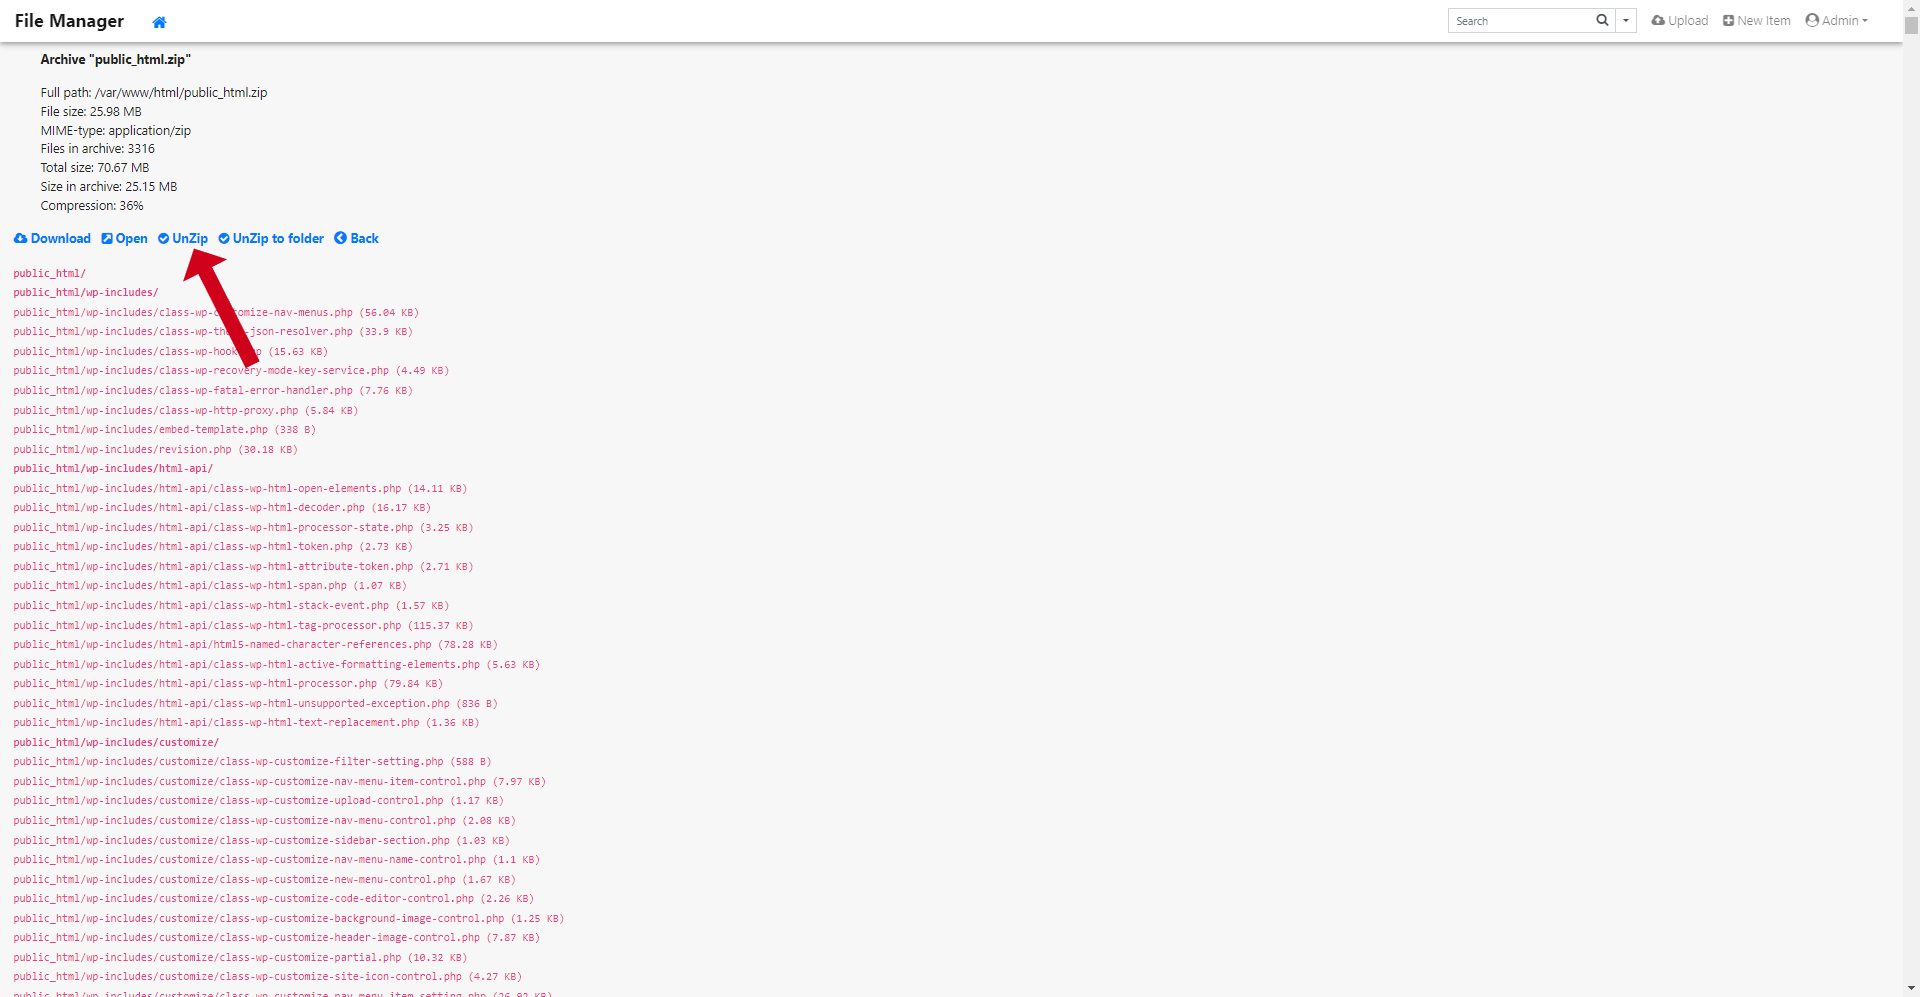
Then right-click on the public_html folder and select compress. You will be prompted to add a name to the file and select an extension. I suggest using the zip format for best compatibility.
Then, a new zip folder would be generated. Just right-click and download the said archive.
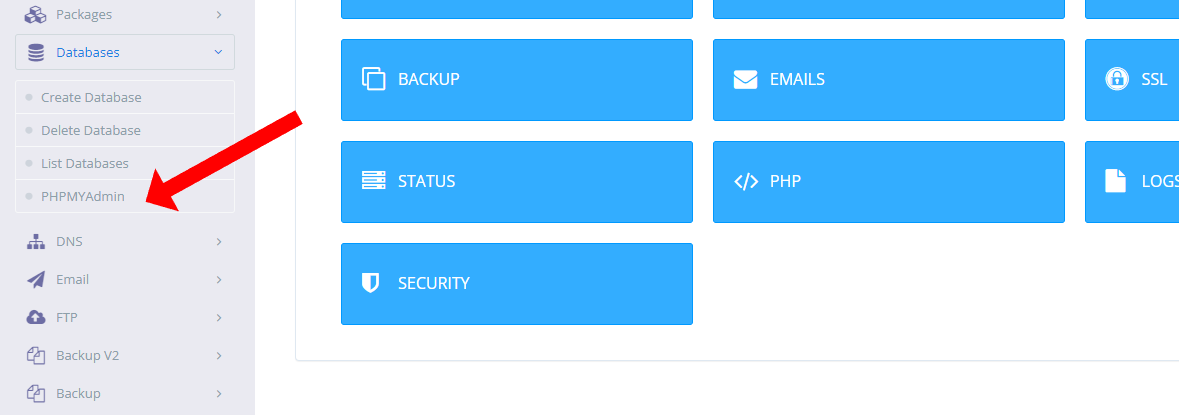
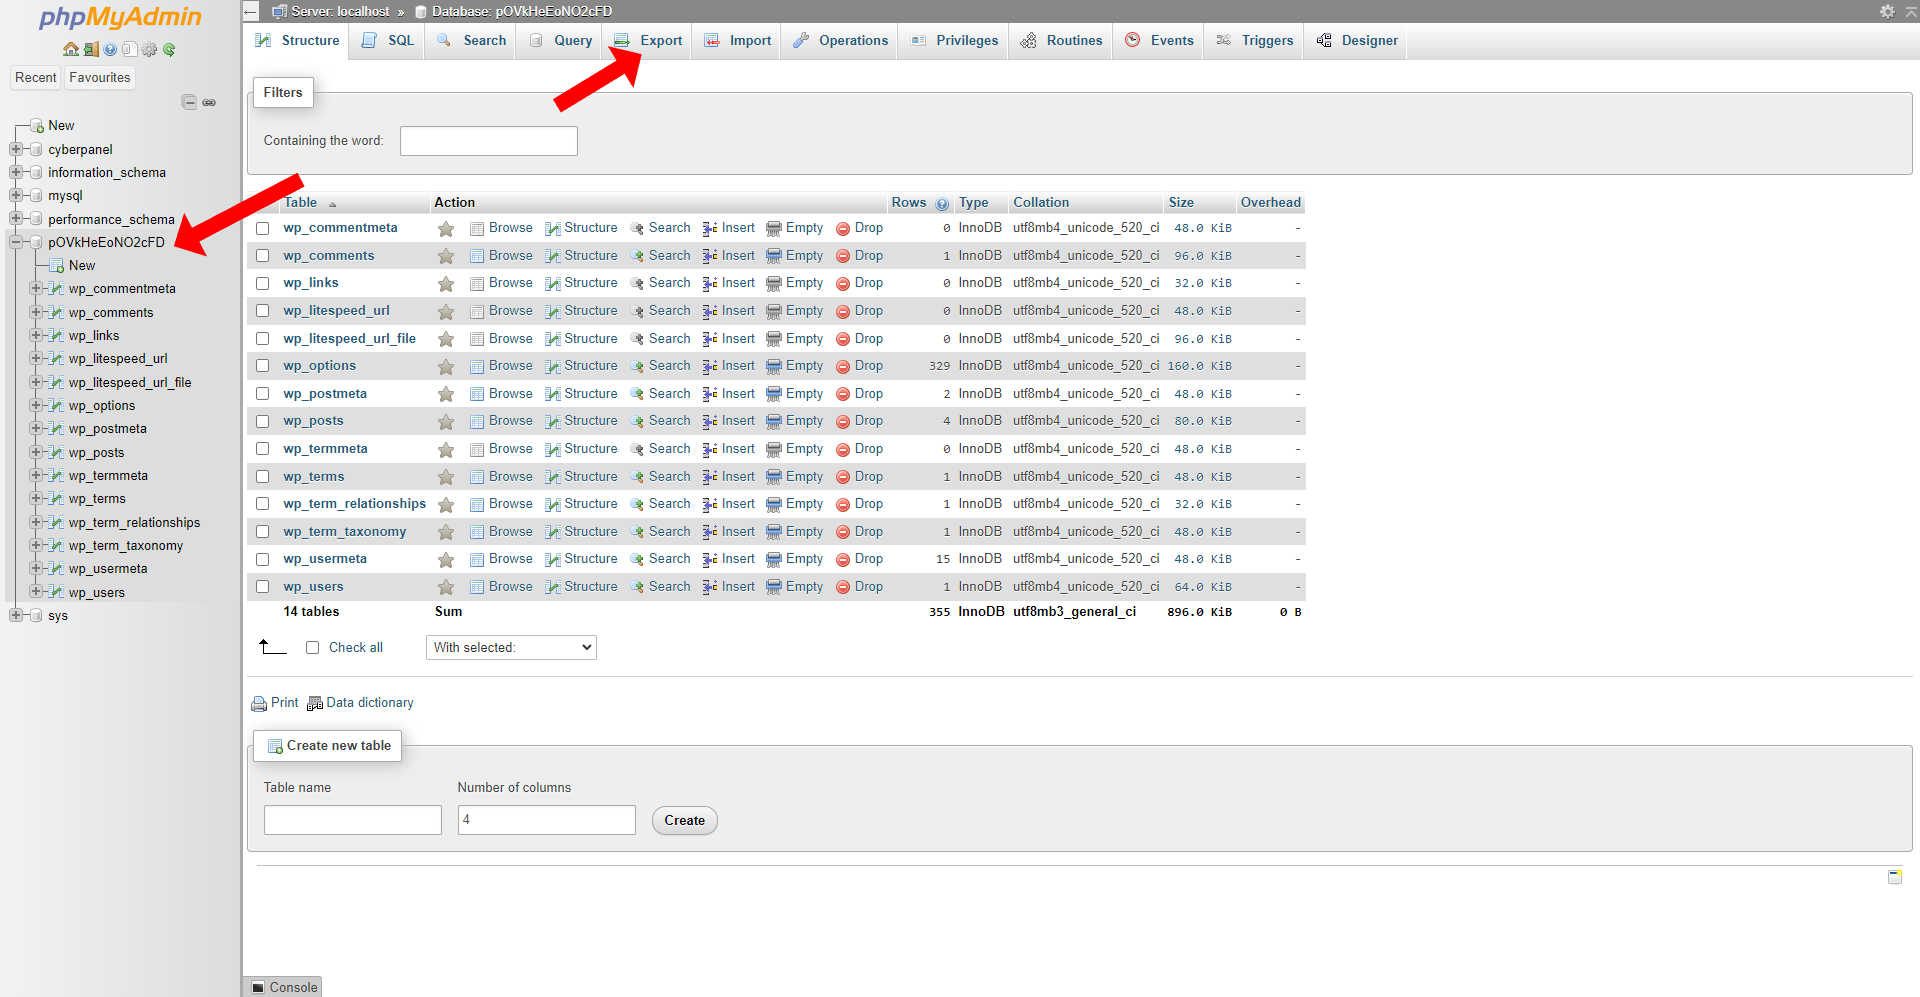
Once the file is downloaded, go to Database and PHPMyAdmin. Clicking on the option will auto login you to the console.
Then, find your website’s database. It would usually be a random string of characters. Following this, go to export and export it as an SQL file.
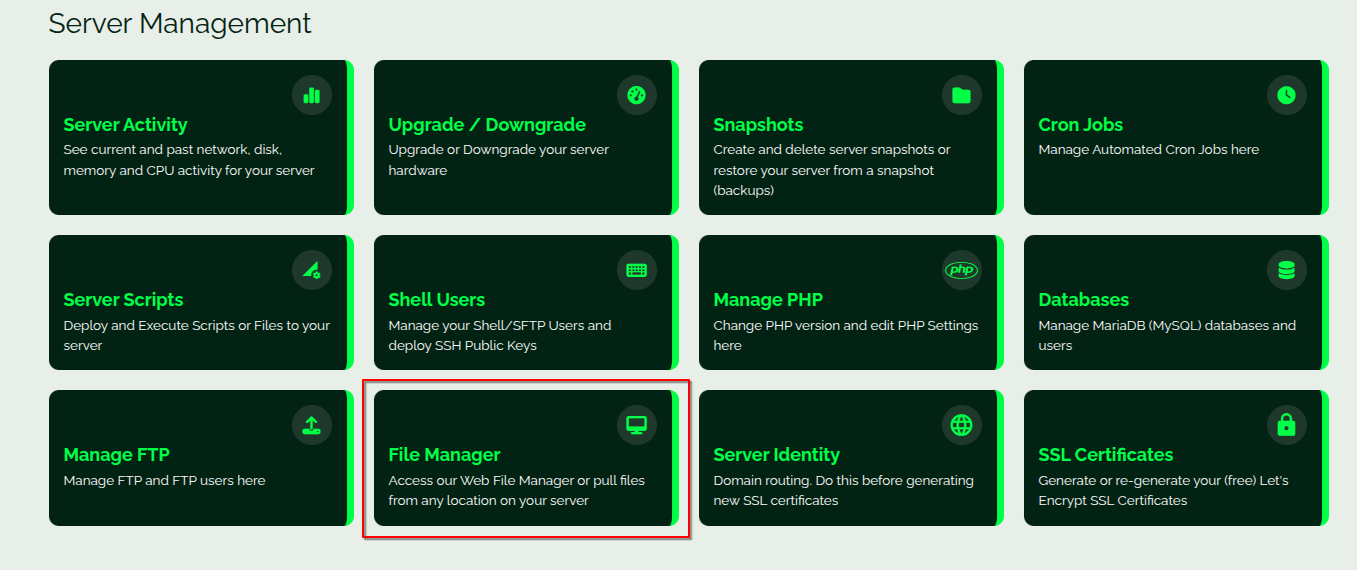
Now, go to Webdock and set up a €/$5.99+ server. You may select Apache or NGINX to be run under the hood. I recommend going with NGINX. As mentioned, if you want to use any options beyond these ones, feel free to install them on your VPS, but you might not be able to use WordPress Manager by Webdock.
Once set up, point your server’s IP to your domain using an A/CNAME record. DNS propagation sometimes takes time, so waiting for a few minutes is a good idea. Once you verify the DNS has propagated, install WordPress on your server, as shown in the previous method.
Once WordPress is installed, go ahead and install File Manager from the overview and log in.
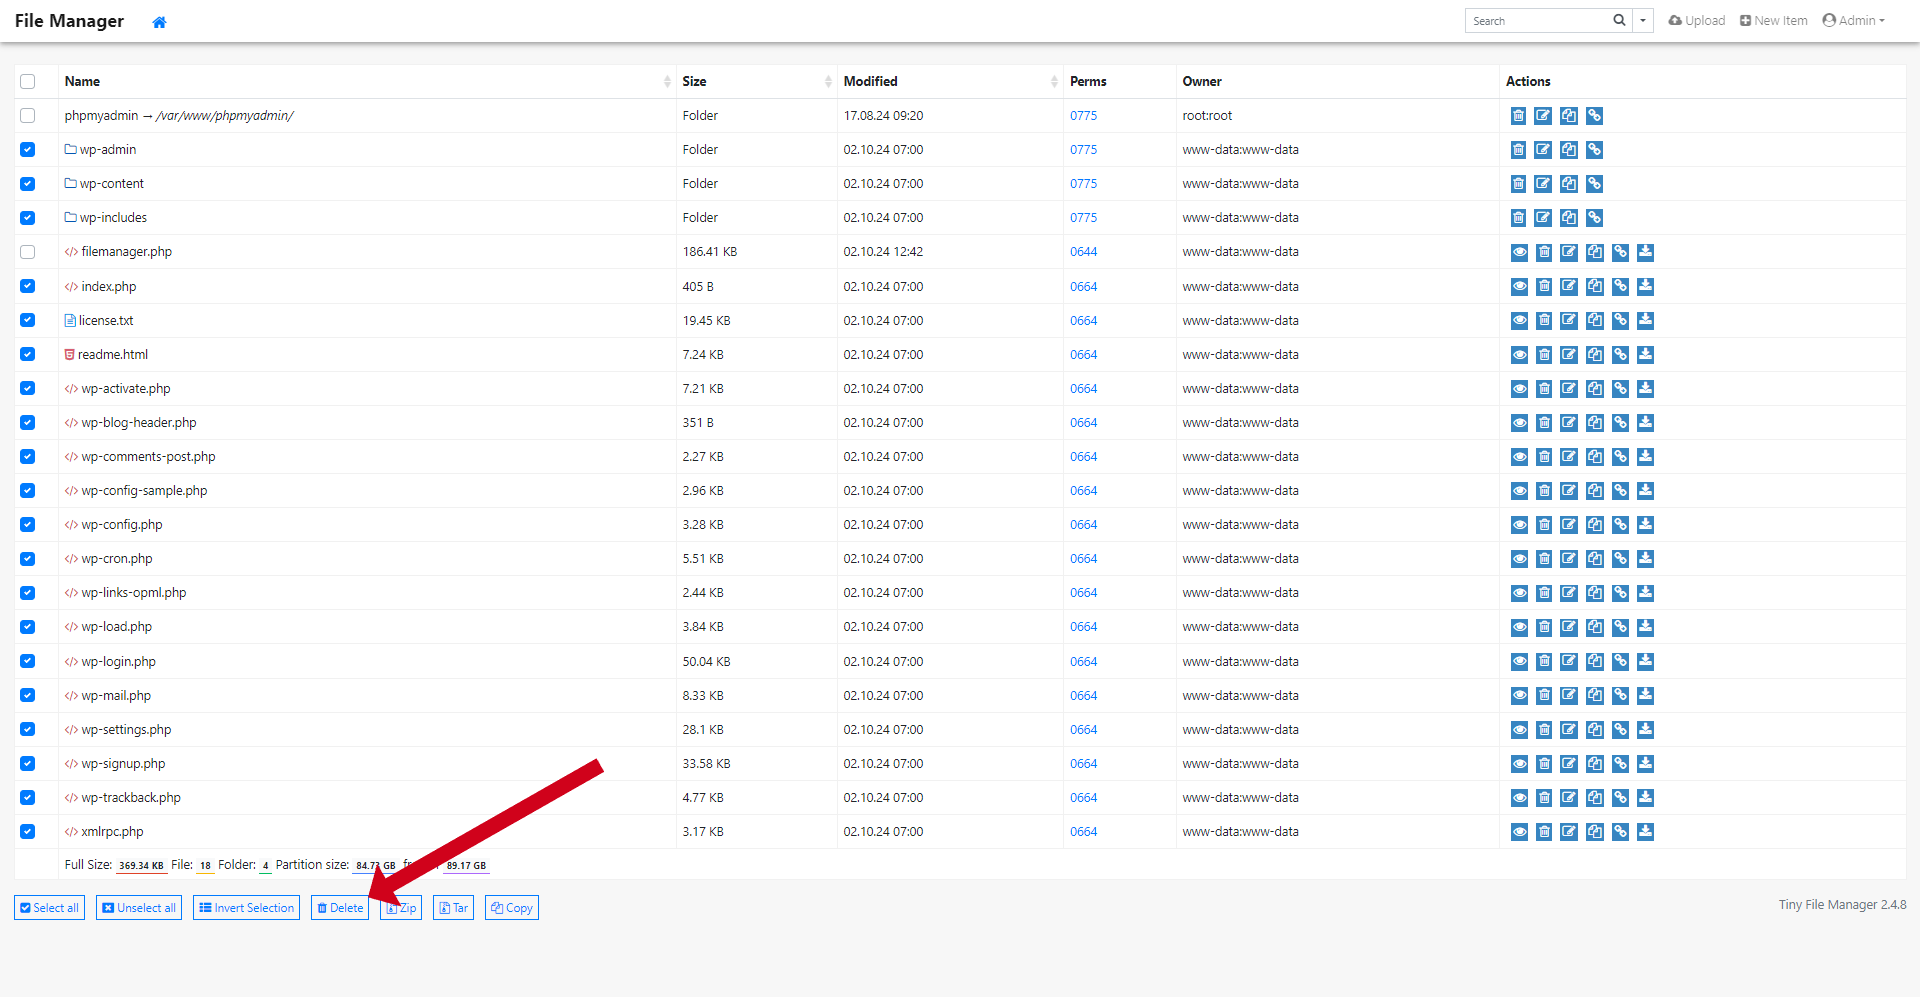
Once you’re in the file manager, select all files from the option below and uncheck the PHPMyAdmin folder as well as the filemanager.php file
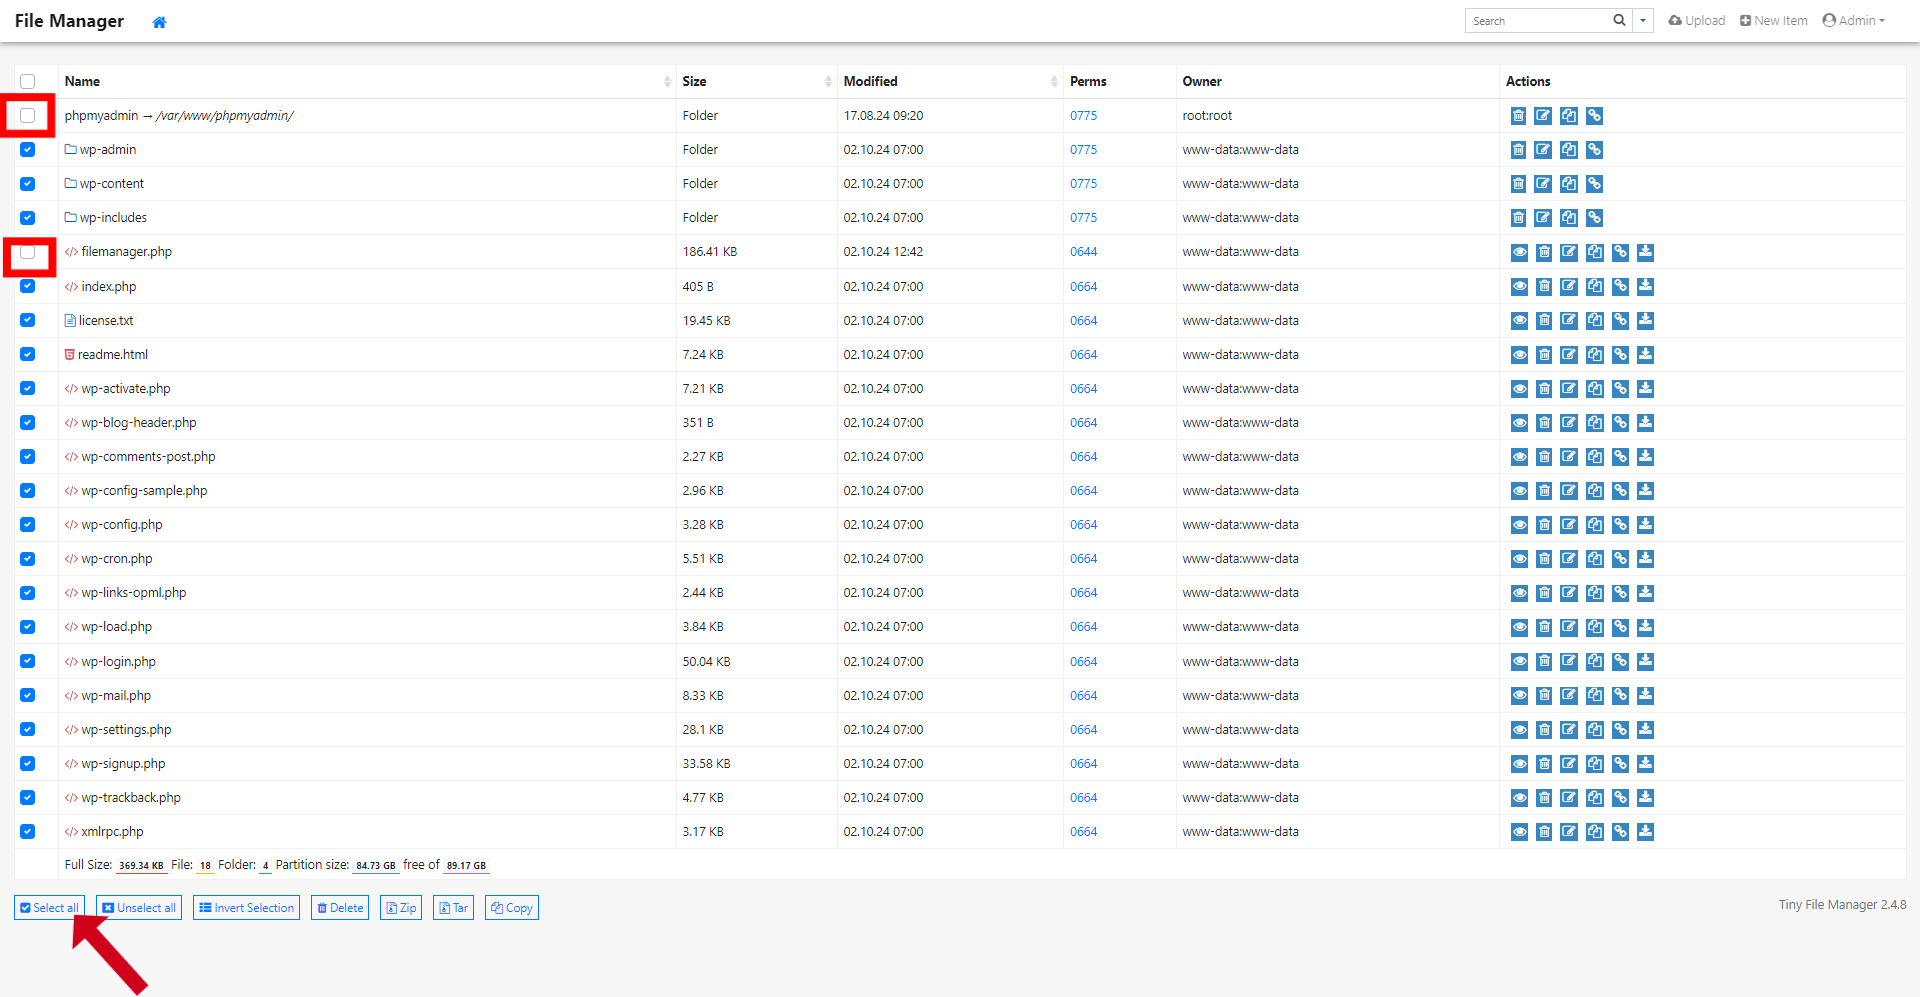
And delete the remaining files.
Now, go to the top right, click on the upload button, and upload the public_html zip downloaded from the CyberPanel dashboard, either by dragging and dropping it or manually selecting it from your computer.
Once the zip folder is uploaded, go back and click on the file to find an option to unzip.
Once unzipped, open the folder; you will find another folder with the name public_html. Open that folder and select all the files. Then click on the copy button.
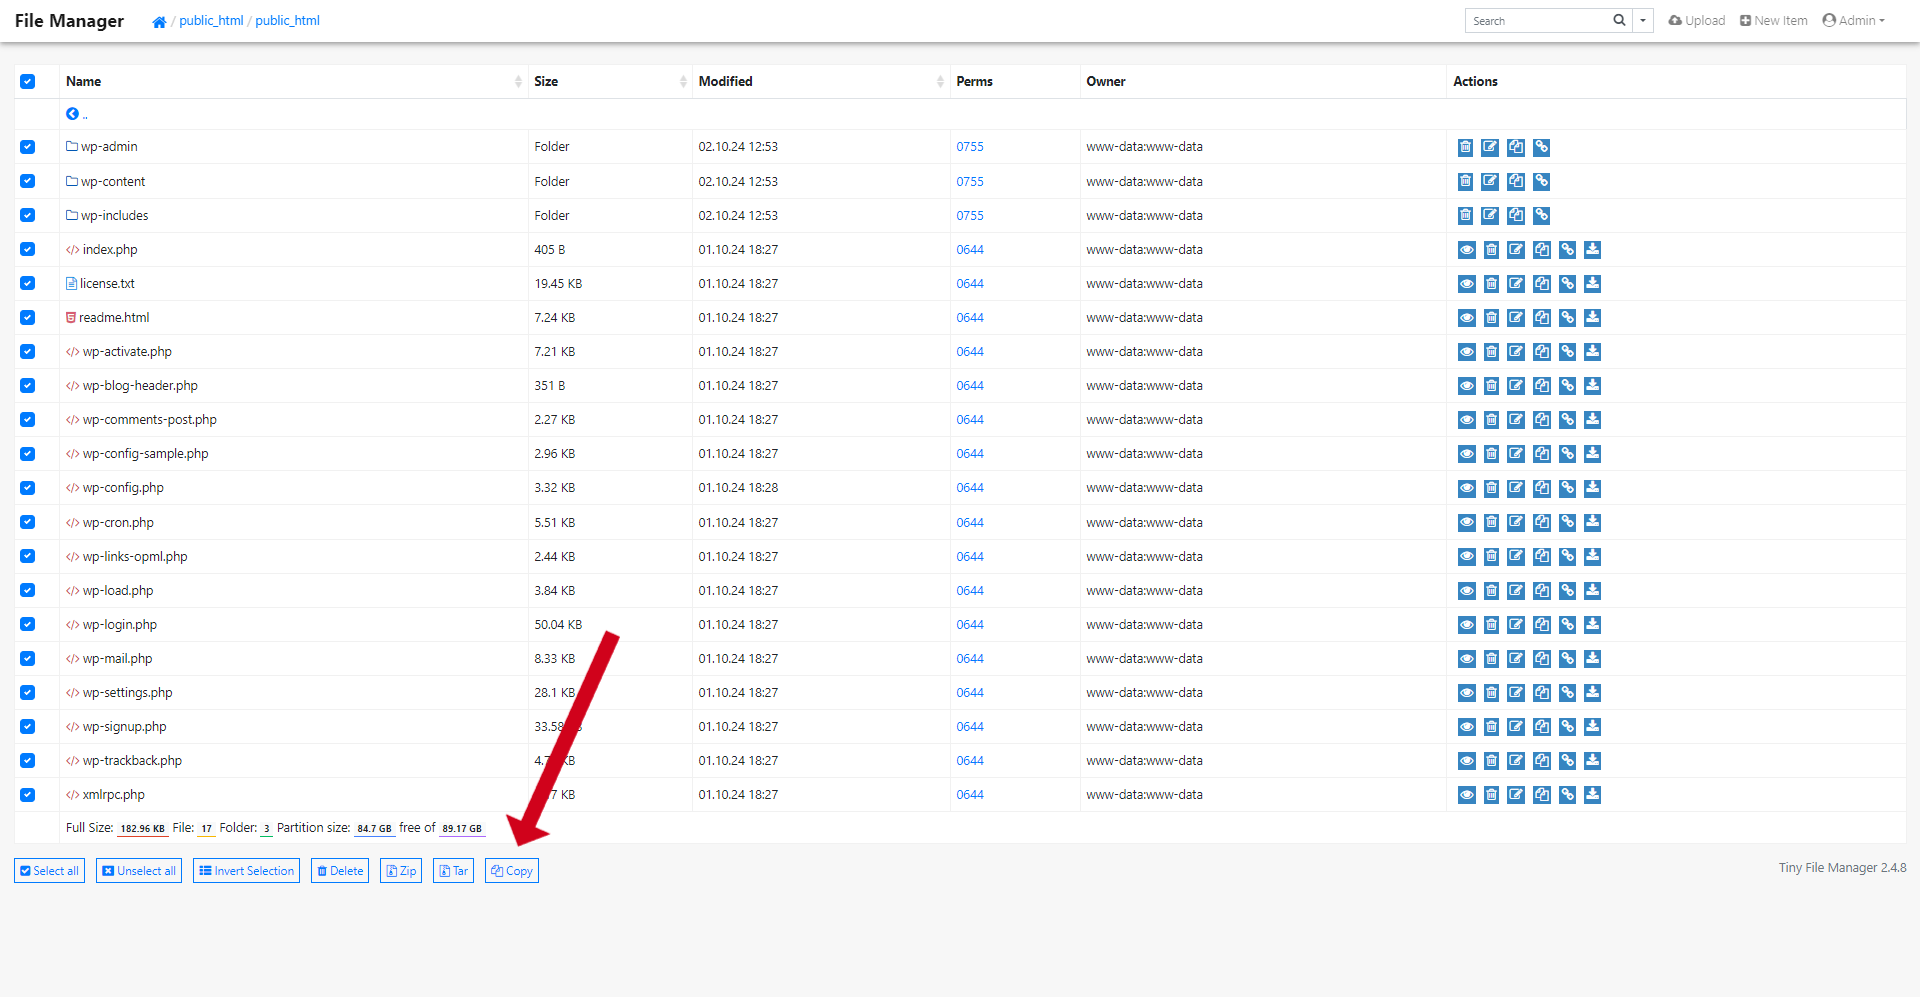
When the new screen opens, check the “Move” box and leave the path empty.
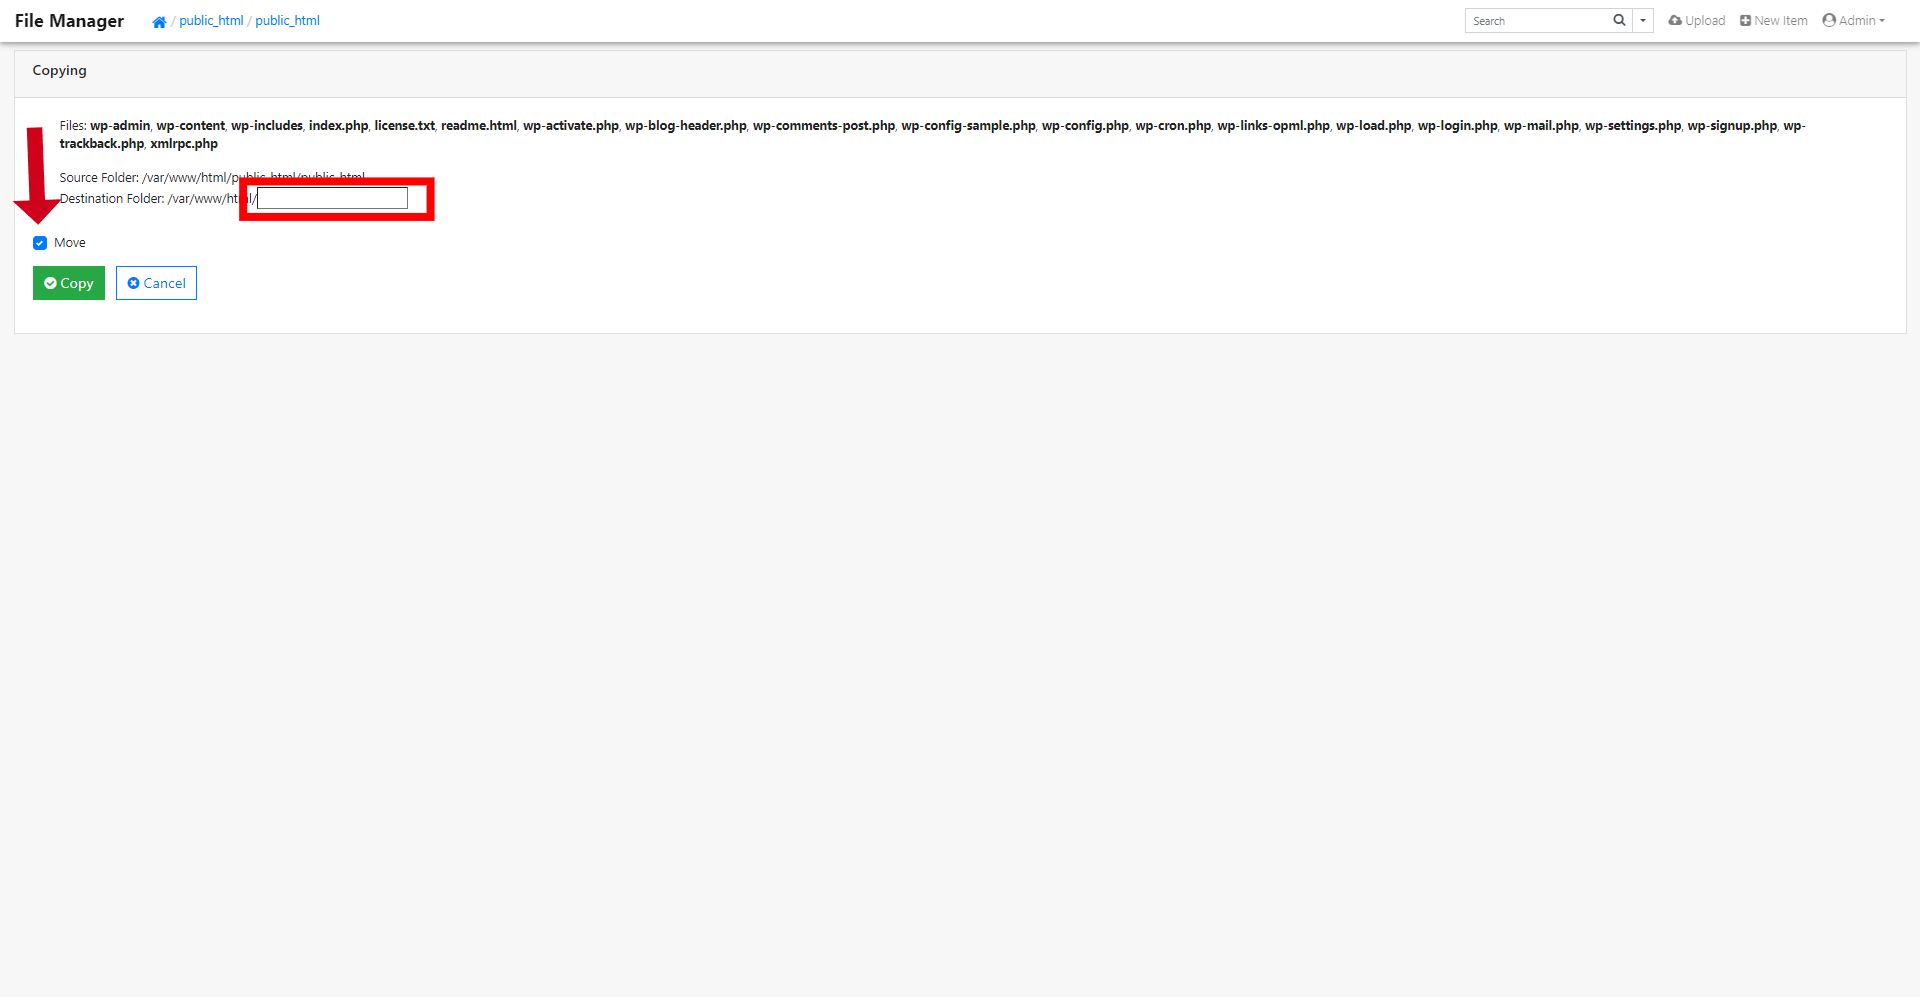
The files are now moved to the main directory; go ahead and delete the zip and the unzipped folder.
Open the wp-config.php file now, find the database details,
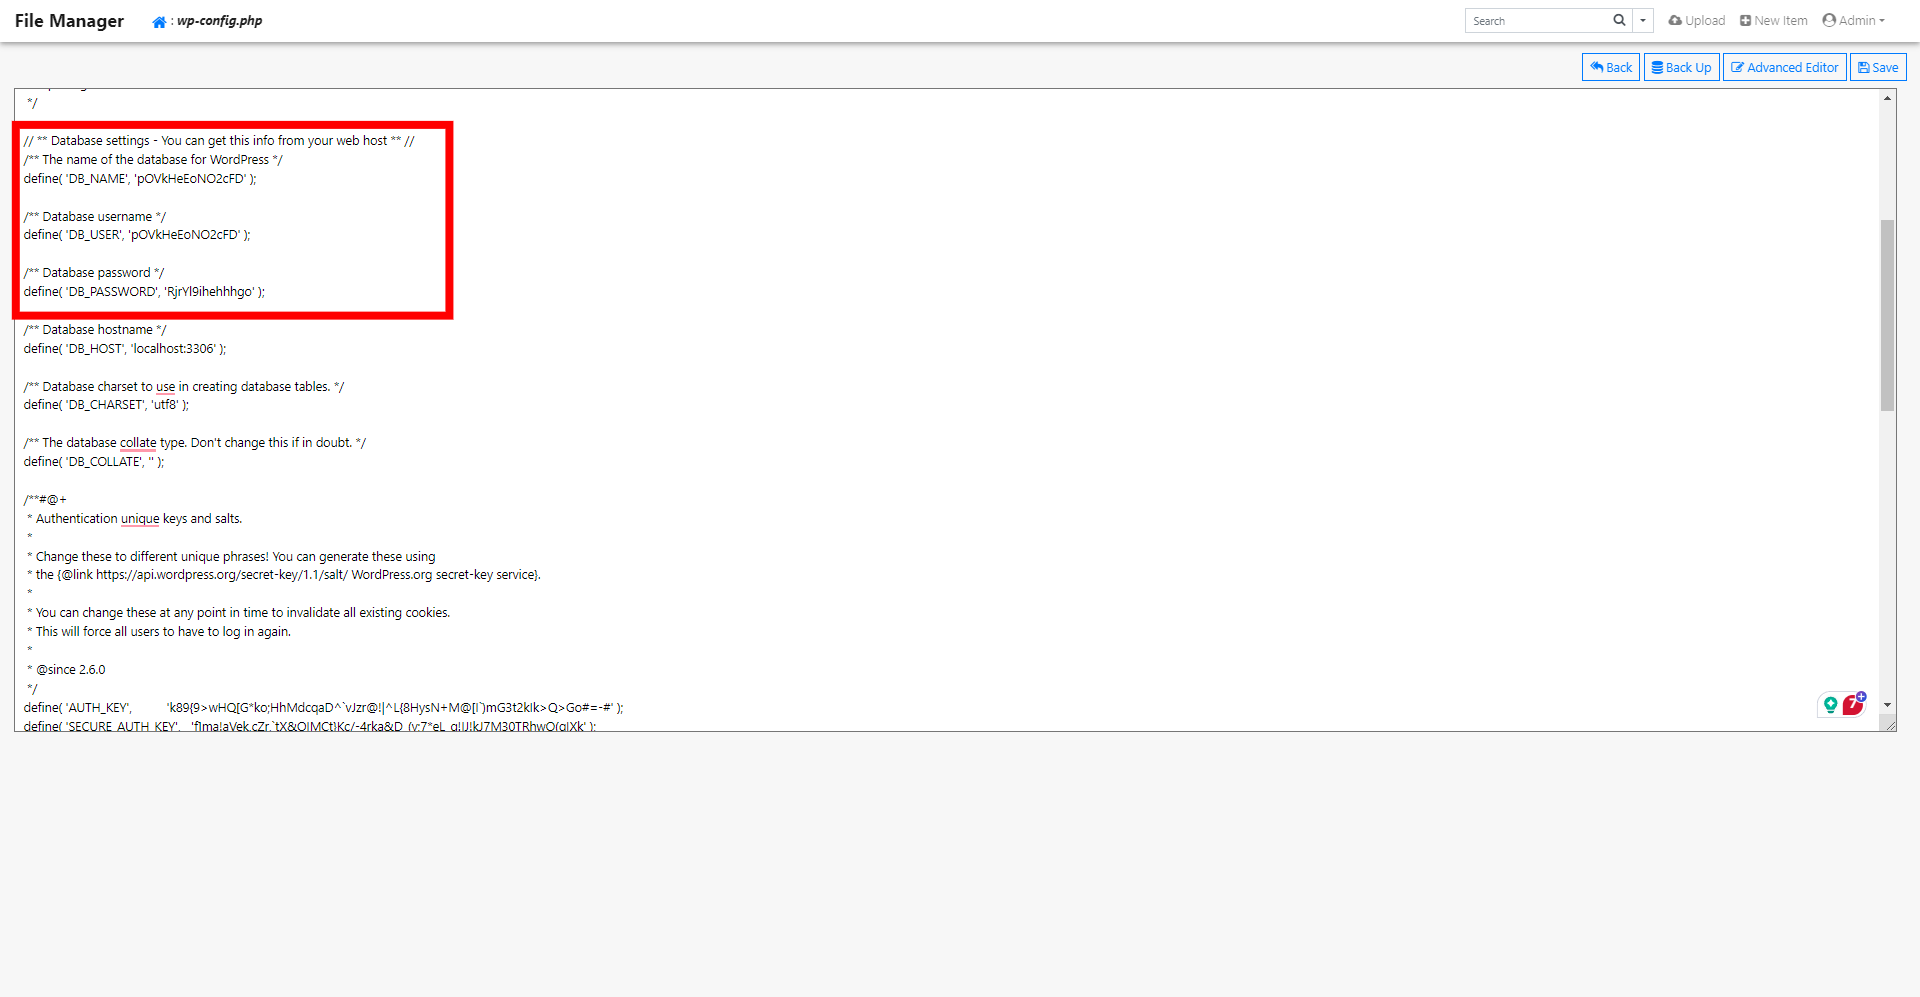
And replace it with the current details, which you can find on your server overview. Save the file once the details are updated.
Ensure you disable and remove the File Manager after completing your file tasks. Even though it is secured with a password, the File Manager can still pose a security threat. It’s best to get rid of it once you’re done. There’s a quick button to delete the file manager once you’re done in the same area where you enabled it.
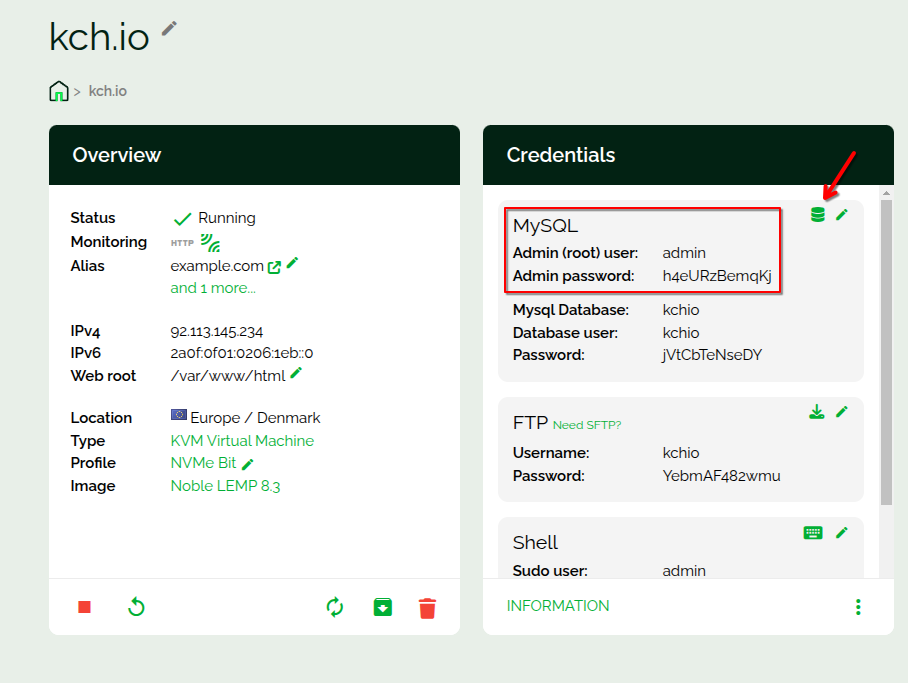
Now, log in to phpMyAdmin by clicking on the small database icon on the credentials tab and add the Admin username and password when prompted.
Find your WordPress website’s database, select all tables, and drop (delete) them.

And go to the import tab.
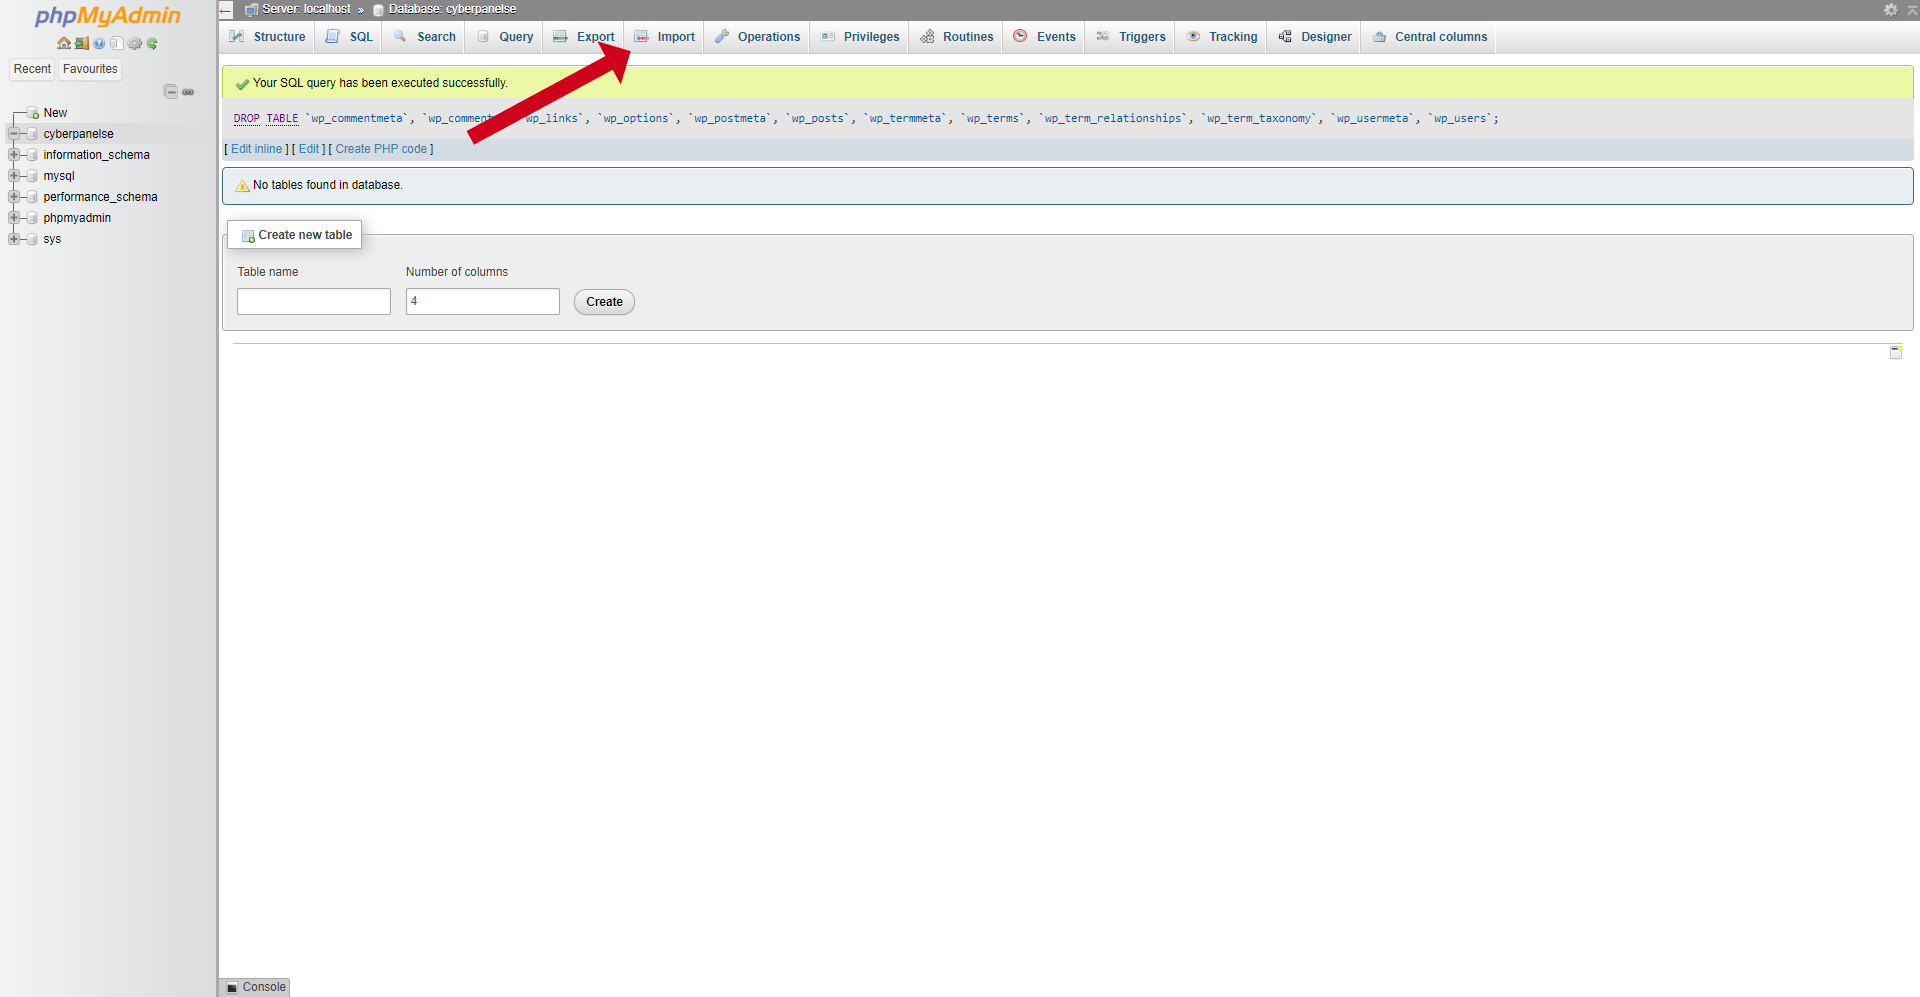
Here, too, you can drag and drop the .sql file we downloaded from the CyberPanel dashboard or manually select it from your machine. This uploaded SQL file will add all the necessary data.
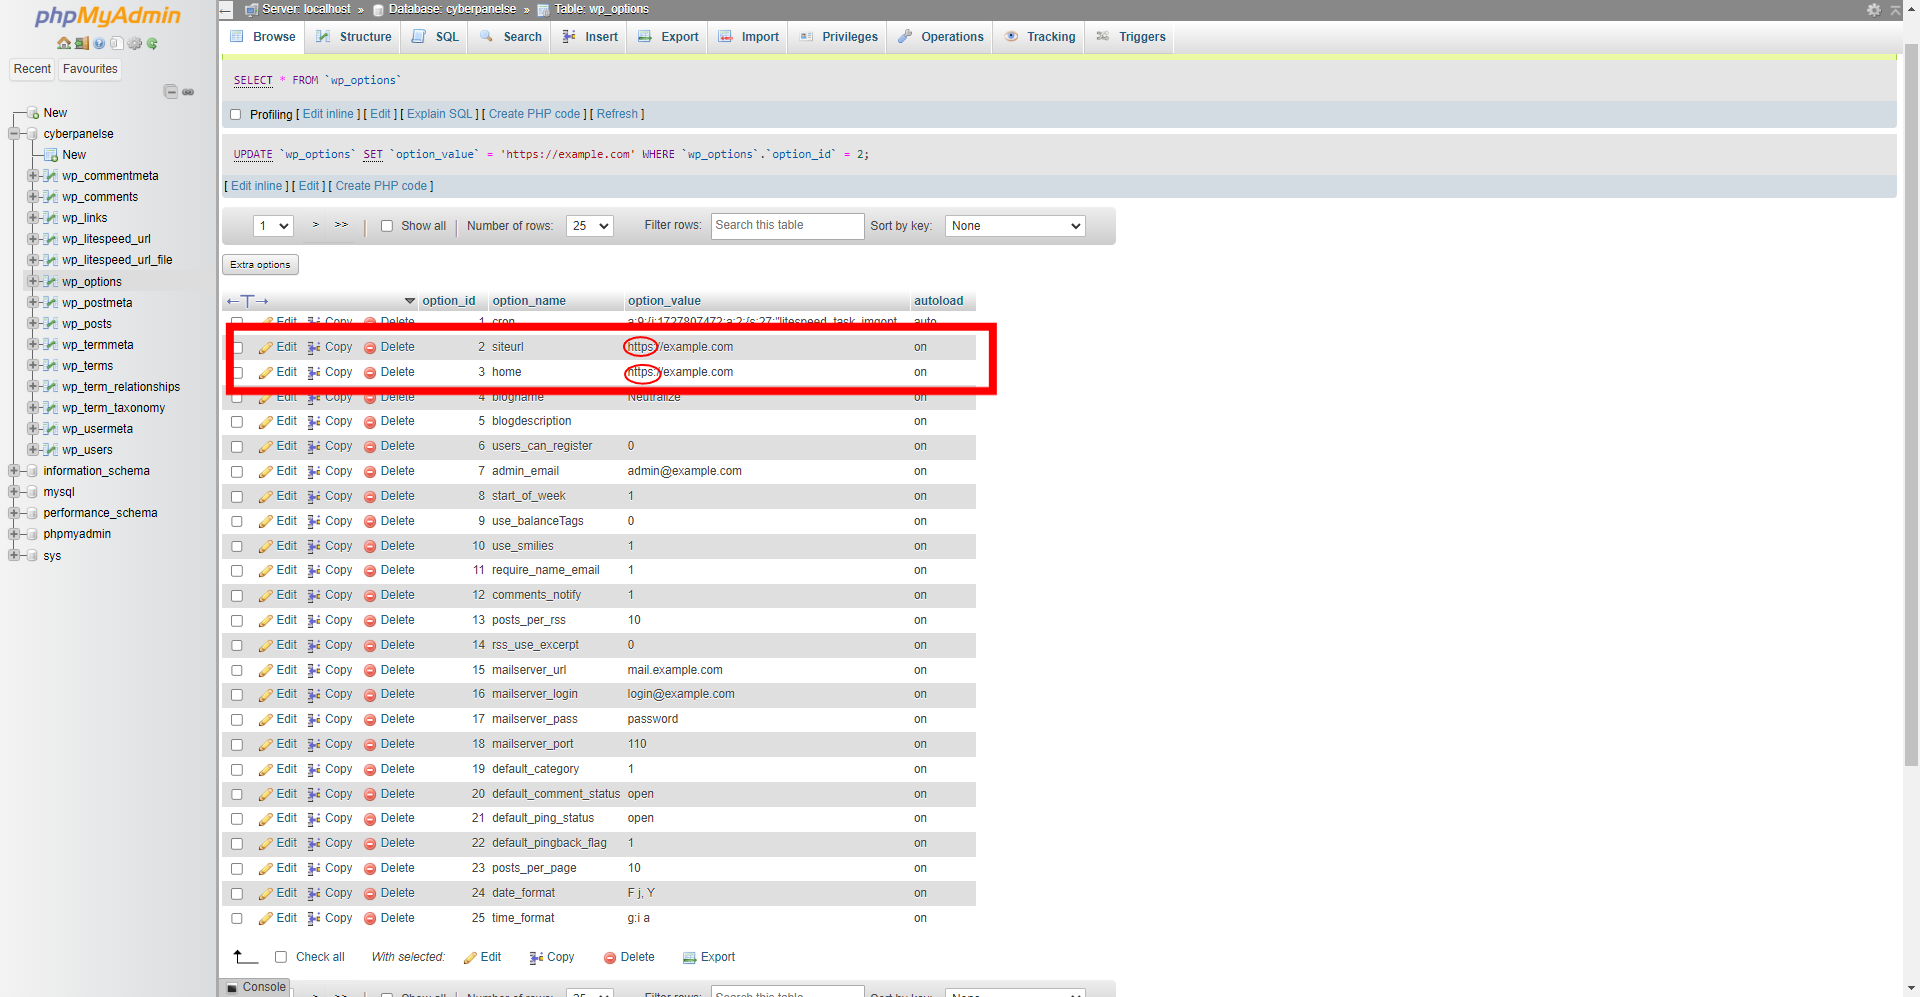
Now, in the structure tab, select tables “wp_litespeed_url” and “wp_litespeed_url_file” and drop them (unless you’re installing the site on a LiteSpeed/OLS setup).
Click on the “wp_options” to open the table and ensure that the siteurl and home option_names have the https:// version of your URL. For some reason, CyberPanel doesn’t add this data itself, which can cause issues before we go live, so you may have to edit it yourself.
Head back to your server overview and then to Alias, as mentioned before, and set the domains again.
This will regenerate the SSL certificates and prevent any errors. Now, go to your site URL and verify that everything is working.
Similarly, you should delete the LS Cache plugin, as it is pretty useless if you use an NGINX or Apache setup. If you’re using any other caching solution, clearing the caches and flushing your permalinks, as shown in the previous method, is a good idea, too.
That’s all! You were able to move your site manually from CyberPanel to Webdock. While not as convenient as using a plugin, it can still be helpful as a free alternative to using a paid/freemium plugin.
Avoiding Downtime
As you may have guessed by now, depending on the size of your website, using either of the methods will result in downtime during migration. So, as a bonus, here’s a handy tip to mitigate downtime.
First, don’t update your DNS records before migration is complete. Then, while setting up your domain as the server identity, skip the Check Domains button and set the domain directly. This will result in an error/warning but go ahead anyway.
Now, get your Server’s IP address from your Webdock dashboard and open your computer’s host file:
- For Windows: Search for Notepad, right-click on it, select “Run as Administrator,” press CTRL + O, and open – c:WindowsSystem32Driversetchosts.
- For Mac: Open the terminal and type sudo nano /private/etc/hosts (for older Mac) or sudo nano /etc/hosts (for newer Mac).
- For Linux: Open a terminal window, type sudo nano /etc/hosts, hit enter, and log in.
Once you have the host file open, scroll to the bottom and add your Webdock server’s IP address. Then, put a space and add both the www and non-www versions of your domain on separate lines. For example:
123.456.789 example.com
123.456.789 www.example.com
Save the changes to the host file and exit the editor. To help your computer quickly resolve your domain to the Webdock server, you may need to clear your computer’s DNS cache.
To clear the DNS cache:
- On Windows: Run the command prompt as an admin and type ipconfig /flushdns
- On Mac: Open the terminal and type sudo dscacheutil -flushcache
- On Linux: Open the terminal and type systemd-resolve –flush-caches
At this point, you can try installing WordPress using Webdock’s WordPress manager. If you then visit the URL of your website, you should see a blank WordPress website. This will only happen on your computer. After you have verified, carry out other tasks as prescribed.
When all the tasks are complete, update your DNS records, click on the Set Identity button again to generate and set a new SSL certificate, clear your host file from the recent additions, and clear your computer’s DNS cache.
There are two big caveats here, though: First, just because it is a low-downtime method doesn’t mean it will copy all the changes that may have happened during the process. So, the original advice of carrying out the task when the traffic is lowest still holds true. You can use tools like WP All Import/Export to transfer any new data that might have been missed during the migration. Alternatively, you could temporarily pause your live site until you move everything to Webdock.
Secondly, if your site is too big, using a plugin with remote storage would be much easier and quicker, as downloading and uploading data for massive websites can sometimes take hours.
In Conclusion
Migrating your WordPress site from CyberPanel to Webdock can significantly enhance your site’s performance, flexibility, and management experience. Whether you choose to use a plugin like UpdraftPlus or opt for a manual migration, the process is straightforward and manageable.
Webdock’s robust features, including multiple web server stack support, free backups, and a user-friendly control panel, make it an excellent choice for WordPress enthusiasts. By following the steps outlined in this guide, you can ensure a smooth transition with minimal downtime, keeping your website running seamlessly and efficiently.
Meet Aayush , a WordPress website designer with almost a decade of experience who crafts visually appealing websites and has a knack for writing engaging technology blogs. In his spare time, he enjoys illuminating the minds around him.
