Introduction
Nginx was created by Igor Sysoev in 2004, with its first public release in October of that year. Igor had conceived the software as a response to the C10k problem – which is an issue that has to do with the performance of handling 10,000 concurrent connections. Nginx is the engine of choice for our cloud vps hosting for wordpress because of its ability to handle concurrent connections efficiently.
Because Nginx’s roots are based on optimizing performance under scale, the web server often outperforms other popular options in benchmark tests – especially regarding static content and high concurrent requests.
But this doesn’t mean you can’t optimize your Nginx even more to handle high-traffic loads. And in this article, we will show you the best ways to tune and optimize your Nginx webserver to handle higher traffic than it usually can handle.
Before tweaking configurations manually, ensure your base foundation is solid with a high-performance Nginx hosting provider like Webdock.
Let’s get started.
Prerequisites
- A Linux Server (We used Ubuntu in this article)
- Access to your Nginx configuration
- Most Important: A Backup of your server
You’ll need to do a few things to tune and optimize Nginx. Firstly, you’ll need to adjust some parameters in the default Nginx configuration file. You can mostly find your Nginx configuration file in /etc/nginx/nginx.conf.
Webdock users can access their Nginx configuration file by SSH-ing into your server as an admin and running the following command as a sudo user:
# nano /etc/nginx/nginx.conf
Disabling access log files
Logging is undoubtedly critical for managing, troubleshooting, and auditing systems. However, it’s essential to be aware that logging and storing large data chunks can take up many system resources.
This can, in turn, slow down server performance. For example, if you’re using access logging, every single Nginx request will be logged, which can use up many CPU resources and reduce Nginx performance.
There are two solutions to help alleviate this issue:
- Solution 1: Buffer the log file –
access_log /var/log/nginx/access.log main buffer=16k;
- Solution 2: Disable the logging fully –
access_log off;
This might disable you from diagnosing any errors that may persist in the future.
Enabling GZip
By compressing clients’ responses, you can reduce the size of the data being transferred, which then requires less network bandwidth and improves page load times for slow connections. This, in turn, helps in better utilizing the saved resources to manage higher traffic loads.
To enable GZip, add the following line in the HTTP section:
gzip on;
Webdock servers have Gzip enabled by default, but there are a few ways you can tweak it for even better results.
Compression should be implemented with cost-benefit analysis, as the compression process requires machine resources. Without proper evaluation, compression might work against you and reduce Nginx performance.
An example configuration might look like this:
gzip on;

gzip_vary on;

gzip_proxied any;

gzip_comp_level 5;

gzip_buffers 16 8k;

gzip_http_version 1.1;

gzip_types text/plain text/css application/json application/x-javascript text/xml application/xml

application/xml+rss text/javascript;
When setting up gzip content compression on your server, make sure only to enable it for appropriate types of content. This includes CSS, text, JavaScript, and other similar files. You can test the effects of compression by enabling and disabling it for different types of content and file sizes. Just be careful not to increase the compression level too much, as this can use extra CPU resources without increasing the throughput.
Tweaking Timeouts
Timeouts can help save your resources, especially when it comes to keepalive connections. By reducing the amount of CPU and network overhead required to open and close connections, timeouts can help keep your Nginx server running more efficiently, especially when put under stress.
By adjusting the following variables, you can reduce CPU and network usage for opening and closing connections:
– client_header_timeout
– client_body_timeout
– keepalive_timeout
– send_timeout
You can optimize Nginx performance by changing these values to best fit your needs.
For example, if you have a lot of clients connecting and disconnecting, you might want to increase the value of client_header_timeout and client_body_timeout. This will give Nginx more time to process each client’s request.
The values I like to use:
client_body_timeout 15;

client_header_timeout 15;

keepalive_timeout 2 2;

send_timeout 15;
These will, too, go within the http section.
Adjusting Worker Processes
Nginx can utilize multiple physical or virtual processors because most modern hardware is designed as a multiprocessor. In most cases, the machine that is hosting your web server will not be equipped to handle multiple workloads at once.
Thus, it would be beneficial to configure Nginx to use all available processors to its advantage since Nginx worker processes are not multi-threaded.
To determine what value you need to set, you first need to determine how many cores your server has. To know, run the following command on SSH:
grep processor /proc/cpuinfo | wc -l
You will get a response than will specify the number of cores allotted to you.
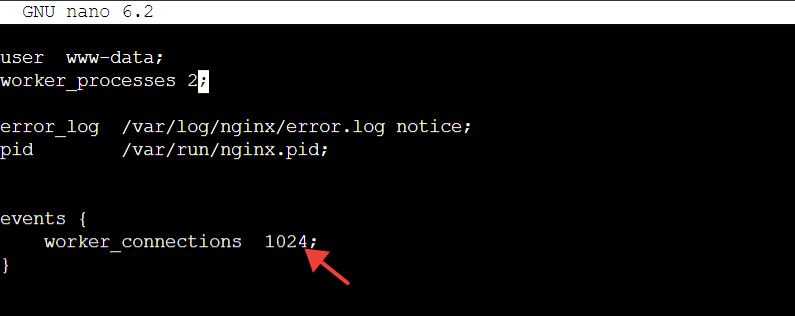
In my example, I have two cores. So, I would modify the first line of my config file from
worker_processes auto;
to
worker_processes 2;
You will need to update this value when you upgrade or downgrade your Webdock server profile.
Taking advantage of Multi-Accept
Multi-accept defines how the worker process accepts new connections. The worker process is off by default, which means it will accept one new connection simultaneously, and the worker process will instantly accept all new connections if you put it on.
In the events section, just change
multi_accept off;
to
multi_accept on;
If you don’t see multi_accept, just place multi_accept on; below the worker_connections.
Adjusting Buffers
You can improve the server’s overall speed and responsiveness by configuring the right size and type of buffer because Buffers are important in optimizing Nginx performance. I like to adjust the following properties with these values that go within the http section:
client_body_buffer_size 15K;

client_header_buffer_size 2k;

client_max_body_size 8m;

large_client_header_buffers 4 4k;
By making slight adjustments to my favorite values above, you can seek out a bit more performance from Nginx, be sure to test the new settings before fully implementing them as your new defaults.
Tweaking Worker Connections
Worker connections tell us the maximum number of clients an Nginx web server can serve at any given time.
Most of the time, a browser opens at least two connections per server at the same time. Therefore, You should set the worker connections to the maximum number of processes the core can run simultaneously.
To find out the total number of processes that your server can run, run the following command using SSH:
# ulimit -n

Enter the same value for worker_connections in the events section.
Setting up the cache for periodically accessed files
Caching is key to making your server tolerate high traffic spikes. Caching regularly accessed files reduces the server’s server load and latency.
Just add the following within the http block:
open_file_cache max=2000 inactive=20s;

open_file_cache_valid 60s;

open_file_cache_min_uses 5;

open_file_cache_errors off;
You always want to test different values to find what works best for you.
Conclusion
Nginx is already one of the fastest web servers, but there are still ways to improve it. You can make it an even more efficient web server that can handle high-traffic loads without using too many resources by tweaking a few settings.
The recommended values for the various parameters are not always the best and only work in specific circumstances. Still, it gives you a fair idea of managing these values per your requirements. You can increase the values gradually while doing performance tests to check for improvements.
It is also necessary to test these on a staging environment before taking them live and having a backup as a safety net.
And lastly, If you don’t see any change, leaving the value at the default is best.
Aayush Nair has been a passionate freelance WordPress designer for the past eight years. He likes to share his knowledge to help and enrich the community in his free time.
