Introduction
Cache-Control are HTTP cache headers that hold instructions for caching for requests and responses. It is used to define how a resource is cached, where it is cached and its maximum age before expiring. When you visit a website, your browser will save images and website data in a store called the cache. When you revisit the same website again, cache-control sets the rules that determine whether your resources are loaded from your local cache or if the browser should send a request to the server for fresh resources.
For better understanding of how the browser renders pages quickly using the cache, you need to know about browser caching and HTTP headers. Correct cache headers are essential for delivering fast Nginx hosting experiences to your end-users.
What is browser caching?
Browser caching is a temporary storage of Web documents, such as images, media and pages. The intention behind this is to help reduce bandwidth. It is used to increase a users browsing speed by locally downloading Web page components to the browser cache. When you revisit that Web page, there is no need to re-download such components. This results in a faster Web page load. Browser will save those resources only for a specific period of time called TTL. Once the TTL has expired, the browser will have to reach out to the server again and download a fresh copy of the resource.
What are HTTP headers?
HTTP headers are the core part of HTTP requests and responses and provide required information about the request or response. All the headers are case-insensitive, header fields are separated by colon, key-value pairs in clear-text string format. These headers contain information about each communication. For example, the request header contains information on what resource is being requested, which browser the client is using and what data formats the client will accept. While response headers contain information on whether the request was successfully fulfilled and the language and format of any resources in the body of the response.
The cache-control header is broken up into directives. You can see the cache-control header of https://google.com with the following command:
curl -I https://google.com
You should get the following output:
HTTP/1.1 301 Moved Permanently
Location: https://www.google.com/
Content-Type: text/html; charset=UTF-8
Date: Fri, 05 Jun 2020 03:03:10 GMT
Expires: Sun, 05 Jul 2020 03:03:10 GMT
Cache-Control: public, max-age=2592000
Server: gws
Content-Length: 220
X-XSS-Protection: 0
X-Frame-Options: SAMEORIGIN
Alt-Svc: h3-27=":443"; ma=2592000,h3-25=":443"; ma=2592000,h3-T050=":443"; ma=2592000,h3-Q050=":443"; ma=2592000,h3-Q049=":443"; ma=2592000,h3-Q048=":443"; ma=2592000,h3-Q046=":443"; ma=2592000,h3-Q043=":443"; ma=2592000,quic=":443"; ma=2592000; v="46,43"
As you can see, the part to the left of the colon is cache-control and the value is on the right of the colon, and there can be one or several comma-separated values for cache control. These values are called directives, and they dictate who can cache a resource as well as how long those resources can be cached before they must be updated.
The most common cache-control headers are detailed below:
Cache-Control: Public
This directive indicates that the response may be stored by any cache, even if the response is normally non-cacheable.
Cache-Control: Private
This directive indicates that the response can only be cached by the browser that is accessing the file. It cannot be cached by an intermediary agent such as proxy or CDN.
Cache-Control: Max-Age
This directive indicates that the maximum amount of time a resource is considered fresh. In other words how many seconds a resource can be served from cache after it’s been downloaded. For example, if the max age is set to 3600 means that the returned resource is valid for 3600 seconds, after which the browser has to request a newer version.
You can also use a technique developed by some asset builder tools, like Webpack or Gulp to force the browser to download a new version of the needed file. This will precompile each file on the server and add hash sums to the file names, such as "app-72420c47cc.css". So, after the next deployment, you will get a new version of the file.
Cache-Control: No-Cache
This directive indicates that a browser may cache a response, but must first submit a validation request to an origin server. This directive is not effective in preventing caches from storing your response. It allows you to cache but subsequence response or any subsequence response for similar data the client needs to check with the browser whether that resource has changed or not. Only if the resource has not changed then the client serves the cache which is stored.
If you apply the technique you learned in the previous section in html files, you will never get new links for your css, js, or image files until you force a reload.
It is recommended to use Cache-Control: no-cache to html files to validate resources on the server before using them from the cache.
Cache-Control: No-Store
This directive indicates that the response should never be cached, For example, banking details you would not want to be stored in any browser cache. For those kinds of purposes, you can use no-store.
Configure Cache-Control Headers for Apache and Nginx Webserver
In this section, we will show you how to set the HTTP Cache-Control header in Apache and Nginx.
Apache
For the Apache web server, you will need to edit your website virtual host configuration file in order to implement the HTTP Cache-Control header, for example:
nano /etc/apache2/sites-enabled/webdock.conf
Add the following contents:
<filesMatch ".(ico|pdf|flv|jpg|jpeg|png|gif|js|css|swf)$">
    Header set Cache-Control "max-age=3600, public"
</filesMatch>
If you want to enable Cache-Control for all files, add Header set line outside the filesMatch block.
As you can see, we set the Cache-Control header’s max-age to 3600 seconds and to public for the listed files.
This can also be set in a .htaccess file in any directory below your web root. If you are using SSL you should consider adding this to the ssl version of your virtual host configuration, which is also placed in /etc/apache2/sites-enabled/
Nginx
For the Nginx web server, you will need to edit your website virtual host configuration file to implement the HTTP Cache-Control header, for example:
nano /etc/nginx/sites-enabled/webdock
Add the following contents:
location ~* .(ico|pdf|flv|jpg|jpeg|png|gif|js|css|swf)$ {
    expires 1h;
    add_header Cache-Control "public, no-transform";
}
If you want to enable Cache-Control for all files, add an add_header line without the enclosing location block, as what the location block does is specify specific filetypes you are targeting with your directives (ico, pdf, flv etc.).
Recommended Settings
We recommend the following settings for all cacheable resources:
- For js, css, and image files, set Cache-Control: public, max-age=31536000, no Etag, no Last-Modified settings.Apache:
<filesMatch ".(js|css|jpg|jpeg|png|
gif|js|css|ico|swf)$"> Header set Cache-Control "max-age=31536000, public" Header unset Last-Modified Header unset ETag </filesMatch> Nginx:
location ~* .(js|css|jpg|jpeg|png|
gif|js|css|ico|swf)$ { expires 1y; etag off; if_modified_since off; add_header Cache-Control "public, no-transform"; } - Set the Last-Modified date to the last time the resource was changed.(Note: This already happens by default in Nginx or Apache)
- If you need precise control over when resources are invalidated we recommend using a URL fingerprinting or versioning technique.
For example, when you do changes to one css file, you should change name to be sure that the updated file will be seen by all because file is cached.This is called URL fingerprinting. - For html files, use Cache-Control: no-cache, and Etag.Apache:
<filesMatch ".(html$">
        Header set Cache-Control "no-cache"
    </filesMatch>
Nginx:
location ~* .(html)$ { etag on; add_header Cache-Control "no-cache"; } - Use Webpack, Gulp or other tools and add unique hash digits to your js, css and image files. (For example, app-67ce7f3483.css). This will force the browser to download a new version of the needed file.If you want to read more about Webpack, you can check out these guides: https://webpack.js.org/guides/getting-started/
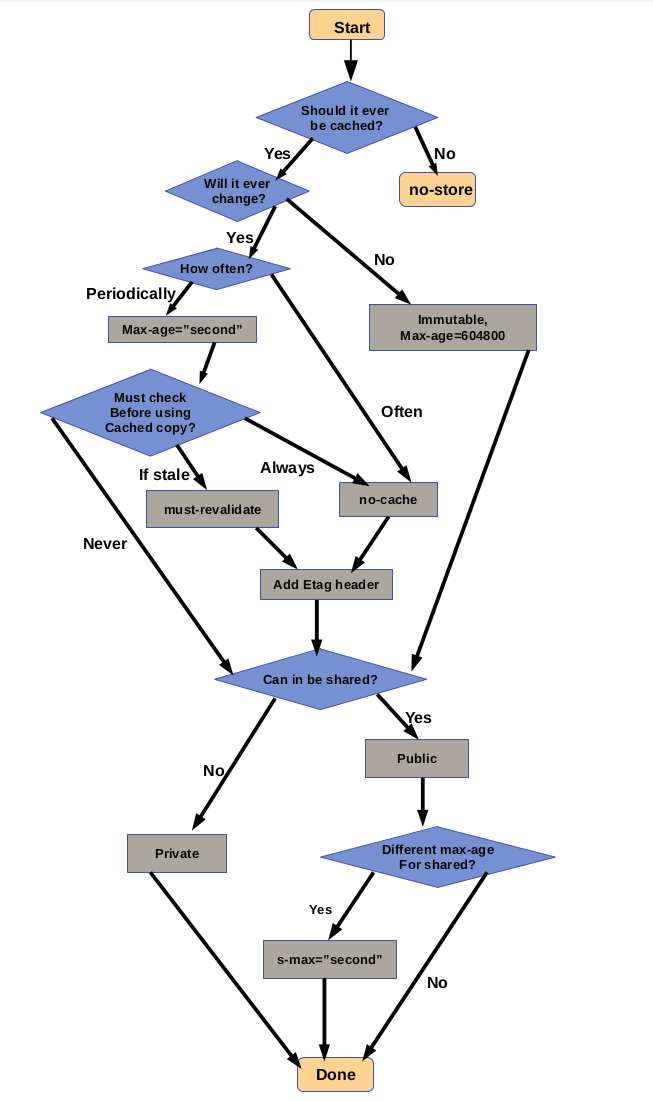
The following – mildly daunting – chart may help with deciding what specific cache directives should be added to a resource:
Etag (Entity tag)
The Etag also called HTTP response header is a cache validators used to determine whether a component in the browser’s cache matches one on the origin server. This will helps to improve loading times since if the resource can be retrieved from local cache, the browser does not need to make an additional request to the server.
The ETag or entity tag is part of HTTP, the protocol for the World Wide Web. It is one of several mechanisms that HTTP provides for web cache validation, and which allows a client to make conditional requests. This allows caches to be more efficient, and saves bandwidth, as a web server does not need to send a full response if the content has not changed. ETags can also be used for optimistic concurrency control, as a way to help prevent simultaneous updates of a resource from overwriting each other.
An ETag is an opaque identifier assigned by a web server to a specific version of a resource found at a URL. If the resource content at that URL ever changes, a new and different ETag is assigned. Used in this manner ETags are similar to fingerprints, and they can be quickly compared to determine whether two versions of a resource are the same. Comparing ETags only makes sense with respect to one URL—ETags for resources obtained from different URLs may or may not be equal, so no meaning can be inferred from their comparison.
Configure Etag in Nginx or Apache for a Resource
Etags also called Entity Tags is another way to treat 304 replies. 304 responses are a way for the web server to tell the user that the latest version of the cache is the version it has, even though the cache time may expire. There is no need to access the file again as it is a waste of time and bandwidth in this situation.
The way it works it that when a browser requests a page that they have already accessed in the past, the browser will send, for example, an HTTP request header in the If-Modified-Since header with the cache date. It basically means “Hey web server, I have a copy of this file I’m asking you for, but it’s 10:15 AM from 1 July 2020, Is that okay to use or is there a newer version of this page available?” If there is a newer file, the web server will send that one to the browser, and if not just tell the browser to use the one it already has.
Etags have the following advantages:
- Effective filtering.
- Faster loading time.
- Lower disk load.
- Lower bandwidth usage.
Nevertheless the utility of ETags depends on implementation and this can result in some problems:
- Slower load times and caching the same resource multiple times
- Higher server load and used bandwidth.
The whole point of using ETags is that they are intended to give us a more precise indication as to whether a file has changed, rather than merely basing it on a timestamp. Etag role is to tell browser if file has been updated or not, so if Etag is not present the browser will always act like file has been changed and will not use caches. ETag can be better in single server than in load balancing servers because if the Etags is not matched with the other server the user will not get the fast response of Etag!
Configure Etags in Apache
By default, ETags is enabled in the Apache web server. If you want to check if ETags is enabled, run this command:
curl -I localhost
You should see that ETags is enabled in the following output:
HTTP/1.1 200 OK
Date: Wed, 01 Jul 2020 09:00:27 GMT
Server: Apache/2.4.7 (Ubuntu)
Last-Modified: Mon, 03 Feb 2020 14:55:14 GMT
ETag: "2cf6-59dad1c5a32cd"
Accept-Ranges: bytes
Content-Length: 11510
Vary: Accept-Encoding
Content-Type: text/html
You can also disable the ETags completely from your system and leave the caching to cache control headers.
You can disable ETags by editing the Apache default configuration file:
nano /etc/apache2/apache2.conf
Add the following lines inside your default web root directory section:
Header unset Etag
FileETag none
Save and close the file then restart your Apache service to apply the changes:
systemctl restart apache2
If you do not have access to SSH on your server then you can edit the .htaccess file to disable ETags.
nano .htaccess
Add the following lines:
Header unset Etag
FileETag none
Save and close the file when you are finished.
You can also verify whether ETags is disabled or not with the following command:
curl -I localhost
You can not see any Etags header in the following output:
HTTP/1.1 200 OK
Date: Wed, 01 Jul 2020 09:01:11 GMT
Server: Apache/2.4.7 (Ubuntu)
Last-Modified: Mon, 03 Feb 2020 14:55:14 GMT
Accept-Ranges: bytes
Content-Length: 11510
Vary: Accept-Encoding
Content-Type: text/html
Configure Etags in Nginx
By default, Nginx also activates Etags once the cache headers are set. So, to be sure if Etag is enabled run this command:
curl -I localhost
You should see that ETags is enabled in the following output:
HTTP/1.1 200 OK
    Server: nginx
    Date: Thu, 10 Sep 2020 18:55:02 GMT
    Content-Type: application/octet-stream
    Content-Length: 1024
    Last-Modified: Thu, 10 Sep 2020 18:50:29 GMT
    Connection: keep-alive
    ETag: "5f5a7575-400"
    Expires: Thu, 10 Sep 2020 19:55:02 GMT
    Cache-Control: max-age=3600
    Cache-Control: public, no-transform
    Accept-Ranges: bytes
You can also disable the ETags completely from your system and leave the caching to cache control headers.
You can disable ETags by editing the Nginx default configuration file:
nano /etc/nginx/sites-enabled/webdock
Add “etag off;” on the lines you have added to enable cache-headers:
location ~* .(ico|pdf|flv|jpg|jpeg|png|gif|js|css|swf)$ {
    expires 1h;
    etag off;
    add_header Cache-Control "public, no-transform";
}
Save and close the file then restart your Apache service to apply the changes:
systemctl restart nginx
You can also check if ETags was successfully disabled by running this command:
curl -I localhost
You can not see any Etags header in the following output:
HTTP/1.1 200 OK
    Server: nginx
    Date: Thu, 10 Sep 2020 19:02:08 GMT
    Content-Type: application/octet-stream
    Content-Length: 1024
    Last-Modified: Thu, 10 Sep 2020 18:50:29 GMT
    Connection: keep-alive
    Expires: Thu, 10 Sep 2020 20:02:08 GMT
    Cache-Control: max-age=3600
    Cache-Control: public, no-transform
    Accept-Ranges: bytes
Security Headers
Now that you have read all about cache headers, we suggest you check out our companion article: How to configure Security Headers in Nginx and Apache
Conclusion
We hope this article was helpful to you, if you have any questions please don’t heasitate to leave a comment.
