Introduction
Wanted to transfer files between your servers but don’t want to deal with authentication or zipping large folders prior to transfering them? This can be achieved with croc!
Croc is a tool that allows you to securely transfer files or folders without dealing with firewalls and port forwarding. Best of all, this tool is free (opensource!)
Installing Croc
Installing croc is super simple. Croc is built in Go, so croc is just a single executable binary. Install it on your servers with just this one command:
$ curl https://getcroc.com | bash
Transfering Files and Folders
Once croc is installed you can send files with “croc send”.
Let’s say you have a zip file with all your website data, you run this:
$ croc send website_data.zip
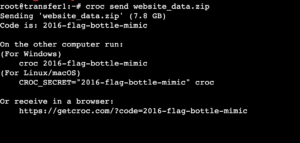
In the output you would see a croc command with an autogenerated secret. Execute that command on the other server (which is the recepient) for the transfer to start. The same syntax works for transferring folders.
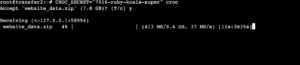
This is how it looks when the transfer is happening.
That’s basically it 🙂
As you saw, there’s no need to deal with complex passwords or manage firewall here.
Using Webdock Croc Relay
By default, croc prefers peer-to-peer transfers. However, sometimes servers are protected with firewalls and ports may not be open. In situations like that Croc uses a relay, which acts as a middleman, for the transfers.
Don’t worry, the relay can’t read any of your data. Before transferring, croc encrypts the data. On the destination server receives the data, it is then decrypted. This is what the “croc secret” is for (as shown in the above images). So, all the relay sees is scrambled data 🙂
Croc maintainer offers a relay for transfers in situations when the sending and receiving parties are behind NAT. The relay is: croc.schollz.com
However, that relay may or may not be fast enough for bigger transfers. So, Webdock selfhosts a croc relay. You can use this for faster transfers!
All you need to do is pass the Webdock relay using the –relay flag. Like this:
$ croc --relay "croc.dk1.webdock.tech" send website_data.zip
Notice, the –relay flag is passed to the croc command, not to the “send” subcommand.
To make things easy you can set the Webdock relay as the default one by passing the –remember flag. You have to do this only once.
$ croc --remember --relay "croc.dk1.webdock.tech" send website_data.zip
That will save the relay config for future transfers. So you need not pass the relay flag anymore.
Our Observation
From what we have seen, croc does compression on-the-fly. So the data is split to chunks, compressed, and then transferred. To improve speeds, you can pass in –no-compress flag when sending the data. This will transfer the data chunks without any compression and you will see an increase in transfer speeds.
Like this:
$ croc --no-compress --relay "croc.dk1.webdock.tech" send website_data.zip
Conclusion
This guide has really touched the core things you need to know about croc. The tool offers lot more features like setting your own secret and such. Croc is available for other platforms as well, for Android and macOS. So you can transfer stuff between your server and personal devices (this is where the Webdock relay will help!)


