Introduction
In this guide, you'll learn step-by-step how to set up Rust on your Ubuntu 22.04 system. From starting the installation to checking that it's working, I'll help you through each part. Whether you're new to coding or already know your way around, you'll find it easy to get Rust up and running with these clear instructions.
What is Rust?
Rust, also known as rust-lang, is a general-purpose programming language focused on performance and safety, particularly in concurrent systems. Its unique features include a strong emphasis on memory safety through a system of ownership and borrowing checked at compile time by the compiler.
Rust also offers type safety and zero-cost abstractions and ensures safe concurrency, thus preventing data races. It comes with an integrated package manager and build system, Cargo. Since its introduction by Mozilla Research,
Rust has been adopted in various domains, such as systems programming, embedded devices, and web assembly, due to its ability to produce efficient and reliable software.
How to Install Rust?
You have two standard options to install Rust on your Linux system: through the apt package manager or with rustup.
Installing using APT
As usual, before starting, make sure to update the system packages registry:
$ sudo apt update
Once you've updated the package registry, go ahead and set up Rust with this command:
$ sudo apt install rustc -y
This should install Rust to your system. Now, we must install Cargo. Cargo assists you in handling your Rust projects through several essential tasks.
Refresh the registry again and install Cargo by running this combined command:
$ sudo apt update && sudo apt -y install cargo
Installing using Rustup
You'll want to download the rustup tool to install Rust with this method. This will set up the newest stable version of Rust for you:
$ curl --proto '=https' --tlsv1.3 https://sh.rustup.rs -sSf | sh
Next, you'll need to select a configuration. This guide follows option 1, the standard choice. But if you know Rustup well and prefer to tailor your setup, go for option 2. Just type your pick and hit Enter.
Rustup will also install cargo for you. Now, add the Rust toolchain directory to your PATH environment variable by running this command:
$ source $HOME/.cargo/env
Rustup is a better way to install Rust because it's the official tool that gives you the newest versions and tools like rustfmt and clippy. apt might not have the latest updates and lacks some features. With rustup, you always get your Rust projects' latest improvements and security.
Installing Compiler
To combine your Rust program's parts into a single file, you need a tool called a linker, which is part of the GCC found in the build-essential package. Without installing GCC, you could face errors during compilation.
Begin by refreshing and upgrading your Apt package index before installing the build-essential package:
$ sudo apt update && sudo apt upgrade -y
The above command hits two birds with one stone, and all prompts are approved automatically with the -y flag.
Once you finish updating and upgrading, go ahead and install the build-essential package:
$ sudo apt install build-essential -y
Testing your Configuration
Let’s first verify the Rust installation. There are several ways to do so, but my go-to way is to check its version number:
$ rustc --version
Once you verify, let’s start by creating a few directories to store our test configuration files:
$ mkdir ~/rustic-charm
$ cd ~/rustic-charm
$ mkdir charm
$ cd charm
Now, let’s create a sample file to run:
$ nano charm.rs
All rust projects have the .rs extension. You can add anything in this file to test, but I’ll add a simple print command to verify:
fn main() {

    println!("Can I Offer You A Nice Egg In This Trying Time?");

}
Then, compile the code and finally run the executable:
$ rustc charm.rs
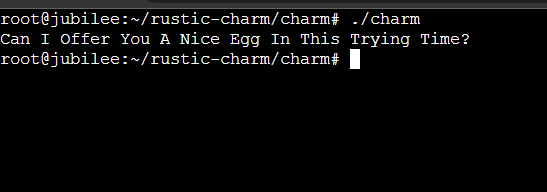
$ ./charm
If things are set up well, you should see the message you added to the file:
Conclusion
Rust is a programming language designed for system development, emphasizing speed, memory safety, and parallelism. It incorporates an advanced system that effectively prevents runtime errors, allowing developers to confidently create high-performance applications free from the typical bugs encountered in other system programming languages.
This detailed guide taught you to set up the environment, delve into the ecosystem, and create a test application.
Meet Aayush , a WordPress website designer with almost a decade of experience who crafts visually appealing websites and has a knack for writing engaging technology blogs. In his spare time, he enjoys illuminating the minds around him.


