Introduction
Managing appointments and meetings is always a headache. Client calls, project reviews, consultations: they pile up fast. You’re juggling Zoom links, email threads, and calendar invites while trying to get work done.
I tried the usual suspects, they work fine until you realize you’re paying monthly fees for basic scheduling, dealing with their branding on everything, and are stuck with whatever features they decide to offer.
That’s why I love Cal.com so much: You have complete control over your scheduling system, no per-booking fees or user limits, and you can customize it however you want.
You still pay for your VPS hosting, but that’s the only thing you pay for. You upgrade when you feel it’s time to, not when a service forces you to. Plus, you own all of your data.
This guide walks you through setting up Cal.com on Ubuntu. Depending on your server, everything will run within 30-45 minutes. Have a look.
What You’ll Need Before Starting
Before you begin, make sure you have:
- A clean server with Ubuntu 24.04 (or any with 20.04 or later)
- At least 2 CPU cores, 2GB RAM, and at least 20GB SSD storage
- Root or sudo access
- A domain name pointing to your server (optional but recommended)
Most VPS providers bundle their specs together. Want 2 CPU cores? Whether you need it or not, you’re forced into a plan with 60GB storage. That pushes the costs up for basic Cal.com hosting with leading VPS providers.
Webdock breaks that model. In addition to choosing from preset packages, you can configure each resource independently. For example, you can pick 2 CPU cores with minimal RAM and storage, or load up on memory while keeping CPU and disk usage low. Higher network speed with minimal everything else? Possible.
You build exactly what Cal.com needs, nothing more!
A Quick Note On Why I Am Using Docker
I started writing this guide planning to use the traditional Node.js setup. I spent way too many hours fighting errors: random memory issues, broken dependencies, and different runtime issues. Ubuntu 22.04 had different system library versions than 24.04, breaking native modules.
The worst part was that I tried various online guides, including Cal’s official documentation, which had the same commands but different results. Classic “works on my machine” syndrome.
So, instead of continuing to bang my head against the wall, I used Docker, and it has some advantages over "vanilla" Node for this use case:
- The same environment everywhere: The container includes the exact Node.js version, system libraries, and dependencies that Cal.com needs. Your server, my server, and the production server all run identical environments.
- No dependency hell: You don’t install Node.js, PostgreSQL, or system build tools on your server. Everything lives inside containers.
- Broken update? Roll back instantly: Pull a new container image to update. If something breaks, restart with the old image. Debugging what went wrong takes 30 seconds instead of hours.
- Your system stays clean: Cal.com runs in its own isolated space. It can’t mess with your other applications or system files. To uninstall, delete containers.
With that out of the way, let's focus on the actual guide.
Installing Docker on Ubuntu
Log in as a sudo user.
Start by updating your system packages:
$ sudo apt update && sudo apt upgrade -y
Ubuntu’s default repositories often contain outdated Docker versions. Let’s install the latest version directly from Docker’s official repository. Remove any existing Docker installations to avoid conflicts:
$ sudo apt remove docker.io docker-doc docker-compose docker-compose-v2 podman-docker containerd runc
Install prerequisites for adding new repositories:
$ sudo apt install ca-certificates curl gnupg lsb-release -y
Add Docker’s official GPG key to verify package authenticity:
$ curl -fsSL https://download.docker.com/linux/ubuntu/gpg | sudo gpg --dearmor -o /usr/share/keyrings/docker-archive-keyring.gpg
Add the Docker repository to your system’s package sources:
$ echo "deb [arch=$(dpkg --print-architecture) signed-by=/usr/share/keyrings/docker-archive-keyring.gpg] https://download.docker.com/linux/ubuntu $(lsb_release -cs) stable" | sudo tee /etc/apt/sources.list.d/docker.list > /dev/null
Update package information to include the new Docker repository:
$ sudo apt update
Install Docker Engine and Docker Compose:
$ sudo apt install docker-ce docker-ce-cli containerd.io docker-buildx-plugin docker-compose-plugin -y
Start Docker and set it to run automatically on boot:
$ sudo systemctl start docker
$ sudo systemctl enable docker
Check that Docker is installed correctly:
$ docker --version
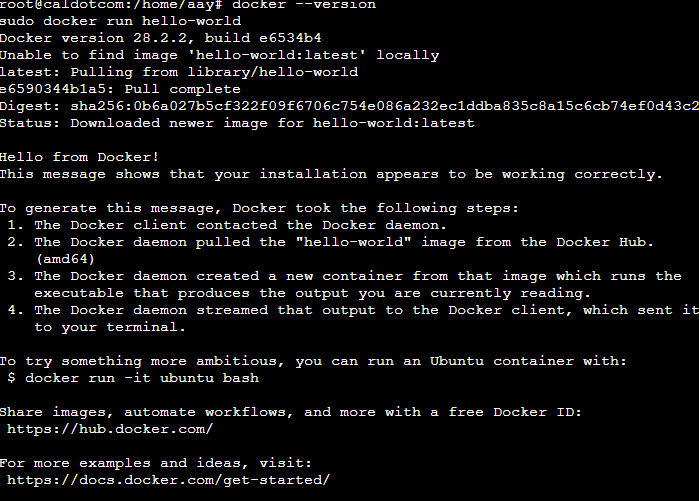
$ sudo docker run hello-world
The hello-world container should download and run successfully, confirming Docker works properly.
Add your user to the docker group so you can run Docker commands without sudo:
$ sudo usermod -aG docker $USER
Log out and back in for the group change to take effect. After logging back in, you should be able to run Docker commands without sudo.
Installing Cal.com
There are two ways to install Cal.com with Docker, depending on your specific requirements:
Method 1: Quick Setup with Pre-built Images
This method uses the community-maintained Docker images from Docker Hub. It’s perfect for testing Cal.com or running simple deployments without customization.
Clone the official Docker repository:
$ git clone --recursive https://github.com/calcom/docker.git
$ cd docker
The recursive flag tells git to also download the Cal.com source code, which is referenced as a submodule in the Docker repository. Without this flag, you’d only get the Docker configuration files but not the actual application code.
Copy the example environment file:
$ cp .env.example .env
Open the environment file for editing:
$ nano .env
You’ll see several configuration options. The most important ones to update:
# Encryption keys - generate these for security

NEXTAUTH_SECRET=your-generated-secret-key
CALENDSO_ENCRYPTION_KEY=your-encryption-key
In a new tab, generate secure random keys for NEXTAUTH_SECRET and CALENDSO_ENCRYPTION_KEY:
$ openssl rand -base64 32
Run this command twice to generate two different keys and copy each result into your .env file. To save more time, you can just generate a 32-character, base64 string key using online services. Just Google them.
Save the file and exit (Ctrl+X, then Y, then Enter in nano). Followed by downloading the required Docker images:
$ docker compose pull
This downloads the Cal.com application image, PostgreSQL database, and Prisma Studio for database management.
Start the complete Cal.com stack:
$ docker compose up -d
The -d flag runs containers in the background. Docker will create and start three containers: the database, the Cal.com application, and Prisma Studio.
Check that all containers are running:
$ docker compose ps
You should see three containers with “running” status.
Method 2: Building Your Own Image
Building your own Docker image gives you full control over the Cal.com configuration. This method is recommended for production deployments where you need custom settings.
Clone the Docker repository without the recursive flag:
$ git clone https://github.com/calcom/docker.git calcom-docker
$ cd calcom-docker
Update the Cal.com submodule to get the latest source code:
$ git submodule update --remote --init
Create your environment file:
$ cp .env.example .env
$ nano .env
Configure the build-time variables. These get baked into the Docker image during compilation:
# Security keys

NEXTAUTH_SECRET=your-nextauth-secret-32-chars
CALENDSO_ENCRYPTION_KEY=your-encryption-key-32-chars

# Disable telemetry for privacy

CALCOM_TELEMETRY_DISABLED=1

# License consent (set to true)

NEXT_PUBLIC_LICENSE_CONSENT=true
The build process requires an active database connection. Start the PostgreSQL container first:
$ docker compose up -d database
Wait about 30 seconds for PostgreSQL to initialize completely.
Build the Cal.com image with Docker Compose:
$ DOCKER_BUILDKIT=0 docker compose build calcom
Depending on your server specifications, the build process takes 10-20 minutes. It downloads dependencies, compiles the application, and creates the final image.
Once the building is completed, start the whole stack:
$ docker compose up -d
Installing and Configuring NGINX
NGINX acts as a reverse proxy, letting people reach your scheduling platform through clean URLs like https://yourdomain.com on standard web ports.
It also lets you add SSL certificates, since Cal.com doesn’t manage HTTPS on its own, we will cover this later.
Start by installing NGINX after logging in as a sudo user (sudo su):
$ sudo apt install nginx -y
We’ll install NGINX directly on your Ubuntu system (outside Docker) to handle clean URLs and SSL certificates. NGINX will grab SSL certificates from Let’s Encrypt and forward all requests to your Cal.com containers.
Let’s quickly add NGINX to systemd so it starts automatically when your server reboots. Without this, NGINX won’t launch after a restart, leaving your Cal.com installation inaccessible even though the Docker containers are running:
$ sudo systemctl restart nginx
$ sudo systemctl enable nginx
This keeps the setup simple: one system-level NGINX handles SSL for all your applications, while Cal.com focuses on scheduling inside its containers.
Then, create a new NGINX configuration file for Cal.com:
$ sudo nano /etc/nginx/sites-available/calcom
Add the following configuration (replace ‘your-domain.com’ with your actual domain):
server {

    listen 80;

    server_name yourdomain.com;


    location / {

        proxy_pass http://127.0.0.1:3000;

        proxy_http_version 1.1;

        proxy_set_header Upgrade $http_upgrade;

        proxy_set_header Connection 'upgrade';

        proxy_set_header Host $host;

        proxy_set_header X-Real-IP $remote_addr;

        proxy_set_header X-Forwarded-For $proxy_add_x_forwarded_for;

        proxy_set_header X-Forwarded-Proto $scheme;

        proxy_cache_bypass $http_upgrade;

    }

}
Enable the configuration by creating a symbolic link:
$ sudo ln -s /etc/nginx/sites-available/calcom /etc/nginx/sites-enabled/
To avoid issues later, remove the default NGINX configuration:
$ sudo rm /etc/nginx/sites-enabled/default
Now, test the config:
$ sudo nginx -t

If the test is successful, restart NGINX:
$ sudo systemctl restart nginx
$ sudo systemctl enable nginx
Configuring SSL and Firewall (Optional but Recommended)
SSL certificates encrypt the connection between your users and your server. Without SSL, everything travels in plain text: passwords, calendar data, personal information. Anyone monitoring network traffic can read it all.
Modern browsers warn users about “not secure” sites without SSL certificates. Your professional scheduling platform shouldn’t trigger security warnings, or that will make your clients run away!
Getting SSL certificates used to be expensive and complicated. Let’s Encrypt changed that by offering free certificates that work just as well as paid ones. The best part is how simple the process becomes with Certbot. I am going to use that for this tutorial because it is so easy to use.
First, install snapd, which Certbot requires:
$ sudo apt update && sudo apt install snapd -y
Install Certbot via snap:
$ sudo snap install --classic certbot
Now run Certbot to automatically configure SSL for your Cal.com installation:
$ sudo certbot --nginx -d your-domain.com
Before running this command, make sure your domain actually points to your server’s IP address; otherwise, the verification will fail. Certbot will ask for your email address and walk you through the setup process.
The tool handles everything: certificate generation, NGINX configuration updates, and even sets up automatic renewal through a cron job. Verify that the renewal process works correctly:
$ sudo certbot renew --dry-run
This test run confirms that your certificates will renew automatically before they expire. Your Cal.com installation now runs over HTTPS, keeping all scheduling data encrypted in transit.
Speaking of keeping things secure, setting up a firewall for your Cal instance will prevent unwanted internet traffic from reaching your server. Cal.com running on your server without a firewall is potentially accessible to attackers.
Ubuntu’s UFW firewall lets you specify exactly which ports should accept connections. For Cal.com, you only need web traffic (ports 80 and 443) and SSH access (port 22) for server management.
First, install UFW:
$ sudo apt update && sudo apt install ufw -y
Configure UFW to allow only necessary traffic with these simple commands:
$ sudo ufw allow 'Nginx Full'
$ sudo ufw allow ssh
$ sudo ufw --force enable
The first command opens ports 80 (HTTP) and 443 (HTTPS) for web browsers to access Cal.com. The second keeps SSH access so you can manage your server remotely. The third activates the firewall and blocks everything else.
Now, your server only responds to legitimate website visitors and SSH connections. Random port scans and attack attempts are blocked automatically. Don't forget to restart your server so the firewall takes effect.
Launching Your Cal.com Instance
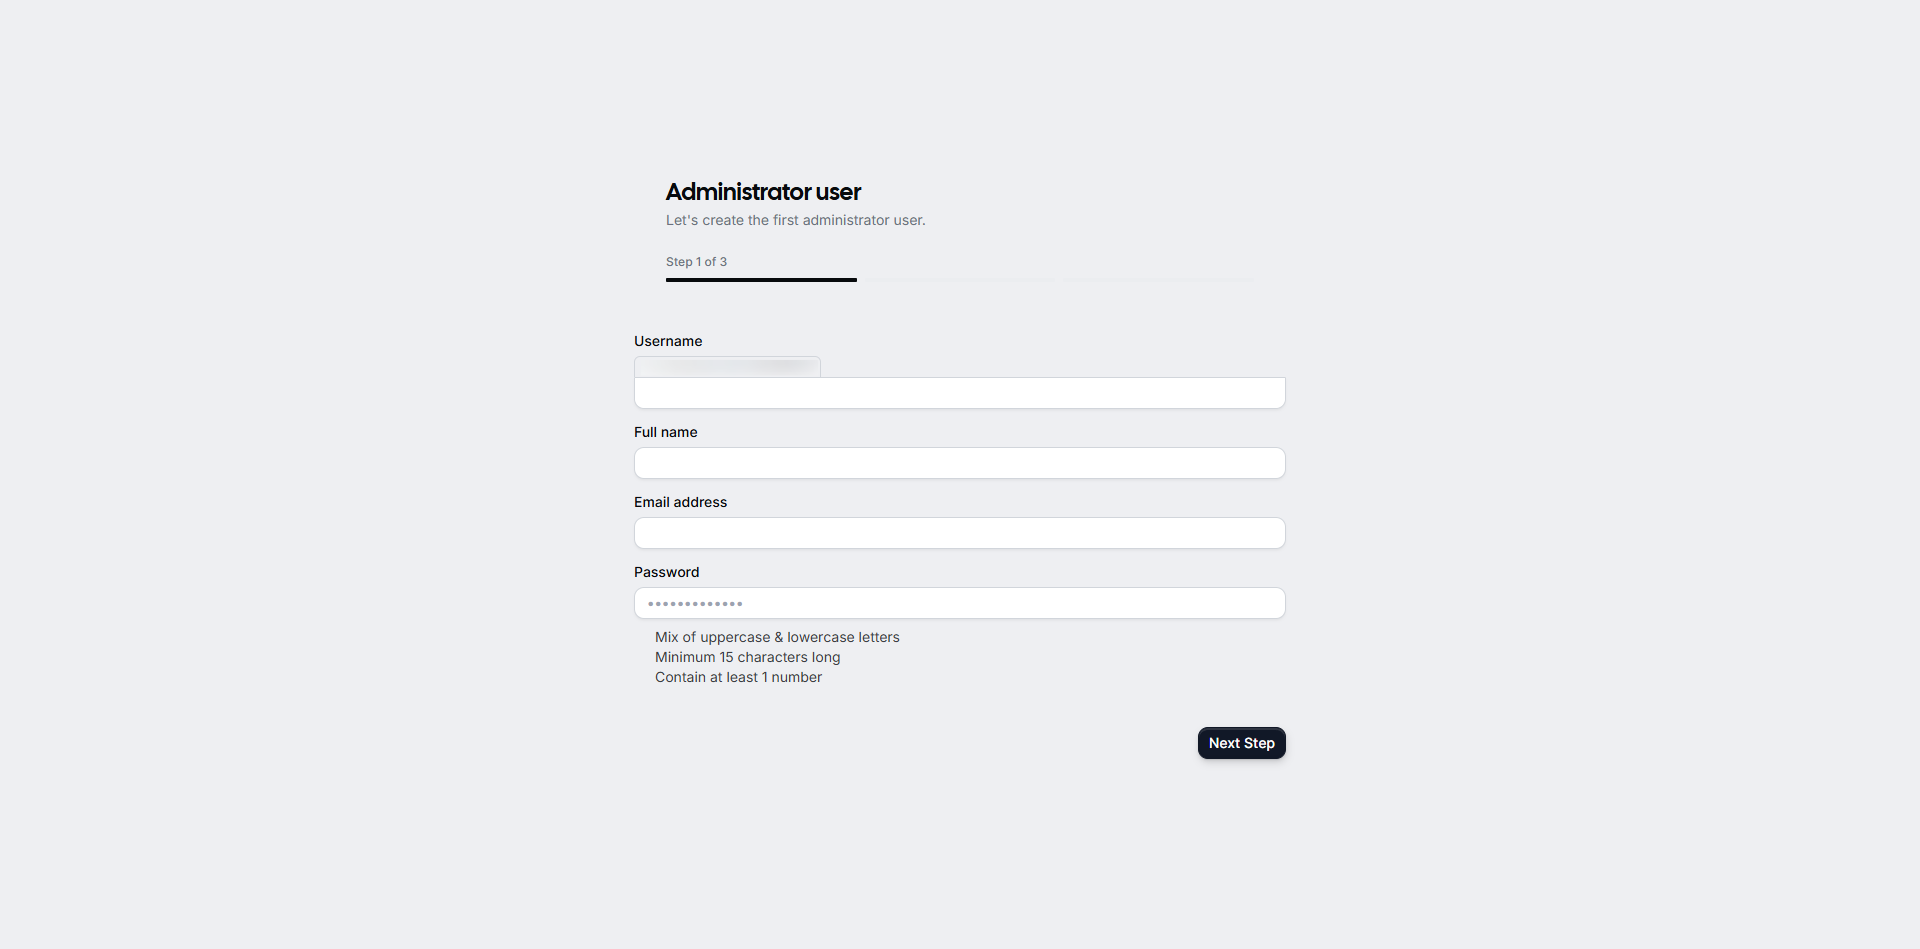
Before you can use Cal.com, you need to create an admin account.
Open your web browser and navigate to your Cal.com installation:
https://your-domain.com
You should see the Cal.com setup page. Follow the on-screen instructions to create your first user account.
Exploring The Interface
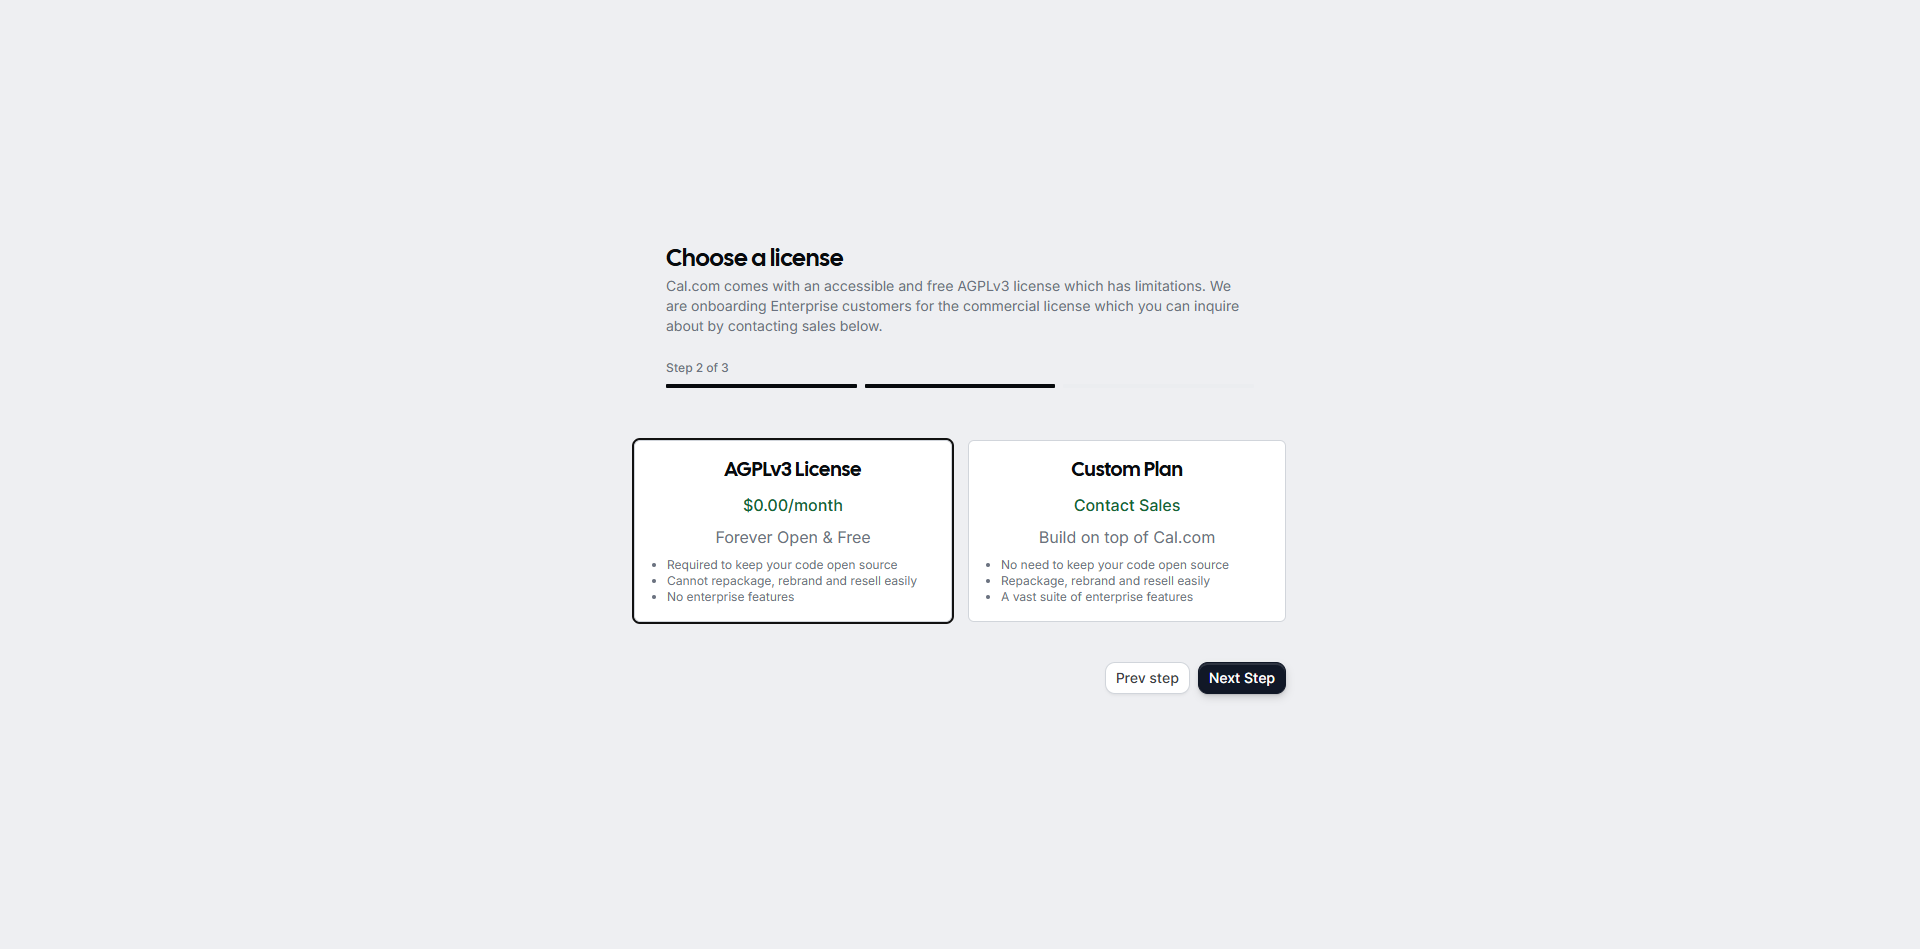
Once logged in for the first time, you will be asked to choose a license. For 99% of cases where you are the first party, the AGPLv3 license should be fine.
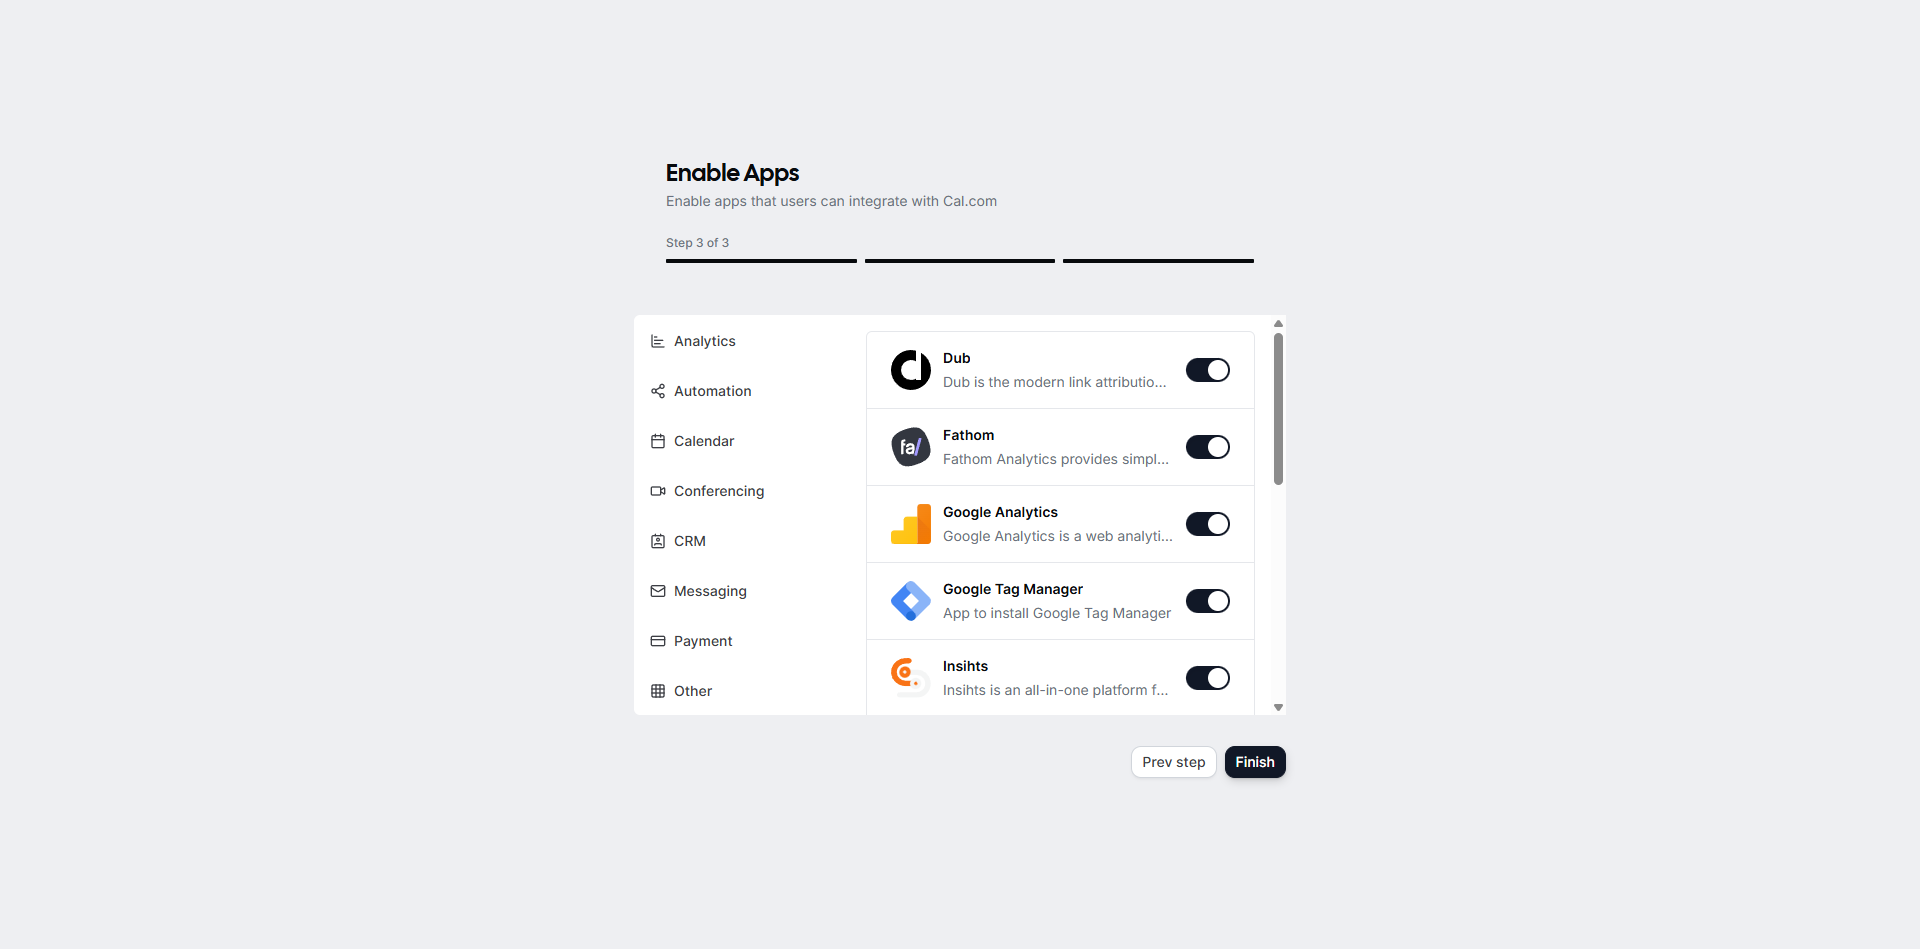
Then you can also enable apps required for this instance, such as Google Analytics, Discord, Google Meet, Zoom, et al.
You’ll land on the event type dashboard, which is actually the page that you land on after logging in. This is your main hub for managing your scheduling.
Event Types are the core of Cal.com. Event types are your pre-set meetings, events, consultations, etc., which you can share with potential attendees. You can create as many event types as you need with each account, and each event type is customizable in terms of its name, URL, duration, availability, and location of the event.
You’ll notice that in the upper right-hand corner of this page, there’s a button marked [+new]. Pressing this button will open a pop-up window where you can create new meeting types.
Bookings show all your scheduled appointments. You can access your booking dashboard from the menu on the left-hand side of your account dashboard. Just click on the tab marked “Bookings,” and you’ll be there.
The booking categories available are as follows: upcoming meetings, unconfirmed meetings, recurring meetings, past meetings, and canceled meetings.
Availability controls when people can book with you. You use this tab to select from previously created availability schedules or to edit them using the quick access button.
With availability date overrides, you can now pick any date that you’re currently available and set specific hours for availability on that day or mark yourself entirely unavailable.
Your public booking page shows visitors your available event types. Once you preview the URL of an event type, its availability will appear as slots available for booking.
The interface is straightforward. Create a test event type and book an appointment with yourself to see how everything works.
Setting Up Email Notifications
Cal.com sends confirmation emails, reminders, and cancellation notices to both you and your meeting attendees. Without email configuration, these notifications won’t work, leaving people confused about appointment details.
Email notifications require an SMTP server to send messages. You have several options, but their reliability varies significantly.
Stop your Cal.com containers temporarily:
$ cd docker
$ docker compose down
Or if you choose the DIY method:
$ cd calcom-docker
$ docker compose down
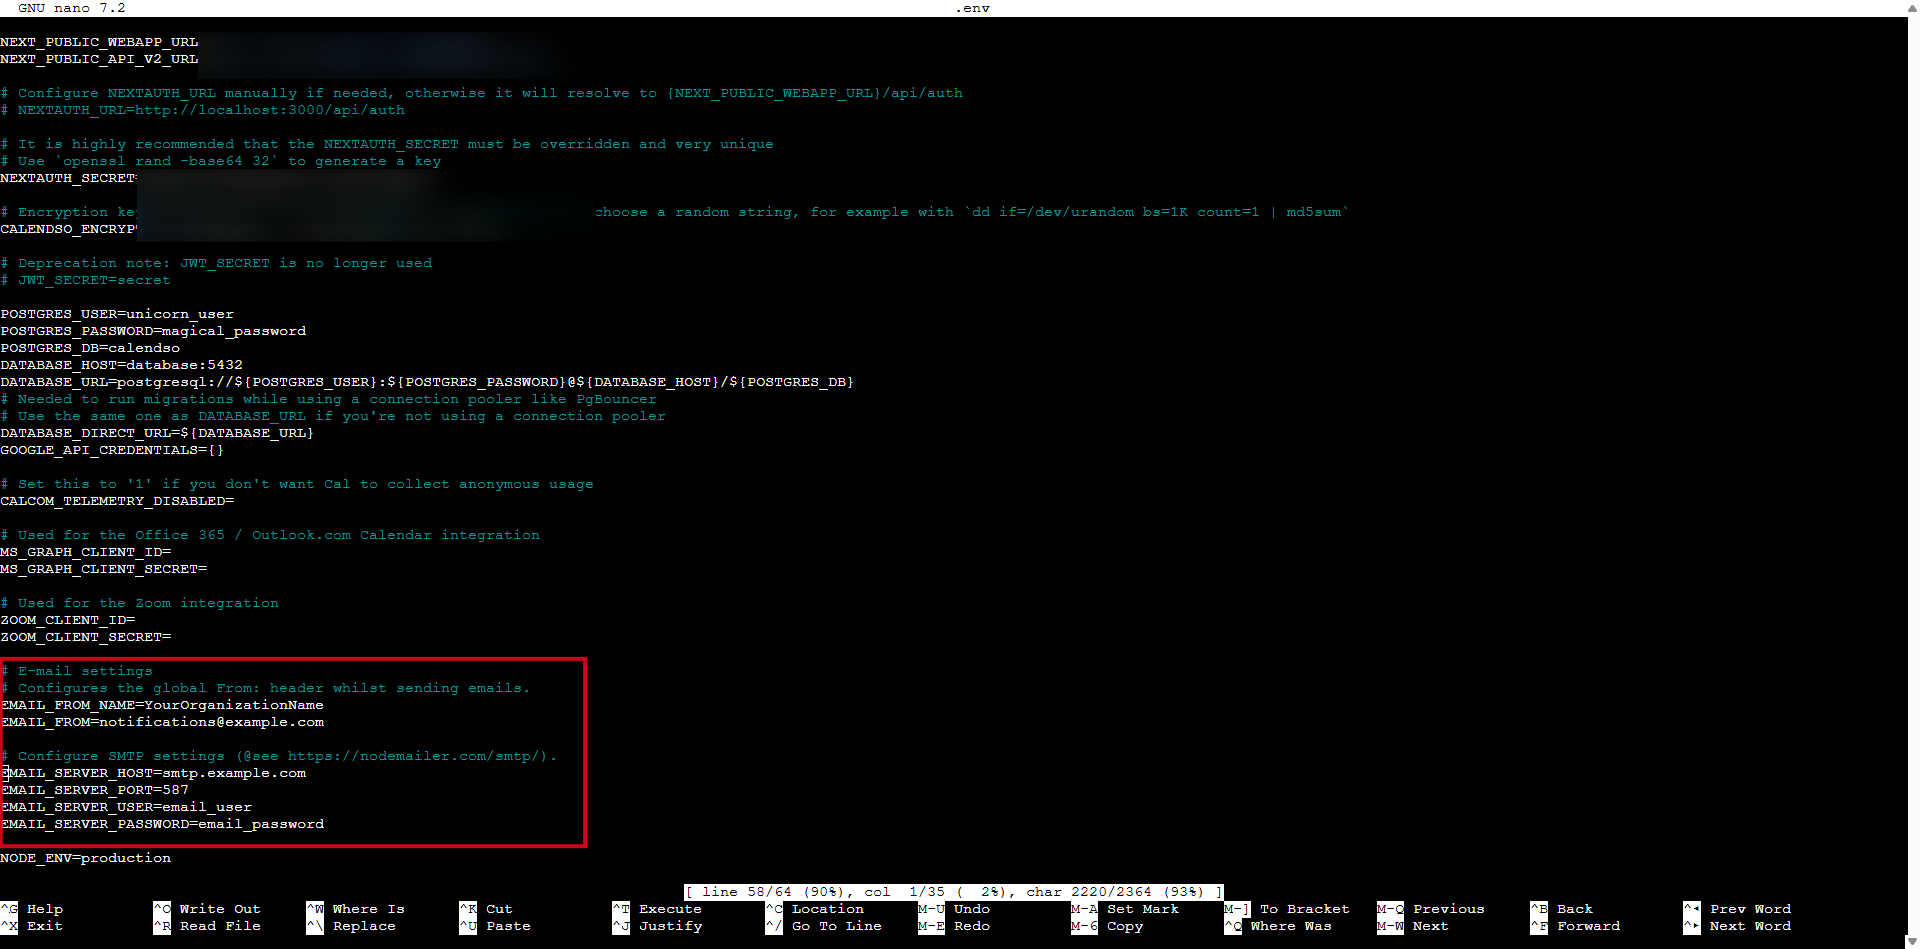
Edit your environment file to add email settings:
$ nano .env
And update the following with your relevant details:
EMAIL_FROM_NAME=YourOrganizationName
EMAIL_FROM=[email protected]
For Gmail :
EMAIL_SERVER_HOST=smtp.gmail.com
EMAIL_SERVER_PORT=465
EMAIL_SERVER_USER=user
EMAIL_SERVER_PASSWORD=your-app-password
Important: Gmail requires an App Password, not your regular password. Go to Google Account Settings → Security → 2-Step Verification → App Passwords to generate one.
For Outlook/Office 365 :
EMAIL_SERVER_HOST=smtp.office365.com
EMAIL_SERVER_PORT=587
EMAIL_SERVER_USER=user
EMAIL_SERVER_PASSWORD=password
Consumer email services like Gmail and Outlook work for testing, but aren’t reliable for business use. These services have strict sending limits, your emails often land in spam folders, and they can suspend your account for sending “too many” transactional emails. Fine for personal use, problematic for client-facing scheduling.
Professional options include dedicated transactional email services like Mailgun, Amazon SES, or Postmark — the industry standard with the highest deliverability rates. These services are designed for automated emails, have better deliverability rates, and won’t flag your account for normal business email volume.
If your VPS plan comes with Postmark addon, you can use it to send highly deliverable transcation emails.
Setting it up takes a few steps. Log in to your Webdock control panel and look for the email management section.
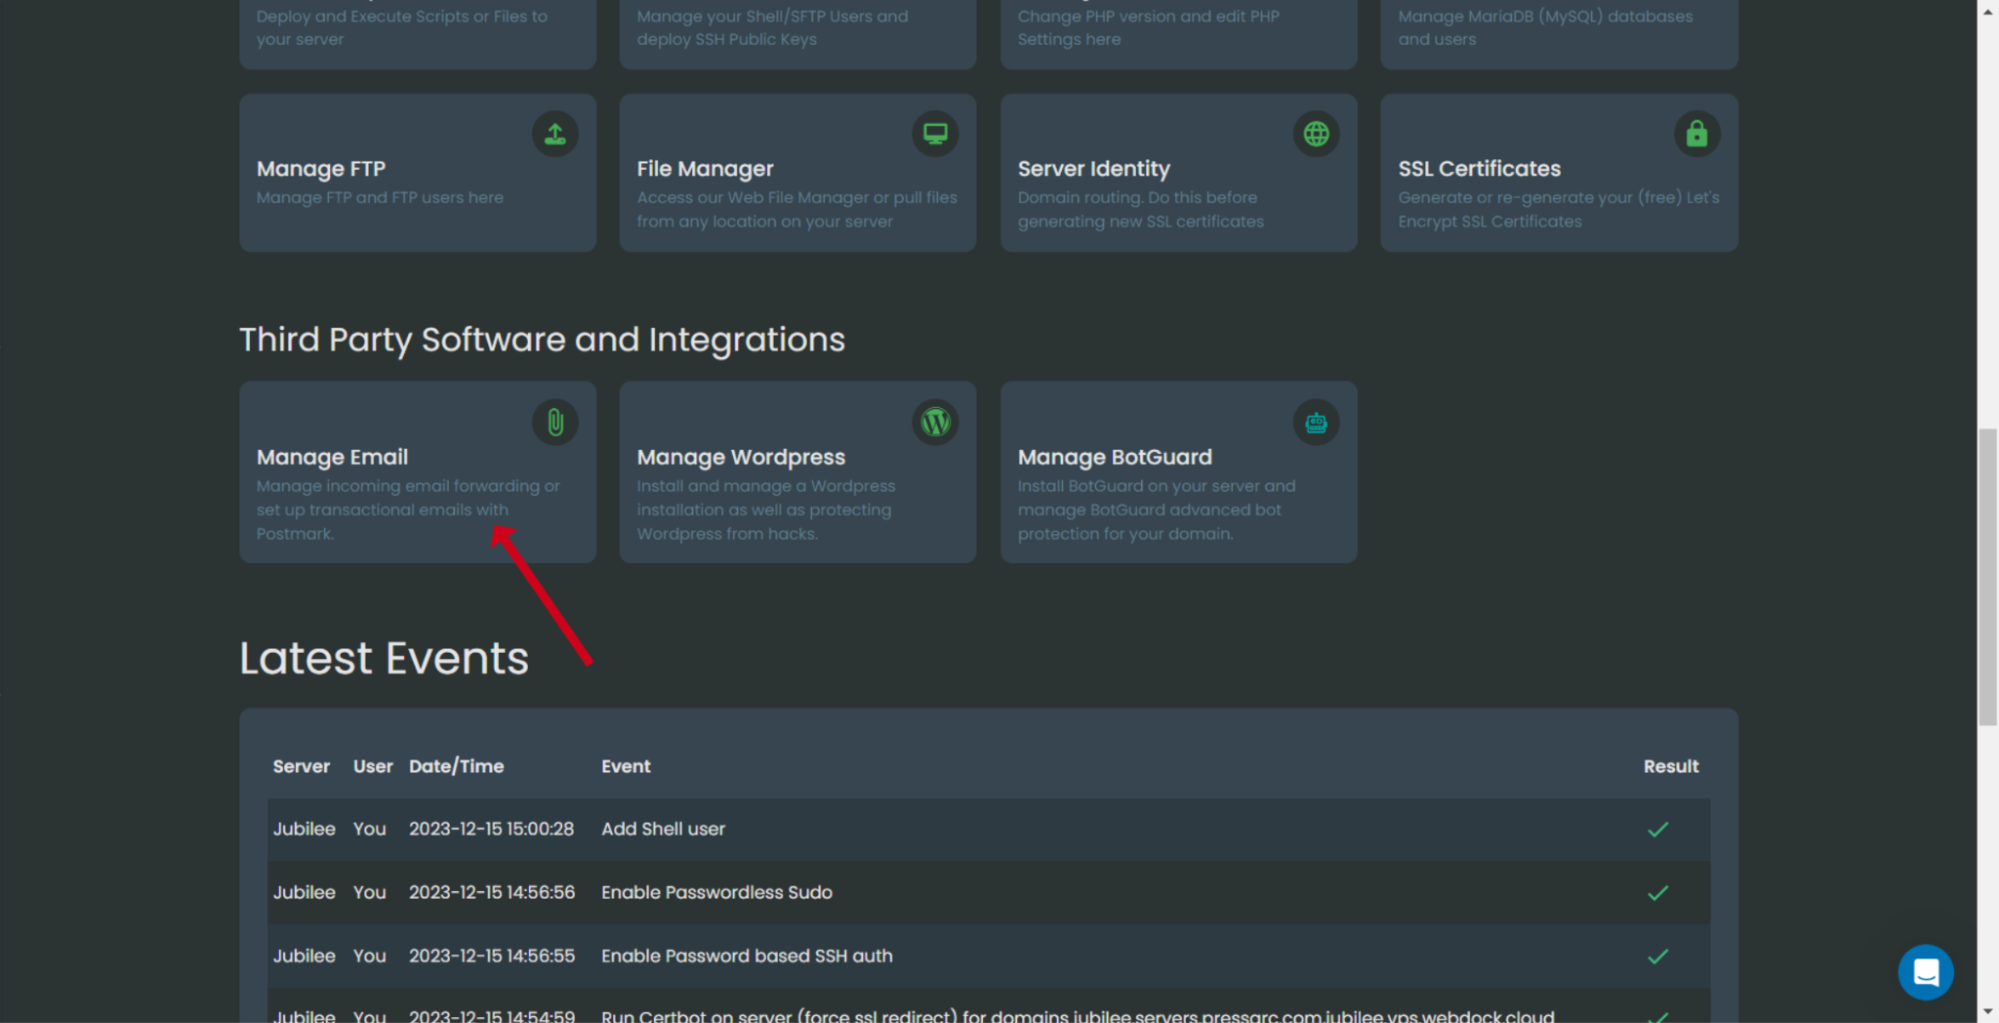
You’ll need to request activation first (they verify legitimate use to prevent spam abuse). After approval, hit the connect button to link your Postmark account.
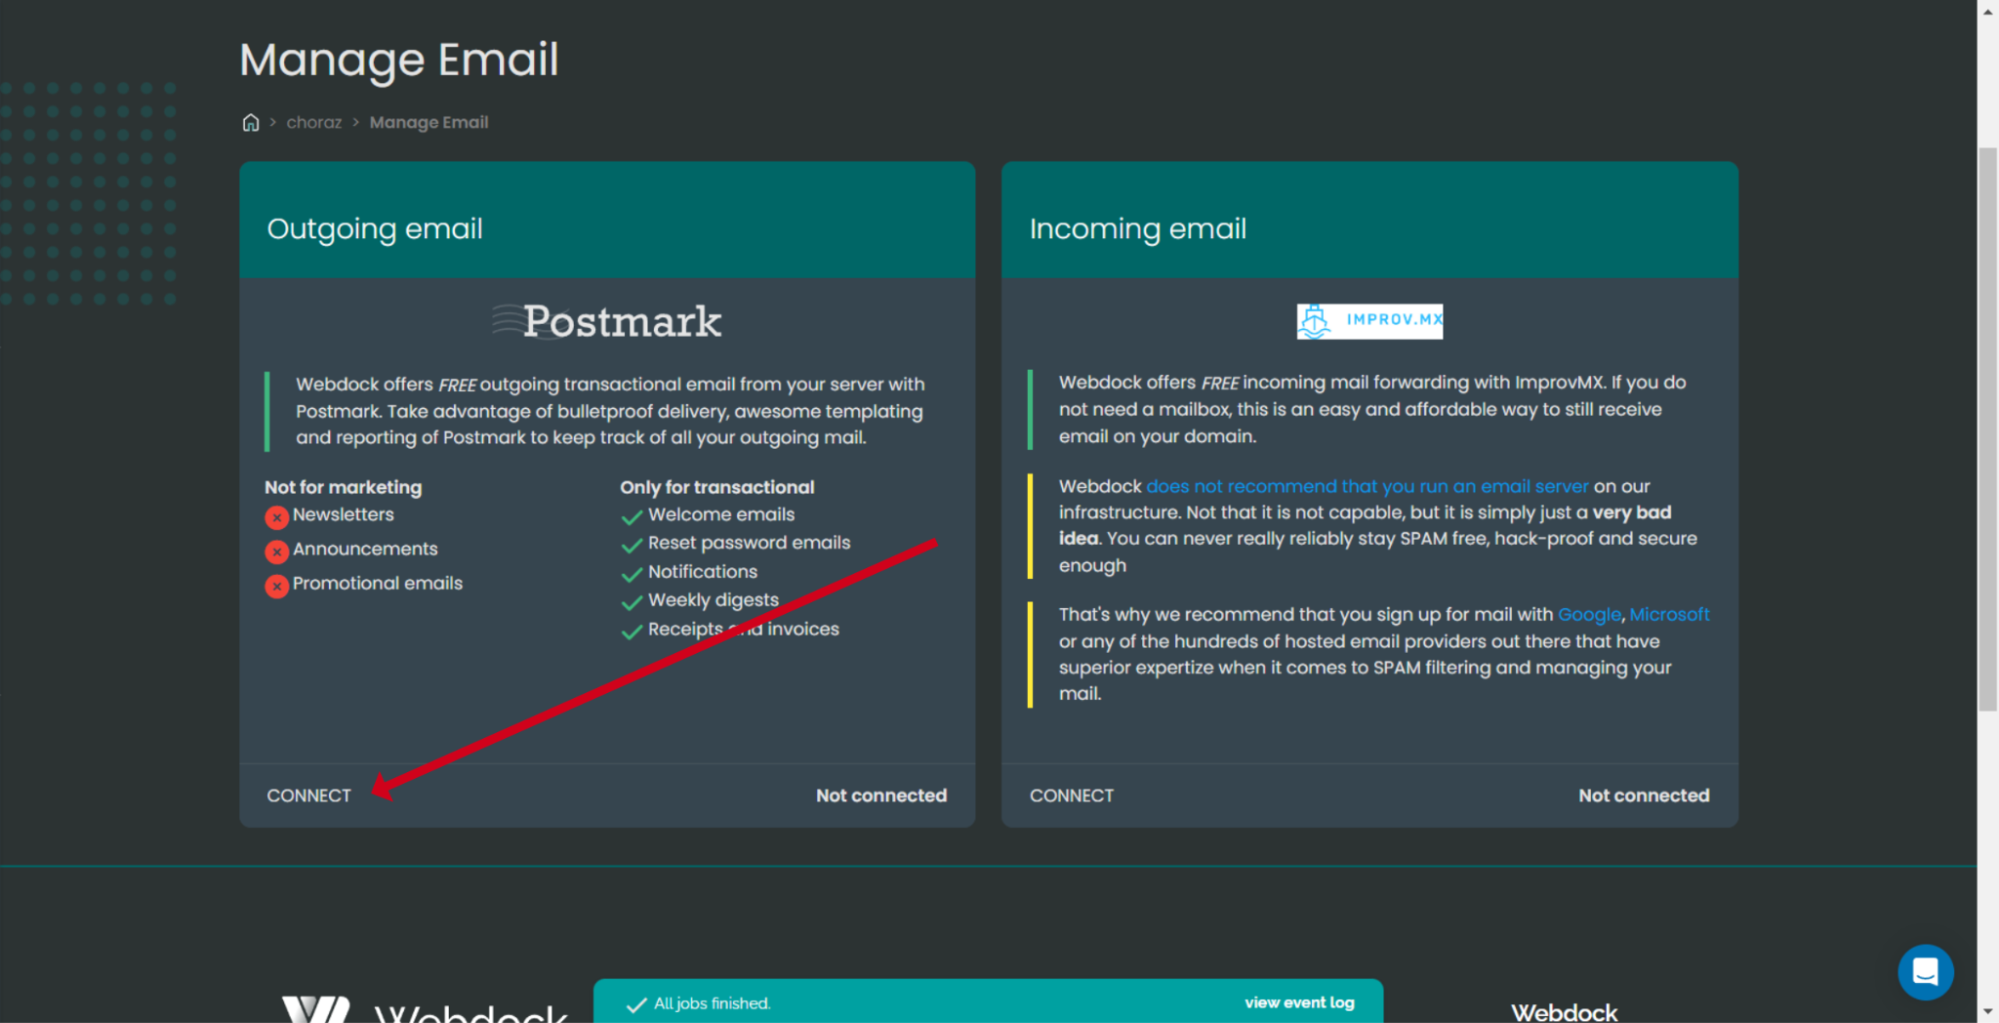
The DNS part requires adding DKIM and return-path records through your domain provider.
These records verify that you own the domain and improve email delivery. DNS changes can take up to 15 minutes to propagate, and once everything checks out, Postmark sends a confirmation email.
For using Postmark or another SMTP service, add the following to the env file:
EMAIL_SERVER_HOST=smtp.example.com
EMAIL_SERVER_PORT=587
EMAIL_SERVER_USER=user
EMAIL_SERVER_PASSWORD=password
For Postmark, you can get these details from your Email’s dashboard. If you’re using a self-hosted mail server with custom SSL certificates, you might need to add this line as well:
NODE_EXTRA_CA_CERTS='/path/to/your/ca-certificate.crt'
This tells Cal.com to trust your custom SSL certificate. Without it, the connection might fail with certificate verification errors. Remember, Webdock, just like most VPS providers, blocks email ports because of how often they are misused. So, using something like Postmark is the best and most efficient way out there.
Replace the placeholder values with your actual email credentials. Save the file and restart Cal.com:
$ docker compose up -d
Create a test booking on your Cal.com installation to verify emails are working. Both you and the test attendee should receive confirmation emails.
Setting Up Cron Jobs
Cal.com needs scheduled tasks to handle reminders, cleanup processes, and other background operations. Without these cron jobs, some features won’t work correctly. Reminders might not send, cleanup tasks won’t run, and the system could accumulate unnecessary data.
The Docker setup doesn’t include cron jobs automatically, so we need to set them up on the host system to trigger tasks inside the containers.
Navigate back to your Cal.com directory:
# For Method 1
$ cd docker
# For Method 2
$ cd calcom-docker
Set up a system cron job to handle Cal.com’s background tasks:
$ sudo crontab -e
Add this line to run Cal.com’s cron tasks every minute:
* * * * * cd /path/to/your/calcom/directory && docker compose exec -T calcom yarn workspace @calcom/web cron
Replace /path/to/your/calcom/directory with the actual path where you cloned the repository (like /home/{username}/docker or /home/{username}/calcom-docker).
This runs the Cal.com cron handler every minute inside the container, which executes the appropriate background tasks based on their individual schedules.
Verify the cron job was added:
$ sudo crontab -l
This approach uses the host system’s cron to trigger tasks inside the Docker container. Setting up cron inside the containers is an alternative, but it’s more complex and not recommended for most setups.
Updating Your Cal Instance
Keeping your Cal.com installation updated brings security patches, bug fixes, and new features. Unlike hosted services that update automatically, self-hosted installations require manual updates.
Updates can range from minor patches to major version changes. The process is straightforward but requires some downtime while the new version builds and deploys.
Before you update, always back up your data first. Updates can go wrong; you don’t want to lose your scheduling data. You can just create free snapshots from your server dashboard.
And to update the Cal.com instance:
$ docker compose down
$ docker compose pull
$ docker compose up -d
Visit your Cal.com installation in a web browser to confirm everything works correctly. Check the footer or admin panel to verify the new version number and test basic functionality:
- Create a test event type
- Book a test appointment
- Check that emails are still being sent
- Verify your existing bookings are intact
Wrapping Up
Your Cal.com installation is complete and running smoothly. The setup process might have seemed more involved than clicking “sign up” on a SaaS platform, but you now have something those services can’t offer: complete ownership of your scheduling system.
If you’re running this on Webdock.io, you’ve got an excellent foundation. Their custom VPS configurations mean you’re only paying for the resources Cal.com needs, not some preset package that wastes money on unused storage or RAM.
Their SSD/NVMe-based infrastructure keeps everything running fast, even during busy booking periods.
Now you can get back to actual work instead of fighting with scheduling tools 😉
Meet Aayush , a WordPress website designer with almost a decade of experience who crafts visually appealing websites and has a knack for writing engaging technology blogs. In his spare time, he enjoys illuminating the surrounding minds.
